
User Manual
Page 1
Kodak EasyShare DX4530 zoom digital camera User's Guide www.kodak.com For interactive tutorials, www.kodak.com/go/howto
Kodak EasyShare DX4530 zoom digital camera User's Guide www.kodak.com For interactive tutorials, www.kodak.com/go/howto

User Manual
Page 4
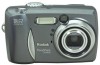
Back View Product Overview 12 3 45 6 14 7 13 8 12 11 10 9 1 Viewfinder 2 Ready light 3 Flash button 4 Mode dial 5 Shutter button 6 Zoom (Wide Angle and Telephoto) 7 Share button 8 Grip 9 Review button 10 Camera screen (LCD) 11Menu button 12 4-way control 13 OK button 14 Delete button ii
Back View Product Overview 12 3 45 6 14 7 13 8 12 11 10 9 1 Viewfinder 2 Ready light 3 Flash button 4 Mode dial 5 Shutter button 6 Zoom (Wide Angle and Telephoto) 7 Share button 8 Grip 9 Review button 10 Camera screen (LCD) 11Menu button 12 4-way control 13 OK button 14 Delete button ii

User Manual
Page 7
Table of Contents 1 Getting Started 1 Install Software First 1 Need This User Guide in Larger Print 1 What Can I Do With My Camera 2 What Can I Do With My Pictures and Videos 2 Package Contents 3 Attaching the Wrist Strap 4 Attaching the Lens Cap Strap 4 Adding Optional Lenses... 4 Loading the Battery 5 Mode Dial Settings 6 Turning On the Camera 7 Setting the Date and Time 8 Checking Camera Status Icons 9 Inserting an SD/MMC Card 10 Choosing Internal Memory or SD/MMC Card 11 Important Battery Information 13 2 Taking ...
Table of Contents 1 Getting Started 1 Install Software First 1 Need This User Guide in Larger Print 1 What Can I Do With My Camera 2 What Can I Do With My Pictures and Videos 2 Package Contents 3 Attaching the Wrist Strap 4 Attaching the Lens Cap Strap 4 Adding Optional Lenses... 4 Loading the Battery 5 Mode Dial Settings 6 Turning On the Camera 7 Setting the Date and Time 8 Checking Camera Status Icons 9 Inserting an SD/MMC Card 10 Choosing Internal Memory or SD/MMC Card 11 Important Battery Information 13 2 Taking ...

User Manual
Page 8
... Landscape Mode 18 Taking Pictures in Close-up Mode 19 Liveview-Framing with the Camera Screen 20 Quickview-Reviewing the Picture Just Taken 21 Using the Auto Focus Framing Marks 22 Using the Optical Zoom 23 Using the Digital Zoom 23 Using the Flash 24 Putting Yourself in the Picture 26 Setting...
... Landscape Mode 18 Taking Pictures in Close-up Mode 19 Liveview-Framing with the Camera Screen 20 Quickview-Reviewing the Picture Just Taken 21 Using the Auto Focus Framing Marks 22 Using the Optical Zoom 23 Using the Digital Zoom 23 Using the Flash 24 Putting Yourself in the Picture 26 Setting...

User Manual
Page 9
... Pictures and Videos 45 Tagging Pictures for Printing 46 Tagging Pictures and Videos for Emailing 47 Tagging Pictures and Videos as Favorites 48 6 Customizing Your Camera Settings 49 Accessing Setup Mode/Menus 49 Setup Menus 49 Changing the Print Quantity Default 50 Turning Off Quickview 50 Turning On Liveview In Still... Modes 51 Turning Off the Shutter Sound 51 Setting Video Out 52 Selecting a Language 52 Formatting Internal Memory or SD/MMC Card 53 Viewing Camera Information 54 vii
... Pictures and Videos 45 Tagging Pictures for Printing 46 Tagging Pictures and Videos for Emailing 47 Tagging Pictures and Videos as Favorites 48 6 Customizing Your Camera Settings 49 Accessing Setup Mode/Menus 49 Setup Menus 49 Changing the Print Quantity Default 50 Turning Off Quickview 50 Turning On Liveview In Still... Modes 51 Turning Off the Shutter Sound 51 Setting Video Out 52 Selecting a Language 52 Formatting Internal Memory or SD/MMC Card 53 Viewing Camera Information 54 vii

User Manual
Page 10
... an Optional SD/MMC Card 60 Ordering Prints Online 60 9 Using the Optional Camera Dock II 61 Camera Dock Package Contents 61 Installing the Camera Insert 62 Connecting the Camera Dock 63 Installing the Battery in the Camera 64 Docking the Camera 65 Charging the Battery 66 Transferring Pictures and Videos 67 Caution When Using a Tripod...
... an Optional SD/MMC Card 60 Ordering Prints Online 60 9 Using the Optional Camera Dock II 61 Camera Dock Package Contents 61 Installing the Camera Insert 62 Connecting the Camera Dock 63 Installing the Battery in the Camera 64 Docking the Camera 65 Charging the Battery 66 Transferring Pictures and Videos 67 Caution When Using a Tripod...

User Manual
Page 11
10 Troubleshooting 69 Troubleshooting-Camera 69 Troubleshooting-Camera Dock II 82 11 Getting Help 85 Helpful Web Links 85 Help in this Manual 85 Software Help 85 Telephone Customer Support 86 12 Appendix 89 Camera Specifications 89 Original Factory Settings-Camera 91 Upgrading Your Software and Firmware 92 Tips, Safety, Maintenance 92 Storage Capacities 93 Locating Pictures and Videos on a Card 94 Card File Naming Conventions 94 Power-Saving Features 95 Optional AC Adapter 95 Regulatory Information 95 ix
10 Troubleshooting 69 Troubleshooting-Camera 69 Troubleshooting-Camera Dock II 82 11 Getting Help 85 Helpful Web Links 85 Help in this Manual 85 Software Help 85 Telephone Customer Support 86 12 Appendix 89 Camera Specifications 89 Original Factory Settings-Camera 91 Upgrading Your Software and Firmware 92 Tips, Safety, Maintenance 92 Storage Capacities 93 Locating Pictures and Videos on a Card 94 Card File Naming Conventions 94 Power-Saving Features 95 Optional AC Adapter 95 Regulatory Information 95 ix

User Manual
Page 13
... as usual. 1 m Change Scale to 200%. 5 Print as PDF to the computer. 1 Getting Started Install Software First Install the software from the Kodak EasyShare software CD before connecting the camera (or optional camera dock) to open the User's Guide. 4 On a Windows OS-based computer or Mac OS 8.6 or 9.x: m From the File menu, select Print...
... as usual. 1 m Change Scale to 200%. 5 Print as PDF to the computer. 1 Getting Started Install Software First Install the software from the Kodak EasyShare software CD before connecting the camera (or optional camera dock) to open the User's Guide. 4 On a Windows OS-based computer or Mac OS 8.6 or 9.x: m From the File menu, select Print...

User Manual
Page 14
...movies. Capture Still Pictures -Use Auto mode to organize and retrieve pictures on a computer. What Can I Do With My Camera? Some Mac operating systems may support limited Kodak EasyShare software features. 2 Set Up -Customize your pictures, make a custom slide show, fix red-eye, crop, rotate, ... software from Ofoto (www.ofoto.com). Or purchase an optional Kodak secure digital (SD) card or multimedia card (MMC) and: m Automatically print to your capabilities. For details, click the Help button in the Kodak EasyShare software. Share-Print pictures, order prints online, email pictures and...
...movies. Capture Still Pictures -Use Auto mode to organize and retrieve pictures on a computer. What Can I Do With My Camera? Some Mac operating systems may support limited Kodak EasyShare software features. 2 Set Up -Customize your pictures, make a custom slide show, fix red-eye, crop, rotate, ... software from Ofoto (www.ofoto.com). Or purchase an optional Kodak secure digital (SD) card or multimedia card (MMC) and: m Automatically print to your capabilities. For details, click the Help button in the Kodak EasyShare software. Share-Print pictures, order prints online, email pictures and...

User Manual
Page 15
...: User's Guide, Quick Start Guide, Kodak EasyShare software CD. (In some countries, the User's Guide is provided on a CD only. For details, see page 61. 3 Chapter 1 Package Contents 1 5 4 2 6 3 7 1 Camera 5 Custom camera dock insert (for EasyShare printer dock 4000 or EasyShare camera dock II) 2 CRV3 or equivalent* 6 Lens cap with a Kodak EasyShare camera dock II, a Kodak EasyShare Ni-MH rechargeable battery and AC...
...: User's Guide, Quick Start Guide, Kodak EasyShare software CD. (In some countries, the User's Guide is provided on a CD only. For details, see page 61. 3 Chapter 1 Package Contents 1 5 4 2 6 3 7 1 Camera 5 Custom camera dock insert (for EasyShare printer dock 4000 or EasyShare camera dock II) 2 CRV3 or equivalent* 6 Lens cap with a Kodak EasyShare camera dock II, a Kodak EasyShare Ni-MH rechargeable battery and AC...

User Manual
Page 16
Use the lens cap to protect the lens when camera is not in use. Long loop Short loop Attaching the Lens Cap Strap 1 Thread the lens cap string through the lens cap strap post. 2 Thread the lens cap through the short loop. Adding Optional Lenses Lens threads Lenses are available. Pull until secure. Purchase accessories at a dealer of Kodak products. Chapter 1 Attaching the Wrist Strap 1 Thread the wrist strap as shown. 2 Thread the long loop through the loop. See www.kodak.com/go/dx4530accessories 4 Pull until secure.
Use the lens cap to protect the lens when camera is not in use. Long loop Short loop Attaching the Lens Cap Strap 1 Thread the lens cap string through the lens cap strap post. 2 Thread the lens cap through the short loop. Adding Optional Lenses Lens threads Lenses are available. Pull until secure. Purchase accessories at a dealer of Kodak products. Chapter 1 Attaching the Wrist Strap 1 Thread the wrist strap as shown. 2 Thread the long loop through the loop. See www.kodak.com/go/dx4530accessories 4 Pull until secure.

User Manual
Page 17
...13 for other types of the camera, slide the battery door and lift to make sure your camera operates dependably, do not use in your camera, insert them as shown. 4 Close the battery door. NOTE: If AA batteries were included with your camera. Important Battery Information The CRV3 .... See page 95 for details on the optional Kodak 3-volt digital camera AC adapter. 5 CRV3 3 Insert the CRV3 battery as shown. Chapter 1 Loading the Battery 1 Turn the Mode dial to Off. 2 On the bottom of batteries you purchased the Kodak EasyShare camera dock II, see page 64 for information on...
...13 for other types of the camera, slide the battery door and lift to make sure your camera operates dependably, do not use in your camera, insert them as shown. 4 Close the battery door. NOTE: If AA batteries were included with your camera. Important Battery Information The CRV3 .... See page 95 for details on the optional Kodak 3-volt digital camera AC adapter. 5 CRV3 3 Insert the CRV3 battery as shown. Chapter 1 Loading the Battery 1 Turn the Mode dial to Off. 2 On the bottom of batteries you purchased the Kodak EasyShare camera dock II, see page 64 for information on...

User Manual
Page 18
...* To turn it on the flash, see page 24. 6 For subjects that are in telephoto. Night For night scenes or low light conditions. Place camera on a flat, steady surface or tripod to 70 cm) in motion. Video Captures video with sound. For general picture-taking. Flash does not fire unless... Close-up For subjects 2.8 to 28 in. (7 to 70 cm) from the lens in wide angle, or 11 to 28 in. (28 to avoid camera shake. Automatically sets exposure and focus. Flash fires if needed . Captures close and background subjects. Landscape For distant subjects. Shutter speed is set between 1/30...
...* To turn it on the flash, see page 24. 6 For subjects that are in telephoto. Night For night scenes or low light conditions. Place camera on a flat, steady surface or tripod to 70 cm) in motion. Video Captures video with sound. For general picture-taking. Flash does not fire unless... Close-up For subjects 2.8 to 28 in. (7 to 70 cm) from the lens in wide angle, or 11 to 28 in. (28 to avoid camera shake. Automatically sets exposure and focus. Flash fires if needed . Captures close and background subjects. Landscape For distant subjects. Shutter speed is set between 1/30...

User Manual
Page 19
AUTO In Still and Video modes, a status area OFF appears on so that are in process. 2 Replace the lens cap. 7 is on whenever the camera is set to Off. To turn on after it off, screen can be used as a viewfinder press the OK button again. times out Turn off ...automatically when you do not remove the lens cap, it See page 51. The camera completes operations that the camera Press the OK button. Chapter 1 Turning On the Camera Ready light Mode dial OK 1 Remove the lens cap. If you turn it Press . When the ready light glows...
AUTO In Still and Video modes, a status area OFF appears on so that are in process. 2 Replace the lens cap. 7 is on whenever the camera is set to Off. To turn on after it off, screen can be used as a viewfinder press the OK button again. times out Turn off ...automatically when you do not remove the lens cap, it See page 51. The camera completes operations that the camera Press the OK button. Chapter 1 Turning On the Camera Ready light Mode dial OK 1 Remove the lens cap. If you turn it Press . When the ready light glows...

User Manual
Page 20
...to highlight Setup, then press the OK button. 3 Press to the The setting remains until you connect the camera. to advance to highlight Date & Time, then press the OK button. See the Kodak EasyShare software Help for an extended time. 1 SET DATE & TIME is removed for details. 8 OK 2 Go... the first time you turn on your computer operating system, Kodak EasyShare software may allow your computer to automatically update the camera clock when you change it. The time is YYYY/MM/DD. NOTE: Depending on the camera or if the battery is highlighted. Press the OK button....
...to highlight Setup, then press the OK button. 3 Press to the The setting remains until you connect the camera. to advance to highlight Date & Time, then press the OK button. See the Kodak EasyShare software Help for an extended time. 1 SET DATE & TIME is removed for details. 8 OK 2 Go... the first time you turn on your computer operating system, Kodak EasyShare software may allow your computer to automatically update the camera clock when you change it. The time is YYYY/MM/DD. NOTE: Depending on the camera or if the battery is highlighted. Press the OK button....
User Manual
Page 21
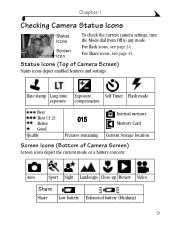
For Share icons, see page 24. For flash icons, see page 45. Status Icons (Top of Camera Screen) Status icons depict enabled features and settings: Date stamp Long time Exposure Self Timer Flash mode exposure compensation Best Best (3:2) Better ...Good Quality Internal memory 015 Memory Card Pictures remaining Current Storage location Screen Icons (Bottom of Camera Screen) Screen icons depict the current mode or a battery concern: Auto Sport Night Landscape Close-up Review Video Share Share Low battery Exhausted battery...
For Share icons, see page 24. For flash icons, see page 45. Status Icons (Top of Camera Screen) Status icons depict enabled features and settings: Date stamp Long time Exposure Self Timer Flash mode exposure compensation Best Best (3:2) Better ...Good Quality Internal memory 015 Memory Card Pictures remaining Current Storage location Screen Icons (Bottom of Camera Screen) Screen icons depict the current mode or a battery concern: Auto Sport Night Landscape Close-up Review Video Share Share Low battery Exhausted battery...
User Manual
Page 22
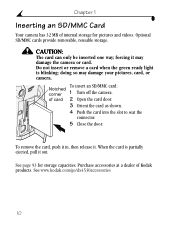
...SD/MMC Card Your camera has 32 MB of Kodak products. Do not insert or remove a card when the green ready light is partially ejected, pull it out. See page 93 for pictures and videos. See www.kodak.com/go/dx4530accessories 10 doing so may damage the camera or card. Notched To... insert an SD/MMC card: corner 1 Turn off the camera. Purchase accessories at a dealer of internal storage for storage capacities. When the card...
...SD/MMC Card Your camera has 32 MB of Kodak products. Do not insert or remove a card when the green ready light is partially ejected, pull it out. See page 93 for pictures and videos. See www.kodak.com/go/dx4530accessories 10 doing so may damage the camera or card. Notched To... insert an SD/MMC card: corner 1 Turn off the camera. Purchase accessories at a dealer of internal storage for storage capacities. When the card...

User Manual
Page 23
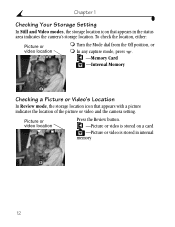
... then press the OK button: Auto (default)-the camera uses the card if one is installed. 5 Highlight Continue, then press the OK button again. Managing Your Storage Location Setting 1 Turn on the size of Kodak products. See www.kodak.com/go/dx4530accessories. For storage capacities, see page... 93. Chapter 1 Choosing Internal Memory or SD/MMC Card The camera offers two options for storing pictures and videos: Internal Memory -store...
... then press the OK button: Auto (default)-the camera uses the card if one is installed. 5 Highlight Continue, then press the OK button again. Managing Your Storage Location Setting 1 Turn on the size of Kodak products. See www.kodak.com/go/dx4530accessories. For storage capacities, see page... 93. Chapter 1 Choosing Internal Memory or SD/MMC Card The camera offers two options for storing pictures and videos: Internal Memory -store...
User Manual
Page 24
...location Press the Review button. -Picture or video is stored on a card -Picture or video is stored in the status area indicates the camera's storage location. Chapter 1 Checking Your Storage Setting In Still and Video modes, the storage location icon that appears with a picture indicates the location... of the picture or video and the camera setting. To check the location, either: Picture or video location m Turn the Mode dial from the Off position, or m In any capture ...
...location Press the Review button. -Picture or video is stored on a card -Picture or video is stored in the status area indicates the camera's storage location. Chapter 1 Checking Your Storage Setting In Still and Video modes, the storage location icon that appears with a picture indicates the location... of the picture or video and the camera setting. To check the location, either: Picture or video location m Turn the Mode dial from the Off position, or m In any capture ...

User Manual
Page 25
... Kodak EasyShare camera dock II and printer dock 4000 We do not recommend or support alkaline batteries. For acceptable battery life, and to make sure your needs-and get the best performance. Chapter 1 Important Battery Information Choose the replacement battery that fits your camera ...165 - 205 Kodak Max digital camera batteries, AA (2) 100 - 140 0 500 Battery Life (Approx. Number of batteries. Actual battery life may vary based on batteries, see www.kodak.com/global/en/service/batteries/batteryUsage.jhtml 13 Kodak Battery Replacement Types/Battery Life Your camera can use ...
... Kodak EasyShare camera dock II and printer dock 4000 We do not recommend or support alkaline batteries. For acceptable battery life, and to make sure your needs-and get the best performance. Chapter 1 Important Battery Information Choose the replacement battery that fits your camera ...165 - 205 Kodak Max digital camera batteries, AA (2) 100 - 140 0 500 Battery Life (Approx. Number of batteries. Actual battery life may vary based on batteries, see www.kodak.com/global/en/service/batteries/batteryUsage.jhtml 13 Kodak Battery Replacement Types/Battery Life Your camera can use ...


