
User Manual
Page 7
... Started 1 Install Software First 1 Need This User Guide in Larger Print 1 What Can I Do With My Camera 2 What Can I Do With My Pictures and Videos 2 Package Contents 3 Loading the Batteries 4 Attaching the Wrist Strap 5 Turning the Camera On and Off 6 Using the OK Button and 4-way Controller 6 Adjusting the Display 7 Setting the Date and Time 8 Checking Camera Status 9 Camera Screen Icons 10 Inserting an MMC/SD Card 11 Choosing Internal Memory or SD/MMC Card 12 Important Battery Information 14 2 Taking Pictures 17 Take a Picture...
... Started 1 Install Software First 1 Need This User Guide in Larger Print 1 What Can I Do With My Camera 2 What Can I Do With My Pictures and Videos 2 Package Contents 3 Loading the Batteries 4 Attaching the Wrist Strap 5 Turning the Camera On and Off 6 Using the OK Button and 4-way Controller 6 Adjusting the Display 7 Setting the Date and Time 8 Checking Camera Status 9 Camera Screen Icons 10 Inserting an MMC/SD Card 11 Choosing Internal Memory or SD/MMC Card 12 Important Battery Information 14 2 Taking Pictures 17 Take a Picture...

User Manual
Page 8
... Pictures 30 Setting Color Mode 31 Pre-tagging for Album Names 32 Placing the Date on Pictures 33 Setting the Orientation Sensor 34 3 Taking Videos 35 Taking a Video 35 Quickview-Reviewing the Video Just Taken 36 Using the Optical Zoom 37 Changing Optional Video Settings 37 Pre-tagging for Album Names 38 Putting Yourself in the Video 39 4 Reviewing Pictures and Videos 41 Viewing Single Pictures and Videos 41 Viewing Multiple Pictures and Videos 42 Playing a Video 42 Deleting Pictures and Videos 43 Changing Optional Review Settings...
... Pictures 30 Setting Color Mode 31 Pre-tagging for Album Names 32 Placing the Date on Pictures 33 Setting the Orientation Sensor 34 3 Taking Videos 35 Taking a Video 35 Quickview-Reviewing the Video Just Taken 36 Using the Optical Zoom 37 Changing Optional Video Settings 37 Pre-tagging for Album Names 38 Putting Yourself in the Video 39 4 Reviewing Pictures and Videos 41 Viewing Single Pictures and Videos 41 Viewing Multiple Pictures and Videos 42 Playing a Video 42 Deleting Pictures and Videos 43 Changing Optional Review Settings...
User Manual
Page 11
... Troubleshooting 77 Camera Problems 77 Camera/Computer Communications 81 SD/MMC Cards and Internal Memory 82 Camera Screen Messages 83 Camera Ready Light Status 88 11 Getting Help 91 Helpful Web Links 91 Help in this Manual 91 Software Help 91 Telephone Customer Support 92 12 Appendix 95 Camera Specifications 95 Original Factory Settings 97 Shutter Speeds 98 Upgrading Your Software and Firmware 98 Tips, Safety, Maintenance 98 Storage Capacities 99 Locating Pictures and Videos on a Card 100 Picture Naming Conventions 101 Power-Saving...
... Troubleshooting 77 Camera Problems 77 Camera/Computer Communications 81 SD/MMC Cards and Internal Memory 82 Camera Screen Messages 83 Camera Ready Light Status 88 11 Getting Help 91 Helpful Web Links 91 Help in this Manual 91 Software Help 91 Telephone Customer Support 92 12 Appendix 95 Camera Specifications 95 Original Factory Settings 97 Shutter Speeds 98 Upgrading Your Software and Firmware 98 Tips, Safety, Maintenance 98 Storage Capacities 99 Locating Pictures and Videos on a Card 100 Picture Naming Conventions 101 Power-Saving...

User Manual
Page 14
.... Some Mac operating systems may support limited Kodak EasyShare software features. 2 Share-Print pictures, order prints online, email pictures and videos. Automatically print to enjoy point-and-shoot operation. Make prints at an SD/MMC-capable Kodak picture maker www.kodak.com/go/picturemaker ! Use Night, Landscape, and Close-up modes to your capabilities. Set Up -Customize your pictures, make a custom slide show, fix red-eye, crop, rotate, and much more. For details, click the Help button in the Kodak EasyShare software. What...
.... Some Mac operating systems may support limited Kodak EasyShare software features. 2 Share-Print pictures, order prints online, email pictures and videos. Automatically print to enjoy point-and-shoot operation. Make prints at an SD/MMC-capable Kodak picture maker www.kodak.com/go/picturemaker ! Use Night, Landscape, and Close-up modes to your capabilities. Set Up -Customize your pictures, make a custom slide show, fix red-eye, crop, rotate, and much more. For details, click the Help button in the Kodak EasyShare software. What...

User Manual
Page 20
... reset message appears the first time you turn on your computer operating system, Kodak EasyShare software may allow your computer to automatically update the camera clock when you change it. The Date & Time screen appears. Or, select CANCEL then press the OK button OK to set the date and time at a later time. 2 Press to adjust the date and time. See the Kodak EasyShare software Help for an extended time. 1 SET DATE & TIME is removed for details. Press the OK button. The date format...
... reset message appears the first time you turn on your computer operating system, Kodak EasyShare software may allow your computer to automatically update the camera clock when you change it. The Date & Time screen appears. Or, select CANCEL then press the OK button OK to set the date and time at a later time. 2 Press to adjust the date and time. See the Kodak EasyShare software Help for an extended time. 1 SET DATE & TIME is removed for details. Press the OK button. The date format...

User Manual
Page 24
... Setting 1 Turn on the size of Kodak products. If not, the camera uses internal memory. SD/MMC Card -Store pictures and videos on a card. The setting remains until you change it and applies to all camera functions. 6 Press the Menu button to highlight the Image Storage icon , then press the OK button. 4 Highlight an option, then press the OK button: Auto (default)-the camera uses the card if one is installed. 5 Highlight Continue, then press the OK button. Chapter 1 Choosing Internal Memory...
... Setting 1 Turn on the size of Kodak products. If not, the camera uses internal memory. SD/MMC Card -Store pictures and videos on a card. The setting remains until you change it and applies to all camera functions. 6 Press the Menu button to highlight the Image Storage icon , then press the OK button. 4 Highlight an option, then press the OK button: Auto (default)-the camera uses the card if one is installed. 5 Highlight Continue, then press the OK button. Chapter 1 Choosing Internal Memory...

User Manual
Page 29
... ready light blinks green, the picture is red, wait until it turns green. The camera screen displays the mode name and description. 2 Use the viewfinder or camera screen to frame your subject. (Press the OK button to turn it on Liveview. See Flash Settings in Review, Share, or Setup. (In Video mode, the camera captures video.) Before you take a picture, make sure the storage location is set the exposure and focus. 4 When the ready light glows green, continue pressing the Shutter button completely down to take pictures...
... ready light blinks green, the picture is red, wait until it turns green. The camera screen displays the mode name and description. 2 Use the viewfinder or camera screen to frame your subject. (Press the OK button to turn it on Liveview. See Flash Settings in Review, Share, or Setup. (In Video mode, the camera captures video.) Before you take a picture, make sure the storage location is set the exposure and focus. 4 When the ready light glows green, continue pressing the Shutter button completely down to take pictures...

User Manual
Page 31
... that it turns green. IMPORTANT: Liveview significantly reduces battery life. 1 Turn the Mode dial to any Still capture position. 2 Press the OK button to turn on Liveview, the camera screen displays a live image of the screen. OK When the ready light blinks green, the picture is displayed at the top of what the lens sees. NOTE: If Picture Quality is set the exposure and focus. 5 When the ready light glows green, continue pressing the Shutter button completely down...
... that it turns green. IMPORTANT: Liveview significantly reduces battery life. 1 Turn the Mode dial to any Still capture position. 2 Press the OK button to turn on Liveview, the camera screen displays a live image of the screen. OK When the ready light blinks green, the picture is displayed at the top of what the lens sees. NOTE: If Picture Quality is set the exposure and focus. 5 When the ready light glows green, continue pressing the Shutter button completely down...

User Manual
Page 47
...: Flash is full. A live image, camera status, and the recording time available appear on . 4 To stop recording, release the Shutter button. 35 NOTE: If you want it for storage capacities. To stop recording, press the Shutter button again. Recording stops if storage is not available in Video mode. The Ready light blinks green, REC appears on the camera screen, and the Self Timer/Video light stays on the camera screen. (The maximum recording time is connected to customize video-taking settings...
...: Flash is full. A live image, camera status, and the recording time available appear on . 4 To stop recording, release the Shutter button. 35 NOTE: If you want it for storage capacities. To stop recording, press the Shutter button again. Recording stops if storage is not available in Video mode. The Ready light blinks green, REC appears on the camera screen, and the Self Timer/Video light stays on the camera screen. (The maximum recording time is connected to customize video-taking settings...

User Manual
Page 56
... (original) size. 5 Press to locate a different picture, or press the Review button to access optional review settings. Magnify (pictures)(page 44) Slide Show (page 47) Play (videos) (page 42) Copy (page 49) Share (page 51) Image Storage (page 12) Video Date Display (page 50) Multi-up (page 42) Protect (page 45) Album (page 46) Picture/Video Information (page 50) Setup Menu (page 55) Magnifying Pictures 1 Press the Review button, then locate a picture. 2 To...
... (original) size. 5 Press to locate a different picture, or press the Review button to access optional review settings. Magnify (pictures)(page 44) Slide Show (page 47) Play (videos) (page 42) Copy (page 49) Share (page 51) Image Storage (page 12) Video Date Display (page 50) Multi-up (page 42) Protect (page 45) Album (page 46) Picture/Video Information (page 50) Setup Menu (page 55) Magnifying Pictures 1 Press the Review button, then locate a picture. 2 To...

User Manual
Page 93
... file on the EasyShare cannot the configuration of the laptop user's guide to disable 6000, see laptops turn off . Uninstall, then re-install the software (page 61). To uninstall, go to Start/Settings/ Control Panel/Add/Remove Programs. Too many applications Disconnect camera from the are running on the www.kodak.com/go to: communicate USB port on the computer. applications, reconnect camera. Camera power is not charged. USB cable is a problem...
... file on the EasyShare cannot the configuration of the laptop user's guide to disable 6000, see laptops turn off . Uninstall, then re-install the software (page 61). To uninstall, go to Start/Settings/ Control Panel/Add/Remove Programs. Too many applications Disconnect camera from the are running on the www.kodak.com/go to: communicate USB port on the computer. applications, reconnect camera. Camera power is not charged. USB cable is a problem...

User Manual
Page 94
... Software is not properly inserted in camera. Uninstall, then re-install the software (page 61). Make sure the camera is off , then back on. Install EasyShare software (page 61). Cause The card may be SD/MMC certified. Close all pictures and videos, including protected files. Camera freezes Camera detects an up when a card error when the card is not installed. Caution: Formatting erases all locate drivers.) incorrectly. Disconnect USB cable. (If using pictures. Chapter 10 Problem Cause Solution Cannot transfer Software...
... Software is not properly inserted in camera. Uninstall, then re-install the software (page 61). Make sure the camera is off , then back on. Install EasyShare software (page 61). Cause The card may be SD/MMC certified. Close all pictures and videos, including protected files. Camera freezes Camera detects an up when a card error when the card is not installed. Caution: Formatting erases all locate drivers.) incorrectly. Disconnect USB cable. (If using pictures. Chapter 10 Problem Cause Solution Cannot transfer Software...

User Manual
Page 97
... save album remaining. Recording stopped. Use this card to slow) take a picture, insert a new card or change storage location to Record in Reset the switch as shown write-protect position. Memory card is full There is (Insert new memory write-protected. Memory card is locked The card is no space (Cannot save album tagging) Insert a new card (page 11), transfer pictures (page 65), or delete pictures (page 43). Insert a new card (page 11). Chapter 10 Message Cause Solution Memory card is protected (Reset switch on memory card) Switch on camera screen...
... save album remaining. Recording stopped. Use this card to slow) take a picture, insert a new card or change storage location to Record in Reset the switch as shown write-protect position. Memory card is full There is (Insert new memory write-protected. Memory card is locked The card is no space (Cannot save album tagging) Insert a new card (page 11), transfer pictures (page 65), or delete pictures (page 43). Insert a new card (page 11). Chapter 10 Message Cause Solution Memory card is protected (Reset switch on memory card) Switch on camera screen...

User Manual
Page 98
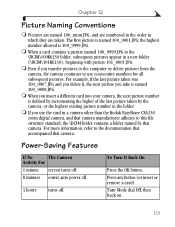
... 65), camera. Internal memory card There is too high for an extended period of the several minutes, then turn will be turned off . delete pictures from the card (page 43), insert a new card, or change storage location to Auto (page 12) and insert card (page 11). 86 turned on the camera; camera turns off .) camera is no more space Transfer pictures to operate. Chapter 10 Message Cause Solution Date and time have been reset This is...
... 65), camera. Internal memory card There is too high for an extended period of the several minutes, then turn will be turned off . delete pictures from the card (page 43), insert a new card, or change storage location to Auto (page 12) and insert card (page 11). 86 turned on the camera; camera turns off .) camera is no more space Transfer pictures to operate. Chapter 10 Message Cause Solution Date and time have been reset This is...

User Manual
Page 104
Chapter 11 Telephone Customer Support If you may speak with a customer support representative. Before You Call ! Have the camera or camera dock connected to your computer. ! Have the following information available: Operating system Processor speed (MHz Computer model Amount of memory (MB Exact error message you received Version of the software or camera, you have questions concerning the operation of Kodak EasyShare software CD Camera serial number 92 Be at your computer. !
Chapter 11 Telephone Customer Support If you may speak with a customer support representative. Before You Call ! Have the camera or camera dock connected to your computer. ! Have the following information available: Operating system Processor speed (MHz Computer model Amount of memory (MB Exact error message you received Version of the software or camera, you have questions concerning the operation of Kodak EasyShare software CD Camera serial number 92 Be at your computer. !
User Manual
Page 110
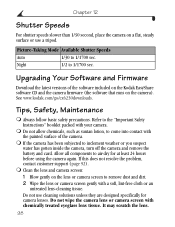
... camera). Do not use a tripod. Allow all components to 1/1700 sec. If this does not resolve the problem, contact customer support (page 92). ! Do not wipe the camera lens or camera screen with a soft, lint-free cloth or an untreated lens-cleaning tissue. Picture-Taking Mode Available Shutter Speeds Auto 1/30 to inclement weather or you suspect water has gotten inside the camera, turn off the camera and remove the battery...
... camera). Do not use a tripod. Allow all components to 1/1700 sec. If this does not resolve the problem, contact customer support (page 92). ! Do not wipe the camera lens or camera screen with a soft, lint-free cloth or an untreated lens-cleaning tissue. Picture-Taking Mode Available Shutter Speeds Auto 1/30 to inclement weather or you suspect water has gotten inside the camera, turn off the camera and remove the battery...
User Manual
Page 113
.... Even if you use consecutive numbers for all subsequent pictures. The first picture is 100_9999.JPG. ! When you take is defined by incrementing the higher of the last picture taken by the camera, or the highest existing picture number in a camera other than the Kodak EasyShare CX6230 zoom digital camera, and that camera manufacturer adheres to this file structure standard, the \DCIM folder contains a folder named by that camera. Turn Mode dial Off...
.... Even if you use consecutive numbers for all subsequent pictures. The first picture is 100_9999.JPG. ! When you take is defined by incrementing the higher of the last picture taken by the camera, or the highest existing picture number in a camera other than the Kodak EasyShare CX6230 zoom digital camera, and that camera manufacturer adheres to this file structure standard, the \DCIM folder contains a folder named by that camera. Turn Mode dial Off...

User Manual
Page 117
... adapter, camera, 102 battery, 15 buying, 91 camera dock, 67 printer dock, 66 SD/MMC card, 11 adjusting screen display, 7 albums, tagging in review mode, 46 pictures, 32 videos, 38 alkaline batteries, warning, 4 auto flash, 22 mode, 18 power-down, 101 Index B batteries alkaline warning, 4 charge via camera dock, 72 door location, iv expected life, 14 extending life, 15 loading, 4, 70 safety and handling, 15 types, 14 black & white pictures, 31 button 4-way controller, 6 delete, ii, 20 flash...
... adapter, camera, 102 battery, 15 buying, 91 camera dock, 67 printer dock, 66 SD/MMC card, 11 adjusting screen display, 7 albums, tagging in review mode, 46 pictures, 32 videos, 38 alkaline batteries, warning, 4 auto flash, 22 mode, 18 power-down, 101 Index B batteries alkaline warning, 4 charge via camera dock, 72 door location, iv expected life, 14 extending life, 15 loading, 4, 70 safety and handling, 15 types, 14 black & white pictures, 31 button 4-way controller, 6 delete, ii, 20 flash...

User Manual
Page 124
... setting date and time, 8 flash, 22 language, 59 picture quality, 29 picture taking mode, 18 resolution, 29 review menu options, 44 self timer, 27, 39 storage location, 12 video out, 59 setup mode, 55 Share button, ii, 51 shutoff, auto, 101 shutter problems, 78 self timer delay, 39 speeds, available, 98 shutter button location, i, ii, iv self timer delay, 27 sleep mode, 101 slide show changing display time, 47 continuous loop, 48 problems, 80 viewing on camera, 47 viewing on television, 48 software getting help, 91 installing, 63 upgrading, 98 specifications camera...
... setting date and time, 8 flash, 22 language, 59 picture quality, 29 picture taking mode, 18 resolution, 29 review menu options, 44 self timer, 27, 39 storage location, 12 video out, 59 setup mode, 55 Share button, ii, 51 shutoff, auto, 101 shutter problems, 78 self timer delay, 39 speeds, available, 98 shutter button location, i, ii, iv self timer delay, 27 sleep mode, 101 slide show changing display time, 47 continuous loop, 48 problems, 80 viewing on camera, 47 viewing on television, 48 software getting help, 91 installing, 63 upgrading, 98 specifications camera...

User Manual
Page 125
... troubleshooting camera, 77 camera dock, 75 turning camera on and off, 6 U universal insert, 68 upgrading software, firmware, 98 URLs, Kodak web sites, 91 USB (universal serial bus) connecting to camera, 65 connecting to camera dock, 69 connection location, iii transferring pictures, 65 V videos checking location, 13 copying, 49 date display, 50 deleting, 43 emailing tagged, 53 file naming, 101 locating on card, 100 mode, 18 protecting, 45 record light, i reviewing, 41, 42 storage capacities, 99 tagging, 38 taking, 35 transfer to...
... troubleshooting camera, 77 camera dock, 75 turning camera on and off, 6 U universal insert, 68 upgrading software, firmware, 98 URLs, Kodak web sites, 91 USB (universal serial bus) connecting to camera, 65 connecting to camera dock, 69 connection location, iii transferring pictures, 65 V videos checking location, 13 copying, 49 date display, 50 deleting, 43 emailing tagged, 53 file naming, 101 locating on card, 100 mode, 18 protecting, 45 record light, i reviewing, 41, 42 storage capacities, 99 tagging, 38 taking, 35 transfer to...


