Getting Started Guide
Page 16
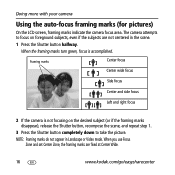
... the auto-focus framing marks (for pictures) On the LCD screen, framing marks indicate the camera focus area. The camera attempts to focus on the desired subject (or if the framing ...Center focus Center wide focus Side focus Center and side focus Left and right focus 2 If the camera is accomplished. When the framing marks turn green, focus is not focusing on foreground subjects, even ...if the subjects are fixed at Center Wide. 16 www.kodak.com/go/easysharecenter NOTE: Framing marks do not appear in the scene. 1 Press the Shutter button ...
... the auto-focus framing marks (for pictures) On the LCD screen, framing marks indicate the camera focus area. The camera attempts to focus on the desired subject (or if the framing ...Center focus Center wide focus Side focus Center and side focus Left and right focus 2 If the camera is accomplished. When the framing marks turn green, focus is not focusing on foreground subjects, even ...if the subjects are fixed at Center Wide. 16 www.kodak.com/go/easysharecenter NOTE: Framing marks do not appear in the scene. 1 Press the Shutter button ...

Getting Started Guide
Page 17
...Play/pause. A video's duration is displayed at the top of the LCD. 2 Working with pictures/videos Reviewing pictures/videos on your pictures/videos. 1 Press Review. (Press again to exit.) 2 for previous/next. www.kodak.com/go /c433accessories.) NOTE: Pictures taken at the 3.5 MP (3:2)... quality setting are displayed at a 3:2 aspect ratio with your camera Press the Review button to view and work with black bars at the top of the screen. To save battery power, use an optional Kodak EasyShare dock. (See www.kodak...
...Play/pause. A video's duration is displayed at the top of the LCD. 2 Working with pictures/videos Reviewing pictures/videos on your pictures/videos. 1 Press Review. (Press again to exit.) 2 for previous/next. www.kodak.com/go /c433accessories.) NOTE: Pictures taken at the 3.5 MP (3:2)... quality setting are displayed at a 3:2 aspect ratio with your camera Press the Review button to view and work with black bars at the top of the screen. To save battery power, use an optional Kodak EasyShare dock. (See www.kodak...
Getting Started Guide
Page 19
... cannot use Undo Delete to highlight Begin Show, then press the OK button. Deleting pictures/videos 1 Press Review. 2 for previous/next. 3 Press Delete. 4 Follow the screen prompts. www.kodak.com/go/c433support 19 This feature is only available immediately after you can use Undo Delete if your pictures/videos on the...
... cannot use Undo Delete to highlight Begin Show, then press the OK button. Deleting pictures/videos 1 Press Review. 2 for previous/next. 3 Press Delete. 4 Follow the screen prompts. www.kodak.com/go/c433support 19 This feature is only available immediately after you can use Undo Delete if your pictures/videos on the...

User's Guide
Page 6
Table of contents 5 Troubleshooting 35 Camera problems 35 Camera/computer communications 37 LCD screen messages 38 6 Getting help 41 Helpful links 41 7 Appendix 43 Camera specifications 43 Storage capacities 46 Important safety instructions 47 Battery life 49 Upgrading your software and firmware 50 Additional care and maintenance 50 Warranty...51 Regulatory compliance 53 iv www.kodak.com/go/support
Table of contents 5 Troubleshooting 35 Camera problems 35 Camera/computer communications 37 LCD screen messages 38 6 Getting help 41 Helpful links 41 7 Appendix 43 Camera specifications 43 Storage capacities 46 Important safety instructions 47 Battery life 49 Upgrading your software and firmware 50 Additional care and maintenance 50 Warranty...51 Regulatory compliance 53 iv www.kodak.com/go/support
User's Guide
Page 12
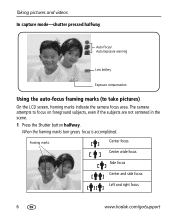
The camera attempts to take pictures) On the LCD screen, framing marks indicate the camera focus area. Taking pictures and videos In capture mode-shutter pressed halfway Auto Focus/ Auto Exposure warning Low battery Exposure compensation Using the auto-focus framing marks (to focus on foreground subjects, even if the subjects are not centered in the scene. 1 Press the Shutter button halfway. When the framing marks turn green, focus is accomplished. Framing marks Center focus Center wide focus Side focus Center and side focus Left and right focus 6 www.kodak.com/go/support
The camera attempts to take pictures) On the LCD screen, framing marks indicate the camera focus area. Taking pictures and videos In capture mode-shutter pressed halfway Auto Focus/ Auto Exposure warning Low battery Exposure compensation Using the auto-focus framing marks (to focus on foreground subjects, even if the subjects are not centered in the scene. 1 Press the Shutter button halfway. When the framing marks turn green, focus is accomplished. Framing marks Center focus Center wide focus Side focus Center and side focus Left and right focus 6 www.kodak.com/go/support

User's Guide
Page 14
...OK Play/pause. view other parts of thumbnails. To save battery power, use an optional Kodak EasyShare dock. (See www.kodak.com/go /support Next picture/video (during review W/T magnify 2X - 8X. view ...previous/next row of the picture. OK view single picture. 8 www.kodak.com/go /c433accessories.) NOTE: Pictures taken at the 3.5 MP (3:2) quality setting are displayed at ... A video's duration is displayed at the top of the LCD. Taking pictures and videos Reviewing pictures and videos on your camera Press the Review button to view and work with black bars...
...OK Play/pause. view other parts of thumbnails. To save battery power, use an optional Kodak EasyShare dock. (See www.kodak.com/go /support Next picture/video (during review W/T magnify 2X - 8X. view ...previous/next row of the picture. OK view single picture. 8 www.kodak.com/go /c433accessories.) NOTE: Pictures taken at the 3.5 MP (3:2) quality setting are displayed at ... A video's duration is displayed at the top of the LCD. Taking pictures and videos Reviewing pictures and videos on your camera Press the Review button to view and work with black bars...
User's Guide
Page 27
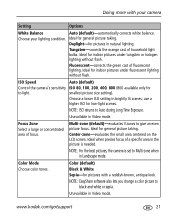
...(default) Black & White Sepia-for indoor pictures under fluorescent lighting without flash. Unavailable in natural lighting. www.kodak.com/go/support 21 Choose your camera Setting Options White Balance Auto (default)-automatically corrects white balance. Ideal for pictures with your lighting condition. NOTE: ... Video mode. Unavailable in brightly lit scenes; Center-zone-evaluates the small area centered on the LCD screen. NOTE: For the best pictures, the camera is needed. NOTE: EasyShare software also lets you change a color picture to Multi-zone when in the picture is set ...
...(default) Black & White Sepia-for indoor pictures under fluorescent lighting without flash. Unavailable in natural lighting. www.kodak.com/go/support 21 Choose your camera Setting Options White Balance Auto (default)-automatically corrects white balance. Ideal for pictures with your lighting condition. NOTE: ... Video mode. Unavailable in brightly lit scenes; Center-zone-evaluates the small area centered on the LCD screen. NOTE: For the best pictures, the camera is needed. NOTE: EasyShare software also lets you change a color picture to Multi-zone when in the picture is set ...

User's Guide
Page 34
...Second-on your computer, then copy up to 32 album names to create albums on your camera 1 Press the Review button, then locate the picture or video. 2 Press the Menu button. 28 www.kodak.com/go/support A plus (+) after the album name means more with album names. Doing ...Set Album , then press the OK button. 3 Press to your computer, EasyShare software opens and categorizes your pictures/videos in your camera with your camera Second-on the screen. Third-transfer to your computer When you turn on the LCD, your album selection is selected. 6 Press the Menu button to tag ...
...Second-on your computer, then copy up to 32 album names to create albums on your camera 1 Press the Review button, then locate the picture or video. 2 Press the Menu button. 28 www.kodak.com/go/support A plus (+) after the album name means more with album names. Doing ...Set Album , then press the OK button. 3 Press to your computer, EasyShare software opens and categorizes your pictures/videos in your camera with your camera Second-on the screen. Third-transfer to your computer When you turn on the LCD, your album selection is selected. 6 Press the Menu button to tag ...

User's Guide
Page 41
...page 50) before loading with Kodak Ni-MH batteries in the camera. Short battery life I The camera is operating normally. corrupted. Camera does not I Charge rechargeable batteries. I Remove the battery, then reinsert or replace it. turn on the LCD screen. Keep rechargeable batteries charged....Troubleshooting For step-by-step product support, visit www.kodak.com/go /support 35 Try one or more the following Camera does not I Use the Refresh feature on your camera dock series 3 or printer dock digital camera series 3. batteries. Stored pictures are I Check the ...
...page 50) before loading with Kodak Ni-MH batteries in the camera. Short battery life I The camera is operating normally. corrupted. Camera does not I Charge rechargeable batteries. I Remove the battery, then reinsert or replace it. turn on the LCD screen. Keep rechargeable batteries charged....Troubleshooting For step-by-step product support, visit www.kodak.com/go /support 35 Try one or more the following Camera does not I Use the Refresh feature on your camera dock series 3 or printer dock digital camera series 3. batteries. Stored pictures are I Check the ...
User's Guide
Page 44
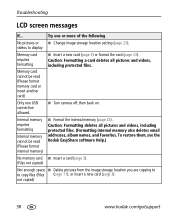
Troubleshooting LCD screen messages If... Only one or more of the following No pictures or I Turn camera off, then back on. I Change image storage location setting (page 23). To restore them, see the Kodak EasyShare software Help.) No memory card I Insert a card (page 3). (Files not copied) Not enough space... card cannot be read (Please format memory card or insert another card) I Format the internal memory (page 23). not copied) 38 www.kodak.com/go/support videos to copy files (Files (page 11), or insert a new card (page 3). Caution: Formatting a card deletes all ...
Troubleshooting LCD screen messages If... Only one or more of the following No pictures or I Turn camera off, then back on. I Change image storage location setting (page 23). To restore them, see the Kodak EasyShare software Help.) No memory card I Insert a card (page 3). (Files not copied) Not enough space... card cannot be read (Please format memory card or insert another card) I Format the internal memory (page 23). not copied) 38 www.kodak.com/go/support videos to copy files (Files (page 11), or insert a new card (page 3). Caution: Formatting a card deletes all ...


