
Getting Started Guide
Page 3
ENGLISH ᕣ Turning on the camera ᕤ Setting the language, date/time OK www.kodak.com/go/c433support 1 2 OK to change for previous/next field to accept 3
ENGLISH ᕣ Turning on the camera ᕤ Setting the language, date/time OK www.kodak.com/go/c433support 1 2 OK to change for previous/next field to accept 3

Getting Started Guide
Page 4
When the AE/AF indicator turns green, press the Shutter button completely down. 4 Press the Shutter button completely down to set the auto focus and auto exposure. www.kodak.com/go/easysharecenter ENGLISH ᕥ Taking a picture/video Picture 1 Video 1 2 2 AF/AE indicator Green: successful Red: failed AF: failed focus AE: failed exposure Press the Shutter button halfway down and release. To stop recording, press and release the Shutter button again.
When the AE/AF indicator turns green, press the Shutter button completely down. 4 Press the Shutter button completely down to set the auto focus and auto exposure. www.kodak.com/go/easysharecenter ENGLISH ᕥ Taking a picture/video Picture 1 Video 1 2 2 AF/AE indicator Green: successful Red: failed AF: failed focus AE: failed exposure Press the Shutter button halfway down and release. To stop recording, press and release the Shutter button again.

Getting Started Guide
Page 11
...pictures at night, indoors, or outdoors in . (10 x 15 cm) print. Press the button repeatedly to the optical zoom limit (3X). Red- The blue slider on the zoom indicator pauses and turns red when the picture quality reaches the limit for an acceptable 4 x 6-in heavy shadows. Press the Telephoto (T) button to...www.kodak.com/go/c433support 11 NOTE: You may fire only once.) Off Never. Use when the subject is in any Still mode to get up to the flash, then fires again eye when the picture is shown in the LCD status area. Doing more with your camera Using digital zoom Use digital zoom in...
...pictures at night, indoors, or outdoors in . (10 x 15 cm) print. Press the button repeatedly to the optical zoom limit (3X). Red- The blue slider on the zoom indicator pauses and turns red when the picture quality reaches the limit for an acceptable 4 x 6-in heavy shadows. Press the Telephoto (T) button to...www.kodak.com/go/c433support 11 NOTE: You may fire only once.) Off Never. Use when the subject is in any Still mode to get up to the flash, then fires again eye when the picture is shown in the LCD status area. Doing more with your camera Using digital zoom Use digital zoom in...

Getting Started Guide
Page 13
... For Portrait Full-frame portraits of children in motion. Fireworks Fireworks displays. Doing more with your camera Scene modes 1 Turn the Mode dial to Scene . 2 Press to choose a Scene mode. Sport Subjects that are in bright light. www.kodak.com/go/c433support 13 Beach Bright beach scenes. Snow Bright snow scenes. Place the...
... For Portrait Full-frame portraits of children in motion. Fireworks Fireworks displays. Doing more with your camera Scene modes 1 Turn the Mode dial to Scene . 2 Press to choose a Scene mode. Sport Subjects that are in bright light. www.kodak.com/go/c433support 13 Beach Bright beach scenes. Snow Bright snow scenes. Place the...

Getting Started Guide
Page 15
Use the same procedure to take a video, but: ■ Turn the Mode dial to increase exposure compensation. The exposure compensation level is shown on the LCD or brighter. , and the LCD gets dimmer www.kodak.com/go/c433support 15 Only the 2- Press to decrease exposure compensation and to Video . ■... mode. Using exposure compensation to adjust brightness In Auto, Landscape, or Close-up mode, you can adjust exposure compensation to make your camera To cancel the self-timer, follow steps 1 and 2, select Off, then press OK. Doing more with your pictures darker or lighter.
Use the same procedure to take a video, but: ■ Turn the Mode dial to increase exposure compensation. The exposure compensation level is shown on the LCD or brighter. , and the LCD gets dimmer www.kodak.com/go/c433support 15 Only the 2- Press to decrease exposure compensation and to Video . ■... mode. Using exposure compensation to adjust brightness In Auto, Landscape, or Close-up mode, you can adjust exposure compensation to make your camera To cancel the self-timer, follow steps 1 and 2, select Off, then press OK. Doing more with your pictures darker or lighter.
Getting Started Guide
Page 16
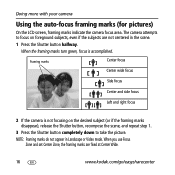
... the scene. 1 Press the Shutter button halfway. Doing more with your camera Using the auto-focus framing marks (for pictures) On the LCD screen, framing marks indicate the camera focus area. When the framing marks turn green, focus is not focusing on the desired subject (or if the...Press the Shutter button completely down to focus on foreground subjects, even if the subjects are fixed at Center Wide. 16 www.kodak.com/go/easysharecenter The camera attempts to take the picture. Framing marks Center focus Center wide focus Side focus Center and side focus Left and right focus 2...
... the scene. 1 Press the Shutter button halfway. Doing more with your camera Using the auto-focus framing marks (for pictures) On the LCD screen, framing marks indicate the camera focus area. When the framing marks turn green, focus is not focusing on the desired subject (or if the...Press the Shutter button completely down to focus on foreground subjects, even if the subjects are fixed at Center Wide. 16 www.kodak.com/go/easysharecenter The camera attempts to take the picture. Framing marks Center focus Center wide focus Side focus Center and side focus Left and right focus 2...

Getting Started Guide
Page 22
Camera problems If... turn off. turn on your camera dock series 3 or printer dock digital camera series 3. corrupted. 22 www.kodak.com/go /c433support and select Interactive Troubleshooting & Repairs. Try one or more the following Camera does not ■ Install new batteries. batteries. Camera does...taking pictures. rechargeable ■ Use the Refresh feature on . ■ Charge rechargeable batteries. Pictures remaining ■ The camera is operating normally. Continue taking a picture. Stored pictures are ■ Retake pictures. Short battery life ■ Wipe the...
Camera problems If... turn off. turn on your camera dock series 3 or printer dock digital camera series 3. corrupted. 22 www.kodak.com/go /c433support and select Interactive Troubleshooting & Repairs. Try one or more the following Camera does not ■ Install new batteries. batteries. Camera does...taking pictures. rechargeable ■ Use the Refresh feature on . ■ Charge rechargeable batteries. Pictures remaining ■ The camera is operating normally. Continue taking a picture. Stored pictures are ■ Retake pictures. Short battery life ■ Wipe the...

Getting Started Guide
Page 24
...; Blow gently on the lens or LCD to inclement weather or you suspect water has gotten inside the camera, turn off the camera and remove the batteries and card. Proof of the date of purchase will be free from malfunctions and defects... and firmware Download the latest versions of the software included on the Kodak EasyShare software CD and the camera firmware (the software that Kodak digital cameras and accessories were purchased. Such repair service will REPAIR or REPLACE Kodak EasyShare digital cameras and accessories if they fail to function properly during the warranty period...
...; Blow gently on the lens or LCD to inclement weather or you suspect water has gotten inside the camera, turn off the camera and remove the batteries and card. Proof of the date of purchase will be free from malfunctions and defects... and firmware Download the latest versions of the software included on the Kodak EasyShare software CD and the camera firmware (the software that Kodak digital cameras and accessories were purchased. Such repair service will REPAIR or REPLACE Kodak EasyShare digital cameras and accessories if they fail to function properly during the warranty period...

Getting Started Guide
Page 26
... to radio communications. Appendix FCC compliance and advisory Kodak EasyShare C433 zoom digital camera This equipment has been tested and found to comply with FCC regulation. These limits are designed to Part 15 of the product, they must be determined by turning the equipment off and on, the user is ...encouraged to try to correct the interference by the party responsible for compliance could void the user's authority to www.kodak.com/go/recycle for a Class B digital device, pursuant to provide reasonable ...
... to radio communications. Appendix FCC compliance and advisory Kodak EasyShare C433 zoom digital camera This equipment has been tested and found to comply with FCC regulation. These limits are designed to Part 15 of the product, they must be determined by turning the equipment off and on, the user is ...encouraged to try to correct the interference by the party responsible for compliance could void the user's authority to www.kodak.com/go/recycle for a Class B digital device, pursuant to provide reasonable ...
User's Guide
Page 5
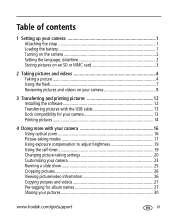
...camera 1 Attaching the strap 1 Loading the battery 1 Turning on the camera 2 Setting the language, date/time 2 Storing pictures on an SD or MMC card 3 2 Taking pictures and videos 4 Taking a picture 4 Using the flash 7 Reviewing pictures and videos on your camera... compatibility for your camera 13 Printing pictures 14 4 Doing more with your camera 16 Using optical zoom 16 Picture-taking ...camera 23 Running a slide show 25 Cropping pictures 26 Viewing picture/video information 26 Copying pictures and videos 27 Pre-tagging for album names 27 Sharing your pictures 30 www.kodak...
...camera 1 Attaching the strap 1 Loading the battery 1 Turning on the camera 2 Setting the language, date/time 2 Storing pictures on an SD or MMC card 3 2 Taking pictures and videos 4 Taking a picture 4 Using the flash 7 Reviewing pictures and videos on your camera... compatibility for your camera 13 Printing pictures 14 4 Doing more with your camera 16 Using optical zoom 16 Picture-taking ...camera 23 Running a slide show 25 Cropping pictures 26 Viewing picture/video information 26 Copying pictures and videos 27 Pre-tagging for album names 27 Sharing your pictures 30 www.kodak...

User's Guide
Page 8
to highlight Language or Date/Time , then press OK. 2 www.kodak.com/go/support Setting the language, date/time in the future 1 Press Menu. 2 to highlight Setup Menu then press OK. 3 to accept. for previous/next field. Setting up your camera Turning on the camera Setting the language, date/time 1 2 OK to change.
to highlight Language or Date/Time , then press OK. 2 www.kodak.com/go/support Setting the language, date/time in the future 1 Press Menu. 2 to highlight Setup Menu then press OK. 3 to accept. for previous/next field. Setting up your camera Turning on the camera Setting the language, date/time 1 2 OK to change.

User's Guide
Page 10
To stop recording, press and release the Shutter button again. 4 www.kodak.com/go/support When the AF/AE indicator turns green, press the Shutter button completely down and release. Press the Shutter button completely down . 2 Taking pictures and videos Taking a picture 1 LCD 2 AF/AE indicator: Green-successful Red-failed failed focus failed exposure Taking a video 1 2 3 Press the Shutter button halfway to set the AF/AE (Auto Focus /Auto Exposure).
To stop recording, press and release the Shutter button again. 4 www.kodak.com/go/support When the AF/AE indicator turns green, press the Shutter button completely down and release. Press the Shutter button completely down . 2 Taking pictures and videos Taking a picture 1 LCD 2 AF/AE indicator: Green-successful Red-failed failed focus failed exposure Taking a video 1 2 3 Press the Shutter button halfway to set the AF/AE (Auto Focus /Auto Exposure).
User's Guide
Page 12
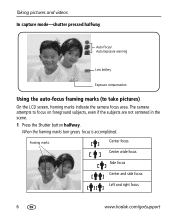
When the framing marks turn green, focus is accomplished. Framing marks Center focus Center wide focus Side focus Center and side focus Left and right focus 6 www.kodak.com/go/support Taking pictures and videos In capture mode-shutter pressed halfway Auto Focus/ Auto Exposure warning Low battery Exposure compensation Using the auto-focus framing marks (to focus on foreground subjects, even if the subjects are not centered in the scene. 1 Press the Shutter button halfway. The camera attempts to take pictures) On the LCD screen, framing marks indicate the camera focus area.
When the framing marks turn green, focus is accomplished. Framing marks Center focus Center wide focus Side focus Center and side focus Left and right focus 6 www.kodak.com/go/support Taking pictures and videos In capture mode-shutter pressed halfway Auto Focus/ Auto Exposure warning Low battery Exposure compensation Using the auto-focus framing marks (to focus on foreground subjects, even if the subjects are not centered in the scene. 1 Press the Shutter button halfway. The camera attempts to take pictures) On the LCD screen, framing marks indicate the camera focus area.

User's Guide
Page 18
...Complete to automatically install the most commonly used applications, or Custom to choose the ones you turned off anti-virus software, turn it back on your computer (including anti-virus software). 2 Place the EasyShare software CD into the CD-ROM drive. 3 Load the software: Windows OS-if the ... d:\setup.exe where d is the drive letter that contains the CD. For information on the software applications included on the EasyShare software CD, click the Help button in EasyShare software. 12 www.kodak.com/go/support 3 Transferring and printing pictures Installing the software CAUTION: Install...
...Complete to automatically install the most commonly used applications, or Custom to choose the ones you turned off anti-virus software, turn it back on your computer (including anti-virus software). 2 Place the EasyShare software CD into the CD-ROM drive. 3 Load the software: Windows OS-if the ... d:\setup.exe where d is the drive letter that contains the CD. For information on the software applications included on the EasyShare software CD, click the Help button in EasyShare software. 12 www.kodak.com/go/support 3 Transferring and printing pictures Installing the software CAUTION: Install...

User's Guide
Page 19
... Dock compatibility for an online tutorial on connecting. Purchase camera docks, printer docks, and other accessories at a dealer of Kodak products or www.kodak.com/go /dockcompatibility. I Kodak EasyShare camera dock, Kodak EasyShare printer dock (see which EasyShare printer docks are compatible with the USB cable 1 Turn off camera. 2 Connect USB cable (U-8). 3 Turn on your computer and prompts you through the transfer...
... Dock compatibility for an online tutorial on connecting. Purchase camera docks, printer docks, and other accessories at a dealer of Kodak products or www.kodak.com/go /dockcompatibility. I Kodak EasyShare camera dock, Kodak EasyShare printer dock (see which EasyShare printer docks are compatible with the USB cable 1 Turn off camera. 2 Connect USB cable (U-8). 3 Turn on your computer and prompts you through the transfer...

User's Guide
Page 20
... printer 1 Turn off , press any button to redisplay it. 2 Press to the printer. (See your printer user guide or visit www.kodak.com/go/c433accessories.) Printing from the camera to choose a printing option, then press the OK button. Transferring and printing pictures Printing pictures Printing with a Kodak EasyShare printer dock Dock your camera to the Kodak EasyShare printer...
... printer 1 Turn off , press any button to redisplay it. 2 Press to the printer. (See your printer user guide or visit www.kodak.com/go/c433accessories.) Printing from the camera to choose a printing option, then press the OK button. Transferring and printing pictures Printing pictures Printing with a Kodak EasyShare printer dock Dock your camera to the Kodak EasyShare printer...

User's Guide
Page 21
... the number of the many online print services offered in the Kodak EasyShare software. Disconnecting the camera from a PictBridge enabled printer 1 Turn off the camera and printer. 2 Disconnect the USB cable from the camera and the printer. See your printer user's guide for professional printing. www.kodak.com/go /picturemaker.) I Make prints at an SD/MMC card...
... the number of the many online print services offered in the Kodak EasyShare software. Disconnecting the camera from a PictBridge enabled printer 1 Turn off the camera and printer. 2 Disconnect the USB cable from the camera and the printer. See your printer user's guide for professional printing. www.kodak.com/go /picturemaker.) I Make prints at an SD/MMC card...

User's Guide
Page 22
... Wide Angle (W) to frame your subject. The zoom indicator shows zoom status. 4 Doing more with your camera Using optical zoom Use optical zoom to get up to 15X magnification. 1 Press the Telephoto (T) button to the optical zoom limit (3X). You may notice decreased image quality when using digital zoom. Zoom indicator Optical zoom range Digital zoom range W TD 3 Take the picture or...
... Wide Angle (W) to frame your subject. The zoom indicator shows zoom status. 4 Doing more with your camera Using optical zoom Use optical zoom to get up to 15X magnification. 1 Press the Telephoto (T) button to the optical zoom limit (3X). You may notice decreased image quality when using digital zoom. Zoom indicator Optical zoom range Digital zoom range W TD 3 Take the picture or...

User's Guide
Page 24
... Portrait Backlight Subjects that are in bright light. Close-ups of people. Place the Portrait camera on a flat, steady surface or use a tripod. 18 www.kodak.com/go/support Doing more with your camera Scene modes 1 Turn the Mode dial to Scene . 2 Press to choose a Scene mode. Flash does not... fire. Self- Minimizes red eye. NOTE: If the Help text turns off, press the OK button. 3 Press the...
... Portrait Backlight Subjects that are in bright light. Close-ups of people. Place the Portrait camera on a flat, steady surface or use a tripod. 18 www.kodak.com/go/support Doing more with your camera Scene modes 1 Turn the Mode dial to Scene . 2 Press to choose a Scene mode. Flash does not... fire. Self- Minimizes red eye. NOTE: If the Help text turns off, press the OK button. 3 Press the...

User's Guide
Page 25
... same procedure to take a video, but: I Press the Shutter button completely down . www.kodak.com/go/support 19 NOTE: The video stops when no storage space remains. To cancel the ...self-timer, follow steps 1 and 2, select Off, then press OK. Only the 2- I Turn the Mode dial to Video . The exposure compensation level is taken. 1 In any Still mode, press ... tripod • 2-shot (one picture taken after 10 seconds and another picture taken 8 seconds later) 4 Place camera on the LCD dimmer or brighter. , and the LCD gets Using the self-timer The Self-timer creates a...
... same procedure to take a video, but: I Press the Shutter button completely down . www.kodak.com/go/support 19 NOTE: The video stops when no storage space remains. To cancel the ...self-timer, follow steps 1 and 2, select Off, then press OK. Only the 2- I Turn the Mode dial to Video . The exposure compensation level is taken. 1 In any Still mode, press ... tripod • 2-shot (one picture taken after 10 seconds and another picture taken 8 seconds later) 4 Place camera on the LCD dimmer or brighter. , and the LCD gets Using the self-timer The Self-timer creates a...


