User Guide
Page 2
...2 Getting Started 6 What's in the box 6 System requirements 6 Installation 8 Site specifications 8 Installing the scanner 8 Installing the Kodak Driver Software 9 Making connections 12 Verifying for a USB port 12 Connecting the USB cable 13 SCSI connections 14 SCSI ...Scanner 21 Turning the scanner on and off 21 Adjusting the input tray 21 Installing and adjusting the output tray 23 Lifting the flatbed cover 23 Start and stop scanning 23 Document preparation 24 Scanning your documents 25 Verifying your scanner installation 26 Viewing test images 29 Application software...
...2 Getting Started 6 What's in the box 6 System requirements 6 Installation 8 Site specifications 8 Installing the scanner 8 Installing the Kodak Driver Software 9 Making connections 12 Verifying for a USB port 12 Connecting the USB cable 13 SCSI connections 14 SCSI ...Scanner 21 Turning the scanner on and off 21 Adjusting the input tray 21 Installing and adjusting the output tray 23 Lifting the flatbed cover 23 Start and stop scanning 23 Document preparation 24 Scanning your documents 25 Verifying your scanner installation 26 Viewing test images 29 Application software...
User Guide
Page 12
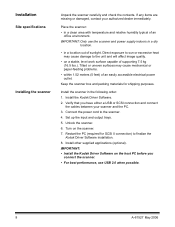
...Turn on a stable, level work surface capable of an office environment. Keep the scanner box and packing materials for SCSI II connection) to finalize the Kodak Driver Software installation. 8. Install the scanner in a clean area with temperature and relative humidity typical of supporting 7.5 kg (16....5 lbs.). Install other supplied applications (optional). If any items are missing or damaged, contact your scanner and the PC. 3. IMPORTANT: • Install the Kodak Driver Software on the host PC before you have either a USB or SCSI connection and connect the cables between ...
...Turn on a stable, level work surface capable of an office environment. Keep the scanner box and packing materials for SCSI II connection) to finalize the Kodak Driver Software installation. 8. Install the scanner in a clean area with temperature and relative humidity typical of supporting 7.5 kg (16....5 lbs.). Install other supplied applications (optional). If any items are missing or damaged, contact your scanner and the PC. 3. IMPORTANT: • Install the Kodak Driver Software on the host PC before you have either a USB or SCSI connection and connect the cables between ...
User Guide
Page 13
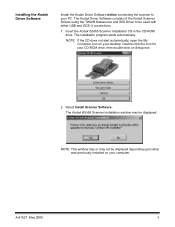
.... 2. Double-click the icon for your CD-ROM drive, then double-click on your desktop. Select Install Scanner Software. A-61527 May 2006 9 Insert the Kodak i55/i65 Scanner Installation CD in the CD-ROM drive. The Kodak i55/i65 Scanner Installation window may be displayed: NOTE: This window may or may not be used with either USB and...
.... 2. Double-click the icon for your CD-ROM drive, then double-click on your desktop. Select Install Scanner Software. A-61527 May 2006 9 Insert the Kodak i55/i65 Scanner Installation CD in the CD-ROM drive. The Kodak i55/i65 Scanner Installation window may be displayed: NOTE: This window may or may not be used with either USB and...

User Guide
Page 14
The Software License Agreement window will be displayed: 5. Click Yes. After reading the agreement, click I Agree to continue. 10 A-61527 May 2006 The Welcome window will be displayed: 4. 3. Click Next.
The Software License Agreement window will be displayed: 5. Click Yes. After reading the agreement, click I Agree to continue. 10 A-61527 May 2006 The Welcome window will be displayed: 4. 3. Click Next.

User Guide
Page 16
... The USB verification tool will check your PC does not have a USB 2.0 port installed, you should install a USB 2.0 Accessory card..: • If you install the Kodak Driver Software, check for a USB port The Kodak i55/i65 Scanners can accommodate either of the following window will be displayed.
... The USB verification tool will check your PC does not have a USB 2.0 port installed, you should install a USB 2.0 Accessory card..: • If you install the Kodak Driver Software, check for a USB port The Kodak i55/i65 Scanners can accommodate either of the following window will be displayed.

User Guide
Page 17
... with your PC. Attach the A end of the USB cable between your PC. A B 1. If you have not installed the Kodak Driver Software, do that port, otherwise use the USB port on your scanner and PC. Connecting the USB cable IMPORTANT: If you installed a USB 2.0 card, use that now before proceeding. Attach the B end...
... with your PC. Attach the A end of the USB cable between your PC. A B 1. If you have not installed the Kodak Driver Software, do that port, otherwise use the USB port on your scanner and PC. Connecting the USB cable IMPORTANT: If you installed a USB 2.0 card, use that now before proceeding. Attach the B end...
User Guide
Page 21
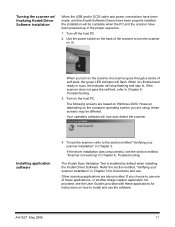
...'s provided with these applications, or another image capture application not provided, see the section entitled, "Scanner not working" in the proper sequence. 1. Installing application software 4. The Kodak Scan Validation Tool is finished and ready to use one of self-tests, the green LED indicator ... Use the power switch on the back of the scanner to install and use . The following screens are also provided. Your operating software will now auto detect the scanner. Turning the scanner on/ finalizing Kodak Driver Software installation When the USB and/or SCSI cable and power...
...'s provided with these applications, or another image capture application not provided, see the section entitled, "Scanner not working" in the proper sequence. 1. Installing application software 4. The Kodak Scan Validation Tool is finished and ready to use one of self-tests, the green LED indicator ... Use the power switch on the back of the scanner to install and use . The following screens are also provided. Your operating software will now auto detect the scanner. Turning the scanner on/ finalizing Kodak Driver Software installation When the USB and/or SCSI cable and power...

User Guide
Page 27
Lifting the flatbed cover 3. Scanning is controlled by software developed for operation, which is indicated by the green indicator light being on and constant. To install and adjust the output tray: 1. To start scanning, make sure the scanner is properly installed and adjusted. If you have a large ... tray extension wire out to lock it into the three slots on and ready for your application software. 23 Before scanning documents, be sure the output tray is on the automatic document feeder. Insert the three tabs on the output tray into place. 4. Hold the output tray ...
Lifting the flatbed cover 3. Scanning is controlled by software developed for operation, which is indicated by the green indicator light being on and constant. To install and adjust the output tray: 1. To start scanning, make sure the scanner is properly installed and adjusted. If you have a large ... tray extension wire out to lock it into the three slots on and ready for your application software. 23 Before scanning documents, be sure the output tray is on the automatic document feeder. Insert the three tabs on the output tray into place. 4. Hold the output tray ...

User Guide
Page 31
Select Defaults. For a Kodak i65 Scanner both sides of the document will be scanned. 5. A-61527 May 2006 27 will be scanned. The factory default settings are set to the factory-installed default settings. This resets the software to capture bi-tonal images. Click OK. For a Kodak i55 Scanner one side of the document will be displayed. 4. 3. A confirmation message, Reset all values to factory defaults? Click OK on the Kodak Scanner Properties dialog box.
Select Defaults. For a Kodak i65 Scanner both sides of the document will be scanned. 5. A-61527 May 2006 27 will be scanned. The factory default settings are set to the factory-installed default settings. This resets the software to capture bi-tonal images. Click OK. For a Kodak i55 Scanner one side of the document will be displayed. 4. 3. A confirmation message, Reset all values to factory defaults? Click OK on the Kodak Scanner Properties dialog box.

User Guide
Page 33
... may not be optimized to open and view the captured image. Application software Some scanning applications are available on the CDs packed with these applications for instructions on this file to meet your scanner. A-61527 May 2006 29 Because factory default settings were used, the image... quality may also use the software. image0000001B.jpg is a front image; See the User's Guide provided with your ...
... may not be optimized to open and view the captured image. Application software Some scanning applications are available on the CDs packed with these applications for instructions on this file to meet your scanner. A-61527 May 2006 29 Because factory default settings were used, the image... quality may also use the software. image0000001B.jpg is a front image; See the User's Guide provided with your ...

User Guide
Page 34
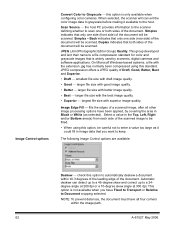
... image. Color - The Kodak i65 Scanner is derived from the color scan. a front color image, a rear color image, a front bi-tonal/binary image, and a rear bitonal/binary image, allowing you take advantage of a document in either in the fed document, cutting the edges of image... to help you to several separate features of the software application you are using (i.e., Kodak Capture Software). indicates that may be scanned, creating a single page image. Using these powerful features. The idea is a simplex scanner. black-and-white. The information that follows describes...
... image. Color - The Kodak i65 Scanner is derived from the color scan. a front color image, a rear color image, a front bi-tonal/binary image, and a rear bitonal/binary image, allowing you take advantage of a document in either in the fed document, cutting the edges of image... to help you to several separate features of the software application you are using (i.e., Kodak Capture Software). indicates that may be scanned, creating a single page image. Using these powerful features. The idea is a simplex scanner. black-and-white. The information that follows describes...
User Guide
Page 38
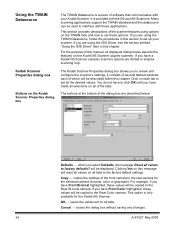
...within this datasource can be used to the rear camera for the Kodak i65 Scanner. will be displayed. It is a piece of software that communicates with the i55 and i65 Scanners. Clicking Yes on all tabs to set up your Kodak Scanner. OK saves the values set all the desired values.... You do not have made all selections on the Kodak Scanner Properties dialog box The TWAIN ...
...within this datasource can be used to the rear camera for the Kodak i65 Scanner. will be displayed. It is a piece of software that communicates with the i55 and i65 Scanners. Clicking Yes on all tabs to set up your Kodak Scanner. OK saves the values set all the desired values.... You do not have made all selections on the Kodak Scanner Properties dialog box The TWAIN ...
User Guide
Page 50
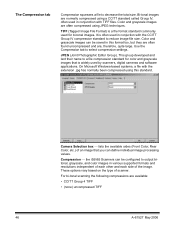
It is often used by scanners, digital cameras and software applications. Use the Compression tab to decrease the total size. On Microsoft Windows-based systems, a file with the extension .jpg has normally been compressed using... and each side of the image. The Compression tab Compression squeezes a file to select compression settings. JPEG (Joint Photographic Editor Group). Compression the i55/i65 Scanners can be configured to a file compression standard for bi-tonal images. Bi-tonal images are available: • CCITT Group 4 TIFF • (none) uncompressed TIFF 46...
It is often used by scanners, digital cameras and software applications. Use the Compression tab to decrease the total size. On Microsoft Windows-based systems, a file with the extension .jpg has normally been compressed using... and each side of the image. The Compression tab Compression squeezes a file to select compression settings. JPEG (Joint Photographic Editor Group). Compression the i55/i65 Scanners can be configured to a file compression standard for bi-tonal images. Bi-tonal images are available: • CCITT Group 4 TIFF • (none) uncompressed TIFF 46...
User Guide
Page 57
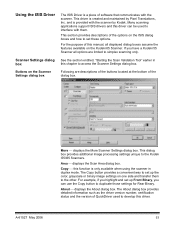
...on the ISIS dialog boxes and how to set up Front Binary, you have a Kodak i55 Scanner all displayed dialog boxes assume the features available on the Kodak i65 Scanner. and is created and maintained by Kodak. This dialog box provides additional image processing settings unique to the other. About ... . The About dialog box provides detailed information such as the driver version number, certification status and the version of software that communicates with them to the Kodak i55/i65 Scanners. If you can be used to simplex scanning only. Copy this driver.
...on the ISIS dialog boxes and how to set up Front Binary, you have a Kodak i55 Scanner all displayed dialog boxes assume the features available on the Kodak i65 Scanner. and is created and maintained by Kodak. This dialog box provides additional image processing settings unique to the other. About ... . The About dialog box provides detailed information such as the driver version number, certification status and the version of software that communicates with them to the Kodak i55/i65 Scanners. If you can be used to simplex scanning only. Copy this driver.
User Guide
Page 66
...area in image data that you have all other image processing options have been applied, by scanners, digital cameras and software applications. Scan Source the host PC provides information to the scanner defining whether to scan one side (rear side) of a scanned image, after all four... corners within ±0.3 degrees of the leading edge of the document. Back indicates that is not available ...
...area in image data that you have all other image processing options have been applied, by scanners, digital cameras and software applications. Scan Source the host PC provides information to the scanner defining whether to scan one side (rear side) of a scanned image, after all four... corners within ±0.3 degrees of the leading edge of the document. Back indicates that is not available ...

User Guide
Page 83
...last device on the SCSI chain. If you cannot add documents to 50 documents in the feeder after installing the software. If you ). No images are being displayed • Documents should only be fed, but the scanner or computer crashes when scanning. • Verify that : ... holds up and ready. Problem Possible Solution Scanner will be distorted. Image quality is plugged in Chapter 2. • Verify if more information, see the section entitled, "Scanning your images may encounter when using the Kodak i55/i65 Scanner. See the section entitled "SCSI connections" ...
...last device on the SCSI chain. If you cannot add documents to 50 documents in the feeder after installing the software. If you ). No images are being displayed • Documents should only be fed, but the scanner or computer crashes when scanning. • Verify that : ... holds up and ready. Problem Possible Solution Scanner will be distorted. Image quality is plugged in Chapter 2. • Verify if more information, see the section entitled, "Scanning your images may encounter when using the Kodak i55/i65 Scanner. See the section entitled "SCSI connections" ...

User Guide
Page 86
4. before the name, you need to reinstall the driver software. 5. Select the Driver tab. 6. Click Update Driver. The Upgrade Device Driver Wizard will be displayed. 82 A-61527 May 2006 Double-click on the Kodak Scanner i65 (or i55). From the Device Manager screen, select Imaging devices. The Scanner Properties dialog box will be displayed. If the Kodak i55/i65 Scanner appears with a ?
4. before the name, you need to reinstall the driver software. 5. Select the Driver tab. 6. Click Update Driver. The Upgrade Device Driver Wizard will be displayed. 82 A-61527 May 2006 Double-click on the Kodak Scanner i65 (or i55). From the Device Manager screen, select Imaging devices. The Scanner Properties dialog box will be displayed. If the Kodak i55/i65 Scanner appears with a ?
User Guide
Page 88
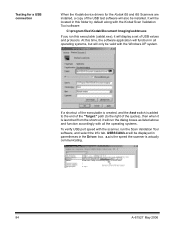
... folder by default along with the Kodak Scan Validation Tool software: C:\program files\Kodak\Document Imaging\usbtst.exe If you run the Scan Validation Tool software, and select the Info tab. Testing for a USB connection When the Kodak device drivers for the Kodak i55 and i65 Scanners are installed, a copy of the USB test software will only be valid with...
... folder by default along with the Kodak Scan Validation Tool software: C:\program files\Kodak\Document Imaging\usbtst.exe If you run the Scan Validation Tool software, and select the Info tab. Testing for a USB connection When the Kodak device drivers for the Kodak i55 and i65 Scanners are installed, a copy of the USB test software will only be valid with...

User Guide
Page 91
...Scanner Dimensions Scanner Weight Host Connection Operating Temperature Humidity Environmental Factors Scanner Power Power Consumption Acoustic Noise (Sound Power level) • i55 Scanner: simplex color scanner with an automatic document feeder, 32 pages per minute (portrait), 200 dpi, bi-tonal • i65 Scanner: duplex color scanner with an automatic document... PDF (with bundled software) Automatic Document Feeder: • Maximum - 21.6 x 86 cm (8.5 x 34 in.) when the host PC is configured with adequate memory. • Minimum - 9.4 x 14 cm (3.7 x 5.5 in . Kodak i55 Scanner: 6.7 kg / 14...
...Scanner Dimensions Scanner Weight Host Connection Operating Temperature Humidity Environmental Factors Scanner Power Power Consumption Acoustic Noise (Sound Power level) • i55 Scanner: simplex color scanner with an automatic document feeder, 32 pages per minute (portrait), 200 dpi, bi-tonal • i65 Scanner: duplex color scanner with an automatic document... PDF (with bundled software) Automatic Document Feeder: • Maximum - 21.6 x 86 cm (8.5 x 34 in.) when the host PC is configured with adequate memory. • Minimum - 9.4 x 14 cm (3.7 x 5.5 in . Kodak i55 Scanner: 6.7 kg / 14...


