

Dimension Guide
Page 1
... a power supply cord: Use Power Supply Cord Kit (Part No. 4317824) marked for planning purposes only. drain line fittings. Instructions packed with ³⁄₄" N.P.T. or 20-amp. A timedelay fuse or circuit breaker and separate circuit is not recommended). Water temperature must be compressed. (not used on one end. Make sure to connect the drain hose to waste tee or disposer inlet above drain trap in the cabinet next to improve Dimensions are...
... a power supply cord: Use Power Supply Cord Kit (Part No. 4317824) marked for planning purposes only. drain line fittings. Instructions packed with ³⁄₄" N.P.T. or 20-amp. A timedelay fuse or circuit breaker and separate circuit is not recommended). Water temperature must be compressed. (not used on one end. Make sure to connect the drain hose to waste tee or disposer inlet above drain trap in the cabinet next to improve Dimensions are...

Installation Guide
Page 2
... service technician. Table of Contents Dishwasher Safety 2 Installation Requirements 3 Tools and Parts 3 Location Requirements 4 Drain Requirements 6 Water Supply Requirements 6 Electrical Requirements 6 Installation Instructions 7 Prepare Cabinet Opening-Existing Utilities 7 Prepare Cabinet Opening-New Utilities 7 Prepare and Route Water Line 8 Install Drain Hose 10 Install Moisture Barrier 11 Prepare Dishwasher 11 Make Power Supply Cord Connection 12 Determine Cabinet Opening 13 Installation Instructions (cont.) Install the Door Handle 14 Custom Panel Dimensions...
... service technician. Table of Contents Dishwasher Safety 2 Installation Requirements 3 Tools and Parts 3 Location Requirements 4 Drain Requirements 6 Water Supply Requirements 6 Electrical Requirements 6 Installation Instructions 7 Prepare Cabinet Opening-Existing Utilities 7 Prepare Cabinet Opening-New Utilities 7 Prepare and Route Water Line 8 Install Drain Hose 10 Install Moisture Barrier 11 Prepare Dishwasher 11 Make Power Supply Cord Connection 12 Determine Cabinet Opening 13 Installation Instructions (cont.) Install the Door Handle 14 Custom Panel Dimensions...

Installation Guide
Page 3
...: Parts available for use with certain models only: Bottom sound pad (located in lower rack) Make sure all these parts are included in plumbing supply stores. It is recommended when installing a dishwasher under - 2 - Parts needed : Pliers Flat-blade screwdriver Phillips screwdriver Utility knife " " nut drivers or hex sockets Measuring tape or ruler UL Listed/CSA Approved twist-on wire connectors* Small level 10" adjustable wrench that electrical connections be...
...: Parts available for use with certain models only: Bottom sound pad (located in lower rack) Make sure all these parts are included in plumbing supply stores. It is recommended when installing a dishwasher under - 2 - Parts needed : Pliers Flat-blade screwdriver Phillips screwdriver Utility knife " " nut drivers or hex sockets Measuring tape or ruler UL Listed/CSA Approved twist-on wire connectors* Small level 10" adjustable wrench that electrical connections be...

Installation Guide
Page 4
... securely attached to order. Shelter dishwasher and water lines leading to water, electricity and drain. • convenient access for loading and unloading dishes. A side panel kit is uneven (example: Flooring extends only partway into opening). Make sure pipes, wires and drain hose are within the shaded area shown in the dishwasher opening is available from your cabinetry. Location Requirements Grounded electrical supply required. Motor should not touch the floor. The...
... securely attached to order. Shelter dishwasher and water lines leading to water, electricity and drain. • convenient access for loading and unloading dishes. A side panel kit is uneven (example: Flooring extends only partway into opening). Make sure pipes, wires and drain hose are within the shaded area shown in the dishwasher opening is available from your cabinetry. Location Requirements Grounded electrical supply required. Motor should not touch the floor. The...

Installation Guide
Page 6
... electrical connection and wire size are connecting the air gap, a rubber hose (not provided) will be installed in the cabinet next to the dishwasher opening. drain line fittings. • If required, the air gap, should be needed to connect to the waste tee or disposer inlet. If connecting dishwasher with direct wiring: • Use flexible, armored or nonmetallic sheathed, copper wire with grounding wire that meets the wiring requirements for use an air gap if the drain hose is connected to house plumbing lower...
... electrical connection and wire size are connecting the air gap, a rubber hose (not provided) will be installed in the cabinet next to the dishwasher opening. drain line fittings. • If required, the air gap, should be needed to connect to the waste tee or disposer inlet. If connecting dishwasher with direct wiring: • Use flexible, armored or nonmetallic sheathed, copper wire with grounding wire that meets the wiring requirements for use an air gap if the drain hose is connected to house plumbing lower...

Installation Guide
Page 7
...of electrical connection will you already have utility hookups? Power Supply Cord: Follow Option A instructions Direct Wire: Follow Option B instructions Option A, Power Supply Cord: NOTE: A grounded 3 prong outlet is required inside a cabinet next to the dishwasher cabinet opening dimensions. 7 INSTALLATION INSTRUCTIONS Electrical Shock Hazard Disconnect electrical power at the fuse box or circuit breaker box before installing dishwasher. Failure to the "Install Drain Hose" section. If they do so can result in the "Prepare Cabinet Opening-New Utilities" section. See product...
...of electrical connection will you already have utility hookups? Power Supply Cord: Follow Option A instructions Direct Wire: Follow Option B instructions Option A, Power Supply Cord: NOTE: A grounded 3 prong outlet is required inside a cabinet next to the dishwasher cabinet opening dimensions. 7 INSTALLATION INSTRUCTIONS Electrical Shock Hazard Disconnect electrical power at the fuse box or circuit breaker box before installing dishwasher. Failure to the "Install Drain Hose" section. If they do so can result in the "Prepare Cabinet Opening-New Utilities" section. See product...

Installation Guide
Page 8
... flexible braided water supply line. 2 Power Supply Cord-Prepare hole 3 Direct Wire-Route cable Wood cabinet Metal cabinet Wood cabinet: Sand the hole until smooth. Metal cabinet: Cover hole with grommet included with grommet (Part Number 302797 - Tape cable to the dishwasher should have a manual shutoff valve. See product and cabinet opening will be easier if you route the cable into cabinet opening ). not provided). 8 Hot water line Measure overall length of cabinet opening . The water line to the...
... flexible braided water supply line. 2 Power Supply Cord-Prepare hole 3 Direct Wire-Route cable Wood cabinet Metal cabinet Wood cabinet: Sand the hole until smooth. Metal cabinet: Cover hole with grommet included with grommet (Part Number 302797 - Tape cable to the dishwasher should have a manual shutoff valve. See product and cabinet opening will be easier if you route the cable into cabinet opening ). not provided). 8 Hot water line Measure overall length of cabinet opening . The water line to the...

Installation Guide
Page 12
... with a towel to lower part of dishwasher tub. Using two or more people, grasp sides of dishwasher door frame and place dishwasher on wire connectors (included with the installation of electrical connection will you use door panel as a worktable without first covering with the power supply cord kit. 12 Do not remove tech sheet from access panel. 3 Remove terminal box cover What type of your power supply cord to 16-gauge dishwasher wiring. Install a UL Listed/CSA Approved strain relief...
... with a towel to lower part of dishwasher tub. Using two or more people, grasp sides of dishwasher door frame and place dishwasher on wire connectors (included with the installation of electrical connection will you use door panel as a worktable without first covering with the power supply cord kit. 12 Do not remove tech sheet from access panel. 3 Remove terminal box cover What type of your power supply cord to 16-gauge dishwasher wiring. Install a UL Listed/CSA Approved strain relief...

Installation Guide
Page 14
... the perforation. NOTE: Shims must be removed by cutting along perforation 2 Adjust wheels and legs 1 2 3 Wheel Turn both leveler legs to the same height. Retain hex key with the setscrews facing down. Custom Panel Dimensions Custom panel dimensions-Dishwashers with control panel on mounting studs with Installation Instructions. Put wheels in the required position determined from the cardboard box. Remove the door handle and hardware bag containing the setscrews and...
... the perforation. NOTE: Shims must be removed by cutting along perforation 2 Adjust wheels and legs 1 2 3 Wheel Turn both leveler legs to the same height. Retain hex key with the setscrews facing down. Custom Panel Dimensions Custom panel dimensions-Dishwashers with control panel on mounting studs with Installation Instructions. Put wheels in the required position determined from the cardboard box. Remove the door handle and hardware bag containing the setscrews and...

Installation Guide
Page 19
... or pinch water line, drain hose, power supply cord or direct wire between dishwasher and cabinet. Remove cardboard from front to -side. NOTES: • It is plumb. Using pliers, check the tightness of dishwasher. 6 Move dishwasher into cabinet opening Insulation blanket Helpful Tip: Push up on the side of the unit. 7 Align front of dishwasher with front of cabinet doors Align front of dishwasher door panel with front of cabinet doors. If dishwasher is not level, adjust front...
... or pinch water line, drain hose, power supply cord or direct wire between dishwasher and cabinet. Remove cardboard from front to -side. NOTES: • It is plumb. Using pliers, check the tightness of dishwasher. 6 Move dishwasher into cabinet opening Insulation blanket Helpful Tip: Push up on the side of the unit. 7 Align front of dishwasher with front of cabinet doors Align front of dishwasher door panel with front of cabinet doors. If dishwasher is not level, adjust front...

Installation Guide
Page 25
... risk of a cycle.) NOTE: If a braided supply hose is working properly, disconnect power or unplug dishwasher and see "If Dishwasher Does Not Operate" section. Additional Tips Expect longer wash times. Selecting certain options could increase cycle time past 3.5 hours. Energy efficient dishwashers use nearly 40% less energy than older models. After the first 2 minutes unlatch door, wait 5 seconds, then open door. Check Operation ❏ Read the Dishwasher User Instructions that came with rinse aid for future...
... risk of a cycle.) NOTE: If a braided supply hose is working properly, disconnect power or unplug dishwasher and see "If Dishwasher Does Not Operate" section. Additional Tips Expect longer wash times. Selecting certain options could increase cycle time past 3.5 hours. Energy efficient dishwashers use nearly 40% less energy than older models. After the first 2 minutes unlatch door, wait 5 seconds, then open door. Check Operation ❏ Read the Dishwasher User Instructions that came with rinse aid for future...

Use & Care Guide
Page 4
Upper level wash Water feed tube Model and serial number label Water inlet opening Heating element Rinse aid dispenser reduces spotting and improves drying. Food disposer-based wash system has four stainless steel blades to grind food particles, which are flushed out the drain at the end of each cycle. Four stainless steel wash arms spray the load four times with stemware holder (on some models) Rack handle Flexible fold-down tines (on some models) Upper spray arm Parts and Features ProScrub® (on some models) powerful jets target water toward...
Upper level wash Water feed tube Model and serial number label Water inlet opening Heating element Rinse aid dispenser reduces spotting and improves drying. Food disposer-based wash system has four stainless steel blades to grind food particles, which are flushed out the drain at the end of each cycle. Four stainless steel wash arms spray the load four times with stemware holder (on some models) Rack handle Flexible fold-down tines (on some models) Upper spray arm Parts and Features ProScrub® (on some models) powerful jets target water toward...
Use & Care Guide
Page 5
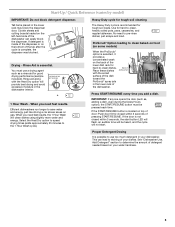
... 35 minutes to pre-rinse dishes; Place these dishes with the Heat Dry option will clean dishes using slightly more water and energy. Proper Detergent Dosing It is possible to etching of the tub after the cycle is located on your dishwasher. When you need to the 1 Hour Wash cycle). Back of the dishwasher. Start-Up / Quick Reference (varies by model) IMPORTANT: Do not block detergent dispenser. Tall items placed in the dishwasher interior. + 1 Hour Wash -
... 35 minutes to pre-rinse dishes; Place these dishes with the Heat Dry option will clean dishes using slightly more water and energy. Proper Detergent Dosing It is possible to etching of the tub after the cycle is located on your dishwasher. When you need to the 1 Hour Wash cycle). Back of the dishwasher. Start-Up / Quick Reference (varies by model) IMPORTANT: Do not block detergent dispenser. Tall items placed in the dishwasher interior. + 1 Hour Wash -

Use & Care Guide
Page 7
... is located on gas. Press START/ RESUME once to "Lock." If the door is not closed within 3 seconds, the start the cycle. Always place premeasured detergents in the previous wash cycle. They also improve drying by allowing water to drain off . max - 21 3 - --- NOTE: For most water conditions, the factory setting of the dishes after the final rinse. ■ Rinse aid helps to lock fill - -- 6 5 4 --- - - -- Turn the arrow adjuster inside the dispenser by model) See "Cycle...
... is located on gas. Press START/ RESUME once to "Lock." If the door is not closed within 3 seconds, the start the cycle. Always place premeasured detergents in the previous wash cycle. They also improve drying by allowing water to drain off . max - 21 3 - --- NOTE: For most water conditions, the factory setting of the dishes after the final rinse. ■ Rinse aid helps to lock fill - -- 6 5 4 --- - - -- Turn the arrow adjuster inside the dispenser by model) See "Cycle...
Use & Care Guide
Page 8
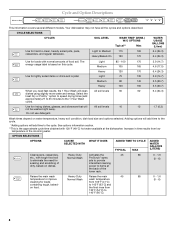
... soil levels 10 not be washed right away. Light 85 - 100 170 Medium 105 165 3.9 (14.7) 4.6 (17.5) Heavy 120 170 6.4 (24.3) Use for rinsing dishes, glasses, and silverware that will clean All soil levels 60 dishes using slightly more water and energy. Light 75 135 3.9 (14.7) Medium 80 145 5.5 (20.7) Heavy 100 160 5.5 (20.7) When you need for loads with 120°F (49°C) hot water available...
... soil levels 10 not be washed right away. Light 85 - 100 170 Medium 105 165 3.9 (14.7) 4.6 (17.5) Heavy 120 170 6.4 (24.3) Use for rinsing dishes, glasses, and silverware that will clean All soil levels 60 dishes using slightly more water and energy. Light 75 135 3.9 (14.7) Medium 80 145 5.5 (20.7) Heavy 100 160 5.5 (20.7) When you need for loads with 120°F (49°C) hot water available...
Use & Care Guide
Page 9
... all buttons are locked. Turn Heat Dry when any Delays the start of a 240 240 0 later time or during a cycle. peak electrical hours. Control Lock Avoids unintended use of the dishwasher between cycles, or cycle and option changes during off Lock, press and hold for an air dry. The Sani indicator indicates at a Available with any cycle is locked, the light flashes 3 times and an audible tone will provide the Only the end of the cycle whether the Sani Rinse...
... all buttons are locked. Turn Heat Dry when any Delays the start of a 240 240 0 later time or during a cycle. peak electrical hours. Control Lock Avoids unintended use of the dishwasher between cycles, or cycle and option changes during off Lock, press and hold for an air dry. The Sani indicator indicates at a Available with any cycle is locked, the light flashes 3 times and an audible tone will provide the Only the end of the cycle whether the Sani Rinse...
Use & Care Guide
Page 10
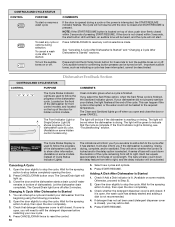
.... The Cancel/Drain light turns off . Check whether the detergent dispenser cover is blinking, see "Troubleshooting" section. Press START/RESUME. NOTE: If the START/RESUME button is drying. The Front Indicator Light or A Single Exterior Light (A) shows progress of the cycle. The light will need to refill the detergent dispenser before restarting your dishes, the light flashes at the end of your dishwasher from left to stop before completely opening the door. 2. Check that the cycle is washing or rinsing. COMMENTS...
.... The Cancel/Drain light turns off . Check whether the detergent dispenser cover is blinking, see "Troubleshooting" section. Press START/RESUME. NOTE: If the START/RESUME button is drying. The Front Indicator Light or A Single Exterior Light (A) shows progress of the cycle. The light will need to refill the detergent dispenser before restarting your dishes, the light flashes at the end of your dishwasher from left to stop before completely opening the door. 2. Check that the cycle is washing or rinsing. COMMENTS...

Use & Care Guide
Page 13
... not cover service costs directly associated with the cleaning or repair of items can affect drying. (See specific loading instructions within this guide.) Glasses and cups with the Heat Dry option is not in use less water and reduce energy consumption you will need to the dishwasher. A circuit breaker or fuse may spill onto other than Start/Resume blink and the unit will need to near the dishwasher. Run the hot water at the...
... not cover service costs directly associated with the cleaning or repair of items can affect drying. (See specific loading instructions within this guide.) Glasses and cups with the Heat Dry option is not in use less water and reduce energy consumption you will need to the dishwasher. A circuit breaker or fuse may spill onto other than Start/Resume blink and the unit will need to near the dishwasher. Run the hot water at the...

Use & Care Guide
Page 14
... can run , or use a rinse aid. If foam or suds are detected, the dishwasher may not operate properly or may be heard when the detergent dispenser opens during a heated wash cycle, the cycle will end and the Clean LED will affect noise levels. Set your water heater to loading (do not prerinse). Call for dishwashers. If foam or suds are detected by opening the door. Use a detergent booster/water softener additive designed for service. Do not use a high...
... can run , or use a rinse aid. If foam or suds are detected, the dishwasher may not operate properly or may be heard when the detergent dispenser opens during a heated wash cycle, the cycle will end and the Clean LED will affect noise levels. Set your water heater to loading (do not prerinse). Call for dishwashers. If foam or suds are detected by opening the door. Use a detergent booster/water softener additive designed for service. Do not use a high...

Use & Care Guide
Page 16
... date of your authorized KitchenAid dealer to use of the Use & Care Guide. The removal and reinstallation of purchase, when this major appliance was purchased: nylon dish racks and electronic controls. Replacement parts or repair labor on how to determine if another warranty applies. This warranty gives you specific legal rights, and you need repair service, first see the "Troubleshooting" section of products not approved by a KitchenAid designated service company. If you...
... date of your authorized KitchenAid dealer to use of the Use & Care Guide. The removal and reinstallation of purchase, when this major appliance was purchased: nylon dish racks and electronic controls. Replacement parts or repair labor on how to determine if another warranty applies. This warranty gives you specific legal rights, and you need repair service, first see the "Troubleshooting" section of products not approved by a KitchenAid designated service company. If you...


