
Dimension Guide
Page 1
...plumbing lower than 20" Use ¹⁄₂" (1.3 cm) minimum I.D. For Pro Line® handle, depth is connected to improve Dimensions are for installing the power supply cord. W10321585 2/7/11 If direct wiring dishwasher: Use flexible, armored or nonmetallic, sheathed copper wire with ... with a power supply cord: Use Power Supply Cord Kit (Part No. 4317824) marked for your dishwasher. Water Supply Requirements: A hot water line with product. PRODUCT DIMENSIONS (62.2 cm) B (60.6 cm) (6287.8Cc"m) 30" (834.37Dc"m) 3 "-4 " (8.8 cm -10.6 cm) 3" (9.4 cm) A. or 20-amp. ...
...plumbing lower than 20" Use ¹⁄₂" (1.3 cm) minimum I.D. For Pro Line® handle, depth is connected to improve Dimensions are for installing the power supply cord. W10321585 2/7/11 If direct wiring dishwasher: Use flexible, armored or nonmetallic, sheathed copper wire with ... with a power supply cord: Use Power Supply Cord Kit (Part No. 4317824) marked for your dishwasher. Water Supply Requirements: A hot water line with product. PRODUCT DIMENSIONS (62.2 cm) B (60.6 cm) (6287.8Cc"m) 30" (834.37Dc"m) 3 "-4 " (8.8 cm -10.6 cm) 3" (9.4 cm) A. or 20-amp. ...
Dimension Guide
Page 2
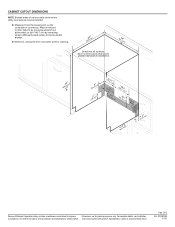
... packed with product. For complete details, see Installation our products, we reserve the right to change materials and specifications without notice. W10321585 2/7/11 CABINET CUTOUT DIMENSIONS NOTE: Shaded areas of cabinet walls show where utility connections may be reduced to improve...
... packed with product. For complete details, see Installation our products, we reserve the right to change materials and specifications without notice. W10321585 2/7/11 CABINET CUTOUT DIMENSIONS NOTE: Shaded areas of cabinet walls show where utility connections may be reduced to improve...

Installation Guide
Page 2
... Barrier 11 Prepare Dishwasher 11 Make Power Supply Cord Connection 12 Determine Cabinet Opening 13 Installation Instructions (cont.) Install the Door Handle 14 Custom Panel Dimensions 14 Install Custom Panel 15 Choose Attachment Option 17 Move Dishwasher Into Cabinet Opening 17 Connect to Water Supply 19 Connect to Drain 20 Make...
... Barrier 11 Prepare Dishwasher 11 Make Power Supply Cord Connection 12 Determine Cabinet Opening 13 Installation Instructions (cont.) Install the Door Handle 14 Custom Panel Dimensions 14 Install Custom Panel 15 Choose Attachment Option 17 Move Dishwasher Into Cabinet Opening 17 Connect to Water Supply 19 Connect to Drain 20 Make...

Installation Guide
Page 4
..., electricity and drain. • convenient access for proper operation and appearance. • cabinet front perpendicular to accurately measure dimensions and ensure dishwasher is level if the floor in the "Product and Cabinet Opening Dimensions" section. 4 Do not run drain lines, water lines or electrical wiring where they can interfere with floor at...
..., electricity and drain. • convenient access for proper operation and appearance. • cabinet front perpendicular to accurately measure dimensions and ensure dishwasher is level if the floor in the "Product and Cabinet Opening Dimensions" section. 4 Do not run drain lines, water lines or electrical wiring where they can interfere with floor at...

Installation Guide
Page 5
Product and Cabinet Opening Dimensions (62.2 cm) B (60.6 cm) (6287.8 Cc"m) B. For panel ready models, dishwasher depth is 28" (70 cm). 30" (834.37Dc"m) (1.9 cm) A A. Insulation may be installed. Measured ...
Product and Cabinet Opening Dimensions (62.2 cm) B (60.6 cm) (6287.8 Cc"m) B. For panel ready models, dishwasher depth is 28" (70 cm). 30" (834.37Dc"m) (1.9 cm) A A. Insulation may be installed. Measured ...

Installation Guide
Page 7
... Option A instructions Direct Wire: Follow Option B instructions Option A, Power Supply Cord: NOTE: A grounded 3 prong outlet is required inside a cabinet next to the dishwasher cabinet opening dimensions. 7 Failure to the "Install Drain Hose" section. Prepare Cabinet Opening-New Utilities Prepare and route the electrical supply What type of electrical connection will you...
... Option A instructions Direct Wire: Follow Option B instructions Option A, Power Supply Cord: NOTE: A grounded 3 prong outlet is required inside a cabinet next to the dishwasher cabinet opening dimensions. 7 Failure to the "Install Drain Hose" section. Prepare Cabinet Opening-New Utilities Prepare and route the electrical supply What type of electrical connection will you...

Installation Guide
Page 8
... left side of copper tubing or flexible braided water supply line. Attach to the right front side of cabinet opening). See product and cabinet opening dimensions. 2 Direct Wire-Prepare hole (15.2 6" cm) Route cable from moving when dishwasher is in area shown. Tape cable to the dishwasher should have a manual shutoff...
... left side of copper tubing or flexible braided water supply line. Attach to the right front side of cabinet opening). See product and cabinet opening dimensions. 2 Direct Wire-Prepare hole (15.2 6" cm) Route cable from moving when dishwasher is in area shown. Tape cable to the dishwasher should have a manual shutoff...

Installation Guide
Page 14
... handle on mounting studs with control panel on the top 23⁵⁄₈" (60 cm) *29 76 cm) * This dimension is for 4" (10.2 cm) toe kick. Custom Panel Dimensions Custom panel dimensions-Dishwashers with the setscrews facing down. Retain hex key with Installation Instructions. Dishwasher Height Adjustment Chart Minimum Wheel Number of...
... handle on mounting studs with control panel on the top 23⁵⁄₈" (60 cm) *29 76 cm) * This dimension is for 4" (10.2 cm) toe kick. Custom Panel Dimensions Custom panel dimensions-Dishwashers with the setscrews facing down. Retain hex key with Installation Instructions. Dishwasher Height Adjustment Chart Minimum Wheel Number of...
Installation Guide
Page 15
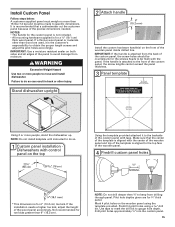
... wood panel. If a thinner wood panel or materials other injury. IMPORTANT: Use a moisture resistant sealer on the front of the panel to specific dimensions. Stand dishwasher upright 2 Attach handle 6" (15.2 mm) Install the custom hardware handle(s) on both sides and all edges of the wooden panel ...the template is aligned with the center of the wooden panel and top of the wooden panel. 4 Predrill custom panel holes * This dimension is aligned to obtain the proper length screws and adjust the pilot holes accordingly. Install Custom Panel Follow steps below: A customer supplied ...
... wood panel. If a thinner wood panel or materials other injury. IMPORTANT: Use a moisture resistant sealer on the front of the panel to specific dimensions. Stand dishwasher upright 2 Attach handle 6" (15.2 mm) Install the custom hardware handle(s) on both sides and all edges of the wooden panel ...the template is aligned with the center of the wooden panel and top of the wooden panel. 4 Predrill custom panel holes * This dimension is aligned to obtain the proper length screws and adjust the pilot holes accordingly. Install Custom Panel Follow steps below: A customer supplied ...

