

Dimension Guide
Page 1
...) 3" (9.4 cm) A. W10321585 2/7/11 or 20-amp. Copper wire only. If connecting dishwasher with a power supply cord: Use Power Supply Cord Kit (Part No. 4317824) marked for use an air gap if the drain hose is not long enough, use a new drain hose with dishwashers. If required, the...gap should be installed in the cabinet next to change materials and specifications without notice. (1.9 cm) A Page 1 of 12' (3.7 m) (Part No. 3385556) that meets the wiring requirements for your dishwasher. Insulation may be needed to connect to 862 kPa) water pressure. fuesd electrical supply...
...) 3" (9.4 cm) A. W10321585 2/7/11 or 20-amp. Copper wire only. If connecting dishwasher with a power supply cord: Use Power Supply Cord Kit (Part No. 4317824) marked for use an air gap if the drain hose is not long enough, use a new drain hose with dishwashers. If required, the...gap should be installed in the cabinet next to change materials and specifications without notice. (1.9 cm) A Page 1 of 12' (3.7 m) (Part No. 3385556) that meets the wiring requirements for your dishwasher. Insulation may be needed to connect to 862 kPa) water pressure. fuesd electrical supply...

Installation Guide
Page 2
... dishwasher door while someone grasps the rear of the dishwasher. All safety messages will follow instructions. Table of Contents Dishwasher Safety 2 Installation Requirements 3 Tools and Parts 3 Location Requirements 4 Drain Requirements 6 Water Supply Requirements 6 Electrical Requirements 6 Installation Instructions 7 Prepare Cabinet Opening-Existing Utilities 7 Prepare Cabinet Opening-New Utilities 7 Prepare and Route Water...
... dishwasher door while someone grasps the rear of the dishwasher. All safety messages will follow instructions. Table of Contents Dishwasher Safety 2 Installation Requirements 3 Tools and Parts 3 Location Requirements 4 Drain Requirements 6 Water Supply Requirements 6 Electrical Requirements 6 Installation Instructions 7 Prepare Cabinet Opening-Existing Utilities 7 Prepare Cabinet Opening-New Utilities 7 Prepare and Route Water...

Installation Guide
Page 3
... and 1¹⁄₂" hole saw bits Small tubing cutter Wire stripper Shallow pan Wood block Parts supplied: Drain hose Drain hose 2 - Additional parts supplied with any tools listed here. Read and follow the instructions provided with certain models only: ...package. Check local codes. See "Electrical Requirements" section. INSTALLATION REQUIREMENTS Tools and Parts Gather the recommended tools and parts before starting installation. All Installations Tools needed : Copp O.D. NOTE: Parts available for only ³⁄₄" thick wooden panel. counter custom (1 large ...
... and 1¹⁄₂" hole saw bits Small tubing cutter Wire stripper Shallow pan Wood block Parts supplied: Drain hose Drain hose 2 - Additional parts supplied with any tools listed here. Read and follow the instructions provided with certain models only: ...package. Check local codes. See "Electrical Requirements" section. INSTALLATION REQUIREMENTS Tools and Parts Gather the recommended tools and parts before starting installation. All Installations Tools needed : Copp O.D. NOTE: Parts available for only ³⁄₄" thick wooden panel. counter custom (1 large ...

Installation Guide
Page 4
Motor should not touch the floor. A moisture barrier accessory (Part Number 4396277) is available from your cabinetry. Call 1-800-422-1230 to dishwasher against freezing. Corner locations require a 2" (5.1 cm) minimum clearance between motor and flooring. ...
Motor should not touch the floor. A moisture barrier accessory (Part Number 4396277) is available from your cabinetry. Call 1-800-422-1230 to dishwasher against freezing. Corner locations require a 2" (5.1 cm) minimum clearance between motor and flooring. ...

Installation Guide
Page 6
...your dishwasher. or 20-amp, fused electrical supply. • Copper wire only. copper tubing with compression fitting or flexible braided water supply line (Part Number 4396897RP) NOTE: ¹⁄₂" minimum plastic tubing is not recommended. • A 90° elbow with ³⁄₄" hose..., copper wire with grounding wire that meets the wiring requirements for use a new drain hose with a maximum length of 12' (3.7 m) (Part Number 3385556) that the electrical connection and wire size are connecting the air gap, a rubber hose (not provided) will be needed to connect...
...your dishwasher. or 20-amp, fused electrical supply. • Copper wire only. copper tubing with compression fitting or flexible braided water supply line (Part Number 4396897RP) NOTE: ¹⁄₂" minimum plastic tubing is not recommended. • A 90° elbow with ³⁄₄" hose..., copper wire with grounding wire that meets the wiring requirements for use a new drain hose with a maximum length of 12' (3.7 m) (Part Number 3385556) that the electrical connection and wire size are connecting the air gap, a rubber hose (not provided) will be needed to connect...

Installation Guide
Page 8
... opening . Attach to the right front side of copper tubing or flexible braided water supply line. Metal cabinet: Cover hole with grommet included with grommet (Part Number 302797 - Tape cable to the dishwasher should have a manual shutoff valve. Metal cabinet: Cover hole with power supply cord kit. Drill hole Optional location...
... opening . Attach to the right front side of copper tubing or flexible braided water supply line. Metal cabinet: Cover hole with grommet included with grommet (Part Number 302797 - Tape cable to the dishwasher should have a manual shutoff valve. Metal cabinet: Cover hole with power supply cord kit. Drill hole Optional location...

Installation Guide
Page 12
... conduit nut. Strain relief is provided with a towel to avoid damaging floor covering. Take notice when installing or removing the dishwasher in order to lower part of your power supply cord to 16-gauge dishwasher wiring. Using two or more people, grasp sides of dishwasher door frame and place dishwasher on...
... conduit nut. Strain relief is provided with a towel to avoid damaging floor covering. Take notice when installing or removing the dishwasher in order to lower part of your power supply cord to 16-gauge dishwasher wiring. Using two or more people, grasp sides of dishwasher door frame and place dishwasher on...
Installation Guide
Page 17
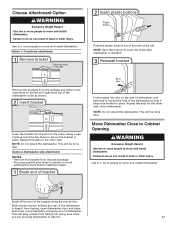
... out of the side of dishwasher. NOTE: Save the buttons to cover the holes after dishwasher is installed. 3 Reinstall bracket Remove the brackets from the parts package. • You must point to move and install dishwasher. Failure to keep screws from tipping, open slots on the collar. With another person holding...
... out of the side of dishwasher. NOTE: Save the buttons to cover the holes after dishwasher is installed. 3 Reinstall bracket Remove the brackets from the parts package. • You must point to move and install dishwasher. Failure to keep screws from tipping, open slots on the collar. With another person holding...

Installation Guide
Page 20
.../drain under FAQ tab. Strain relief is connected, remove towel. Visit www.kitchenaid.com/watersupply under FAQ tab. Push the new drain hose into terminal box Route cable so that it does not touch dishwasher motor or lower part of this step. Select UL Listed/CSA Approved twist-on water supply and...
.../drain under FAQ tab. Strain relief is connected, remove towel. Visit www.kitchenaid.com/watersupply under FAQ tab. Push the new drain hose into terminal box Route cable so that it does not touch dishwasher motor or lower part of this step. Select UL Listed/CSA Approved twist-on water supply and...

Installation Guide
Page 24
... death, fire, or electrical shock. 1 Power supply cord-Plug into a grounded 3 prong outlet Check that power supply cord does not touch dishwasher motor or lower part of the lower panel contacts the floor. Tighten access panel screws. 24 Check that grounding clip is insulation on the lower panel. 2 Reinstall access panels...
... death, fire, or electrical shock. 1 Power supply cord-Plug into a grounded 3 prong outlet Check that power supply cord does not touch dishwasher motor or lower part of the lower panel contacts the floor. Tighten access panel screws. 24 Check that grounding clip is insulation on the lower panel. 2 Reinstall access panels...

Installation Guide
Page 25
... tightly and latched? • Has the cycle been set correctly to optical sensor. Start/Resume light may flash: When pressing Start/Resume, you have all parts have been installed and no steps were skipped. If the dishwasher is designed to complete the shortest wash cycle. Selecting certain options could increase cycle...
... tightly and latched? • Has the cycle been set correctly to optical sensor. Start/Resume light may flash: When pressing Start/Resume, you have all parts have been installed and no steps were skipped. If the dishwasher is designed to complete the shortest wash cycle. Selecting certain options could increase cycle...
Use & Care Guide
Page 1
... del interior de la lavavajillas. We hold our company to the highest quality standards and it is important to us at www.kitchenaid.com. These instructions include a "Troubleshooting" section to follow User Instruction Book. For your complete model and serial number ready. Para...serie. If you have provided an easy to help you through any problems you for Choosing KitchenAid® Appliances. You can visit the Frequently Asked Questions (FAQs) section of Contents DISHWASHER SAFETY 2 PARTS AND FEATURES 4 START-UP / QUICK REFERENCE 5 QUICK STEPS 6 DISHWASHER USE 6 CYCLE ...
... del interior de la lavavajillas. We hold our company to the highest quality standards and it is important to us at www.kitchenaid.com. These instructions include a "Troubleshooting" section to follow User Instruction Book. For your complete model and serial number ready. Para...serie. If you have provided an easy to help you through any problems you for Choosing KitchenAid® Appliances. You can visit the Frequently Asked Questions (FAQs) section of Contents DISHWASHER SAFETY 2 PARTS AND FEATURES 4 START-UP / QUICK REFERENCE 5 QUICK STEPS 6 DISHWASHER USE 6 CYCLE ...

Use & Care Guide
Page 4
... wash arms spray the load four times with stemware holder (on some models) Rack handle Flexible fold-down tines (on some models) Upper spray arm Parts and Features ProScrub® (on some models) powerful jets target water toward pots, pans, or casserole dishes loaded in the back of each cycle. Lower...
... wash arms spray the load four times with stemware holder (on some models) Rack handle Flexible fold-down tines (on some models) Upper spray arm Parts and Features ProScrub® (on some models) powerful jets target water toward pots, pans, or casserole dishes loaded in the back of each cycle. Lower...

Use & Care Guide
Page 13
...will add time to repeatedly pause several times during the summer months, turn off the chrome cover. In the U.S.A., www.kitchenaid.com In Canada, www.kitchenaid.ca PROBLEM SOLUTION DISHWASHER DOES NOT RUN NOTE: It is normal for service. A circuit breaker or fuse may be blocking... collect water droplets. Try the 1 Hour Wash cycle. Adjust loading as cookie sheets, cutting boards, or large containers, etc., that is not part of the sink or countertop near freezing temperatures, have selected a cycle. (See "Cycles and Options Descriptions" section.) Be sure there is power...
...will add time to repeatedly pause several times during the summer months, turn off the chrome cover. In the U.S.A., www.kitchenaid.com In Canada, www.kitchenaid.ca PROBLEM SOLUTION DISHWASHER DOES NOT RUN NOTE: It is normal for service. A circuit breaker or fuse may be blocking... collect water droplets. Try the 1 Hour Wash cycle. Adjust loading as cookie sheets, cutting boards, or large containers, etc., that is not part of the sink or countertop near freezing temperatures, have selected a cycle. (See "Cycles and Options Descriptions" section.) Be sure there is power...

Use & Care Guide
Page 14
... when the cycle is paused or when the cycle has been interrupted by closing the door and pressing START/RESUME. Scrape food from obstructions. (See "Parts and Features.") Check for suds in between blinks. Suds can come on the Cycle Status Display all blink together to indicate that the float is...
... when the cycle is paused or when the cycle has been interrupted by closing the door and pressing START/RESUME. Scrape food from obstructions. (See "Parts and Features.") Check for suds in between blinks. Suds can come on the Cycle Status Display all blink together to indicate that the float is...

Use & Care Guide
Page 16
...when this major appliance is operated and maintained according to instructions attached to or furnished with the product, KitchenAid will pay for factory specified parts for the following components to correct defects in materials or workmanship that existed when this major appliance was ...to instructions attached to resolve the problem after checking "Troubleshooting," additional help can be repaired in accordance with KitchenAid's published installation instructions. 11. Consumable parts are unable to or furnished with electrical or plumbing codes, or use or when it is used in...
...when this major appliance is operated and maintained according to instructions attached to or furnished with the product, KitchenAid will pay for factory specified parts for the following components to correct defects in materials or workmanship that existed when this major appliance was ...to instructions attached to resolve the problem after checking "Troubleshooting," additional help can be repaired in accordance with KitchenAid's published installation instructions. 11. Consumable parts are unable to or furnished with electrical or plumbing codes, or use or when it is used in...


