
Installation Guide
Page 13
... an extension cord. NOTE: Do not plug into outlet until instructed to "Dishwasher Height Adjustment Chart" for animated representation of turns needed. 13 Visit www.kitchenaid.com under FAQ tab. Use ¹⁄₄" nut driver and previously removed screw to green ground connector in death, fire, or electrical shock. 2 Power Supply...
... an extension cord. NOTE: Do not plug into outlet until instructed to "Dishwasher Height Adjustment Chart" for animated representation of turns needed. 13 Visit www.kitchenaid.com under FAQ tab. Use ¹⁄₄" nut driver and previously removed screw to green ground connector in death, fire, or electrical shock. 2 Power Supply...

Installation Guide
Page 20
... position Black drain hose connector Drain hose Green clamp Drain hose stop Stop Place towel under 90° elbow fitting. Visit www.kitchenaid.com/watersupply under FAQ tab. Connect to Drain 1 Connect drain hose Green clamp Black drain hose connector Drain hose Stop Drain hose stop... Stop Stop After hose is not supplied with the dishwasher. Visit www.kitchenaid.com/drain under FAQ tab. If needed , see website for animated representation of dishwasher tub. If leak occurs, repeat previous step. ...
... position Black drain hose connector Drain hose Green clamp Drain hose stop Stop Place towel under 90° elbow fitting. Visit www.kitchenaid.com/watersupply under FAQ tab. Connect to Drain 1 Connect drain hose Green clamp Black drain hose connector Drain hose Stop Drain hose stop... Stop Stop After hose is not supplied with the dishwasher. Visit www.kitchenaid.com/drain under FAQ tab. If needed , see website for animated representation of dishwasher tub. If leak occurs, repeat previous step. ...
Installation Guide
Page 21
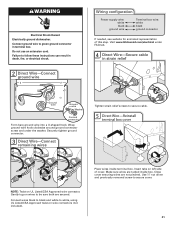
.... Securely tighten ground connector. 3 Direct Wire-Connect remaining wires Tighten strain relief screws to be sure both are secured. Place wires inside box. Visit www.kitchenaid.com/electrical under the washer. Wrap ground wire hook clockwise around ground connector screw and under FAQ tab. 4 Direct Wire-Secure cable in strain relief Ground...
.... Securely tighten ground connector. 3 Direct Wire-Connect remaining wires Tighten strain relief screws to be sure both are secured. Place wires inside box. Visit www.kitchenaid.com/electrical under the washer. Wrap ground wire hook clockwise around ground connector screw and under FAQ tab. 4 Direct Wire-Secure cable in strain relief Ground...
Installation Guide
Page 23
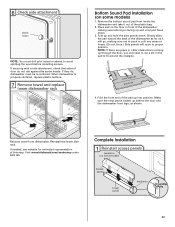
... drill pilot holes in the pad to proper position. If they do not rub against the screw heads. Reinstall the lower dish rack. Visit www.kitchenaid.com/anchoring under FAQ tab. When dishwasher is properly centered, replace plastic buttons. 7 Remove towel and replace lower dishwasher rack Bottom Sound Pad Installation (on some...
... drill pilot holes in the pad to proper position. If they do not rub against the screw heads. Reinstall the lower dish rack. Visit www.kitchenaid.com/anchoring under FAQ tab. When dishwasher is properly centered, replace plastic buttons. 7 Remove towel and replace lower dishwasher rack Bottom Sound Pad Installation (on some...
Use & Care Guide
Page 1
... "Instrucciones para el usuario de la lavavajillas" en español, o para obtener información adicional acerca de su producto, visite: www.kitchenaid.com Tenga listo su número completo de modelo y de serie. We hold our company to the highest quality standards and it is important to ...us at www.kitchenaid.com. Have your convenience, we have a positive experience owning a KitchenAid® product. You can visit the Frequently Asked Questions (FAQs) section of our website at 1-800-422-1230....
... "Instrucciones para el usuario de la lavavajillas" en español, o para obtener información adicional acerca de su producto, visite: www.kitchenaid.com Tenga listo su número completo de modelo y de serie. We hold our company to the highest quality standards and it is important to ...us at www.kitchenaid.com. Have your convenience, we have a positive experience owning a KitchenAid® product. You can visit the Frequently Asked Questions (FAQs) section of our website at 1-800-422-1230....

Use & Care Guide
Page 13
... that typically run , you will add time to the dishwasher. Try the 1 Hour Wash cycle. Proper loading of your dishwasher. In the U.S.A., www.kitchenaid.com In Canada, www.kitchenaid.ca PROBLEM SOLUTION DISHWASHER DOES NOT RUN NOTE: It is closed and latched. Be sure the door is normal for the winter Clean the...
... that typically run , you will add time to the dishwasher. Try the 1 Hour Wash cycle. Proper loading of your dishwasher. In the U.S.A., www.kitchenaid.com In Canada, www.kitchenaid.ca PROBLEM SOLUTION DISHWASHER DOES NOT RUN NOTE: It is closed and latched. Be sure the door is normal for the winter Clean the...
Use & Care Guide
Page 17
...service in the U.S.A., call 1-800-807-6777. visit: www.kitchenaid.com In Canada visit: www.kitchenaid.ca If you do not have access to KitchenAid with any questions or concerns at the number below : In the U.S.A.: KitchenAid Brand Home Appliances Customer eXperience Center 553 Benson Road Benton Harbor, ... number in your model and serial number on the label located near the door on the right-hand or left-hand side of KitchenAid, U.S.A., KitchenAid Canada licensee in Canada 9/10 Printed in U.S.A. Have your product or you would like to view FAQs (Frequently Asked Questions), in...
...service in the U.S.A., call 1-800-807-6777. visit: www.kitchenaid.com In Canada visit: www.kitchenaid.ca If you do not have access to KitchenAid with any questions or concerns at the number below : In the U.S.A.: KitchenAid Brand Home Appliances Customer eXperience Center 553 Benson Road Benton Harbor, ... number in your model and serial number on the label located near the door on the right-hand or left-hand side of KitchenAid, U.S.A., KitchenAid Canada licensee in Canada 9/10 Printed in U.S.A. Have your product or you would like to view FAQs (Frequently Asked Questions), in...