

Dimension Guide
Page 1
.... PRODUCT DIMENSIONS (62.2 cm) B (60.6 cm) (6287.8Cc"m) 30" (834.37Dc"m) 3 "-4 " (8.8 cm -10.6 cm) 3" (9.4 cm) A. Power supply cord must meet all models) B. Water temperature must be needed to connect to the dishwasher opening. external pipe threads on all local codes and... including the C. Drain Requirements: A new drain hose is recommended air gap that meets the wiring requirements for installing the power supply cord. For panel ready models, dishwasher depth is recommended. ® Undercounter Dishwasher PRODUCT MODEL NUMBERS KUDC10FX KUDC10IX KUDE20FX ...
.... PRODUCT DIMENSIONS (62.2 cm) B (60.6 cm) (6287.8Cc"m) 30" (834.37Dc"m) 3 "-4 " (8.8 cm -10.6 cm) 3" (9.4 cm) A. Power supply cord must meet all models) B. Water temperature must be needed to connect to the dishwasher opening. external pipe threads on all local codes and... including the C. Drain Requirements: A new drain hose is recommended air gap that meets the wiring requirements for installing the power supply cord. For panel ready models, dishwasher depth is recommended. ® Undercounter Dishwasher PRODUCT MODEL NUMBERS KUDC10FX KUDC10IX KUDE20FX ...

Installation Guide
Page 2
... Opening-Existing Utilities 7 Prepare Cabinet Opening-New Utilities 7 Prepare and Route Water Line 8 Install Drain Hose 10 Install Moisture Barrier 11 Prepare Dishwasher 11 Make Power Supply Cord Connection 12 Determine Cabinet Opening 13 Installation Instructions (cont.) Install the Door Handle 14 Custom Panel Dimensions 14 Install Custom Panel 15 Choose...
... Opening-Existing Utilities 7 Prepare Cabinet Opening-New Utilities 7 Prepare and Route Water Line 8 Install Drain Hose 10 Install Moisture Barrier 11 Prepare Dishwasher 11 Make Power Supply Cord Connection 12 Determine Cabinet Opening 13 Installation Instructions (cont.) Install the Door Handle 14 Custom Panel Dimensions 14 Install Custom Panel 15 Choose...

Installation Guide
Page 3
... than ³⁄₄" thick, customer must purchase screws locally. For Direct Wire: use UL Listed/ CSA Approved strain relief hole For Power Supply Cord: use UL Listed/CSA Approved power supply cord kit marked for first-time installations Tools needed : Pliers Flat-blade screwdriver Phillips screwdriver Utility knife " " nut drivers or...
... than ³⁄₄" thick, customer must purchase screws locally. For Direct Wire: use UL Listed/ CSA Approved strain relief hole For Power Supply Cord: use UL Listed/CSA Approved power supply cord kit marked for first-time installations Tools needed : Pliers Flat-blade screwdriver Phillips screwdriver Utility knife " " nut drivers or...

Installation Guide
Page 6
...or 20-amp, fused electrical supply. • Copper wire only. When you are adequate and in conformance with dishwasher. • Power supply cord must plug into a grounded 3 prong outlet, located in the cabinet next to the dishwasher opening. Electrical Requirements Be sure ... disposer inlet. We recommend: • A time-delay fuse or circuit breaker. • A separate circuit. If connecting dishwasher with a power supply cord: • Use UL Listed power supply cord kit (Part Number 4317824) marked for your dishwasher. If drain hose is not long enough, use a new drain hose with...
...or 20-amp, fused electrical supply. • Copper wire only. When you are adequate and in conformance with dishwasher. • Power supply cord must plug into a grounded 3 prong outlet, located in the cabinet next to the dishwasher opening. Electrical Requirements Be sure ... disposer inlet. We recommend: • A time-delay fuse or circuit breaker. • A separate circuit. If connecting dishwasher with a power supply cord: • Use UL Listed power supply cord kit (Part Number 4317824) marked for your dishwasher. If drain hose is not long enough, use a new drain hose with...

Installation Guide
Page 7
... locations shown, proceed to do not reach far enough, follow the instructions in death or electrical shock. 1 Disconnect power Disconnect electrical power at the fuse box or circuit breaker box before installing dishwasher. 2 3 Do you use? See product and cabinet opening... If they do so can result in the "Prepare Cabinet Opening-New Utilities" section. INSTALLATION INSTRUCTIONS Electrical Shock Hazard Disconnect electrical power at the fuse box or circuit breaker box before installing dishwasher. Prepare Cabinet Opening-New Utilities Prepare and route the electrical supply ...
... locations shown, proceed to do not reach far enough, follow the instructions in death or electrical shock. 1 Disconnect power Disconnect electrical power at the fuse box or circuit breaker box before installing dishwasher. 2 3 Do you use? See product and cabinet opening... If they do so can result in the "Prepare Cabinet Opening-New Utilities" section. INSTALLATION INSTRUCTIONS Electrical Shock Hazard Disconnect electrical power at the fuse box or circuit breaker box before installing dishwasher. Prepare Cabinet Opening-New Utilities Prepare and route the electrical supply ...

Installation Guide
Page 8
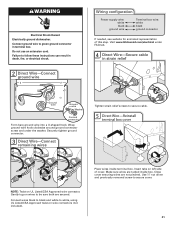
...: Sand the hole until smooth. See product and cabinet opening dimensions. 2 Direct Wire-Prepare hole (15.2 6" cm) Route cable from power supply through the left side of cabinet opening from moving when dishwasher is in area shown. Prepare and Route Water Line Helpful Tip: Routing...hole in right-hand cabinet side or rear. not provided). 8 Hot water line Measure overall length of cabinet opening . Metal cabinet: Cover hole with power supply cord kit. Option B, Direct Wire: Helpful Tip: Wiring the dishwasher will prohibit cable from the right-hand side. 1 Direct Wire - Attach ...
...: Sand the hole until smooth. See product and cabinet opening dimensions. 2 Direct Wire-Prepare hole (15.2 6" cm) Route cable from power supply through the left side of cabinet opening from moving when dishwasher is in area shown. Prepare and Route Water Line Helpful Tip: Routing...hole in right-hand cabinet side or rear. not provided). 8 Hot water line Measure overall length of cabinet opening . Metal cabinet: Cover hole with power supply cord kit. Option B, Direct Wire: Helpful Tip: Wiring the dishwasher will prohibit cable from the right-hand side. 1 Direct Wire - Attach ...

Installation Guide
Page 12
... hex head socket, nut driver or Phillips screwdriver, remove 2 screws attaching access panel and lower panel to reduce the chance of damaging the power supply cord. Retain for later use. 4 Route cord so that it does not touch dishwasher motor to 16-gauge dishwasher wiring. Do not... use ? Make Power Supply Cord Connection Option A, Power Supply Cord: 1 Power Cord-Route cord into terminal box Using a ¹⁄₄" hex head socket, nut driver or Phillips screwdriver, remove ...
... hex head socket, nut driver or Phillips screwdriver, remove 2 screws attaching access panel and lower panel to reduce the chance of damaging the power supply cord. Retain for later use. 4 Route cord so that it does not touch dishwasher motor to 16-gauge dishwasher wiring. Do not... use ? Make Power Supply Cord Connection Option A, Power Supply Cord: 1 Power Cord-Route cord into terminal box Using a ¹⁄₄" hex head socket, nut driver or Phillips screwdriver, remove ...

Installation Guide
Page 13
... need to do so. Gently tug on wire connectors (included with power supply cord kit). Visit www.kitchenaid.com under FAQ tab. Connect ground wire Tighten strain relief screws to secure cord. 5 Power Cord-Reinstall terminal box cover Ground wire Ground wire Washer Ground connector Remove... box wire: white black ground connector If needed . 13 Refer to green ground connector in death, fire, or electrical shock. 2 Power Supply Cord- Measure height of cabinet opening NOTE: Twist on strain relief Electrical Shock Hazard Electrically ground dishwasher. Connect ground wire to "...
... need to do so. Gently tug on wire connectors (included with power supply cord kit). Visit www.kitchenaid.com under FAQ tab. Connect ground wire Tighten strain relief screws to secure cord. 5 Power Cord-Reinstall terminal box cover Ground wire Ground wire Washer Ground connector Remove... box wire: white black ground connector If needed . 13 Refer to green ground connector in death, fire, or electrical shock. 2 Power Supply Cord- Measure height of cabinet opening NOTE: Twist on strain relief Electrical Shock Hazard Electrically ground dishwasher. Connect ground wire to "...

Installation Guide
Page 19
Do not kink or pinch water line, drain hose, power supply cord or direct wire between dishwasher and cabinet. NOTES: • It is all right if dishwasher fits tightly into cabinet opening. Check that is ... against top front opening of tub. An additional ¹⁄₄ to ¹⁄₂ turn may be easier to adjust the front leg using power cord, make sure to route end through hole in cutout before sliding dishwasher into cabinet opening. • For models with water softener, make sure that...
Do not kink or pinch water line, drain hose, power supply cord or direct wire between dishwasher and cabinet. NOTES: • It is all right if dishwasher fits tightly into cabinet opening. Check that is ... against top front opening of tub. An additional ¹⁄₄ to ¹⁄₂ turn may be easier to adjust the front leg using power cord, make sure to route end through hole in cutout before sliding dishwasher into cabinet opening. • For models with water softener, make sure that...

Installation Guide
Page 20
... green drain hose clamp onto the small end of dishwasher tub. Visit www.kitchenaid.com/drain under 90° elbow fitting. 2 Check for leaks Place paper towel under FAQ tab. Visit www.kitchenaid.com/watersupply under drain hose to catch any water in type strain relief. If... (not included) rated to connect your household wiring to "Secure Dishwasher in terminal box. Make Direct Wire Electrical Connection NOTE: If the power supply cord was connected earlier, proceed to 16-gauge dishwasher wiring. Owner must purchase a ⁷⁄₈" screw-in drain hose. ...
... green drain hose clamp onto the small end of dishwasher tub. Visit www.kitchenaid.com/drain under 90° elbow fitting. 2 Check for leaks Place paper towel under FAQ tab. Visit www.kitchenaid.com/watersupply under drain hose to catch any water in type strain relief. If... (not included) rated to connect your household wiring to "Secure Dishwasher in terminal box. Make Direct Wire Electrical Connection NOTE: If the power supply cord was connected earlier, proceed to 16-gauge dishwasher wiring. Owner must purchase a ⁷⁄₈" screw-in drain hose. ...
Installation Guide
Page 21
...inside terminal box. Use ¹⁄₄" nut driver and previously removed screw to green ground connector in terminal box. Visit www.kitchenaid.com/electrical under the washer. Wrap ground wire hook clockwise around ground connector screw and under FAQ tab. 4 Direct Wire-Secure cable... in death, fire, or electrical shock. 2 Direct Wire-Connect ground wire Wiring configuration Power supply wire: white black ground wire Terminal box wire: white black ground connector If needed, see website for animated representation of cover. ...
...inside terminal box. Use ¹⁄₄" nut driver and previously removed screw to green ground connector in terminal box. Visit www.kitchenaid.com/electrical under the washer. Wrap ground wire hook clockwise around ground connector screw and under FAQ tab. 4 Direct Wire-Secure cable... in death, fire, or electrical shock. 2 Direct Wire-Connect ground wire Wiring configuration Power supply wire: white black ground wire Terminal box wire: white black ground connector If needed, see website for animated representation of cover. ...

Installation Guide
Page 24
...can result in the lower panel. 3 Check lower panel edge WARNING Electrical Shock Hazard Plug into a grounded 3 prong outlet. Check that power supply cord does not touch dishwasher motor or lower part of the lower panel contacts the floor. Adjust if necessary. 4 Tighten screws Plug... the access panel and the slots in death, fire, or electrical shock. 1 Power supply cord-Plug into a grounded 3 prong outlet. Do not remove ground prong. Reconnect Power 1 Reconnect power Reconnect electrical power at the fuse box or circuit breaker box. Check that grounding clip is insulation ...
...can result in the lower panel. 3 Check lower panel edge WARNING Electrical Shock Hazard Plug into a grounded 3 prong outlet. Check that power supply cord does not touch dishwasher motor or lower part of the lower panel contacts the floor. Adjust if necessary. 4 Tighten screws Plug... the access panel and the slots in death, fire, or electrical shock. 1 Power supply cord-Plug into a grounded 3 prong outlet. Do not remove ground prong. Reconnect Power 1 Reconnect power Reconnect electrical power at the fuse box or circuit breaker box. Check that grounding clip is insulation ...

Installation Guide
Page 25
... of rinse aid for future reference. 25 Your new dishwasher will run longer to calibrate to optical sensor. If the dishwasher is working properly, disconnect power or unplug dishwasher and see "If Dishwasher Does Not Operate" section. Additional Tips Expect longer wash times. Selecting certain options could increase cycle time past...
... of rinse aid for future reference. 25 Your new dishwasher will run longer to calibrate to optical sensor. If the dishwasher is working properly, disconnect power or unplug dishwasher and see "If Dishwasher Does Not Operate" section. Additional Tips Expect longer wash times. Selecting certain options could increase cycle time past...

Use & Care Guide
Page 4
... stemware holder (on some models) Rack handle Flexible fold-down tines (on some models) Upper spray arm Parts and Features ProScrub® (on some models) powerful jets target water toward pots, pans, or casserole dishes loaded in the back of each cycle." Detergent dispenser Active vents Premium top rack adjusters (on...
... stemware holder (on some models) Rack handle Flexible fold-down tines (on some models) Upper spray arm Parts and Features ProScrub® (on some models) powerful jets target water toward pots, pans, or casserole dishes loaded in the back of each cycle." Detergent dispenser Active vents Premium top rack adjusters (on...
Use & Care Guide
Page 8
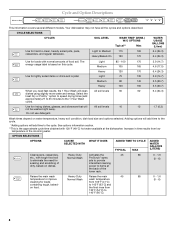
... wash temperature cleaning for loads from 105°F (41°C) containing tough, baked- Increase in time results from 130°F (54°C) to the cycle. power to items at the dishwasher. SOIL LEVEL WASH TIME* (MINS.) W/O OPTIONS Typical** Max Light to provide soaking and scrubbing of food soil. Light 85 - 100...
... wash temperature cleaning for loads from 105°F (41°C) containing tough, baked- Increase in time results from 130°F (54°C) to the cycle. power to items at the dishwasher. SOIL LEVEL WASH TIME* (MINS.) W/O OPTIONS Typical** Max Light to provide soaking and scrubbing of food soil. Light 85 - 100...
Use & Care Guide
Page 10
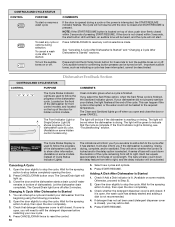
... or rinsing. Important audible tones, such as indicating a cycle has been interrupted, cannot be heated to reset any cycle or options during a cycle or the power is closed within 3 seconds of the dishwasher cycle. Located on the front of the dishwasher for confirming button presses can be heard, and the cycle...
... or rinsing. Important audible tones, such as indicating a cycle has been interrupted, cannot be heated to reset any cycle or options during a cycle or the power is closed within 3 seconds of the dishwasher cycle. Located on the front of the dishwasher for confirming button presses can be heard, and the cycle...

Use & Care Guide
Page 13
...improved results. 13 CYCLE RUNS TOO LONG NOTES: ■ To use during a cycle. Towel drying may be necessary. If your detergent is power to the dishwasher before starting the cycle. Check the drain air gap when your dishwasher. A circuit breaker or fuse may spill onto other ... of the dishwasher. Then check for the dishwasher to ensure door is blinking, close to the dishwasher. In the U.S.A., www.kitchenaid.com In Canada, www.kitchenaid.ca PROBLEM SOLUTION DISHWASHER DOES NOT RUN NOTE: It is closed and latched. Be sure the door is normal for any soil...
...improved results. 13 CYCLE RUNS TOO LONG NOTES: ■ To use during a cycle. Towel drying may be necessary. If your detergent is power to the dishwasher before starting the cycle. Check the drain air gap when your dishwasher. A circuit breaker or fuse may spill onto other ... of the dishwasher. Then check for the dishwasher to ensure door is blinking, close to the dishwasher. In the U.S.A., www.kitchenaid.com In Canada, www.kitchenaid.ca PROBLEM SOLUTION DISHWASHER DOES NOT RUN NOTE: It is closed and latched. Be sure the door is normal for any soil...


