
Instruction Manual
Page 1
JAVASTUDIO™ COLLECTION PROGRAMMABLE COFFEE MAKERS INSTRUCTIONS KCM511 KCM514 KCM515 1-800-541-6390 Details Inside ® FOR THE WA1Y IT'S MADE.™
JAVASTUDIO™ COLLECTION PROGRAMMABLE COFFEE MAKERS INSTRUCTIONS KCM511 KCM514 KCM515 1-800-541-6390 Details Inside ® FOR THE WA1Y IT'S MADE.™

Instruction Manual
Page 2
... United States and your KitchenAid® Coffee Maker should fail within the first year of ownership, simply call our toll-free Customer Satisfaction Center at 1-800-541-6390 Monday through Friday, 8 a.m. For a detailed explanation of warranty terms and conditions, including how to arrange for your personal records: Model Number Serial Number Date Purchased Store Name Before you receive your replacement Coffee Maker, use your Coffee Maker...
... United States and your KitchenAid® Coffee Maker should fail within the first year of ownership, simply call our toll-free Customer Satisfaction Center at 1-800-541-6390 Monday through Friday, 8 a.m. For a detailed explanation of warranty terms and conditions, including how to arrange for your personal records: Model Number Serial Number Date Purchased Store Name Before you receive your replacement Coffee Maker, use your Coffee Maker...

Instruction Manual
Page 3
... Important Safeguards 3 FEATURES AND OPERATION Coffee Maker General Features 4 Display and Control Pad Features 6 Pre-Use Cleaning 8 Installing the Water Filter 8 To Set the Time-of-Day Clock 9 Brewing Coffee 10 Using the Thermal Carafe 11 The Pause and Pour Feature 12 Using the Automatic Brew Timer 12 The Cleaning Needed Indicator 13 Coffee Brewing Suggestions: Advice for Great Taste 14 CARE AND CLEANING Cleaning the Coffee Maker 15 Descaling the Coffee Maker 15 Troubleshooting and Error Codes 16 WARRANTY AND SERVICE INFORMATION Warranty for the 50 United States and District of...
... Important Safeguards 3 FEATURES AND OPERATION Coffee Maker General Features 4 Display and Control Pad Features 6 Pre-Use Cleaning 8 Installing the Water Filter 8 To Set the Time-of-Day Clock 9 Brewing Coffee 10 Using the Thermal Carafe 11 The Pause and Pour Feature 12 Using the Automatic Brew Timer 12 The Cleaning Needed Indicator 13 Coffee Brewing Suggestions: Advice for Great Taste 14 CARE AND CLEANING Cleaning the Coffee Maker 15 Descaling the Coffee Maker 15 Troubleshooting and Error Codes 16 WARRANTY AND SERVICE INFORMATION Warranty for the 50 United States and District of...
Instruction Manual
Page 4
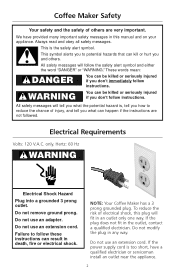
... way. Electrical Requirements Volts: 120 V.A.C. Do not use an extension cord. Do not use an adapter. Failure to follow these instructions can be killed or seriously injured if you don't follow the safety alert symbol and either the word "DANGER" or "WARNING." NOTE: Your Coffee Maker has a 3 prong grounded plug. Always read and obey all safety messages...
... way. Electrical Requirements Volts: 120 V.A.C. Do not use an extension cord. Do not use an adapter. Failure to follow these instructions can be killed or seriously injured if you don't follow the safety alert symbol and either the word "DANGER" or "WARNING." NOTE: Your Coffee Maker has a 3 prong grounded plug. Always read and obey all safety messages...
Instruction Manual
Page 5
... safety precautions should always be used by the appliance manufacturer may result in a heated oven. 11. Allow to the nearest Authorized Service Facility for use . 12. This product has been UL Listed for other liquid. 4. Do not use appliance for household use appliance without lid properly placed on a wet or cold surface. 15. Do not clean container with cleaners, steel...
... safety precautions should always be used by the appliance manufacturer may result in a heated oven. 11. Allow to the nearest Authorized Service Facility for use . 12. This product has been UL Listed for other liquid. 4. Do not use appliance for household use appliance without lid properly placed on a wet or cold surface. 15. Do not clean container with cleaners, steel...

Instruction Manual
Page 6
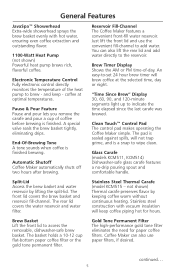
Split-Lid General Features JavaSpa™ Showerhead Brew Basket Reservoir Fill-Channel "Time Since Brew" Display Brew Timer Display Clean Touch™ Control Pad Wrap-Around Housing Glass Carafe Coffee Scoop Gold Tone Permanent Filter 4
Split-Lid General Features JavaSpa™ Showerhead Brew Basket Reservoir Fill-Channel "Time Since Brew" Display Brew Timer Display Clean Touch™ Control Pad Wrap-Around Housing Glass Carafe Coffee Scoop Gold Tone Permanent Filter 4
Instruction Manual
Page 7
... Heat Pump (not shown) Powerful heat pump brews rich, flavorful coffee. Just lift the front lid and use paper filters, if desired. An easy-to-set 24 hour brew timer will keep - not shown) Thermal carafe preserves flavor by lifting the split-lid. Brew Basket Lift the front lid to wipe clean. Coffee Maker can also lift the rear lid and add water directly to add water. continued... 5 Pause & Pour Feature Pause and pour lets you remove the carafe and pour a cup of coffee...
... Heat Pump (not shown) Powerful heat pump brews rich, flavorful coffee. Just lift the front lid and use paper filters, if desired. An easy-to-set 24 hour brew timer will keep - not shown) Thermal carafe preserves flavor by lifting the split-lid. Brew Basket Lift the front lid to wipe clean. Coffee Maker can also lift the rear lid and add water directly to add water. continued... 5 Pause & Pour Feature Pause and pour lets you remove the carafe and pour a cup of coffee...

Instruction Manual
Page 8
... "Time Since Brew" Display Brew Timer Display Cleaning Needed Indicator "H" and "M" Buttons On/Off 1-4 Cup Auto On Set Set (Program) (Clock) 6 Filter also softens the water, which impair coffee flavor. The filter handle serves as a convenient water level indicator. Full-Length Cord Storage (not shown) Compartment in back of unit keeps excess cord out of ground coffee for each cup desired. Coffee Scoop Use one rounded scoop of the way. Wrap-Around Housing Stylish design minimizes heat loss from the carafe while...
... "Time Since Brew" Display Brew Timer Display Cleaning Needed Indicator "H" and "M" Buttons On/Off 1-4 Cup Auto On Set Set (Program) (Clock) 6 Filter also softens the water, which impair coffee flavor. The filter handle serves as a convenient water level indicator. Full-Length Cord Storage (not shown) Compartment in back of unit keeps excess cord out of ground coffee for each cup desired. Coffee Scoop Use one rounded scoop of the way. Wrap-Around Housing Stylish design minimizes heat loss from the carafe while...

Instruction Manual
Page 9
... program an automatic brew time. Cleaning Needed Indicator The indicator will light. An indicator light shows when the 1 to turn the Coffee Maker on or off. Auto On Press to 4 cup brew cycle is less than 30 minutes old. Small lights indicate whether the time is pressed, the ... • Brew timer display will flash • Set (Clock) indicator will flash • "H" (hour) and "M" (minute) Buttons can be used to set when the Auto On Button is pressed, the Coffee Maker...
... program an automatic brew time. Cleaning Needed Indicator The indicator will light. An indicator light shows when the 1 to turn the Coffee Maker on or off. Auto On Press to 4 cup brew cycle is less than 30 minutes old. Small lights indicate whether the time is pressed, the ... • Brew timer display will flash • Set (Clock) indicator will flash • "H" (hour) and "M" (minute) Buttons can be used to set when the Auto On Button is pressed, the Coffee Maker...
Instruction Manual
Page 10
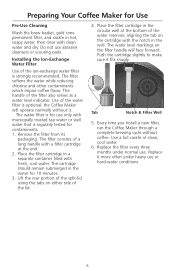
... tap water or well water that is strongly recommended. Installing the Ion-Exchange Water Filter Use of a long handle with the notch in the well. The filter consists of the ion-exchange water filter is regularly tested for Use Pre-Use Cleaning Wash the brew basket, gold tone permanent filter, and carafe in the circular well at the bottom of the lid. 4. Place the filter cartridge in hot, soapy water, then...
... tap water or well water that is strongly recommended. Installing the Ion-Exchange Water Filter Use of a long handle with the notch in the well. The filter consists of the ion-exchange water filter is regularly tested for Use Pre-Use Cleaning Wash the brew basket, gold tone permanent filter, and carafe in the circular well at the bottom of the lid. 4. Place the filter cartridge in hot, soapy water, then...

Instruction Manual
Page 11
... "M" Buttons 5. Failure to flash. 4. Plug power cord into a grounded 3 prong outlet. The AM and PM indicator lights on the brew timer display will stop flashing and the Set (Clock) indicator will change when the hour digits roll past "12". Press the Set (Clock) Button to set is pressed and held, the digits will automatically record the displayed time and exit clocksetting mode if no buttons are pressed for Use To Set the Time...
... "M" Buttons 5. Failure to flash. 4. Plug power cord into a grounded 3 prong outlet. The AM and PM indicator lights on the brew timer display will stop flashing and the Set (Clock) indicator will change when the hour digits roll past "12". Press the Set (Clock) Button to set is pressed and held, the digits will automatically record the displayed time and exit clocksetting mode if no buttons are pressed for Use To Set the Time...
Instruction Manual
Page 12
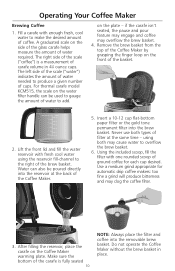
... gold tone permanent filter into the removable brew basket. Never use both may overflow the brew basket. 4. Water can be poured directly into the reservoir at the same time - Do not operate the Coffee Maker without the brew basket in 41⁄4 ounce cups. A graduated scale on the front of carafe volume in place. Remove the brew basket from the top of the Coffee Maker by grasping the finger loop on the side of the glass carafe helps measure...
... gold tone permanent filter into the removable brew basket. Never use both may overflow the brew basket. 4. Water can be poured directly into the reservoir at the same time - Do not operate the Coffee Maker without the brew basket in 41⁄4 ounce cups. A graduated scale on the front of carafe volume in place. Remove the brew basket from the top of the Coffee Maker by grasping the finger loop on the side of the glass carafe helps measure...

Instruction Manual
Page 13
.../Off button. Using the Thermal Carafe (model KCM515 only) The stainless steel thermal carafe features a double walled, vacuum insulated design that will seal automatically. • To remove the carafe lid for cleaning, turn a stopper or press a button to brew additional carafes of 2 hours, the Coffee Maker and warming plate will light immediately after brewing, indicating the coffee is complete. 10. The special lid and spout design doesn't require you set the carafe upright, the lid will keep coffee hot - When...
.../Off button. Using the Thermal Carafe (model KCM515 only) The stainless steel thermal carafe features a double walled, vacuum insulated design that will seal automatically. • To remove the carafe lid for cleaning, turn a stopper or press a button to brew additional carafes of 2 hours, the Coffee Maker and warming plate will light immediately after brewing, indicating the coffee is complete. 10. The special lid and spout design doesn't require you set the carafe upright, the lid will keep coffee hot - When...

Instruction Manual
Page 14
... from ground coffee differ at a preset time, making it returns to flash. The Coffee Maker will change when the hour digits roll past "12". Press the Set (Program) Button. Using the Automatic Brew Timer The Coffee Maker can be programmed to brew coffee at each stage of the brewing cycle, and a finished carafe represents a delicate blend of these flavors. Fill the Coffee Maker with respect to exit the program-setting mode. Operating Your Coffee Maker The Pause and Pour Feature...
... from ground coffee differ at a preset time, making it returns to flash. The Coffee Maker will change when the hour digits roll past "12". Press the Set (Program) Button. Using the Automatic Brew Timer The Coffee Maker can be programmed to brew coffee at each stage of the brewing cycle, and a finished carafe represents a delicate blend of these flavors. Fill the Coffee Maker with respect to exit the program-setting mode. Operating Your Coffee Maker The Pause and Pour Feature...

Instruction Manual
Page 15
... scale, the cleaning needed indicator will light after a brewing cycle is complete. Please see page 15 for descaling steps. 13 The Coffee Maker will always default to the last brew time set. The Coffee Maker will begin brewing at the programmed time, activate the automatic brew timer by pressing the Auto On Button. When deactivated, the Auto On indicator light will build up of your Coffee Maker. The Cleaning Needed Indicator Calcium deposits ("scale") from water will go...
... scale, the cleaning needed indicator will light after a brewing cycle is complete. Please see page 15 for descaling steps. 13 The Coffee Maker will always default to the last brew time set. The Coffee Maker will begin brewing at the programmed time, activate the automatic brew timer by pressing the Auto On Button. When deactivated, the Auto On indicator light will build up of your Coffee Maker. The Cleaning Needed Indicator Calcium deposits ("scale") from water will go...

Instruction Manual
Page 16
... Ground Coffee For standard drip-process coffee, a good starting point is strongly recommended for automatic drip coffee makers. Brew Water Purity The ion-exchange water filter that comes with your brew water. Daily cleaning of freshly brewed coffee. Doing this will go stale and impair the flavor of the brew basket and carafe is to use the filter - Where local water quality is not recommended, as measured with hot water. Freezing can damage the Coffee Maker. and replace...
... Ground Coffee For standard drip-process coffee, a good starting point is strongly recommended for automatic drip coffee makers. Brew Water Purity The ion-exchange water filter that comes with your brew water. Daily cleaning of freshly brewed coffee. Doing this will go stale and impair the flavor of the brew basket and carafe is to use the filter - Where local water quality is not recommended, as measured with hot water. Freezing can damage the Coffee Maker. and replace...

Instruction Manual
Page 17
... the cleaning needed indicator lights after the brewing cycle is complete. Keep repeating Step 2 until the cleaning needed indicator will build up of your Coffee Maker. Rinse the Coffee Maker by turning it counter-clockwise, then lifting. 4. Reinstall or replace the water filter. Wash the brew basket, carafe, and gold tone permanent filter in hot, soapy water and rinse with a warm, soapy cloth. Always mix the descaling solution using cool water. • When using a descaling agent, follow the directions...
... the cleaning needed indicator lights after the brewing cycle is complete. Keep repeating Step 2 until the cleaning needed indicator will build up of your Coffee Maker. Rinse the Coffee Maker by turning it counter-clockwise, then lifting. 4. Reinstall or replace the water filter. Wash the brew basket, carafe, and gold tone permanent filter in hot, soapy water and rinse with a warm, soapy cloth. Always mix the descaling solution using cool water. • When using a descaling agent, follow the directions...

Instruction Manual
Page 18
... on the brew timer display: Press the On/Off Button to reset the Coffee Maker. If the error codes reappear, there is a problem with the steps above, please refer to the Warranty and Service section beginning on the following page. Unplug the Coffee Maker, press each button several times, then plug the Coffee Maker back in. (If the Coffee Maker has been stored or used in a cool environment, warm the unit to normal...
... on the brew timer display: Press the On/Off Button to reset the Coffee Maker. If the error codes reappear, there is a problem with the steps above, please refer to the Warranty and Service section beginning on the following page. Unplug the Coffee Maker, press each button several times, then plug the Coffee Maker back in. (If the Coffee Maker has been stored or used in a cool environment, warm the unit to normal...

Instruction Manual
Page 19
.... To arrange for service, follow the instructions under the KitchenAid® Coffee Maker Warranty for Puerto Rico on how to arrange for service, or call the Customer Satisfaction Center toll-free at 1-800-541-6390. Replacement parts or repair labor costs for Coffee Makers operated outside the 50 United States and District of Columbia. KitchenAid Will Not Pay For: A. C. Length of Warranty: One Year Full Warranty from accident, alteration...
.... To arrange for service, follow the instructions under the KitchenAid® Coffee Maker Warranty for Puerto Rico on how to arrange for service, or call the Customer Satisfaction Center toll-free at 1-800-541-6390. Replacement parts or repair labor costs for Coffee Makers operated outside the 50 United States and District of Columbia. KitchenAid Will Not Pay For: A. C. Length of Warranty: One Year Full Warranty from accident, alteration...

Instruction Manual
Page 20
... 8 p.m., Monday through Friday, 10 a.m. For service information, call toll-free 1-800-541-6390, 8 a.m. Ordering Accessories and Replacement Parts To order accessories or replacement parts for Service After the Warranty Expires WARNING Electrical Shock Hazard Unplug before servicing. to do so can also write to : Customer Satisfaction Center KitchenAid Portable Appliances P.O. Joseph, MI 49085-0218 18 KitchenAid® Coffee Maker Warranty for Puerto Rico A limited one year...
... 8 p.m., Monday through Friday, 10 a.m. For service information, call toll-free 1-800-541-6390, 8 a.m. Ordering Accessories and Replacement Parts To order accessories or replacement parts for Service After the Warranty Expires WARNING Electrical Shock Hazard Unplug before servicing. to do so can also write to : Customer Satisfaction Center KitchenAid Portable Appliances P.O. Joseph, MI 49085-0218 18 KitchenAid® Coffee Maker Warranty for Puerto Rico A limited one year...


