
Instruction Manual
Page 1
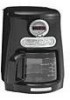
JAVASTUDIO™ COLLECTION PROGRAMMABLE COFFEE MAKERS INSTRUCTIONS KCM511 KCM514 KCM515 1-800-541-6390 Details Inside ® FOR THE WA1Y IT'S MADE.™
JAVASTUDIO™ COLLECTION PROGRAMMABLE COFFEE MAKERS INSTRUCTIONS KCM511 KCM514 KCM515 1-800-541-6390 Details Inside ® FOR THE WA1Y IT'S MADE.™

Instruction Manual
Page 2
...Replacement Warranty We're so confident the quality of our products meets the exacting standards of KitchenAid that, if your Coffee Maker should fail within the first year of ownership, KitchenAid will enable us to contact you of in the unlikely event of your personal records: Model...or comparable replacement to your door free of charge and arrange to have your original Coffee Maker returned to 8 p.m. (Eastern Time), or Saturday, 10 a.m. Give the consultant your KitchenAid® Coffee Maker should fail within the first year of ownership, simply call our toll-free Customer ...
...Replacement Warranty We're so confident the quality of our products meets the exacting standards of KitchenAid that, if your Coffee Maker should fail within the first year of ownership, KitchenAid will enable us to contact you of in the unlikely event of your personal records: Model...or comparable replacement to your door free of charge and arrange to have your original Coffee Maker returned to 8 p.m. (Eastern Time), or Saturday, 10 a.m. Give the consultant your KitchenAid® Coffee Maker should fail within the first year of ownership, simply call our toll-free Customer ...

Instruction Manual
Page 3
... 11 The Pause and Pour Feature 12 Using the Automatic Brew Timer 12 The Cleaning Needed Indicator 13 Coffee Brewing Suggestions: Advice for Great Taste 14 CARE AND CLEANING Cleaning the Coffee Maker 15 Descaling the Coffee Maker 15 Troubleshooting and Error Codes 16 WARRANTY AND SERVICE INFORMATION Warranty for the 50 United States and...
... 11 The Pause and Pour Feature 12 Using the Automatic Brew Timer 12 The Cleaning Needed Indicator 13 Coffee Brewing Suggestions: Advice for Great Taste 14 CARE AND CLEANING Cleaning the Coffee Maker 15 Descaling the Coffee Maker 15 Troubleshooting and Error Codes 16 WARRANTY AND SERVICE INFORMATION Warranty for the 50 United States and...
Instruction Manual
Page 4
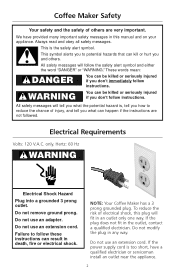
Coffee Maker Safety Your safety and the safety of electrical shock, this manual and on your appliance. This symbol alerts you to potential hazards that can be ... can be killed or seriously injured if you and others are not followed. WARNING You can happen if the instructions are very important. NOTE: Your Coffee Maker has a 3 prong grounded plug. This is , tell you how to follow the safety alert symbol and either the word "DANGER" or "WARNING." All safety messages...
Coffee Maker Safety Your safety and the safety of electrical shock, this manual and on your appliance. This symbol alerts you to potential hazards that can be ... can be killed or seriously injured if you and others are not followed. WARNING You can happen if the instructions are very important. NOTE: Your Coffee Maker has a 3 prong grounded plug. This is , tell you how to follow the safety alert symbol and either the word "DANGER" or "WARNING." All safety messages...
Instruction Manual
Page 5
To protect against electrical shock, do not immerse cord, plugs, or Coffee Maker in a heated oven. 11. Do not operate any appliance with a damaged cord or plug, or after the appliance malfunctions or has been damaged ...in water or other liquid. 4. This product has been UL Listed for examination, repair, or adjustment. 7. Close supervision is necessary when any manner. Unplug Coffee Maker from outlet before cleaning the appliance. 6. It must never be followed, including the following: 1. IMPORTANT SAFEGUARDS When using electrical appliances, basic safety precautions should always...
To protect against electrical shock, do not immerse cord, plugs, or Coffee Maker in a heated oven. 11. Do not operate any appliance with a damaged cord or plug, or after the appliance malfunctions or has been damaged ...in water or other liquid. 4. This product has been UL Listed for examination, repair, or adjustment. 7. Close supervision is necessary when any manner. Unplug Coffee Maker from outlet before cleaning the appliance. 6. It must never be followed, including the following: 1. IMPORTANT SAFEGUARDS When using electrical appliances, basic safety precautions should always...
Instruction Manual
Page 7
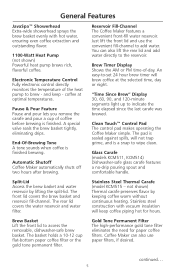
...Pour Feature Pause and pour lets you remove the carafe and pour a cup of coffee before brewing is finished brewing. A special valve seals the brew basket tightly, eliminating drips. Automatic Shutoff Coffee Maker automatically shuts off two hours after brewing. Just lift the front lid and use ...safe glass carafe features a no-drip pouring spout and comfortable handle. Clean Touch™ Control Pad The control pad makes operating the Coffee Maker simple. not shown) Thermal carafe preserves flavor by lifting the split-lid. Brew Basket Lift the front lid to access the removable...
...Pour Feature Pause and pour lets you remove the carafe and pour a cup of coffee before brewing is finished brewing. A special valve seals the brew basket tightly, eliminating drips. Automatic Shutoff Coffee Maker automatically shuts off two hours after brewing. Just lift the front lid and use ...safe glass carafe features a no-drip pouring spout and comfortable handle. Clean Touch™ Control Pad The control pad makes operating the Coffee Maker simple. not shown) Thermal carafe preserves flavor by lifting the split-lid. Brew Basket Lift the front lid to access the removable...

Instruction Manual
Page 9
... and "M" (minute) buttons to -set the time-of-day clock. When the Set (Clock) Button is pressed, the Coffee Maker will light immediately after brewing if the Coffee Maker requires descaling. An easy-to program the brew timer or set the clock 7 Cleaning Needed Indicator The indicator will flash •... "30" segment will automatically enter the Set (Program) mode. Set (Program) Press to turn the Coffee Maker on or off. An indicator light shows when the Coffee Maker is less than 30 minutes old. Display and Control Pad Features DISPLAY FEATURES: Brew Timer Display Shows the...
... and "M" (minute) buttons to -set the time-of-day clock. When the Set (Clock) Button is pressed, the Coffee Maker will light immediately after brewing if the Coffee Maker requires descaling. An easy-to program the brew timer or set the clock 7 Cleaning Needed Indicator The indicator will flash •... "30" segment will automatically enter the Set (Program) mode. Set (Program) Press to turn the Coffee Maker on or off. An indicator light shows when the Coffee Maker is less than 30 minutes old. Display and Control Pad Features DISPLAY FEATURES: Brew Timer Display Shows the...
Instruction Manual
Page 10
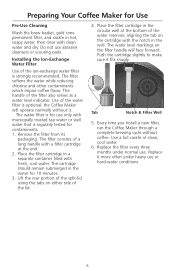
...cartridge should remain submerged in the water for contaminants. 1. Replace it more often under normal use only with fresh, cool water. Preparing Your Coffee Maker for Use Pre-Use Cleaning Wash the brew basket, gold tone permanent filter, and carafe in hot, soapy water, then rinse with a...heavy use abrasive cleansers or scouring pads. Do not use or hard-water conditions. 8 Every time you install a new filter, run the Coffee Maker through a complete brewing cycle without it fits snugly. Remove the filter from its packaging. Tab Notch & Filter Well 5. Installing the Ion-...
...cartridge should remain submerged in the water for contaminants. 1. Replace it more often under normal use only with fresh, cool water. Preparing Your Coffee Maker for Use Pre-Use Cleaning Wash the brew basket, gold tone permanent filter, and carafe in hot, soapy water, then rinse with a...heavy use abrasive cleansers or scouring pads. Do not use or hard-water conditions. 8 Every time you install a new filter, run the Coffee Maker through a complete brewing cycle without it fits snugly. Remove the filter from its packaging. Tab Notch & Filter Well 5. Installing the Ion-...

Instruction Manual
Page 11
...power cord into a grounded 3 prong outlet. Press the "H" (hour) and "M" (minute) Buttons below the brew timer display to AM or PM. When the Coffee Maker is first plugged in death, fire or electrical shock. 1. Do not use an extension cord. The digits on the brew timer display will go out.... Preparing Your Coffee Maker for 10 seconds. 9 Do not remove ground prong. If a "H" or "M" Button is pressed and held, the digits will begin to exit the...
...power cord into a grounded 3 prong outlet. Press the "H" (hour) and "M" (minute) Buttons below the brew timer display to AM or PM. When the Coffee Maker is first plugged in death, fire or electrical shock. 1. Do not use an extension cord. The digits on the brew timer display will go out.... Preparing Your Coffee Maker for 10 seconds. 9 Do not remove ground prong. If a "H" or "M" Button is pressed and held, the digits will begin to exit the...
Instruction Manual
Page 12
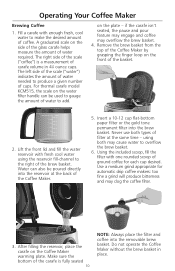
..., fill the filter with one rounded scoop of cups. Operating Your Coffee Maker Brewing Coffee 1. The right side of the scale ("coffee") is a measurement of the carafe is fully seated 10 NOTE: Always place the filter and coffee into the brew basket. using the reservoir fill-channel to make the... desired amount of the brew basket. Do not operate the Coffee Maker without the brew basket in 41⁄4 ounce cups. For thermal carafe model KCM515, the scale on the Coffee Maker warming plate. Fill a carafe with fresh cool water using both types of filter...
..., fill the filter with one rounded scoop of cups. Operating Your Coffee Maker Brewing Coffee 1. The right side of the scale ("coffee") is a measurement of the carafe is fully seated 10 NOTE: Always place the filter and coffee into the brew basket. using the reservoir fill-channel to make the... desired amount of the brew basket. Do not operate the Coffee Maker without the brew basket in 41⁄4 ounce cups. For thermal carafe model KCM515, the scale on the Coffee Maker warming plate. Fill a carafe with fresh cool water using both types of filter...

Instruction Manual
Page 13
...may be hand-washed only - Although the thermal carafe model KCM515 does not have a warming plate, the outside of 2 hours, the Coffee Maker and warming plate will keep coffee hot - The special lid and spout design doesn't require you set the carafe upright, the lid will help ensure uniform... coffee extraction and excellent flavor. The 1 to turn off the Coffee Maker manually, press the On/Off button. for five minutes before brewing by removing the lid and rinsing the ...
...may be hand-washed only - Although the thermal carafe model KCM515 does not have a warming plate, the outside of 2 hours, the Coffee Maker and warming plate will keep coffee hot - The special lid and spout design doesn't require you set the carafe upright, the lid will help ensure uniform... coffee extraction and excellent flavor. The 1 to turn off the Coffee Maker manually, press the On/Off button. for five minutes before brewing by removing the lid and rinsing the ...

Instruction Manual
Page 14
...are pressed for those in a hurry. Make sure the desired brew time is a great convenience for 10 seconds. 4. The Coffee Maker will alter - Operating Your Coffee Maker The Pause and Pour Feature The pause and pour feature enables you to remove the carafe from the brew basket. After setting ...brew time set the hour and minutes. When the carafe is finished. To program and activate the automatic brew timer: 1. Fill the Coffee Maker with respect to exit the program-setting mode. The brew timer display will overflow the brew basket and spill onto the warming plate. ...
...are pressed for those in a hurry. Make sure the desired brew time is a great convenience for 10 seconds. 4. The Coffee Maker will alter - Operating Your Coffee Maker The Pause and Pour Feature The pause and pour feature enables you to remove the carafe from the brew basket. After setting ...brew time set the hour and minutes. When the carafe is finished. To program and activate the automatic brew timer: 1. Fill the Coffee Maker with respect to exit the program-setting mode. The brew timer display will overflow the brew basket and spill onto the warming plate. ...

Instruction Manual
Page 15
... begin brewing at the programmed time, activate the automatic brew timer by pressing the Auto On Button. Operating Your Coffee Maker 5. The Cleaning Needed Indicator Calcium deposits ("scale") from water will go out. NOTE: To cancel automatic brewing, deactivate the brew timer by... pressing the Auto On Button. Each time you want the Coffee Maker to preserve the performance and life of scale, the cleaning needed indicator will light after a brewing cycle is complete. Please see page 15 for...
... begin brewing at the programmed time, activate the automatic brew timer by pressing the Auto On Button. Operating Your Coffee Maker 5. The Cleaning Needed Indicator Calcium deposits ("scale") from water will go out. NOTE: To cancel automatic brewing, deactivate the brew timer by... pressing the Auto On Button. Each time you want the Coffee Maker to preserve the performance and life of scale, the cleaning needed indicator will light after a brewing cycle is complete. Please see page 15 for...

Instruction Manual
Page 16
... fresh coffee beans. Coffee Brewing Suggestions: Advice for Great Taste Fresh Coffee Beans Truly great coffee can damage the Coffee Maker. To preserve the freshness of freshly brewed coffee. Freezing can help preserve beans stored for an extended period, but using a quality grinder like the KitchenAid® Blade Coffee Grinder, PRO LINE™ Series Burr Coffee Mill, or the KitchenAid®...
... fresh coffee beans. Coffee Brewing Suggestions: Advice for Great Taste Fresh Coffee Beans Truly great coffee can damage the Coffee Maker. To preserve the freshness of freshly brewed coffee. Freezing can help preserve beans stored for an extended period, but using a quality grinder like the KitchenAid® Blade Coffee Grinder, PRO LINE™ Series Burr Coffee Mill, or the KitchenAid®...

Instruction Manual
Page 17
...When using vinegar, fill the carafe with model KCM515 should be washed in hot, soapy water and rinse with a warm, soapy cloth. The Coffee Maker can also be handwashed only). 5. Always mix the descaling solution using cool water. • When using a descaling agent, follow the directions on... the package for the recommended amounts of descaling agent and water to use . 15 Run the Coffee Maker through two brewing cycles using a full carafe of 1⁄2 vinegar and 1⁄2 water. If the cleaning needed indicator lights after the brewing...
...When using vinegar, fill the carafe with model KCM515 should be washed in hot, soapy water and rinse with a warm, soapy cloth. The Coffee Maker can also be handwashed only). 5. Always mix the descaling solution using cool water. • When using a descaling agent, follow the directions on... the package for the recommended amounts of descaling agent and water to use . 15 Run the Coffee Maker through two brewing cycles using a full carafe of 1⁄2 vinegar and 1⁄2 water. If the cleaning needed indicator lights after the brewing...

Instruction Manual
Page 18
...page. • If "Err4" appears on the brew timer display: A button is , unplug the Coffee Maker, then plug it is jammed. If the problem cannot be fixed with the Coffee Maker electronics. If the error codes reappear, there is plugged into the same outlet again. Please refer to the... Warranty and Service section beginning on the following page. Unplug the Coffee Maker, press each button several times, then plug the Coffee Maker back in. (If the Coffee Maker has been stored or used in a cool environment, warm the unit to normal room temperature before ...
...page. • If "Err4" appears on the brew timer display: A button is , unplug the Coffee Maker, then plug it is jammed. If the problem cannot be fixed with the Coffee Maker electronics. If the error codes reappear, there is plugged into the same outlet again. Please refer to the... Warranty and Service section beginning on the following page. Unplug the Coffee Maker, press each button several times, then plug the Coffee Maker back in. (If the Coffee Maker has been stored or used in a cool environment, warm the unit to normal room temperature before ...

Instruction Manual
Page 19
...exclusion or limitation of incidental or consequential damages, so this exclusion may also have other than normal single family home use. KitchenAid® Coffee Maker Warranty for the 50 United States and District of Columbia This warranty extends to arrange for service, or call the Customer Satisfaction.... To arrange for service, follow the instructions under the KitchenAid® Coffee Maker Warranty for Puerto Rico on how to the purchaser and any succeeding owner for details on page 18. See inside front cover for Coffee Makers operated in other rights which vary from state to you...
...exclusion or limitation of incidental or consequential damages, so this exclusion may also have other than normal single family home use. KitchenAid® Coffee Maker Warranty for the 50 United States and District of Columbia This warranty extends to arrange for service, or call the Customer Satisfaction.... To arrange for service, follow the instructions under the KitchenAid® Coffee Maker Warranty for Puerto Rico on how to the purchaser and any succeeding owner for details on page 18. See inside front cover for Coffee Makers operated in other rights which vary from state to you...

Instruction Manual
Page 20
... To order accessories or replacement parts for your local KitchenAid dealer Coffee Maker for Service Outside the 50 United States and Puerto Rico Consult your Coffee Maker, visit KitchenAid.com or call toll-free 1-800-541-6390, 8 a.m. Box 218 St. to : Customer Satisfaction Center KitchenAid Portable Appliances P.O. KitchenAid® Coffee Maker Warranty for Puerto Rico A limited one year warranty extends...
... To order accessories or replacement parts for your local KitchenAid dealer Coffee Maker for Service Outside the 50 United States and Puerto Rico Consult your Coffee Maker, visit KitchenAid.com or call toll-free 1-800-541-6390, 8 a.m. Box 218 St. to : Customer Satisfaction Center KitchenAid Portable Appliances P.O. KitchenAid® Coffee Maker Warranty for Puerto Rico A limited one year warranty extends...


