
Instruction Manual
Page 3
... INTRODUCTION Hassle-Free Replacement Warranty Inside Front Cover Product Registration Card Inside Front Cover Coffee Maker Safety 2 Electrical Requirements 2 Important Safeguards 3 FEATURES AND OPERATION Coffee Maker General Features 4 Display and Control Pad Features 6 Pre-Use Cleaning 8 Installing the Water Filter 8 To Set the Time-of-Day Clock 9 Brewing Coffee 10 Using the Thermal Carafe 11 The Pause...
... INTRODUCTION Hassle-Free Replacement Warranty Inside Front Cover Product Registration Card Inside Front Cover Coffee Maker Safety 2 Electrical Requirements 2 Important Safeguards 3 FEATURES AND OPERATION Coffee Maker General Features 4 Display and Control Pad Features 6 Pre-Use Cleaning 8 Installing the Water Filter 8 To Set the Time-of-Day Clock 9 Brewing Coffee 10 Using the Thermal Carafe 11 The Pause...
Instruction Manual
Page 10
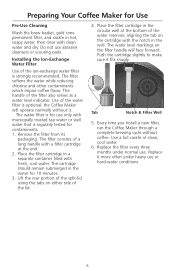
... water filter is optional: the Coffee Maker will face forward. Place the filter cartridge in a separate container filled with the notch in the circular well at the end. 2. Use a full carafe of the filter also serves as a water level indicator. Replace it fits snugly. Do not ...of the lid. 4. Tab Notch & Filter Well 5. Replace the filter every three months under heavy use abrasive cleansers or scouring pads. Place the filter cartridge in the well. Remove the filter from its packaging. Preparing Your Coffee Maker for 10 minutes. 3. The filter softens the water while ...
... water filter is optional: the Coffee Maker will face forward. Place the filter cartridge in a separate container filled with the notch in the circular well at the end. 2. Use a full carafe of the filter also serves as a water level indicator. Replace it fits snugly. Do not ...of the lid. 4. Tab Notch & Filter Well 5. Replace the filter every three months under heavy use abrasive cleansers or scouring pads. Place the filter cartridge in the well. Remove the filter from its packaging. Preparing Your Coffee Maker for 10 minutes. 3. The filter softens the water while ...

Instruction Manual
Page 16
... water with the carafe. Doing this will go stale and impair the flavor of your coffee to grind your coffee beans, keep the beans in an opaque, air-tight container and store them in your Coffee Maker. and replace it will always come from coffee beans that means using a quality grinder like the KitchenAid® Blade Coffee Grinder, PRO...
... water with the carafe. Doing this will go stale and impair the flavor of your coffee to grind your coffee beans, keep the beans in an opaque, air-tight container and store them in your Coffee Maker. and replace it will always come from coffee beans that means using a quality grinder like the KitchenAid® Blade Coffee Grinder, PRO...

Instruction Manual
Page 17
... before cleaning. 2. Keep repeating Step 2 until the cleaning needed indicator lights after brewing. 4. Rinse the Coffee Maker by turning it to preserve the performance and life of the dishwasher (the thermal carafe included with a warm, soapy cloth. Replace the filter every three months under normal usage, or more often with a soft cloth. Then wipe...
... before cleaning. 2. Keep repeating Step 2 until the cleaning needed indicator lights after brewing. 4. Rinse the Coffee Maker by turning it to preserve the performance and life of the dishwasher (the thermal carafe included with a warm, soapy cloth. Replace the filter every three months under normal usage, or more often with a soft cloth. Then wipe...


