Instruction Manual
Page 2
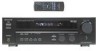
... FM 75Ω AM ANTENNA MONITOR OUT L DEEMPHASIS CHANNEL SPACE SYSTEM CONTROL 50µs AM 9kHz FM 50kHz 75µs AM 10kHz FM 100kHz AUDIO DVD CD / DVD OPTICAL VIDEO 2 COAXIAL DIGITAL IN DVD / 6CH INPUT CENTER FRONT SPEAKERS (8-16Ω) CENTER SPEAKER (8-16Ω) + SURROUND SPEAKERS (8-16Ω) + R - - THE LIGHTNING FLASH WITH ARROWHEAD SYMBOL, WITHIN AN EQUILATERAL TRIANGLE, IS INTENDED TO ALERT THE USER TO THE PRESENCE OF...
... FM 75Ω AM ANTENNA MONITOR OUT L DEEMPHASIS CHANNEL SPACE SYSTEM CONTROL 50µs AM 9kHz FM 50kHz 75µs AM 10kHz FM 100kHz AUDIO DVD CD / DVD OPTICAL VIDEO 2 COAXIAL DIGITAL IN DVD / 6CH INPUT CENTER FRONT SPEAKERS (8-16Ω) CENTER SPEAKER (8-16Ω) + SURROUND SPEAKERS (8-16Ω) + R - - THE LIGHTNING FLASH WITH ARROWHEAD SYMBOL, WITHIN AN EQUILATERAL TRIANGLE, IS INTENDED TO ALERT THE USER TO THE PRESENCE OF...
Instruction Manual
Page 3
... audio components 9 Connecting video components 10 Digital connections 11 Connecting a DVD player (6-channel input) (For VR-615/KRF-V5060D only 12 Connecting the speakers 13 Connecting the terminals 14 Connecting the antennas 14 Connecting the system control 15 Preparing the remote control 16 Preparing for surround sound 17 Speaker settings 17 Operations Normal playback 19 Preparing for future reference. 3 EN and Europe only 25 Ambience effects 26 Surround modes 26 Surround play 28 DVD 6-channel playback (For VR-615/KRFV5060D only 29 Convenient functions 29 Remote Control...
... audio components 9 Connecting video components 10 Digital connections 11 Connecting a DVD player (6-channel input) (For VR-615/KRF-V5060D only 12 Connecting the speakers 13 Connecting the terminals 14 Connecting the antennas 14 Connecting the system control 15 Preparing the remote control 16 Preparing for surround sound 17 Speaker settings 17 Operations Normal playback 19 Preparing for future reference. 3 EN and Europe only 25 Ambience effects 26 Surround modes 26 Surround play 28 DVD 6-channel playback (For VR-615/KRFV5060D only 29 Convenient functions 29 Remote Control...
Instruction Manual
Page 4
... to 5.1 channels of independent digital audio for approximately 1 day. • Power mode. • Input selector settings. • Picture output. • Speaker ON/OFF. • Volume level. • BASS, TREBLE, INPUT level. • Dimmer level. • MD/TAPE settings. • Listen mode setting. • Speaker settings. • SW RE-MIX ON/OFF. • Distance setting. • Input mode setting. • Midnight mode setting. • PRO LOGIC II mode setting. • Broadcast band. • Frequency setting. • Preset stations. • Tuning mode. • CINEMA EQ ON...
... to 5.1 channels of independent digital audio for approximately 1 day. • Power mode. • Input selector settings. • Picture output. • Speaker ON/OFF. • Volume level. • BASS, TREBLE, INPUT level. • Dimmer level. • MD/TAPE settings. • Listen mode setting. • Speaker settings. • SW RE-MIX ON/OFF. • Distance setting. • Input mode setting. • Midnight mode setting. • PRO LOGIC II mode setting. • Broadcast band. • Frequency setting. • Preset stations. • Tuning mode. • CINEMA EQ ON...
Instruction Manual
Page 5
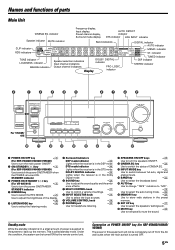
... in the Dolby Digital mode. 6 SOUND key ª Use to turn the power ON/STANDBY. indicator TONE indicator LOUDNESS indicator 96kHzfs indicator Speaker selection indicators Input channel indicators Output channel indicators Display DOLBY DIGITAL indicator PRO LOGIC indicator TUNED indicator DSP indicator STEREO indicator POWER STANDBY ON ⁄ STANDBY For VR-605/ 615 STANDBY ON ⁄ STANDBY SPEAKERS ON ⁄ OFF POWER ON OFF PHONES DIMMER LISTEN MODE DSP DTS DOLBY DIGITAL CINEMA EQ INPUT MODE BAND AUTO MEMORY VOLUME CONTROL SOUND SET UP MULTI CONTROL INPUT SELECTOR...
... in the Dolby Digital mode. 6 SOUND key ª Use to turn the power ON/STANDBY. indicator TONE indicator LOUDNESS indicator 96kHzfs indicator Speaker selection indicators Input channel indicators Output channel indicators Display DOLBY DIGITAL indicator PRO LOGIC indicator TUNED indicator DSP indicator STEREO indicator POWER STANDBY ON ⁄ STANDBY For VR-605/ 615 STANDBY ON ⁄ STANDBY SPEAKERS ON ⁄ OFF POWER ON OFF PHONES DIMMER LISTEN MODE DSP DTS DOLBY DIGITAL CINEMA EQ INPUT MODE BAND AUTO MEMORY VOLUME CONTROL SOUND SET UP MULTI CONTROL INPUT SELECTOR...
Instruction Manual
Page 6
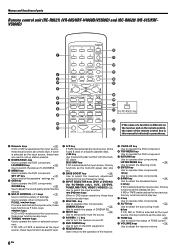
...; TONE key ) Use to switch the status of the remote control key in this key functions as the multi-CD player disc skip key. 8 BASS BOOST key ) Use to select the maximum adjustment setting for the low frequency range. 9 INPUT SELECTOR keys [DVD or DVD/6ch (for RC-R0620 only), AUX, CD/DVD, TUNER, MD/TAPE, VIDEO1, VIDEO2]( Use to adjust the receiver volume. 6 EN nent. CD player. MUTE key ) Use to temporarily mute the sound. @ POWER ( ) key Use to turn the receiver...
...; TONE key ) Use to switch the status of the remote control key in this key functions as the multi-CD player disc skip key. 8 BASS BOOST key ) Use to select the maximum adjustment setting for the low frequency range. 9 INPUT SELECTOR keys [DVD or DVD/6ch (for RC-R0620 only), AUX, CD/DVD, TUNER, MD/TAPE, VIDEO1, VIDEO2]( Use to adjust the receiver volume. 6 EN nent. CD player. MUTE key ) Use to temporarily mute the sound. @ POWER ( ) key Use to turn the receiver...
Instruction Manual
Page 7
... player disc skip key. 8 BASS BOOST key ) Use to select the maximum adjustment setting for the low frequency range. 9 INPUT SELECTOR keys [DVD or DVD/6ch (for RC-R0622only), AUX or PHONO (for PTY search. ^ TOP MENU key Use to operate the tuner or selected compo- CINEMA EQ key ) Use to switch the status of TONE control. £ VOLUME keys ( Use to switch the status of CINEMA EQ. ! RDS DISPLAY key ¢ Use for RDS function. & RETURN key Use to select the input sources. 4 DVD...
... player disc skip key. 8 BASS BOOST key ) Use to select the maximum adjustment setting for the low frequency range. 9 INPUT SELECTOR keys [DVD or DVD/6ch (for RC-R0622only), AUX or PHONO (for PTY search. ^ TOP MENU key Use to operate the tuner or selected compo- CINEMA EQ key ) Use to switch the status of TONE control. £ VOLUME keys ( Use to switch the status of CINEMA EQ. ! RDS DISPLAY key ¢ Use for RDS function. & RETURN key Use to select the input sources. 4 DVD...
Instruction Manual
Page 8
... Make connections as follows: In DTS play mode 1 F-AUTO (digital input, analog input) 2 D-MANUAL (digital input) In CD/DVD, VIDEO2, DVD or DVD/6CH (VR-615/KRF-V5060D only) play mode 1 F-AUTO (digital input, analog input) 2 D-MANUAL (digital input) 3 6CH INPT (DVD/6CH input) 4 ANALOG (analog input) Digital input: Select this setting to play digital signals from a cassette deck, VCR, or record player. The initial factory setting is pressed quickly, sound may be cases in which the listening mode is given to digital signal during playback to match the type of input signal (Dolby Digital...
... Make connections as follows: In DTS play mode 1 F-AUTO (digital input, analog input) 2 D-MANUAL (digital input) In CD/DVD, VIDEO2, DVD or DVD/6CH (VR-615/KRF-V5060D only) play mode 1 F-AUTO (digital input, analog input) 2 D-MANUAL (digital input) 3 6CH INPT (DVD/6CH input) 4 ANALOG (analog input) Digital input: Select this setting to play digital signals from a cassette deck, VCR, or record player. The initial factory setting is pressed quickly, sound may be cases in which the listening mode is given to digital signal during playback to match the type of input signal (Dolby Digital...
Instruction Manual
Page 11
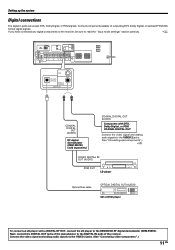
... CHANNEL SPACE SYSTEM CONTROL 50µs AM 9kHz FM 50kHz 75µs AM 10kHz FM 100kHz AUDIO DVD CD / DVD OPTICAL VIDEO 2 COAXIAL DIGITAL IN DVD / 6CH INPUT CENTER FRONT SPEAKERS (8-16Ω) CENTER SPEAKER (8-16Ω) + SURROUND SPEAKERS (8-16Ω) + R - - If you have connected any digital components to the receiver, be sure to the KENWOOD RF digital demodulator (DEM-9991D). Connect the video signal and analog audio signals to the DIGITAL IN jacks of outputting DTS, Dolby Digital, or standard PCM (CD) format digital signals. Setting...
... CHANNEL SPACE SYSTEM CONTROL 50µs AM 9kHz FM 50kHz 75µs AM 10kHz FM 100kHz AUDIO DVD CD / DVD OPTICAL VIDEO 2 COAXIAL DIGITAL IN DVD / 6CH INPUT CENTER FRONT SPEAKERS (8-16Ω) CENTER SPEAKER (8-16Ω) + SURROUND SPEAKERS (8-16Ω) + R - - If you have connected any digital components to the receiver, be sure to the KENWOOD RF digital demodulator (DEM-9991D). Connect the video signal and analog audio signals to the DIGITAL IN jacks of outputting DTS, Dolby Digital, or standard PCM (CD) format digital signals. Setting...
Instruction Manual
Page 12
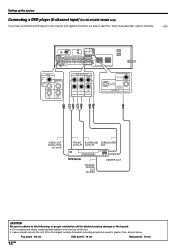
... PLAY IN PLAY IN DVD MD / TAPE VIDEO1 VIDEO 2 FRONT SURROUND SUB WOOFER R SUB WOOFER RED PRE OUT L WHITE C R GREEN GRAY SPEAKERS L BLUE AC OUTLETS AC110V-120V / 220V-240V~ AC 220240V~ AC 110120V~ 50 / 60Hz SWITCHED TOTAL 90W MAX. VOLTAGE SELECTOR VIDEO DVD IN VIDEO 2 IN MONITOR OUT VIDEO 1 IN VIDEO 1 OUT DVD / 6CH INPUT CENTER FRONT SURROUND SUB WOOFER DVD / 6CH CD / DVD OPTICAL VIDEO 2 COAXIAL DIGITAL IN VIDEO OUT (Yellow RCA pin cord) FRONT SURROUND SUBWOOFER OUT L/R OUT L/R OUT DVD player COAXIAL DIGITAL OUT (AUDIO) CENTER...
... PLAY IN PLAY IN DVD MD / TAPE VIDEO1 VIDEO 2 FRONT SURROUND SUB WOOFER R SUB WOOFER RED PRE OUT L WHITE C R GREEN GRAY SPEAKERS L BLUE AC OUTLETS AC110V-120V / 220V-240V~ AC 220240V~ AC 110120V~ 50 / 60Hz SWITCHED TOTAL 90W MAX. VOLTAGE SELECTOR VIDEO DVD IN VIDEO 2 IN MONITOR OUT VIDEO 1 IN VIDEO 1 OUT DVD / 6CH INPUT CENTER FRONT SURROUND SUB WOOFER DVD / 6CH CD / DVD OPTICAL VIDEO 2 COAXIAL DIGITAL IN VIDEO OUT (Yellow RCA pin cord) FRONT SURROUND SUBWOOFER OUT L/R OUT L/R OUT DVD player COAXIAL DIGITAL OUT (AUDIO) CENTER...
Instruction Manual
Page 14
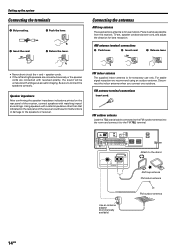
... as possible from the receiver, TV set, speaker cords and power cord, and adjust the direction for best reception. FM indoor antenna The supplied indoor antenna is for temporary use indoors. For stable signal reception we recommend using an outdoor antenna. VIDEO 1 IN VIDEO 1 OUT GND PHONO CD / DVD REC OUT PLAY IN REC OUT PLAY IN PLAY IN DVD MD / TAPE VIDEO1 VIDEO 2 FRONT SURROUND SUB WOOFER R SUB WOOFER RED PRE OUT L WHITE C R GREEN GRAY SPEAKERS L BLUE AC OUTLETS AC110V...
... as possible from the receiver, TV set, speaker cords and power cord, and adjust the direction for best reception. FM indoor antenna The supplied indoor antenna is for temporary use indoors. For stable signal reception we recommend using an outdoor antenna. VIDEO 1 IN VIDEO 1 OUT GND PHONO CD / DVD REC OUT PLAY IN REC OUT PLAY IN PLAY IN DVD MD / TAPE VIDEO1 VIDEO 2 FRONT SURROUND SUB WOOFER R SUB WOOFER RED PRE OUT L WHITE C R GREEN GRAY SPEAKERS L BLUE AC OUTLETS AC110V...
Instruction Manual
Page 17
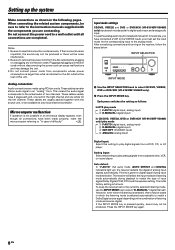
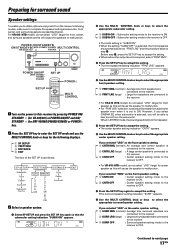
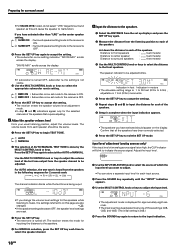
... front speakers are connected to the receiver. 3 SURR OFF : Surround speaker setting mode to malfunction. POWER ON/STANDBY ON/STANDBY (KRF-V5060D/ V4060D/ MULTI CONTROL (VR-605/615) V5560D) POWER ON/OFF (KRF-V5060D/ V4060D/ V5560D) SET UP SET UP POWER MULTI CONTROL 1Turn on the power to this will cause the speaker to malfunction. • For "FRNT LRG" selection, no sound will be heard from the receiver's listening modes, make sure to complete the speaker settings (subwoofer, front, center, and surround speakers...
... front speakers are connected to the receiver. 3 SURR OFF : Surround speaker setting mode to malfunction. POWER ON/STANDBY ON/STANDBY (KRF-V5060D/ V4060D/ MULTI CONTROL (VR-605/615) V5560D) POWER ON/OFF (KRF-V5060D/ V4060D/ V5560D) SET UP SET UP POWER MULTI CONTROL 1Turn on the power to this will cause the speaker to malfunction. • For "FRNT LRG" selection, no sound will be heard from the receiver's listening modes, make sure to complete the speaker settings (subwoofer, front, center, and surround speakers...
Instruction Manual
Page 18
... be adjusted to any one of the speakers. Preparing for surround sound • For VR-615 (HTB model), do not select "LRG" (large) for surround speaker as the center speaker setting, 1 SURR ON : Surround speaker setting mode to the receiver is ON. 2 SURR OFF : Surround speaker setting mode to the receiver is complete when the input indication appears. • The speakers you change the volume level settings for 2 seconds each: The channel indication blinks while the test tone is done by the MULTI CONTROL...
... be adjusted to any one of the speakers. Preparing for surround sound • For VR-615 (HTB model), do not select "LRG" (large) for surround speaker as the center speaker setting, 1 SURR ON : Surround speaker setting mode to the receiver is ON. 2 SURR OFF : Surround speaker setting mode to the receiver is complete when the input indication appears. • The speakers you change the volume level settings for 2 seconds each: The channel indication blinks while the test tone is done by the MULTI CONTROL...
Instruction Manual
Page 19
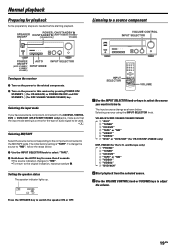
... a source component VOLUME CONTROL INPUT SELECTOR POWER ON/OFF (KRF-V5060D/ V4060D/ V5560D) AUTO INPUT MODE INPUT SELECTOR Turning on the receiver 1 Turn on the power to the related components. 2 Turn on the power to the MD/TAPE jacks. VR-605/615/KRF-V5060D/V4060D/V5560D 1 "AUX" 2 "TUNER" 3 "CD/DVD" 4 "TAPE" or "MD" 5 "VIDEO1" 6 "VIDEO2" 7 "DVD" or "DVD/6CH" (for VR-615/KRF-V5060D only) KRF-V5060D (for the type of audio signal to be used. 8 Selecting MD/TAPE Select the source...
... a source component VOLUME CONTROL INPUT SELECTOR POWER ON/OFF (KRF-V5060D/ V4060D/ V5560D) AUTO INPUT MODE INPUT SELECTOR Turning on the receiver 1 Turn on the power to the related components. 2 Turn on the power to the MD/TAPE jacks. VR-605/615/KRF-V5060D/V4060D/V5560D 1 "AUX" 2 "TUNER" 3 "CD/DVD" 4 "TAPE" or "MD" 5 "VIDEO1" 6 "VIDEO2" 7 "DVD" or "DVD/6CH" (for VR-615/KRF-V5060D only) KRF-V5060D (for the type of audio signal to be used. 8 Selecting MD/TAPE Select the source...
Instruction Manual
Page 20
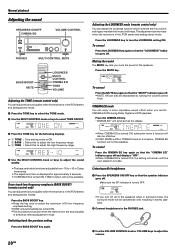
... adjust the volume. Adjusting the LOUDNESS mode (remote control only) You can also be turned ON. • This key does not function when the receiver is in stereo playback. 2 Connect headphones to +10 in 2 step increments. • The adjustment item is displayed for the following displays. 1 TONE : Tone setting mode is ON. 2 BASS : Select this to adjust the low frequency range. 3 TREB : Select this to adjust the high frequency range. 4 Use the MULTI CONTROL knob or keys to adjust the sound...
... adjust the volume. Adjusting the LOUDNESS mode (remote control only) You can also be turned ON. • This key does not function when the receiver is in stereo playback. 2 Connect headphones to +10 in 2 step increments. • The adjustment item is displayed for the following displays. 1 TONE : Tone setting mode is ON. 2 BASS : Select this to adjust the low frequency range. 3 TREB : Select this to adjust the high frequency range. 4 Use the MULTI CONTROL knob or keys to adjust the sound...
Instruction Manual
Page 22
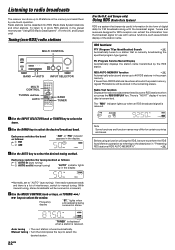
...) Tuning (non-RDS) radio stations MULTI CONTROL BAND AUTO INPUT SELECTOR MULTI CONTROL TUNING 1 / ¡ AUTO BAND TUNER (For the U.K. PS (Program Service Name) Display Automatically displays the station name transmitted by some RDS stations when you press the RDS DISPLAY key. Frequency display "ST." Auto tuning : The next station is received. To listen to select the desired broadcast band. Tuners and receivers designed for use with the broadcast signal. If fewer than 40 RDS stations have been stored in the preset...
...) Tuning (non-RDS) radio stations MULTI CONTROL BAND AUTO INPUT SELECTOR MULTI CONTROL TUNING 1 / ¡ AUTO BAND TUNER (For the U.K. PS (Program Service Name) Display Automatically displays the station name transmitted by some RDS stations when you press the RDS DISPLAY key. Frequency display "ST." Auto tuning : The next station is received. To listen to select the desired broadcast band. Tuners and receivers designed for use with the broadcast signal. If fewer than 40 RDS stations have been stored in the preset...
Instruction Manual
Page 26
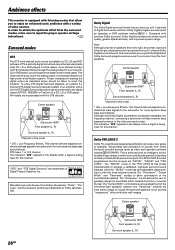
... logic design, a matrix surround decoding and the decoding of video sources. Proper measures for this receiver lets you enjoy Dolby Digital (and Dolby Surround) program sources, even if you enjoy up to 5.1 channels of the soundfields as video and Laserdisc software marked ). This is a strictly digital format and cannot be connected to produce a calibrated, high-level surround sound playback while the "MUSIC" mode has user-adjustable characteris- Center speaker 26 EN Subwoofer (SW) Front speaker (L, R) Surround speaker (L, R) In order to...
... logic design, a matrix surround decoding and the decoding of video sources. Proper measures for this receiver lets you enjoy Dolby Digital (and Dolby Surround) program sources, even if you enjoy up to 5.1 channels of the soundfields as video and Laserdisc software marked ). This is a strictly digital format and cannot be connected to produce a calibrated, high-level surround sound playback while the "MUSIC" mode has user-adjustable characteris- Center speaker 26 EN Subwoofer (SW) Front speaker (L, R) Surround speaker (L, R) In order to...
Instruction Manual
Page 28
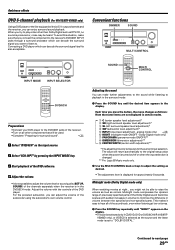
... INPUT SELECTOR LISTEN MODE Preparations •Turn ON related components. •Complete "Preparing for surround sound" (speaker settings).& • Use the INPUT SELECTOR to select the component you wish to play The DTS compatible models can be used when playing video, DVD, or LD software bearing the mark. Notes • Depending on the type of available channels. 3Adjust the volume. Ambience effects Surround play back. 8 • Noise will scroll from a single component, be sure to use a Dolby Digital compatible source component...
... INPUT SELECTOR LISTEN MODE Preparations •Turn ON related components. •Complete "Preparing for surround sound" (speaker settings).& • Use the INPUT SELECTOR to select the component you wish to play The DTS compatible models can be used when playing video, DVD, or LD software bearing the mark. Notes • Depending on the type of available channels. 3Adjust the volume. Ambience effects Surround play back. 8 • Noise will scroll from a single component, be sure to use a Dolby Digital compatible source component...
Instruction Manual
Page 29
..., no sound is set to adjust the volume level or sound quality (SET UP, SOUND) of the channels separately when the receiver is displayed for approximately 8 seconds. When you try to play a disc other components that will return automatically to the original setup value when the power is turned on/off or when the input selection is changed. ** Pro Logic II Music mode only. 2 Use the MULTI CONTROL knob or keys to adjust the setting as the input source...
..., no sound is set to adjust the volume level or sound quality (SET UP, SOUND) of the channels separately when the receiver is displayed for approximately 8 seconds. When you try to play a disc other components that will return automatically to the original setup value when the power is turned on/off or when the input selection is changed. ** Pro Logic II Music mode only. 2 Use the MULTI CONTROL knob or keys to adjust the setting as the input source...
Instruction Manual
Page 31
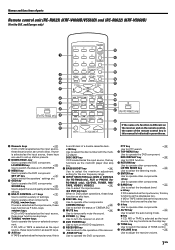
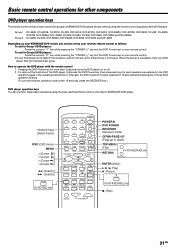
... (Select tracks) OSD (OSD menu) MENU %(Cursor ») fi(Cursor «) #(Cursor \) @(Cursor |) 1 (Search) ¡ (Search) PHONO (For RC-R0622 only) POWER 1 2 3 4 5 6 DVD POWER 7 8 9 RECEIVER 0 +10 DOWN-PAGE-UP LOUDNESS MENU OSD RETURN TOP MENU SET UP SOUND LISTEN MODE P.CALL P.CALL MULTI CONTROL TUNING ENTER BAND A/B+100 AUTO BASS BOOST DISC SKIP DVD AUX CD/DVD TUNER MD/TAPE DVD DISC SEL. In this unit can perform these basic operations using the remote control supplied with the remote control...
... (Select tracks) OSD (OSD menu) MENU %(Cursor ») fi(Cursor «) #(Cursor \) @(Cursor |) 1 (Search) ¡ (Search) PHONO (For RC-R0622 only) POWER 1 2 3 4 5 6 DVD POWER 7 8 9 RECEIVER 0 +10 DOWN-PAGE-UP LOUDNESS MENU OSD RETURN TOP MENU SET UP SOUND LISTEN MODE P.CALL P.CALL MULTI CONTROL TUNING ENTER BAND A/B+100 AUTO BASS BOOST DISC SKIP DVD AUX CD/DVD TUNER MD/TAPE DVD DISC SEL. In this unit can perform these basic operations using the remote control supplied with the remote control...

Instruction Manual
Page 33
...; Adjust the volume to a proper level. • Turn OFF the MUTE. ) • Set the SPEAKERS switch to ON. ( The standby indicator blinks and sound is copy-guarded. • Set the input mode to digital manual before starting playback of the Dolby Digital source. 8 • Press the INPUT MODE key to select to digital auto mode. 8 • Copy-guarded video software cannot be recorded. not output. • Turn the power off, eliminate the short-circuiting, then turn the POWER key OFF. using the test tone...
...; Adjust the volume to a proper level. • Turn OFF the MUTE. ) • Set the SPEAKERS switch to ON. ( The standby indicator blinks and sound is copy-guarded. • Set the input mode to digital manual before starting playback of the Dolby Digital source. 8 • Press the INPUT MODE key to select to digital auto mode. 8 • Copy-guarded video software cannot be recorded. not output. • Turn the power off, eliminate the short-circuiting, then turn the POWER key OFF. using the test tone...


