Instruction Manual
Page 2
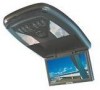
... Adjustments 7 Changing the Dome Light Bulbs 7 Troubleshooting Guide 7 Specifications 7 2 LZH-70W Instruction Manual CONGRATULATIONS! Your LZH-70W console lets rear-seat passengers enjoy audio/video entertainment from its 7" diagonal LCD screen and wired & wireless headphone outputs. For the latest information about this and other Kenwood products, visit the Kenwood Corporation Web site at: www.kenwoodeurope.com Table of...
... Adjustments 7 Changing the Dome Light Bulbs 7 Troubleshooting Guide 7 Specifications 7 2 LZH-70W Instruction Manual CONGRATULATIONS! Your LZH-70W console lets rear-seat passengers enjoy audio/video entertainment from its 7" diagonal LCD screen and wired & wireless headphone outputs. For the latest information about this and other Kenwood products, visit the Kenwood Corporation Web site at: www.kenwoodeurope.com Table of...
Instruction Manual
Page 3
...the screen. If the liquid crystal fluid from the LCD contacts your health or even fatal. CAUTION To prevent damage to the LZH-70W, take the following precautions: • Make sure ...with too much dust or the possibility of water splashing. • Do not subject the monitor unit to excessive shock, as it is a piece of precision equipment. • When ...wires, make sure to the unit. This Product is not installed by the professional importer of place during installation, consult your Kenwood dealer. • Be careful not to drop the unit or subject it may cause your Kenwood...
...the screen. If the liquid crystal fluid from the LCD contacts your health or even fatal. CAUTION To prevent damage to the LZH-70W, take the following precautions: • Make sure ...with too much dust or the possibility of water splashing. • Do not subject the monitor unit to excessive shock, as it is a piece of precision equipment. • When ...wires, make sure to the unit. This Product is not installed by the professional importer of place during installation, consult your Kenwood dealer. • Be careful not to drop the unit or subject it may cause your Kenwood...
Instruction Manual
Page 4
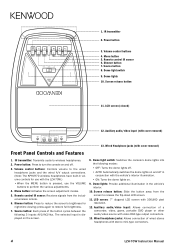
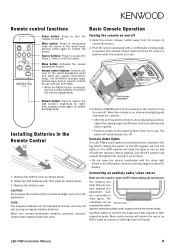
... audio/video source with stereo mini-type connectors. 4 LZH-70W Instruction Manual The selected input is pressed, use the VOLUME buttons to restore full brightness. 7. LCD screen: 7" diagonal LCD screen with cover removed) 13. Menu button 5. Volume control buttons: Controls volume to the wired headphone jacks and the wired A/V output connections. (Note: The KPH-IR70 wireless...
... audio/video source with stereo mini-type connectors. 4 LZH-70W Instruction Manual The selected input is pressed, use the VOLUME buttons to restore full brightness. 7. LCD screen: 7" diagonal LCD screen with cover removed) 13. Menu button 5. Volume control buttons: Controls volume to the wired headphone jacks and the wired A/V output connections. (Note: The KPH-IR70 wireless...
Instruction Manual
Page 5
... screen adjustment modes. Dimmer button: Press to reduce the LCD screen's brightness for operational checks, and may not last ...controlled by removing their respective jacks. The connectors can be accessed by the 3-position sliding switch. LZH-70W Instruction Manual 5 Source buttons: Press to restore full brightness. The internal friction detent will automatically ...optional A/V equipment, such as shown above . 3. Volume control buttons: Controls volume to the wired headphone jacks and wired A/V output connections. (Note: The KPH-IR70 wireless headphones have built-in use with their...
... screen adjustment modes. Dimmer button: Press to reduce the LCD screen's brightness for operational checks, and may not last ...controlled by removing their respective jacks. The connectors can be accessed by the 3-position sliding switch. LZH-70W Instruction Manual 5 Source buttons: Press to restore full brightness. The internal friction detent will automatically ...optional A/V equipment, such as shown above . 3. Volume control buttons: Controls volume to the wired headphone jacks and wired A/V output connections. (Note: The KPH-IR70 wireless headphones have built-in use with their...
Instruction Manual
Page 6
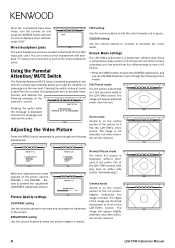
... of the picture so it fills the entire width of the wired headphone jacks. Screen Mode settings The LZH-70W's LCD screen is not distorted, but video resolution will not fill the screen completely, you can connect wired headphones with grey bars on -screen display's input indicator reads... "AUX". When the adjustment you to each of the LZH-70W's screen. buttons to perform...
... of the picture so it fills the entire width of the wired headphone jacks. Screen Mode settings The LZH-70W's LCD screen is not distorted, but video resolution will not fill the screen completely, you can connect wired headphones with grey bars on -screen display's input indicator reads... "AUX". When the adjustment you to each of the LZH-70W's screen. buttons to perform...
Instruction Manual
Page 7
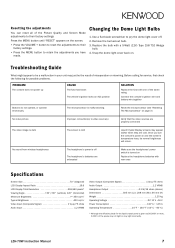
...Light Bulbs 1. Replace the bulb with new ones Specifications Screen Size 7.0" (diagonal) LCD Display Aspect Ratio 16:9 LCD Display Total Resolution 336,960 pixels* Viewing Angle 30°/-60° (vertical...Replace the fuse with one of the same rating Connect the console's ignition wire and battery wire together Buttons do not operate, or operate erroneously The microprocessor is malfunctioning ... the headphone batteries with a 5-Watt (12V) Type 158 T10 Wedge bulb. 4. LZH-70W Instruction Manual 7 Snap the dome light cover back on. Resetting the adjustments You can...
...Light Bulbs 1. Replace the bulb with new ones Specifications Screen Size 7.0" (diagonal) LCD Display Aspect Ratio 16:9 LCD Display Total Resolution 336,960 pixels* Viewing Angle 30°/-60° (vertical...Replace the fuse with one of the same rating Connect the console's ignition wire and battery wire together Buttons do not operate, or operate erroneously The microprocessor is malfunctioning ... the headphone batteries with a 5-Watt (12V) Type 158 T10 Wedge bulb. 4. LZH-70W Instruction Manual 7 Snap the dome light cover back on. Resetting the adjustments You can...
Installation Manual
Page 2
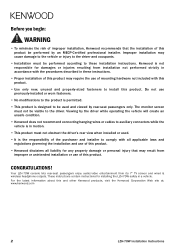
...8226; To minimise the risk of improper installation, Kenwood recommends that may result from improper or unintended installation or use of this product. The monitor screen must not be used . • It is not responsible for installing the LZH-70W safely in motion. • This product must be...No modifications to the driver. Viewing by the driver while operating the vehicle will create an unsafe condition. • Kenwood does not recommend connecting hanging wires or cables to auxiliary connectors while the vehicle is designed to be visible to the product is permitted. • ...
...8226; To minimise the risk of improper installation, Kenwood recommends that may result from improper or unintended installation or use of this product. The monitor screen must not be used . • It is not responsible for installing the LZH-70W safely in motion. • This product must be...No modifications to the driver. Viewing by the driver while operating the vehicle will create an unsafe condition. • Kenwood does not recommend connecting hanging wires or cables to auxiliary connectors while the vehicle is designed to be visible to the product is permitted. • ...
Installation Manual
Page 3
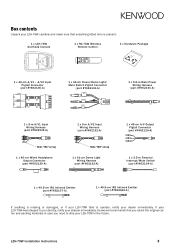
...5-m A/V1 Input Wiring Harness (part #Y662136-A) Note: "IR1" on tag 1 x 46-cm Wired Headphone Output Connector (part #Y662130-A) 1 x 5-m A/V2 Input Wiring Harness (part #Y662161-A) Note: "IR2" on tag 1 x 61-cm Dome Light Wiring Harness (part #Y662132-A) 1 x 5.5-m Main Power Wiring Harness (part #...If anything is present: 1 x LZH-70W Overhead Console 1 x RC-70W Wireless Remote Control 1 x Hardware Package 1 x 46-cm A/V1 - If your LZH-70W was shipped to operate, notify your LZH-70W in the future. LZH-70W Installation Instructions 3 Kenwood recommends that everything listed here is ...
...5-m A/V1 Input Wiring Harness (part #Y662136-A) Note: "IR1" on tag 1 x 46-cm Wired Headphone Output Connector (part #Y662130-A) 1 x 5-m A/V2 Input Wiring Harness (part #Y662161-A) Note: "IR2" on tag 1 x 61-cm Dome Light Wiring Harness (part #Y662132-A) 1 x 5.5-m Main Power Wiring Harness (part #...If anything is present: 1 x LZH-70W Overhead Console 1 x RC-70W Wireless Remote Control 1 x Hardware Package 1 x 46-cm A/V1 - If your LZH-70W was shipped to operate, notify your LZH-70W in the future. LZH-70W Installation Instructions 3 Kenwood recommends that everything listed here is ...
Installation Manual
Page 4
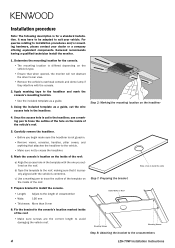
... bracket to install the console. • Length: Adjust to the crossmembers 4 LZH-70W Installation Instructions Kenwood recommends having a qualified technician install the monitor. 1. Step 2: Marking the mounting location on the inside of the vehicle's... roof. 5. Once the access hole is cut in the headliner, use a marking pen to the headliner and mark the console's mounting location. • Use the included template as a guide, cut the wire...
... bracket to install the console. • Length: Adjust to the crossmembers 4 LZH-70W Installation Instructions Kenwood recommends having a qualified technician install the monitor. 1. Step 2: Marking the mounting location on the inside of the vehicle's... roof. 5. Once the access hole is cut in the headliner, use a marking pen to the headliner and mark the console's mounting location. • Use the included template as a guide, cut the wire...
Installation Manual
Page 5
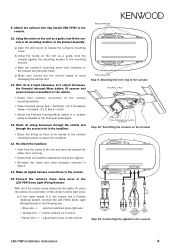
...damaging the vehicle roof. 11. Step 9: Attaching the trim ring to the console. 10. Connect the vehicle's dome lamp wires to the LZH-70W Dome Light Wiring Harness: With all of the vehicle doors closed and the lights off, place the probes of the roof and work out ...pilot holes. Using the marks on the bracket assembly: a) Open the LCD screen to the front-seat passengers. Make all headliner attachment points are the correct length to the console LZH-70W Installation Instructions 5 Wire all wiring harnesses through the vehicle and through the access hole in its mounting ...
...damaging the vehicle roof. 11. Step 9: Attaching the trim ring to the console. 10. Connect the vehicle's dome lamp wires to the LZH-70W Dome Light Wiring Harness: With all of the vehicle doors closed and the lights off, place the probes of the roof and work out ...pilot holes. Using the marks on the bracket assembly: a) Open the LCD screen to the front-seat passengers. Make all headliner attachment points are the correct length to the console LZH-70W Installation Instructions 5 Wire all wiring harnesses through the vehicle and through the access hole in its mounting ...
Installation Manual
Page 6
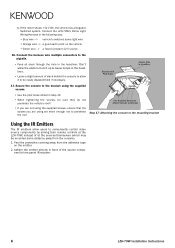
...IR emitters allow it to penetrate the roof. Peel the protective covering away from the console). 1. Connect the LZH-70W's Dome Light Wiring Harness in front of at the sources themselves (which may be easily disassembled if necessary. 17. Connect the harness... wire multipin connectors to conveniently control video source components by aiming their remote controls at the LZH-70W, instead of the source component's front-panel IR receiver. 6 LZH-70W Installation Instructions b) If the meter shows +12 V DC, the...
...IR emitters allow it to penetrate the roof. Peel the protective covering away from the console). 1. Connect the LZH-70W's Dome Light Wiring Harness in front of at the sources themselves (which may be easily disassembled if necessary. 17. Connect the harness... wire multipin connectors to conveniently control video source components by aiming their remote controls at the LZH-70W, instead of the source component's front-panel IR receiver. 6 LZH-70W Installation Instructions b) If the meter shows +12 V DC, the...


