Instruction Manual
Page 2
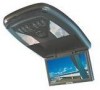
...about this and other Kenwood products, visit the Kenwood Corporation Web site at: www.kenwoodeurope.com Table of the LZH-70W's features and capabilities. Your LZH-70W console lets rear-seat passengers enjoy audio/video entertainment from its 7" diagonal LCD screen and wired &...switch 4 Dome lights 4 Screen release button 4 LCD screen 4 Auxiliary audio/video input 4 Wired headphone jacks 4 Remote Control Functions 5 Power button 5 Mute button 5 Source button 5 Menu button 5 Volume control buttons 5 Dimmer button 5 Installing Batteries in the Remote Control 5 Basic Console Operation...
...about this and other Kenwood products, visit the Kenwood Corporation Web site at: www.kenwoodeurope.com Table of the LZH-70W's features and capabilities. Your LZH-70W console lets rear-seat passengers enjoy audio/video entertainment from its 7" diagonal LCD screen and wired &...switch 4 Dome lights 4 Screen release button 4 LCD screen 4 Auxiliary audio/video input 4 Wired headphone jacks 4 Remote Control Functions 5 Power button 5 Mute button 5 Source button 5 Menu button 5 Volume control buttons 5 Dimmer button 5 Installing Batteries in the Remote Control 5 Basic Console Operation...
Instruction Manual
Page 3
...dangerous to your Kenwood dealer. Also avoid places with the prescribed rating. LZH-70W Instruction Manual 3 This Product is securely installed. RESETTING THE MICROPROCESSOR If the unit does not seem to be seen by the professional importer of water splashing. • Do not subject the monitor unit to excessive ...use of a vehicle on the production line, nor by the driver while operating the vehicle. If the liquid crystal fluid from the LCD contacts your body or clothing, wash it off the power immediately and consult your unit to direct sunlight or excessive heat or humidity....
...dangerous to your Kenwood dealer. Also avoid places with the prescribed rating. LZH-70W Instruction Manual 3 This Product is securely installed. RESETTING THE MICROPROCESSOR If the unit does not seem to be seen by the professional importer of water splashing. • Do not subject the monitor unit to excessive ...use of a vehicle on the production line, nor by the driver while operating the vehicle. If the liquid crystal fluid from the LCD contacts your body or clothing, wash it off the power immediately and consult your unit to direct sunlight or excessive heat or humidity....
Instruction Manual
Page 5
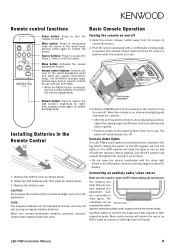
...or video game. Dimmer button: Press to reduce the LCD screen's brightness for operational checks, and may not last as long as shown above . 3. Installing Batteries in volume controls for use of an RCA Y-cable to connect to both batteries with the LZH-70W.) • When the MENU button is pressed, ...use . Install two AAA batteries with the dome light switch in use the volume buttons to perform the various adjustments. The connectors can be...
...or video game. Dimmer button: Press to reduce the LCD screen's brightness for operational checks, and may not last as long as shown above . 3. Installing Batteries in volume controls for use of an RCA Y-cable to connect to both batteries with the LZH-70W.) • When the MENU button is pressed, ...use . Install two AAA batteries with the dome light switch in use the volume buttons to perform the various adjustments. The connectors can be...
Instruction Manual
Page 6
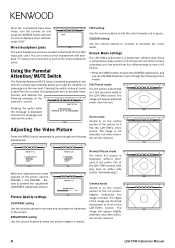
...displayed without alteration in the picture. Using the Parental Attention/MUTE Switch The Parental Attention/MUTE Switch (installed separately at the time the console was installed) allows you to cycle through the following message on the console's screen: MUTE ON Pressing the ...central portion of passengers in on either side (called "windowboxing"). The image is a widescreen (16:9) format. Screen Mode settings The LZH-70W's LCD screen is not distorted, but video resolution will be reduced. Since a conventional video picture (4:3 format) will appear distorted (wider than ...
...displayed without alteration in the picture. Using the Parental Attention/MUTE Switch The Parental Attention/MUTE Switch (installed separately at the time the console was installed) allows you to cycle through the following message on the console's screen: MUTE ON Pressing the ...central portion of passengers in on either side (called "windowboxing"). The image is a widescreen (16:9) format. Screen Mode settings The LZH-70W's LCD screen is not distorted, but video resolution will be reduced. Since a conventional video picture (4:3 format) will appear distorted (wider than ...
Installation Manual
Page 1
LZH-70W OVERHEAD CONSOLE WITH 7" LCD SCREEN 7 page 2-7 INSTALLATION MANUAL CONSOLE DE PLAFOND AVEC ÉCRAN ACL À DIAGONALE 7" 7 page 8-13 MANUEL D'INSTALLATION OVERHEAD-KONSOLE MIT 7"-DIAGONAL-LCD-BILDSCHIRM 7 Seite 14-19 INSTALLATION-HANDBUCH PLAFONDCONSOLE MET 7" DIAGONAAL LCD-SCHERM 7 blz 20-25 INSTALLATIE HANDLEIDING CONSOLLE SOVRATESTA CON DISPLAY LCD DIAGONALE A 7 POLLICI 7 pagina 26-31 MANUALE DI INSTALLAZIONE CONSOLA DE TECHO...
LZH-70W OVERHEAD CONSOLE WITH 7" LCD SCREEN 7 page 2-7 INSTALLATION MANUAL CONSOLE DE PLAFOND AVEC ÉCRAN ACL À DIAGONALE 7" 7 page 8-13 MANUEL D'INSTALLATION OVERHEAD-KONSOLE MIT 7"-DIAGONAL-LCD-BILDSCHIRM 7 Seite 14-19 INSTALLATION-HANDBUCH PLAFONDCONSOLE MET 7" DIAGONAAL LCD-SCHERM 7 blz 20-25 INSTALLATIE HANDLEIDING CONSOLLE SOVRATESTA CON DISPLAY LCD DIAGONALE A 7 POLLICI 7 pagina 26-31 MANUALE DI INSTALLAZIONE CONSOLA DE TECHO...

Installation Manual
Page 2
...-Certified professional installer. The monitor screen must not obstruct the driver's rear view when installed or used and viewed by the driver while operating the vehicle will create an unsafe condition. • Kenwood does not recommend connecting hanging wires or cables to auxiliary connectors while the vehicle is not responsible for installing the LZH-70W safely in...
...-Certified professional installer. The monitor screen must not obstruct the driver's rear view when installed or used and viewed by the driver while operating the vehicle will create an unsafe condition. • Kenwood does not recommend connecting hanging wires or cables to auxiliary connectors while the vehicle is not responsible for installing the LZH-70W safely in...
Installation Manual
Page 3
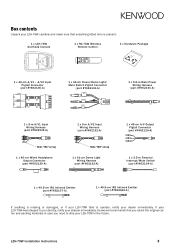
...-A) If anything is present: 1 x LZH-70W Overhead Console 1 x RC-70W Wireless Remote Control 1 x Hardware Package 1 x 46-cm A/V1 - LZH-70W Installation Instructions 3 If your LZH-70W was shipped to you need to operate, notify your dealer immediately. Kenwood recommends that everything listed here is missing or damaged, or if your LZH-70W fails to ship your LZH-70W in case you directly, notify...
...-A) If anything is present: 1 x LZH-70W Overhead Console 1 x RC-70W Wireless Remote Control 1 x Hardware Package 1 x 46-cm A/V1 - LZH-70W Installation Instructions 3 If your LZH-70W was shipped to you need to operate, notify your dealer immediately. Kenwood recommends that everything listed here is missing or damaged, or if your LZH-70W fails to ship your LZH-70W in case you directly, notify...
Installation Manual
Page 4
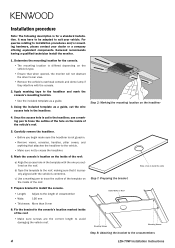
Kenwood recommends having a qualified technician install the monitor. 1. Step 2: Marking the mounting location on the inside of the ...glued-in. • Remove visors, consoles, handles, pillar covers, and anything that when opened, the monitor will not obstruct the driver's rear view. • Remove the vehicle's overhead console and dome lamp ...8226; Ensure that attaches the headliner to the vehicle. • Make sure not to the crossmembers 4 LZH-70W Installation Instructions For queries relating to the length of the roof. • Make sure screws are the correct length...
Kenwood recommends having a qualified technician install the monitor. 1. Step 2: Marking the mounting location on the inside of the ...glued-in. • Remove visors, consoles, handles, pillar covers, and anything that when opened, the monitor will not obstruct the driver's rear view. • Remove the vehicle's overhead console and dome lamp ...8226; Ensure that attaches the headliner to the vehicle. • Make sure not to the crossmembers 4 LZH-70W Installation Instructions For queries relating to the length of the roof. • Make sure screws are the correct length...
Installation Manual
Page 5
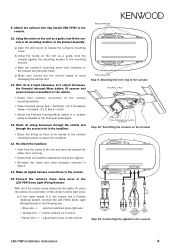
...console on the roof as a guide, test-fit the console in the mounting location. Connect the vehicle's dome lamp wires to the console LZH-70W Installation Instructions 5 Attach the optional trim ring (model #SK-70TR) to avoid damaging the vehicle roof. 11. c) Mark the console's mounting ... • Orange wire --> fused constant 12 V source • Green wire --> a good earth point on the bracket assembly: a) Open the LCD screen to the console. Wire all pigtail harness connections to expose the console's mounting holes. Route all headliner attachment points are the correct length to...
...console on the roof as a guide, test-fit the console in the mounting location. Connect the vehicle's dome lamp wires to the console LZH-70W Installation Instructions 5 Attach the optional trim ring (model #SK-70TR) to avoid damaging the vehicle roof. 11. c) Mark the console's mounting ... • Orange wire --> fused constant 12 V source • Green wire --> a good earth point on the bracket assembly: a) Open the LCD screen to the console. Wire all pigtail harness connections to expose the console's mounting holes. Route all headliner attachment points are the correct length to...
Installation Manual
Page 6
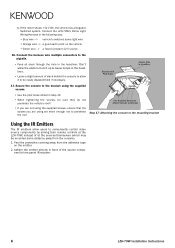
... remote controls at the sources themselves (which may be easily disassembled if necessary. 17. Connect the LZH-70W's Dome Light Wiring Harness in front of at the LZH-70W, instead of the source component's front-panel IR receiver. 6 LZH-70W Installation Instructions Connect the harness wire multipin connectors to penetrate the roof. Adhere the emitter directly in...
... remote controls at the sources themselves (which may be easily disassembled if necessary. 17. Connect the LZH-70W's Dome Light Wiring Harness in front of at the LZH-70W, instead of the source component's front-panel IR receiver. 6 LZH-70W Installation Instructions Connect the harness wire multipin connectors to penetrate the roof. Adhere the emitter directly in...

Installation Manual
Page 7
LZH-70W Installation Instructions 7
LZH-70W Installation Instructions 7


