
Instruction Manual
Page 1
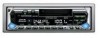
... through this instruction manual. Model KOS-L702 Serial number US Residence Only Register Online Register your new monitor. Familiarity with installation and operation procedures will help you call upon your Kenwood dealer for information or service on the warranty card, and in the space provided below. For your records Record the serial number, found on the back of the unit, in the...
... through this instruction manual. Model KOS-L702 Serial number US Residence Only Register Online Register your new monitor. Familiarity with installation and operation procedures will help you call upon your Kenwood dealer for information or service on the warranty card, and in the space provided below. For your records Record the serial number, found on the back of the unit, in the...
Instruction Manual
Page 2
... unit's display when you could lose the authority to operate this equipment may cause harmful interference unless the modifications are driving for any extended period. • Mounting and wiring this product requires skills and experience. The user could damage the unit. • You cannot view video pictures whilst the vehicle is damaged or broken due to malfunction. • Do not use radio frequency...
... unit's display when you could lose the authority to operate this equipment may cause harmful interference unless the modifications are driving for any extended period. • Mounting and wiring this product requires skills and experience. The user could damage the unit. • You cannot view video pictures whilst the vehicle is damaged or broken due to malfunction. • Do not use radio frequency...

Instruction Manual
Page 3
... our health and the environment. Contact your Kenwood dealer. • When you . English | 3 Reset button Screen brightness during low temperatures When the temperature of the display and the panel appearing in the illustrations may scratch the surface or erases characters. A/V controller you can control from what appears on the display in this unit is stained badly, wipe the stain off...
... our health and the environment. Contact your Kenwood dealer. • When you . English | 3 Reset button Screen brightness during low temperatures When the temperature of the display and the panel appearing in the illustrations may scratch the surface or erases characters. A/V controller you can control from what appears on the display in this unit is stained badly, wipe the stain off...
Instruction Manual
Page 4
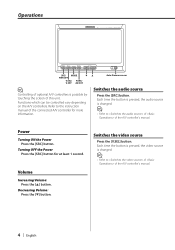
... the connected A/V controller for at least 1 second. Decreasing Volume: Press the [∞] button. Each time the button is pressed, the video source is changed . ⁄ • Refer to of of this unit. Functions which can be controlled vary depending on the A/V controllers. Switches the audio source Press the [SRC] button. Volume Increasing Volume: Press the [5] button. Turning OFF the Power Press the [SRC] button for more information. Switches the video source Press the [V.SEL] button. Operations SRC/ MODE PWR...
... the connected A/V controller for at least 1 second. Decreasing Volume: Press the [∞] button. Each time the button is pressed, the video source is changed . ⁄ • Refer to of of this unit. Functions which can be controlled vary depending on the A/V controllers. Switches the audio source Press the [SRC] button. Volume Increasing Volume: Press the [5] button. Turning OFF the Power Press the [SRC] button for more information. Switches the video source Press the [V.SEL] button. Operations SRC/ MODE PWR...

Instruction Manual
Page 5
Switching Screen Mode Press the [MODE] button. Setting Picture & Easy Control Panel Source Control Screen Picture Panel (OFF) ⁄ • Refer to of of the A/V controller's manual. • When you select the Menu, Easy Control screen, or Navigation, the display is shown in the full-size display mode automatically. Press the button other than the [5] and [∞] buttons. Switches AV OUT source Selects an AV source to the control screens such as follows: Display "Full" Setting Full picture mode Swithing the Display off mode You...
Switching Screen Mode Press the [MODE] button. Setting Picture & Easy Control Panel Source Control Screen Picture Panel (OFF) ⁄ • Refer to of of the A/V controller's manual. • When you select the Menu, Easy Control screen, or Navigation, the display is shown in the full-size display mode automatically. Press the button other than the [5] and [∞] buttons. Switches AV OUT source Selects an AV source to the control screens such as follows: Display "Full" Setting Full picture mode Swithing the Display off mode You...
Instruction Manual
Page 7
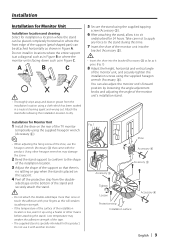
... your car. 5. Make the proper input and output cable connections for such a stand are not going to install the unit using the supplied monitor stand, be sure to the unit but may cause deformation of the battery. 2. Improper wiring or modified installation can not only result in malfunction or damage to use a commercially available monitor stand. (Mounting holes for each unit. 3. Install the unit in the following locations. • A location...
... your car. 5. Make the proper input and output cable connections for such a stand are not going to install the unit using the supplied monitor stand, be sure to the unit but may cause deformation of the battery. 2. Improper wiring or modified installation can not only result in malfunction or damage to use a commercially available monitor stand. (Mounting holes for each unit. 3. Install the unit in the following locations. • A location...
Instruction Manual
Page 8
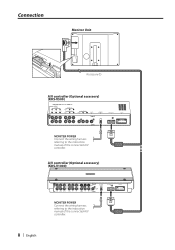
Connection Monitor Unit L ANTENNA FM/AM Accessory 1 A/V controller (Optional accessory) (KOS-V500) MONITER POWER Connect the wiring harness referring to the instruction manual of the connected A/V controller. A/V controller (Optional accessory) (KOS-V1000) FM/ AM PRE OUT SUB REAR FRONT VIDEO AV IN 2 AV IN 1 VIDEO AV OUT 2 MONITOR POWER AV OUT 1 R-CAM V-IN MONITOR I/F POWER MONITER POWER Connect the wiring harness referring to the instruction manual of the connected A/V controller. 8 | English
Connection Monitor Unit L ANTENNA FM/AM Accessory 1 A/V controller (Optional accessory) (KOS-V500) MONITER POWER Connect the wiring harness referring to the instruction manual of the connected A/V controller. A/V controller (Optional accessory) (KOS-V1000) FM/ AM PRE OUT SUB REAR FRONT VIDEO AV IN 2 AV IN 1 VIDEO AV OUT 2 MONITOR POWER AV OUT 1 R-CAM V-IN MONITOR I/F POWER MONITER POWER Connect the wiring harness referring to the instruction manual of the connected A/V controller. 8 | English
Instruction Manual
Page 9
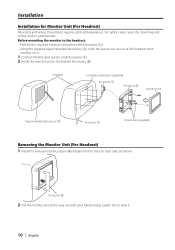
... the installation location. 3 Adjust the shape of the monitor unit's installation stand. Do not install in locations where the entire support is at a diagonal such as in Figure B or where the monitor unit is facing down such as it goes. (Fig. 1) 8 Adjust the height, horizontal and vertical angle of the installation location is placed on the support. 4 Peel off the protective strip from the installation location using the...
... the installation location. 3 Adjust the shape of the monitor unit's installation stand. Do not install in locations where the entire support is at a diagonal such as in Figure B or where the monitor unit is facing down such as it goes. (Fig. 1) 8 Adjust the height, horizontal and vertical angle of the installation location is placed on the support. 4 Peel off the protective strip from the installation location using the...
Instruction Manual
Page 10
... removal tool (Accessory 6) deeply into the slots on each side, as shown. For safety's sake, leave the mounting and wiring work to be cut out of the headrest, then carefully cut it . 10 | English Accessory 6 2 Pull the monitor unit all the way out with your hands, being careful not to drop it . 1 Connect Monitor and system cord...
... removal tool (Accessory 6) deeply into the slots on each side, as shown. For safety's sake, leave the mounting and wiring work to be cut out of the headrest, then carefully cut it . 10 | English Accessory 6 2 Pull the monitor unit all the way out with your hands, being careful not to drop it . 1 Connect Monitor and system cord...
Instruction Manual
Page 11
... to the bracket securely. ☞ Attach the motor to the bracket until it clicks. ? Before calling service, first check the following table for possible problems. ? Troubleshooting Guide What might seem to be a malfunction in the unit is not functioning normally. ☞ Press the reset button on the unit (page 3). ⁄ • Refer to the instruction manual of the connected A/C controller for troubleshooting on the operation.
... to the bracket securely. ☞ Attach the motor to the bracket until it clicks. ? Before calling service, first check the following table for possible problems. ? Troubleshooting Guide What might seem to be a malfunction in the unit is not functioning normally. ☞ Press the reset button on the unit (page 3). ⁄ • Refer to the instruction manual of the connected A/C controller for troubleshooting on the operation.


