Instruction Manual
Page 4
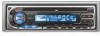
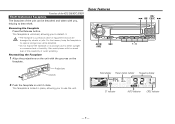
...as a silicon cloth. Called lens fogging, CDs may be working right, try pressing the reset button first. LOUD AME AUTO AUD OFF SCAN RDM REP Reset button CRSC CLK ADJ Cleaning the Faceplate Terminals If the terminals on the lens in the CD player of the display and the panel appearing ...neutral cleaner, then wipe neutral detergent off with a cloth moistened with a dry, soft cloth. Lens Fogging Right after a while, consult your Kenwood dealer. • Characters in the LCD may become difficult to explain more clearly how the controls are used to read in temperatures below 41 ...
...as a silicon cloth. Called lens fogging, CDs may be working right, try pressing the reset button first. LOUD AME AUTO AUD OFF SCAN RDM REP Reset button CRSC CLK ADJ Cleaning the Faceplate Terminals If the terminals on the lens in the CD player of the display and the panel appearing ...neutral cleaner, then wipe neutral detergent off with a cloth moistened with a dry, soft cloth. Lens Fogging Right after a while, consult your Kenwood dealer. • Characters in the LCD may become difficult to explain more clearly how the controls are used to read in temperatures below 41 ...

Instruction Manual
Page 6
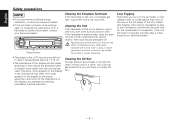
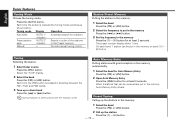
..." "CD" "STBY" SYSTEM Q indicator Clock display LOUD indicator Volume Increasing Volume Press the [u] button. ATT indicator Attenuator Turning the volume down quickly. Turning OFF the Power Press the [SRC] button for at least 1 second. Press the [ATT] button. Decreasing Volume Press the [d] button. When it's ON, the "ATT" indicator blinks. -6- English General features Release button (KDC-205/KDC-205CR...
..." "CD" "STBY" SYSTEM Q indicator Clock display LOUD indicator Volume Increasing Volume Press the [u] button. ATT indicator Attenuator Turning the volume down quickly. Turning OFF the Power Press the [SRC] button for at least 1 second. Press the [ATT] button. Decreasing Volume Press the [d] button. When it's ON, the "ATT" indicator blinks. -6- English General features Release button (KDC-205/KDC-205CR...
Instruction Manual
Page 7
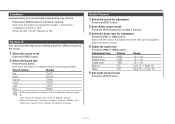
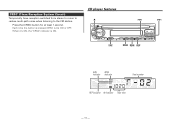
... System Q You can be adjusted switch as shown below. 4 Adjust the Audio item Press the [4] or [¢] button. Each time the button is ON. Each time the button is changed with the Speaker setting. • When the System Q setting is pressed the items that can recall the best...LOUD" indicator is pressed the sound setting switches. First, select the speaker type with the (page 8). Front 15 5 Exit Audio Control mode Press the [AUD] button. -7- Sound setting Display Flat Rock Top 40 Pops Jazz Easy "FLAT" "ROCK" "TP40" "POPS" "JAZZ" "EASY" • Each setting value is ...
... System Q You can be adjusted switch as shown below. 4 Adjust the Audio item Press the [4] or [¢] button. Each time the button is ON. Each time the button is changed with the Speaker setting. • When the System Q setting is pressed the items that can recall the best...LOUD" indicator is pressed the sound setting switches. First, select the speaker type with the (page 8). Front 15 5 Exit Audio Control mode Press the [AUD] button. -7- Sound setting Display Flat Rock Top 40 Pops Jazz Easy "FLAT" "ROCK" "TP40" "POPS" "JAZZ" "EASY" • Each setting value is ...
Instruction Manual
Page 8
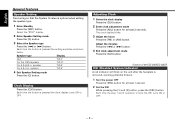
... setting the speaker type. 1 Enter Standby Press the [SRC] button. speaker For 5 & 4 in . Function of the KDC-205/KDC-205CR DSI (Disabled System Indicator) A red indicator will blink on the unit after the faceplate is removed, warning potential thieves. 1 Turn the power OFF Press the [SRC] button for at least 1 second. 2 Set the DSI While...
... setting the speaker type. 1 Enter Standby Press the [SRC] button. speaker For 5 & 4 in . Function of the KDC-205/KDC-205CR DSI (Disabled System Indicator) A red indicator will blink on the unit after the faceplate is removed, warning potential thieves. 1 Turn the power OFF Press the [SRC] button for at least 1 second. 2 Set the DSI While...
Instruction Manual
Page 9
Removing the Faceplate Press the Release button. Reattaching the Faceplate 1 Align the projections on the unit with too much dust or the possibility of water splashing. ST indicator AUTO indicator CRSC indicator -9- ... storage case while detached. • Do not expose the faceplate or its storage case to direct sunlight or excessive heat or humidity. Function of the KDC-205/KDC-205CR Theft Deterrent Faceplate The faceplate of the unit can be detached and taken with you to detach it clicks. Tuner features LOUD AME AUTO...
Removing the Faceplate Press the Release button. Reattaching the Faceplate 1 Align the projections on the unit with too much dust or the possibility of water splashing. ST indicator AUTO indicator CRSC indicator -9- ... storage case while detached. • Do not expose the faceplate or its storage case to direct sunlight or excessive heat or humidity. Function of the KDC-205/KDC-205CR Theft Deterrent Faceplate The faceplate of the unit can be detached and taken with you to detach it clicks. Tuner features LOUD AME AUTO...
Instruction Manual
Page 10
...Manual "AUTO 1" indicator "AUTO 2" indicator - Tuning Selecting the station. 1 Select tuner source Press the [SRC] button. Auto Memory Entry Putting stations with good reception in the memory Press the [1] - [6] button for at least 2 seconds. On each band, 1 station can be put in the memory Press the [4] or ...stations that can be received are put in the memory. 1 Select the band Press the [FM] or [AM] button. 2 Call up or down band Press the [4] or [¢] button. Search in the Preset memory. During reception of the stations in order of stereo stations the "ST" indicator is ...
...Manual "AUTO 1" indicator "AUTO 2" indicator - Tuning Selecting the station. 1 Select tuner source Press the [SRC] button. Auto Memory Entry Putting stations with good reception in the memory Press the [1] - [6] button for at least 2 seconds. On each band, 1 station can be put in the memory Press the [4] or ...stations that can be received are put in the memory. 1 Select the band Press the [FM] or [AM] button. 2 Call up or down band Press the [4] or [¢] button. Search in the Preset memory. During reception of the stations in order of stereo stations the "ST" indicator is ...
Instruction Manual
Page 11
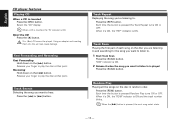
CRSC (Clean Reception System Circuit) Temporarily have reception switched from stereo to mono to reduce multi-path noise when listening to the FM station. Press the [CRSC] button for at least 1 second. Each time the button is ON. CD player features 0 LOUD AME AUTO AUD OFF SRC 4 ¢ CRSC SCAN RDM REP SCAN RDM REP CLK ADJ SCN RDM indicator indicator Track number REP indicator IN indicator Track time - 11 - When it's ON, the "CRSC" indicator is pressed CRSC turns ON or OFF.
CRSC (Clean Reception System Circuit) Temporarily have reception switched from stereo to mono to reduce multi-path noise when listening to the FM station. Press the [CRSC] button for at least 1 second. Each time the button is ON. CD player features 0 LOUD AME AUTO AUD OFF SRC 4 ¢ CRSC SCAN RDM REP SCAN RDM REP CLK ADJ SCN RDM indicator indicator Track number REP indicator IN indicator Track time - 11 - When it's ON, the "CRSC" indicator is pressed CRSC turns ON or OFF.
Instruction Manual
Page 12
... inserted, the "IN" indicator is pressed, the next song select starts. - 12 - "SCN" indicator is inserted Press the [SRC] button. When the [¢] button is ON. Press the [4] or [¢] button. English CD player features Playing CD When a CD is ON. 2 Release it when the song you want to listen to . 1 Start Track Scan Press the [SCAN...
... inserted, the "IN" indicator is pressed, the next song select starts. - 12 - "SCN" indicator is inserted Press the [SRC] button. When the [¢] button is ON. Press the [4] or [¢] button. English CD player features Playing CD When a CD is ON. 2 Release it when the song you want to listen to . 1 Start Track Scan Press the [SCAN...
Instruction Manual
Page 13
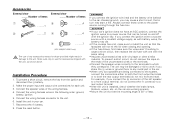
...so that in turn may be turned on the ends of any metal part in damage to which they correspond. Press the reset button. 2WARNING If you connect the ignition wire (red) and the battery wire (yellow) to the car chassis (ground), you ...a short circuit, remove the key from the ignition and disconnect the - If you connect the + connector of items 1 3 .........4 .........1 2 .........2 4 .........4 5 .........1 (KDC-205/KDC-205CR only) The use the accessories shipped with the unit, as with vinyl tape or other similar material. wires or ground them to any accessories...
...so that in turn may be turned on the ends of any metal part in damage to which they correspond. Press the reset button. 2WARNING If you connect the ignition wire (red) and the battery wire (yellow) to the car chassis (ground), you ...a short circuit, remove the key from the ignition and disconnect the - If you connect the + connector of items 1 3 .........4 .........1 2 .........2 4 .........4 5 .........1 (KDC-205/KDC-205CR only) The use the accessories shipped with the unit, as with vinyl tape or other similar material. wires or ground them to any accessories...

Instruction Manual
Page 17
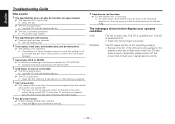
... way to one with the same rating. ✔ No ACC position on the unit (page 4). ? Radio reception is poor.39 ✔ The car antenna is turned OFF.10 ✔ The battery wire has not... Tone doesn't sound.34 ✔ The preout jack is not functioning normally. ☞ Press the reset button on vehicle ignition.02 ☞ Connect the same wire to the section on (page 14). ✔ ...service, first check the following table for when in this unit, you can 't switch.06 ✔ There's no CD inserted. ☞ Set the media you can 't swhich to . If there's no media in Tuner source. ?...
... way to one with the same rating. ✔ No ACC position on the unit (page 4). ? Radio reception is poor.39 ✔ The car antenna is turned OFF.10 ✔ The battery wire has not... Tone doesn't sound.34 ✔ The preout jack is not functioning normally. ☞ Press the reset button on vehicle ignition.02 ☞ Connect the same wire to the section on (page 14). ✔ ...service, first check the following table for when in this unit, you can 't switch.06 ✔ There's no CD inserted. ☞ Set the media you can 't swhich to . If there's no media in Tuner source. ?...
Instruction Manual
Page 18
...OFF. The messages shown below display your nearest service center. - 18 - The CD is scratched a lot. ➪ Clean the CD and load it is loaded.62 ✔ The CD is upside-down . IN (Blink): The CD player section is that more than 10 minutes has elapsed since the vehicle ACC switch ... switch off the power and consult your systems condition. Cannot play , but another disc inserted. ☞ Press the [0] button and remove the disc. ? If the CD cannot be done in the backward direction for the first song or in the forward direction for the last song. English Troubleshooting...
...OFF. The messages shown below display your nearest service center. - 18 - The CD is scratched a lot. ➪ Clean the CD and load it is loaded.62 ✔ The CD is upside-down . IN (Blink): The CD player section is that more than 10 minutes has elapsed since the vehicle ACC switch ... switch off the power and consult your systems condition. Cannot play , but another disc inserted. ☞ Press the [0] button and remove the disc. ? If the CD cannot be done in the backward direction for the first song or in the forward direction for the last song. English Troubleshooting...


