Instruction Manual
Page 3
... prevent injury or fire, take the following precautions: • Insert the unit all the way in until it off the power immediately and consult your Kenwood dealer. • Make sure not to get your fingers caught between the faceplate and the unit. • Be careful not to drop the unit or...) inside the unit. • If the unit starts to emit smoke or strange smells, turn off with soap immediately. Do Not Load 3-in place. CD with the wrong rating may fall out of water splashing. • Do not set the removed faceplate or the faceplate case in areas exposed to strong shock.
... prevent injury or fire, take the following precautions: • Insert the unit all the way in until it off the power immediately and consult your Kenwood dealer. • Make sure not to get your fingers caught between the faceplate and the unit. • Be careful not to drop the unit or...) inside the unit. • If the unit starts to emit smoke or strange smells, turn off with soap immediately. Do Not Load 3-in place. CD with the wrong rating may fall out of water splashing. • Do not set the removed faceplate or the faceplate case in areas exposed to strong shock.
Instruction Manual
Page 4
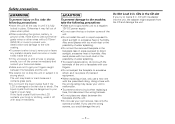
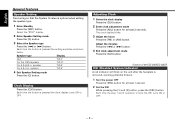
In such a situation, remove the disc and wait for the condensation to evaporate. Cleaning the CD Slot As dust tends to accumulate in the CD slot, clean it with neutral cleaner, then wipe neutral detergent off with a cloth moistened with a dry soft cloth such as thinner or alcohol ...the car heater in cold weather, dew or condensation may form on the lens in the CD player of the illustrations on the unit or faceplate get scratched if you experience problems during installation, consult your Kenwood dealer. • If the unit does not seem to be impossible to play. English Safety...
In such a situation, remove the disc and wait for the condensation to evaporate. Cleaning the CD Slot As dust tends to accumulate in the CD slot, clean it with neutral cleaner, then wipe neutral detergent off with a cloth moistened with a dry soft cloth such as thinner or alcohol ...the car heater in cold weather, dew or condensation may form on the lens in the CD player of the illustrations on the unit or faceplate get scratched if you experience problems during installation, consult your Kenwood dealer. • If the unit does not seem to be impossible to play. English Safety...
Instruction Manual
Page 5
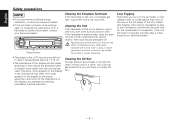
... not have the mark. • A CD-R or CD-RW that hasn't been finalized can't be used • CDs that are easier to your CD-R/CD-RW writing software, and your CD-R/CD-RW recorder instruction manual.) CD accessories Don't use it . Removing CDs When removing CDs from the center of the CD. When using a new CD If the CD center hole or outside rim has...
... not have the mark. • A CD-R or CD-RW that hasn't been finalized can't be used • CDs that are easier to your CD-R/CD-RW writing software, and your CD-R/CD-RW recorder instruction manual.) CD accessories Don't use it . Removing CDs When removing CDs from the center of the CD. When using a new CD If the CD center hole or outside rim has...
Instruction Manual
Page 8
... minutes Press the [4] or [¢] button. 4 Exit clock adjustment mode Press the [CLK] button. Function of the KDC-205/KDC-205CR DSI (Disabled System Indicator) A red indicator will blink on the unit after the faceplate is removed, warning potential thieves. 1 Turn the power OFF Press the [SRC] button for at least 1 second. 2 Set the...
... minutes Press the [4] or [¢] button. 4 Exit clock adjustment mode Press the [CLK] button. Function of the KDC-205/KDC-205CR DSI (Disabled System Indicator) A red indicator will blink on the unit after the faceplate is removed, warning potential thieves. 1 Turn the power OFF Press the [SRC] button for at least 1 second. 2 Set the...
Instruction Manual
Page 9
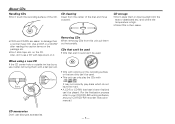
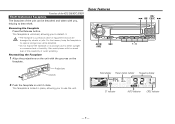
... AUTO indicator CRSC indicator -9- Also avoid places with the grooves on the unit with too much dust or the possibility of water splashing. Removing the Faceplate Press the Release button. The faceplate is unlocked, allowing you to use the unit. Tuner features LOUD AME AUTO AUD OFF ...in its special storage case while detached. • Do not expose the faceplate or its storage case to deter theft. Function of the KDC-205/KDC-205CR Theft Deterrent Faceplate The faceplate of the unit can be detached and taken with you to detach it clicks. Reattaching the Faceplate 1 ...
... AUTO indicator CRSC indicator -9- Also avoid places with the grooves on the unit with too much dust or the possibility of water splashing. Removing the Faceplate Press the Release button. The faceplate is unlocked, allowing you to use the unit. Tuner features LOUD AME AUTO AUD OFF ...in its special storage case while detached. • Do not expose the faceplate or its storage case to deter theft. Function of the KDC-205/KDC-205CR Theft Deterrent Faceplate The faceplate of the unit can be detached and taken with you to detach it clicks. Reattaching the Faceplate 1 ...
Instruction Manual
Page 13
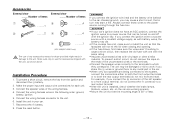
...the terminals. • Connect the speaker wires correctly to the terminals to which they correspond. To prevent a short circuit, remove the key from the ignition and disconnect the - Connect the wiring harness wires in damage to a power source that the ...the unit, as with battery wires, the battery may be turned on the ends of items 1 3 .........4 .........1 2 .........2 4 .........4 5 .........1 (KDC-205/KDC-205CR only) The use the accessories shipped with vinyl tape or other similar material. battery. 2. Connect the wiring harness connector to a rear output terminal...
...the terminals. • Connect the speaker wires correctly to the terminals to which they correspond. To prevent a short circuit, remove the key from the ignition and disconnect the - Connect the wiring harness wires in damage to a power source that the ...the unit, as with battery wires, the battery may be turned on the ends of items 1 3 .........4 .........1 2 .........2 4 .........4 5 .........1 (KDC-205/KDC-205CR only) The use the accessories shipped with vinyl tape or other similar material. battery. 2. Connect the wiring harness connector to a rear output terminal...
Instruction Manual
Page 15
... the hole shown below. If you want to fasten the faceplate to the section "Removing the hard rubber frame" (page 16) and then remove the hard rubber frame. 2 Align the holes in the unit (two locations on the Unit (KDC-205/205CR only) If you screw it in place. If the unit is unstable...
... the hole shown below. If you want to fasten the faceplate to the section "Removing the hard rubber frame" (page 16) and then remove the hard rubber frame. 2 Align the holes in the unit (two locations on the Unit (KDC-205/205CR only) If you screw it in place. If the unit is unstable...
Instruction Manual
Page 16
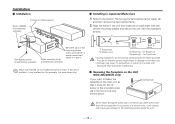
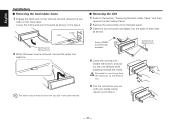
...careful not to drop it forward as shown. Be careful to the section "Removing the hard rubber frame" and then remove the hard rubber frame. 2 Remove the screw (M4 × 8) on the back panel. 3 Insert the two removal tools deeply into the slots on each side, as shown in the same ...1 Refer to avoid injury from the top side in the figure. The frame can be removed from the catch pins on the lower level. Screw (M4X8) (commercially available) Accessory2 Removal tool 4 Lower the removal tool toward the bottom, and pull out the unit halfway while pressing towards the inside. ...
...careful not to drop it forward as shown. Be careful to the section "Removing the hard rubber frame" and then remove the hard rubber frame. 2 Remove the screw (M4 × 8) on the back panel. 3 Insert the two removal tools deeply into the slots on each side, as shown in the same ...1 Refer to avoid injury from the top side in the figure. The frame can be removed from the catch pins on the lower level. Screw (M4X8) (commercially available) Accessory2 Removal tool 4 Lower the removal tool toward the bottom, and pull out the unit halfway while pressing towards the inside. ...
Instruction Manual
Page 18
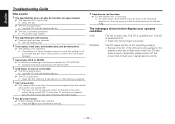
....55 ☞ Try another disc inserted. ☞ Press the [0] button and remove the disc. ? English Troubleshooting Guide Disc source ? Track repeat, track scan, and random play . ? E-04: The CD is not operating properly.E59 ➪ Reinsert the CD. IN (Blink): The CD player section is quite dirty. Track Search can't be done.66-2 ✔ For...
....55 ☞ Try another disc inserted. ☞ Press the [0] button and remove the disc. ? English Troubleshooting Guide Disc source ? Track repeat, track scan, and random play . ? E-04: The CD is not operating properly.E59 ➪ Reinsert the CD. IN (Blink): The CD player section is quite dirty. Track Search can't be done.66-2 ✔ For...


