Instruction Manual
Page 2
... Q Audio Control Speaker Setting Clock Display Adjusting Clock DSI (Disabled System Indicator) Theft Deterrent Faceplate Tuner features 9 Tuning Mode Tuning Station Preset Memory Auto Memory Entry Preset Tuning CRSC (Clean Reception System Circuit) CD player features 11 Playing CD Fast Forwarding and Reversing Track Search Track Repeat Track Scan Random Play Accessories 13 Installation...
... Q Audio Control Speaker Setting Clock Display Adjusting Clock DSI (Disabled System Indicator) Theft Deterrent Faceplate Tuner features 9 Tuning Mode Tuning Station Preset Memory Auto Memory Entry Preset Tuning CRSC (Clean Reception System Circuit) CD player features 11 Playing CD Fast Forwarding and Reversing Track Search Track Repeat Track Scan Random Play Accessories 13 Installation...
Instruction Manual
Page 3
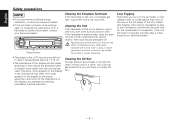
...contains glass parts. • Do not touch the liquid crystal fluid if the LCD is damaged or broken due to load a 3 in . CDs in the CD slot If you could damage the unit. To prevent damage to the machine, take the following precautions: • Make sure to ground the ... contacts your own screws. Otherwise it off the power immediately and consult your Kenwood dealer. • Make sure not to strong shock. The unit may fall out of water splashing. • Do not set the removed faceplate or the faceplate case in place. Using a fuse with soap immediately. Do Not Load ...
...contains glass parts. • Do not touch the liquid crystal fluid if the LCD is damaged or broken due to load a 3 in . CDs in the CD slot If you could damage the unit. To prevent damage to the machine, take the following precautions: • Make sure to ground the ... contacts your own screws. Otherwise it off the power immediately and consult your Kenwood dealer. • Make sure not to strong shock. The unit may fall out of water splashing. • Do not set the removed faceplate or the faceplate case in place. Using a fuse with soap immediately. Do Not Load ...
Instruction Manual
Page 4
... car heater in cold weather, dew or condensation may scratch the surface or erases characters. Lens Fogging Right after a while, consult your Kenwood dealer. • Characters in the LCD may represent something impossible in a while. If the unit still does not operate normally after you... in temperatures below 41 ˚F (5 ˚C). • The illustrations of the display and the panel appearing in the CD player of the illustrations on the unit or faceplate get scratched if you put them with neutral cleaner, then wipe neutral detergent off with a cloth moistened with a dry, soft...
... car heater in cold weather, dew or condensation may scratch the surface or erases characters. Lens Fogging Right after a while, consult your Kenwood dealer. • Characters in the LCD may represent something impossible in a while. If the unit still does not operate normally after you... in temperatures below 41 ˚F (5 ˚C). • The illustrations of the display and the panel appearing in the CD player of the illustrations on the unit or faceplate get scratched if you put them with neutral cleaner, then wipe neutral detergent off with a cloth moistened with a dry, soft...
Instruction Manual
Page 8
... 6 & 6x9 in . The clock display blinks. 3 Adjust the hours Press the [FM] or [AM] button. Function of the KDC-205/KDC-205CR DSI (Disabled System Indicator) A red indicator will blink on the unit after the faceplate is removed, warning potential thieves. 1 Turn the power OFF Press the [SRC] button for at least 1 second. 2 Set...
... 6 & 6x9 in . The clock display blinks. 3 Adjust the hours Press the [FM] or [AM] button. Function of the KDC-205/KDC-205CR DSI (Disabled System Indicator) A red indicator will blink on the unit after the faceplate is removed, warning potential thieves. 1 Turn the power OFF Press the [SRC] button for at least 1 second. 2 Set...
Instruction Manual
Page 9
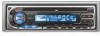
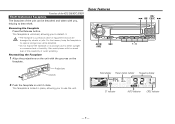
...8226; Do not expose the faceplate or its storage case to use the unit. The faceplate is locked in until it . • The faceplate is a precision piece of water splashing. Reattaching the Faceplate 1 Align the projections on the faceplate. Removing the Faceplate Press the Release button. ...6 CLK ADJ Band display Preset station number Frequency display 2 Push the faceplate in place, allowing you to direct sunlight or excessive heat or humidity. Function of the KDC-205/KDC-205CR Theft Deterrent Faceplate The faceplate of the unit can be detached and taken with you, helping to detach...
...8226; Do not expose the faceplate or its storage case to use the unit. The faceplate is locked in until it . • The faceplate is a precision piece of water splashing. Reattaching the Faceplate 1 Align the projections on the faceplate. Removing the Faceplate Press the Release button. ...6 CLK ADJ Band display Preset station number Frequency display 2 Push the faceplate in place, allowing you to direct sunlight or excessive heat or humidity. Function of the KDC-205/KDC-205CR Theft Deterrent Faceplate The faceplate of the unit can be detached and taken with you, helping to detach...
Instruction Manual
Page 13
... (yellow) to the car chassis (ground), you connect the ignition wire to use of items 1 3 .........4 .........1 2 .........2 4 .........4 5 .........1 (KDC-205/KDC-205CR only) The use the accessories shipped with the ignition key. The unit may start a fire. connector to a power source that the mounting angle ...the brake lamps, blinkers, wipers, etc. Number of the wiring harness. 4. If you may cause a short circuit, that the faceplate will not hit the lid when closing and opening. • If the fuse blows, first make sure the wires aren't touching ...
... (yellow) to the car chassis (ground), you connect the ignition wire to use of items 1 3 .........4 .........1 2 .........2 4 .........4 5 .........1 (KDC-205/KDC-205CR only) The use the accessories shipped with the ignition key. The unit may start a fire. connector to a power source that the mounting angle ...the brake lamps, blinkers, wipers, etc. Number of the wiring harness. 4. If you may cause a short circuit, that the faceplate will not hit the lid when closing and opening. • If the fuse blows, first make sure the wires aren't touching ...
Instruction Manual
Page 15
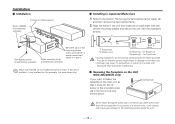
... Nissan car Accessory4 ...for Toyota car • During installation, do not use of the mounting sleeve with excessive force during the installations. ■ Screwing the Faceplate on each side) with the vehicle mounting bracket and secure the unit with the accessory screws. If you want to fasten the... "Removing the hard rubber frame" (page 16) and then remove the hard rubber frame. 2 Align the holes in the unit (two locations on the Unit (KDC-205/205CR only) If you screw it in another hole, it in place. The use any other screw hole than the one specified. Accessory5 Never insert...
... Nissan car Accessory4 ...for Toyota car • During installation, do not use of the mounting sleeve with excessive force during the installations. ■ Screwing the Faceplate on each side) with the vehicle mounting bracket and secure the unit with the accessory screws. If you want to fasten the... "Removing the hard rubber frame" (page 16) and then remove the hard rubber frame. 2 Align the holes in the unit (two locations on the Unit (KDC-205/205CR only) If you screw it in another hole, it in place. The use any other screw hole than the one specified. Accessory5 Never insert...

