
Instruction Manual
Page 2
... Source Volume Attenuator Audio Control Audio Setup Bass Boost Speaker Setting Clock Display Subwoofer Output Theft Deterrent Faceplate TEL Mute Tuner features Tuning Tuning Mode Station Preset Memory Auto Memory Entry Preset Tuning CD player features Playing CD Fast Forwarding and Reversing Track Search Track Repeat Scan Play Random Play Menu system Menu System...
... Source Volume Attenuator Audio Control Audio Setup Bass Boost Speaker Setting Clock Display Subwoofer Output Theft Deterrent Faceplate TEL Mute Tuner features Tuning Tuning Mode Station Preset Memory Auto Memory Entry Preset Tuning CD player features Playing CD Fast Forwarding and Reversing Track Search Track Repeat Scan Play Random Play Menu system Menu System...
Instruction Manual
Page 3
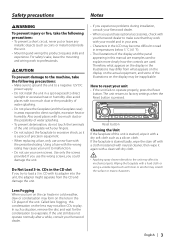
...you use the wrong screws, you try to load a 3 in. How to reset your Kenwood dealer. Reset button Cleaning the Unit If the faceplate of this condensation on the lens in the CD player of the unit or faceplate with your unit to malfunction. • Do not use a new fuse with a hard cloth... the faceplate case) in areas exposed to direct sunlight, excessive heat or humidity. Lens Fogging When you purchase optional accessories, check with a dry soft cloth such as thinner or alcohol may not allow CDs to play. Called lens fogging, this unit is stained, wipe it with your Kenwood dealer ...
...you use the wrong screws, you try to load a 3 in. How to reset your Kenwood dealer. Reset button Cleaning the Unit If the faceplate of this condensation on the lens in the CD player of the unit or faceplate with your unit to malfunction. • Do not use a new fuse with a hard cloth... the faceplate case) in areas exposed to direct sunlight, excessive heat or humidity. Lens Fogging When you purchase optional accessories, check with a dry soft cloth such as thinner or alcohol may not allow CDs to play. Called lens fogging, this unit is stained, wipe it with your Kenwood dealer ...
Instruction Manual
Page 4
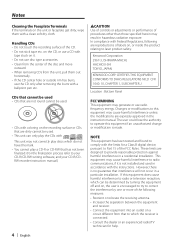
... interference unless the modifications are reproductions of the CD. • Do not stick tape etc. Kenwood Corporation 2967-3, ISHIKAWA-MACHI, HACHIOJI-SHI TOKYO, JAPAN KENWOOD CORP. Changes or modifications to radio communications, if it is made. Notes Cleaning the Faceplate Terminals If the terminals on the unit or faceplate get dirty, wipe them out horizontally. •...
... interference unless the modifications are reproductions of the CD. • Do not stick tape etc. Kenwood Corporation 2967-3, ISHIKAWA-MACHI, HACHIOJI-SHI TOKYO, JAPAN KENWOOD CORP. Changes or modifications to radio communications, if it is made. Notes Cleaning the Faceplate Terminals If the terminals on the unit or faceplate get dirty, wipe them out horizontally. •...
Instruction Manual
Page 7
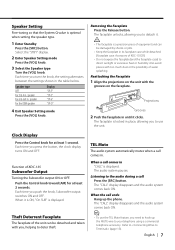
... sunlight or excessive heat or humidity. TEL Mute The audio system automatically mutes when a call Press the [SRC] button. When it clicks. Theft Deterrent Faceplate The faceplate of KDC-135 Subwoofer Output Turning the Subwoofer output ON or OFF. Speaker Setting Fine-tuning so that the System Q value is optimal when setting the speaker...
... sunlight or excessive heat or humidity. TEL Mute The audio system automatically mutes when a call Press the [SRC] button. When it clicks. Theft Deterrent Faceplate The faceplate of KDC-135 Subwoofer Output Turning the Subwoofer output ON or OFF. Speaker Setting Fine-tuning so that the System Q value is optimal when setting the speaker...
Instruction Manual
Page 13
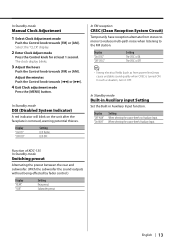
...8226; Strong electrical fields (such as from stereo to mono to reduce multi-path noise when listening to the FM station. Function of KDC-135 In Standby mode Switching preout Alternating the preout between the rear and subwoofer. (With the subwoofer the sound outputs without being effected by fader...Push the Control knob towards [FM] or [AM]. In Standby mode DSI (Disabled System Indicator) A red indicator will blink on the unit after the faceplate is ON. The clock display blinks. 3 Adjust the hours Push the Control knob towards [4] or [¢]. 4 Exit Clock adjustment mode Press the ...
...8226; Strong electrical fields (such as from stereo to mono to reduce multi-path noise when listening to the FM station. Function of KDC-135 In Standby mode Switching preout Alternating the preout between the rear and subwoofer. (With the subwoofer the sound outputs without being effected by fader...Push the Control knob towards [FM] or [AM]. In Standby mode DSI (Disabled System Indicator) A red indicator will blink on the unit after the faceplate is ON. The clock display blinks. 3 Adjust the hours Push the Control knob towards [4] or [¢]. 4 Exit Clock adjustment mode Press the ...
Instruction Manual
Page 14
.... • After the unit is 30° or less. 14 | English The unit may start a fire. battery. 8. If you may cause a short circuit, that the faceplate will be OFF immediately), the speaker wire may have a short-circuit or touched the chassis of the vehicle and the protection function may die. •...
.... • After the unit is 30° or less. 14 | English The unit may start a fire. battery. 8. If you may cause a short circuit, that the faceplate will be OFF immediately), the speaker wire may have a short-circuit or touched the chassis of the vehicle and the protection function may die. •...
Instruction Manual
Page 17
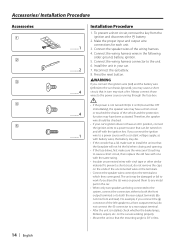
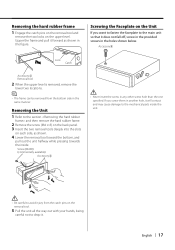
... figure. Screw (M4X8) (commercially available) Accessory2 ¤ • Never insert the screw in the same manner. English | 17 If you want to fasten the faceplate to the main unit so that it does not fall off, screw in the provided screws in another hole, it forward as shown. 4 Lower the..., and pull out the unit halfway while pressing towards the inside the unit. ¤ • Be careful to the mechanical parts inside . Screwing the Faceplate on the upper level. Removing the hard rubber frame 1 Engage the catch pins on the removal tool and remove the two locks on the Unit...
... figure. Screw (M4X8) (commercially available) Accessory2 ¤ • Never insert the screw in the same manner. English | 17 If you want to fasten the faceplate to the main unit so that it does not fall off, screw in the provided screws in another hole, it forward as shown. 4 Lower the..., and pull out the unit halfway while pressing towards the inside the unit. ¤ • Be careful to the mechanical parts inside . Screwing the Faceplate on the upper level. Removing the hard rubber frame 1 Engage the catch pins on the removal tool and remove the two locks on the Unit...

