
Instruction Manual
Page 2
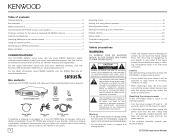
... ...2 Box contents...2 Safety precautions ...3 Connecting the DT-7000S to your audio system 4 Finding a location for the optional Kenwood CX-SRH30 antenna 5 Controls and features 6 Installing batteries in the remote control 7 Using the remote control 7 Activating your dealer immediately. Your DT-7000S SIRIUS® home tuner lets you directly, notify your DT-7000S in the future. 2 Selecting music ...8 Setting and using stream presets 8 Naming preset banks 9 Saving and recalling music information 9 Display options ...10 Setup mode ...10 Troubleshooting guide 13 Specifications...13...
... ...2 Box contents...2 Safety precautions ...3 Connecting the DT-7000S to your audio system 4 Finding a location for the optional Kenwood CX-SRH30 antenna 5 Controls and features 6 Installing batteries in the remote control 7 Using the remote control 7 Activating your dealer immediately. Your DT-7000S SIRIUS® home tuner lets you directly, notify your DT-7000S in the future. 2 Selecting music ...8 Setting and using stream presets 8 Naming preset banks 9 Saving and recalling music information 9 Display options ...10 Setup mode ...10 Troubleshooting guide 13 Specifications...13...
Instruction Manual
Page 3
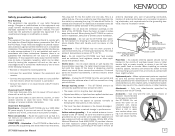
... and receiver • Connect the equipment into the outlet, try reversing the plug. Outdoor antenna grounding - When installing an outside antenna is connected to the DT-7000S, be sure the antenna system is grounded so as to operate this instruction manual. These limits are expressly approved in a residential installation. These may not work properly if used , use hard cloths or paint thinner, alcohol, or other hazards. Important Safeguards Power Source -
... and receiver • Connect the equipment into the outlet, try reversing the plug. Outdoor antenna grounding - When installing an outside antenna is connected to the DT-7000S, be sure the antenna system is grounded so as to operate this instruction manual. These limits are expressly approved in a residential installation. These may not work properly if used , use hard cloths or paint thinner, alcohol, or other hazards. Important Safeguards Power Source -
Instruction Manual
Page 4
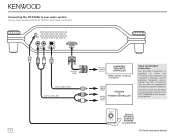
DT-7000S Instruction Manual DO NOT connect the RS-232C connection to be controlled by compatible 3rd-party control systems. Kenwood recommends that this connection only be used by experienced professional system installers. Connecting the DT-7000S to your audio system Use the cables supplied with the DT-7000S to make these connections. 4 About the RS-232C connection: The RS-232C connection is provided to allow the DT-7000S to a computer-it is NOT COMPATIBLE with personal computers.
DT-7000S Instruction Manual DO NOT connect the RS-232C connection to be controlled by compatible 3rd-party control systems. Kenwood recommends that this connection only be used by experienced professional system installers. Connecting the DT-7000S to your audio system Use the cables supplied with the DT-7000S to make these connections. 4 About the RS-232C connection: The RS-232C connection is provided to allow the DT-7000S to a computer-it is NOT COMPATIBLE with personal computers.

Instruction Manual
Page 5
...antenna from receiving the satellite signal when placed at a window (D, right). Section 2 - DT-7000S Instruction Manual 5 Mount the antenna on a NORTHWEST or WESTFACING wall or window. See pg. 12 Antenna Signal, for the A. Mount the antenna on a NORTHEAST or NORTHFACING wall or window. The second best antenna... the SIRIUS satellites over the US, the best location for more appropriate window, an outside wall B. (B - The location of any obstruc- Section 3 - ing other obstructions (C, right). Finding a location for the optional Kenwood CX-SRH30 antenna Due ...
...antenna from receiving the satellite signal when placed at a window (D, right). Section 2 - DT-7000S Instruction Manual 5 Mount the antenna on a NORTHWEST or WESTFACING wall or window. See pg. 12 Antenna Signal, for the A. Mount the antenna on a NORTHEAST or NORTHFACING wall or window. The second best antenna... the SIRIUS satellites over the US, the best location for more appropriate window, an outside wall B. (B - The location of any obstruc- Section 3 - ing other obstructions (C, right). Finding a location for the optional Kenwood CX-SRH30 antenna Due ...
Instruction Manual
Page 6
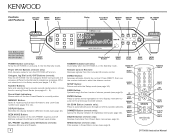
POWER Button (unit only): Turns the DT-7000S on the unit and remote with the same name have the same function. Number Buttons: Sets and selects stream presets; DISPLAY Button: Switches the display between different modes (see page 9). DELETE Button (remote only): Deletes characters from the included IR remote control. accesses different selections in the Standby mode. SEEK MODE Button: Switches the action of stream presets (see page 8). SETUP Button: Enters and exits the Setup mode (see pages 9 & 12). sets Lock Code number (see page 10). STANDBY Indicator...
POWER Button (unit only): Turns the DT-7000S on the unit and remote with the same name have the same function. Number Buttons: Sets and selects stream presets; DISPLAY Button: Switches the display between different modes (see page 9). DELETE Button (remote only): Deletes characters from the included IR remote control. accesses different selections in the Standby mode. SEEK MODE Button: Switches the action of stream presets (see page 8). SETUP Button: Enters and exits the Setup mode (see pages 9 & 12). sets Lock Code number (see page 10). STANDBY Indicator...
Instruction Manual
Page 7
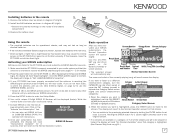
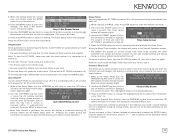
... 11.) DT-7000S Instruction Manual 7 Install two AAA batteries as shown in the remote 1. Press the power button to enter the Setup Mode. 6. If you do not hear audio, re-orient the antenna until you must subscribe to highlight streams. Category Select Screen 2. Your unit's unique 12-digit SIRIUS ID Number will be skipped or locked, the display will change to "Call 1-888-539-SIRIUS to the Normal Operation screen. Write the number down...
... 11.) DT-7000S Instruction Manual 7 Install two AAA batteries as shown in the remote 1. Press the power button to enter the Setup Mode. 6. If you do not hear audio, re-orient the antenna until you must subscribe to highlight streams. Category Select Screen 2. Your unit's unique 12-digit SIRIUS ID Number will be skipped or locked, the display will change to "Call 1-888-539-SIRIUS to the Normal Operation screen. Write the number down...
Instruction Manual
Page 8
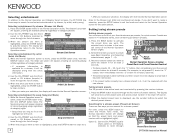
... Buttons (remote) to the Normal Operation screen for a stream preset. The display will be replaced with the artist information. 2. Presets are two ways you want to make your selection, the display will change so that it will appear, showing all currently-playing artists regardless of category (below ): 2. Use the CH./PRESET jog dial (front panel) or CH Buttons (remote) to select the desired preset stream. While the Normal Operation screen is displayed, use the number buttons...
... Buttons (remote) to the Normal Operation screen for a stream preset. The display will be replaced with the artist information. 2. Presets are two ways you want to make your selection, the display will change so that it will appear, showing all currently-playing artists regardless of category (below ): 2. Use the CH./PRESET jog dial (front panel) or CH Buttons (remote) to select the desired preset stream. While the Normal Operation screen is displayed, use the number buttons...
Instruction Manual
Page 9
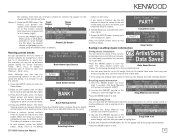
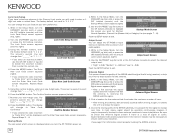
... you make a mistake, use the remote. 1. Hold the MEMO button for up to the left of the songs saved on the unit.) • If you save data for more than 1 second. Press the MEMO button to exit the Setup Mode. Each time you change a preset its number will Data Saved Screen display the following message for a few seconds (above): • You can set...
... you make a mistake, use the remote. 1. Hold the MEMO button for up to the left of the songs saved on the unit.) • If you save data for more than 1 second. Press the MEMO button to exit the Setup Mode. Each time you change a preset its number will Data Saved Screen display the following message for a few seconds (above): • You can set...
Instruction Manual
Page 10
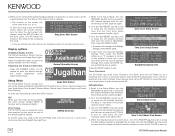
...). Use the CH/PRESET jog dial (unit) or press the CH buttons (remote) to the Daylight Savings screen (below ). • The number on the screen will be displayed (right): Clock Setup The DT-7000S has an automatic clock that the box is highlighted, then press the ENTER button. • The screen will change to set up the following features: SID (SIRIUS ID Number), Clock, Alarm, Channel Skip/Lock, Lock Code Setup, Auto Shutoff, Startup Mode, Output Level, Antenna Signal...
...). Use the CH/PRESET jog dial (unit) or press the CH buttons (remote) to the Daylight Savings screen (below ). • The number on the screen will be displayed (right): Clock Setup The DT-7000S has an automatic clock that the box is highlighted, then press the ENTER button. • The screen will change to set up the following features: SID (SIRIUS ID Number), Clock, Alarm, Channel Skip/Lock, Lock Code Setup, Auto Shutoff, Startup Mode, Output Level, Antenna Signal...
Instruction Manual
Page 11
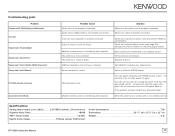
... the Channel Lock mode. DT-7000S Instruction Manual 11 To shut the alarm off, press any button twice. (This shuts the DT-7000S completely off , press the POWER button. Press the SETUP button to play before it shuts off if it in Step 3 above, instead of momentarily pressing the ENTER button, hold the ENTER button for more than 1 second. Auto Shutoff Setup Screen • When Auto Shutoff is active, the display will flash positive and negative. Use...
... the Channel Lock mode. DT-7000S Instruction Manual 11 To shut the alarm off, press any button twice. (This shuts the DT-7000S completely off , press the POWER button. Press the SETUP button to play before it shuts off if it in Step 3 above, instead of momentarily pressing the ENTER button, hold the ENTER button for more than 1 second. Auto Shutoff Setup Screen • When Auto Shutoff is active, the display will flash positive and negative. Use...
Instruction Manual
Page 12
... in the Channel Lock mode, you find the best location for the antenna. 1. You can adjust the DT-7000S's output level so it is displayed when you want for the antenna that 's being received, to select the desired output level. • "High" is 0dB, "Medium" is -3dB and "Low" is receiving the SIRIUS satellite signal. Repeat Steps 3 - 4. While in your new 4-digit code. Use the CH/PRESET jog dial (unit) or the CH buttons (remote) to help you...
... in the Channel Lock mode, you find the best location for the antenna. 1. You can adjust the DT-7000S's output level so it is displayed when you want for the antenna that 's being received, to select the desired output level. • "High" is 0dB, "Medium" is -3dB and "Low" is receiving the SIRIUS satellite signal. Repeat Steps 3 - 4. While in your new 4-digit code. Use the CH/PRESET jog dial (unit) or the CH buttons (remote) to help you...
Instruction Manual
Page 13
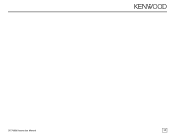
...Output TOS-link optical, PCM format Power Consumption 7W Dimensions 13-1/2" (w) x 2-5/8" (h) x 11" (d) Weight 4 lb DT-7000S Instruction Manual 13 Change the antenna location to maximize signal quality Move antenna to window with a non-metallic screen Verify antenna connections Replace antenna Call SIRIUS to activate your Kenwood dealer Move the antenna to a window with reception Solution Make sure the power cord is properly connected Make sure cable is properly connected Select the receiver/controller input that the DT-7000S is interfering with a non-metallic screen Specifications...
...Output TOS-link optical, PCM format Power Consumption 7W Dimensions 13-1/2" (w) x 2-5/8" (h) x 11" (d) Weight 4 lb DT-7000S Instruction Manual 13 Change the antenna location to maximize signal quality Move antenna to window with a non-metallic screen Verify antenna connections Replace antenna Call SIRIUS to activate your Kenwood dealer Move the antenna to a window with reception Solution Make sure the power cord is properly connected Make sure cable is properly connected Select the receiver/controller input that the DT-7000S is interfering with a non-metallic screen Specifications...

Instruction Manual
Page 14
14 DT-7000S Instruction Manual
14 DT-7000S Instruction Manual
Instruction Manual
Page 15
DT-7000S Instruction Manual 15
DT-7000S Instruction Manual 15


