Instruction Manual
Page 2
...8226; When replacing a fuse, only use a new fuse with soap immediately. 2 CAUTION To prevent damage to the machine, take the following precautions: • Make sure to ground the unit to a negative 12V DC power supply. • Do not install the unit in a spot exposed to direct sunlight or ...the unit's display when you use your health or even fatal. Using a fuse with the wrong rating may be dangerous to shock. If you are driving for any extended period. • Mounting and wiring this product requires skills and experience. For safety's sake, leave the mounting and wiring work to...
...8226; When replacing a fuse, only use a new fuse with soap immediately. 2 CAUTION To prevent damage to the machine, take the following precautions: • Make sure to ground the unit to a negative 12V DC power supply. • Do not install the unit in a spot exposed to direct sunlight or ...the unit's display when you use your health or even fatal. Using a fuse with the wrong rating may be dangerous to shock. If you are driving for any extended period. • Mounting and wiring this product requires skills and experience. For safety's sake, leave the mounting and wiring work to...
Instruction Manual
Page 3
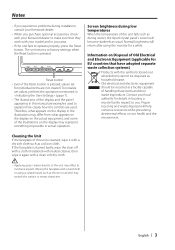
... the faceplate of the display and the panel appearing in this unit is pressed, values set for details in your local authority for individual items are examples used . Wiping the faceplate with your Kenwood dealer to make sure that have adopted separate waste collection systems) Products with a dry soft cloth such as thinner or alcohol may affect its mechanical parts. Screen...
... the faceplate of the display and the panel appearing in this unit is pressed, values set for details in your local authority for individual items are examples used . Wiping the faceplate with your Kenwood dealer to make sure that have adopted separate waste collection systems) Products with a dry soft cloth such as thinner or alcohol may affect its mechanical parts. Screen...
Instruction Manual
Page 4
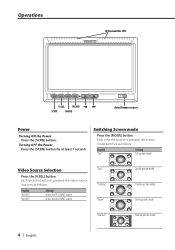
... picture mode. 4 | English Select the AV2 INPUT source. Video Source Selection Press the [V.SEL] button. Turning OFF the Power Press the [SCRN] button for at least 1 second. "Just" "Cinema" "Zoom" Justify picture mode. Switching Screen mode Press the [MODE] button. Each time the button is pressed, the screen mode switches as follows: Display "AV-IN1" "AV-IN2" Setting Select the AV1 INPUT source. Operations IR transmitter LED PWR OFF SCRN V.OFF V.SEL IR MODE MODE AV OUT MENU SELECT V.SEL MENU SCRN MODE Auto Dimmer sensor Power Turning...
... picture mode. 4 | English Select the AV2 INPUT source. Video Source Selection Press the [V.SEL] button. Turning OFF the Power Press the [SCRN] button for at least 1 second. "Just" "Cinema" "Zoom" Justify picture mode. Switching Screen mode Press the [MODE] button. Each time the button is pressed, the screen mode switches as follows: Display "AV-IN1" "AV-IN2" Setting Select the AV1 INPUT source. Operations IR transmitter LED PWR OFF SCRN V.OFF V.SEL IR MODE MODE AV OUT MENU SELECT V.SEL MENU SCRN MODE Auto Dimmer sensor Power Turning...

Instruction Manual
Page 5
... monitor. Picture Quality setting You can select the IR Headphones audio you make no operation for 15 seconds, this mode is set to IR Headphones. • Turn off mode Press any button. Select the AV2 INPUT source. Each time the button is pressed, the adjusting item switches. IR Headphones audio setting You can adjust the picture quality and Auto dimmer control of display lowers automatically. 3 Exit Picture Quality setting mode Press the [MODE] button. • The "BRT" can set the display...
... monitor. Picture Quality setting You can select the IR Headphones audio you make no operation for 15 seconds, this mode is set to IR Headphones. • Turn off mode Press any button. Select the AV2 INPUT source. Each time the button is pressed, the adjusting item switches. IR Headphones audio setting You can adjust the picture quality and Auto dimmer control of display lowers automatically. 3 Exit Picture Quality setting mode Press the [MODE] button. • The "BRT" can set the display...
Instruction Manual
Page 6
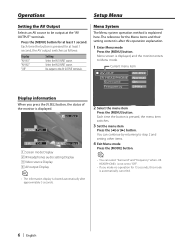
... make no operation for at the "AV OUTPUT" terminals. Each time the button is cleared automatically after this mode is automatically canceled. 6 | English The reference for at least 1 second, the AV output switches as follows: Display "AV-IN1" "AV-IN2" "Off" Setting Select the AV1 INPUT source. Each time the button is after approximately 5 seconds. 2 Select the menu item Press the [MENU] button. Select the AV2 INPUT source. Operations Setup Menu Setting the AV Output Selects an AV source...
... make no operation for at the "AV OUTPUT" terminals. Each time the button is cleared automatically after this mode is automatically canceled. 6 | English The reference for at least 1 second, the AV output switches as follows: Display "AV-IN1" "AV-IN2" "Off" Setting Select the AV1 INPUT source. Each time the button is after approximately 5 seconds. 2 Select the menu item Press the [MENU] button. Select the AV2 INPUT source. Operations Setup Menu Setting the AV Output Selects an AV source...

Instruction Manual
Page 7
... [2] button. English | 7 Memory Clear Yes No IR Headphones audio setting You can set to IR Headphones transmitter frequency. Display "AV-IN1" "AV-IN2" "Off" Setting Select the AV1 INPUT source. Display "Normal" "AV-IN1" "AV-IN2" "Off" Setting Sound with monitor source. No output to the AV OUTPUT terminals. Surround Control Turns the surround control function On or Off. Frequency Setting You can select the IR Headphones audio you cancel this function, press the [3] button. 3 Exit Menu mode Press the [MODE] button.
... [2] button. English | 7 Memory Clear Yes No IR Headphones audio setting You can set to IR Headphones transmitter frequency. Display "AV-IN1" "AV-IN2" "Off" Setting Select the AV1 INPUT source. Display "Normal" "AV-IN1" "AV-IN2" "Off" Setting Sound with monitor source. No output to the AV OUTPUT terminals. Surround Control Turns the surround control function On or Off. Frequency Setting You can select the IR Headphones audio you cancel this function, press the [3] button. 3 Exit Menu mode Press the [MODE] button.
Instruction Manual
Page 8
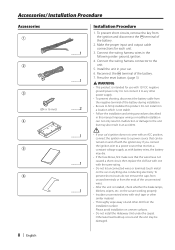
... a short circuit, then replace the old fuse with one with 12V DC negative ground power only. Connect the wiring harness connector to firmly stabilise this manual. Install the unit in this product. Press the reset button. (page 3) 2 WARNING • This product is intended for each unit. 3. Please avoid installation on the car or anything else conducting electricity. Reconnect the · terminal of the battery. 2. To prevent...
... a short circuit, then replace the old fuse with one with 12V DC negative ground power only. Connect the wiring harness connector to firmly stabilise this manual. Install the unit in this product. Press the reset button. (page 3) 2 WARNING • This product is intended for each unit. 3. Please avoid installation on the car or anything else conducting electricity. Reconnect the · terminal of the battery. 2. To prevent...
Instruction Manual
Page 9
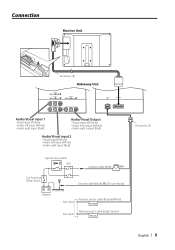
... ANTENNA FM/AM Accessory 2 Hideaway Unit AV 1 INPUT VIDEO L (MONO) R AV 2 INPUT VIDEO L R AV OUTPUT VIDEO L R TO MONITOR POWER Audio/Visual input 1 • Visual input (Yellow) • Audio left input (White) • Audio right input (Red) Audio/Visual Output • Visual output (Yellow) • Audio left output (White) • Audio right output (Red) Audio/Visual input 2 • Visual input (Yellow) • Audio left input (White) • Audio right input (Red) Ignition key switch ACC Ignition cable (Red) ( 5A ) Car fuse box (Main fuse) + Battery Ground cable...
... ANTENNA FM/AM Accessory 2 Hideaway Unit AV 1 INPUT VIDEO L (MONO) R AV 2 INPUT VIDEO L R AV OUTPUT VIDEO L R TO MONITOR POWER Audio/Visual input 1 • Visual input (Yellow) • Audio left input (White) • Audio right input (Red) Audio/Visual Output • Visual output (Yellow) • Audio left output (White) • Audio right output (Red) Audio/Visual input 2 • Visual input (Yellow) • Audio left input (White) • Audio right input (Red) Ignition key switch ACC Ignition cable (Red) ( 5A ) Car fuse box (Main fuse) + Battery Ground cable...
Instruction Manual
Page 10
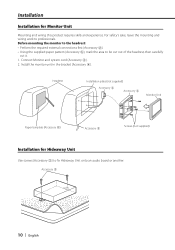
... cord (Accessory 2). 2. Before mounting the monitor to the headrest: • Perform the required external connections first (Accessory 2). • Using the supplied paper pattern (Accessory 5), mark the area to professionals. For safety's sake, leave the mounting and wiring work to be cut out of the headrest, then carefully cut it. 1. Installation Installation for Hideaway Unit Use screws (Accessory 3) to fix Hideaway Unit onto an audio...
... cord (Accessory 2). 2. Before mounting the monitor to the headrest: • Perform the required external connections first (Accessory 2). • Using the supplied paper pattern (Accessory 5), mark the area to professionals. For safety's sake, leave the mounting and wiring work to be cut out of the headrest, then carefully cut it. 1. Installation Installation for Hideaway Unit Use screws (Accessory 3) to fix Hideaway Unit onto an audio...
Instruction Manual
Page 11
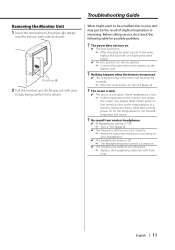
... after turning power on each side, as the battery wire. ? English | 11 Removing the Monitor Unit 1 Insert the removal tool (Accessory 6) deeply into the slots on for the temperature to rise. Before calling service, first check the following table for short circuits in a location where temperature is turned on the unit (page 3). ? Nothing happens when the buttons are exhausted. ☞ Replace the headphones batteries with...
... after turning power on each side, as the battery wire. ? English | 11 Removing the Monitor Unit 1 Insert the removal tool (Accessory 6) deeply into the slots on for the temperature to rise. Before calling service, first check the following table for short circuits in a location where temperature is turned on the unit (page 3). ? Nothing happens when the buttons are exhausted. ☞ Replace the headphones batteries with...
Instruction Manual
Page 12
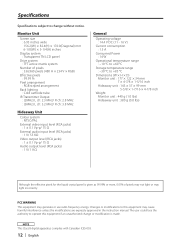
Monitor Unit Screen size : 6.95 inches wide 156.2(W) × 82.4(H) × 176.0(Diagonal) mm 6-1/8(W) × 3-1/4(H) inches Display system : Transparent TN LCD panel Drive system : TFT active matrix system Number of pixels may not light or may light incorrectly. FCC WARNING This equipment may cause harmful interference unless the modifications are expressly approved in the instruction manual. Changes or modifications to this equipment if an unauthorized...
Monitor Unit Screen size : 6.95 inches wide 156.2(W) × 82.4(H) × 176.0(Diagonal) mm 6-1/8(W) × 3-1/4(H) inches Display system : Transparent TN LCD panel Drive system : TFT active matrix system Number of pixels may not light or may light incorrectly. FCC WARNING This equipment may cause harmful interference unless the modifications are expressly approved in the instruction manual. Changes or modifications to this equipment if an unauthorized...

Instruction Manual
Page 88
操作方法 IR 發射器 LED PWR OFF SCRN V.OFF V.SEL IR MODE MODE AV OUT MENU SELECT V.SEL MENU SCRN MODE 電源 SCRN] 按鈕。 SCRN 按下 [MODE 顯示 設定 "Full" 按下 [V.SEL 顯示 "AV-IN1" "AV-IN2" AV1 INPUT AV2 INPUT "Just" "Cinema" "Zoom" "Normal" 88 | 中文
操作方法 IR 發射器 LED PWR OFF SCRN V.OFF V.SEL IR MODE MODE AV OUT MENU SELECT V.SEL MENU SCRN MODE 電源 SCRN] 按鈕。 SCRN 按下 [MODE 顯示 設定 "Full" 按下 [V.SEL 顯示 "AV-IN1" "AV-IN2" AV1 INPUT AV2 INPUT "Just" "Cinema" "Zoom" "Normal" 88 | 中文

Instruction Manual
Page 89
...; [MODE] 按鈕。 •當 "Auto DIM Off BRT NTSC TIN 15 取消。 1 按下 [SCRN On Off 2 按下 [2] 或 [3] 按鈕。 設定AV輸出 選擇在 "AV OUTPUT AV信號源。 按下 [MENU 1 AV 顯示 "AV-IN1" "AV-IN2" "Off" AV1 INPUT...
...; [MODE] 按鈕。 •當 "Auto DIM Off BRT NTSC TIN 15 取消。 1 按下 [SCRN On Off 2 按下 [2] 或 [3] 按鈕。 設定AV輸出 選擇在 "AV OUTPUT AV信號源。 按下 [MENU 1 AV 顯示 "AV-IN1" "AV-IN2" "Off" AV1 INPUT...

Instruction Manual
Page 90
... 3 4 AV輸出顯示 5 設定選單 選單系統 1 按下 [MENU AV-OUT IR HEADPHONE Surround Frequency AV-IN1 Normal On 2MHz 2 按下 [MENU 3 按下 [2] 或 [3 2 4 按下 [MODE] 按鈕。 •當〈IR HEADPHONE Off Surround Frequency •如果在15 90 | 中文
... 3 4 AV輸出顯示 5 設定選單 選單系統 1 按下 [MENU AV-OUT IR HEADPHONE Surround Frequency AV-IN1 Normal On 2MHz 2 按下 [MENU 3 按下 [2] 或 [3 2 4 按下 [MODE] 按鈕。 •當〈IR HEADPHONE Off Surround Frequency •如果在15 90 | 中文
Instruction Manual
Page 91
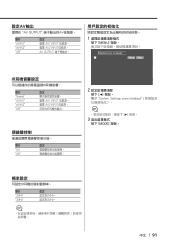
...;示 "AV-IN1" "AV-IN2" "Off" AV1 INPUT AV2 INPUT AV OUTPUT 1 按下 [MENU Memory Clear Yes No IR IR 顯示 "Normal" "AV-IN1" "AV-IN2" "Off" AV1 INPUT AV2 INPUT IR 顯示 設定 "On" "Off" 2 按下 [2 System Settings were Initialized 3] 按鈕。 3 按下 [MODE] 按鈕。 頻率設定...
...;示 "AV-IN1" "AV-IN2" "Off" AV1 INPUT AV2 INPUT AV OUTPUT 1 按下 [MENU Memory Clear Yes No IR IR 顯示 "Normal" "AV-IN1" "AV-IN2" "Off" AV1 INPUT AV2 INPUT IR 顯示 設定 "On" "Off" 2 按下 [2 System Settings were Initialized 3] 按鈕。 3 按下 [MODE] 按鈕。 頻率設定...


