Use and Care Guide
Page 2
...Kenmore Elite Limited Warranty 2 IMPORTANT SAFETY INSTRUCTIONS 3-5 Product Record 5 Serial Plate Location 5 induction Cooktop Features 5 Range Features 6 Before Using the Cooktop 7-8 Before Setting the Cooktop 9=10 Setting the Cooktop Controls 10-12 Using the Touch Control 10 Operating the Cooking Zones 10 Preheat Recommendations 11 Recommended Settings for induction...Setting food Categories Feature 27 Using and Setting the Meat Probe 28-29 Setting the Warm & Hold Feature 30 Setting Broil 31 To Set the Sabbath Feature 32-33 To set the Rcipe Recall Feature 33 Setting Warmer...
...Kenmore Elite Limited Warranty 2 IMPORTANT SAFETY INSTRUCTIONS 3-5 Product Record 5 Serial Plate Location 5 induction Cooktop Features 5 Range Features 6 Before Using the Cooktop 7-8 Before Setting the Cooktop 9=10 Setting the Cooktop Controls 10-12 Using the Touch Control 10 Operating the Cooking Zones 10 Preheat Recommendations 11 Recommended Settings for induction...Setting food Categories Feature 27 Using and Setting the Meat Probe 28-29 Setting the Warm & Hold Feature 30 Setting Broil 31 To Set the Sabbath Feature 32-33 To set the Rcipe Recall Feature 33 Setting Warmer...
Use and Care Guide
Page 3
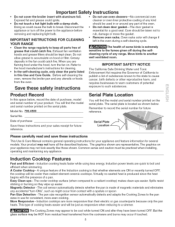
... Parts & Repair is engaged. It would be allowed to the appliance. Areas near an induction unit while it is connected. _..ii.i.l........ ...ii.i...... During and after unpacking the range. The safety symbol IF_ calls your particular situation. All safety messages will not occur in ... you what can result in serious injuries and also cause damage to provide reasonable protection against harmful interference in case of a range by properly installed anti=tip bracket(s) provided with packaging material. • Proper Installation-Be sure your appliance for proper anti-tip...
... Parts & Repair is engaged. It would be allowed to the appliance. Areas near an induction unit while it is connected. _..ii.i.l........ ...ii.i...... During and after unpacking the range. The safety symbol IF_ calls your particular situation. All safety messages will not occur in ... you what can result in serious injuries and also cause damage to provide reasonable protection against harmful interference in case of a range by properly installed anti=tip bracket(s) provided with packaging material. • Proper Installation-Be sure your appliance for proper anti-tip...
Use and Care Guide
Page 4
... covers are suitable for cooktop use. ,, Do not use decorative surface element covers. Select utensils having flat bottoms large enough to the side of the range when opening the door of time, make sure that has boiled dry may melt. , Protective liners--Do not use aluminum foil to line oven bottom... or any unused range if it is to the cooktop. ,, When flaming foods under a ventilating the fan on grease fires--Smother the fire with caution--If a wet sponge or...
... covers are suitable for cooktop use. ,, Do not use decorative surface element covers. Select utensils having flat bottoms large enough to the side of the range when opening the door of time, make sure that has boiled dry may melt. , Protective liners--Do not use aluminum foil to line oven bottom... or any unused range if it is to the cooktop. ,, When flaming foods under a ventilating the fan on grease fires--Smother the fire with caution--If a wet sponge or...
Use and Care Guide
Page 5
... oven, remove the broiler pan and any appliance. You will find the model and serial number printed on . Model No. 790.4500 Serial No. Date of purchase Save these instructions and your appliance and feature information for consistent, more responsive than radiant element ceramic cooktops...with aluminum foil. • Do not use for several models. rub, damage or move the gasket. deposits in or around any range. Induction power levels are representative. Virtually no wasted heat is appliance or turn -ONs", such as responsive when reducing to IMPORTANT SAFETY NOTICE ...
... oven, remove the broiler pan and any appliance. You will find the model and serial number printed on . Model No. 790.4500 Serial No. Date of purchase Save these instructions and your appliance and feature information for consistent, more responsive than radiant element ceramic cooktops...with aluminum foil. • Do not use for several models. rub, damage or move the gasket. deposits in or around any range. Induction power levels are representative. Virtually no wasted heat is appliance or turn -ONs", such as responsive when reducing to IMPORTANT SAFETY NOTICE ...
Use and Care Guide
Page 6
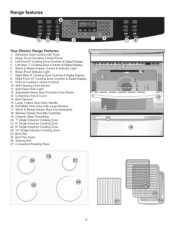
... illustrated) 18. Electronic Oven Control with Large Window 17. Range features Your Electric Range Features: 1. Bread Proof Indicator Light 7. Right Rear 6" Cooking Zone Controls & Digital Display 8. Ceramic Glass Smoothtop 20. 7" Single Induction Cooking Zone 21. 6" Single Induction Cooking Zone 22. 8" Single Induction Cooking Zone 23. 10" Single Induction Cooking Zone 24. Left Rear 7" Cooking Zone Controls...
... illustrated) 18. Electronic Oven Control with Large Window 17. Range features Your Electric Range Features: 1. Bread Proof Indicator Light 7. Right Rear 6" Cooking Zone Controls & Digital Display 8. Ceramic Glass Smoothtop 20. 7" Single Induction Cooking Zone 21. 6" Single Induction Cooking Zone 22. 8" Single Induction Cooking Zone 23. 10" Single Induction Cooking Zone 24. Left Rear 7" Cooking Zone Controls...

Use and Care Guide
Page 11
... lying on the controls area of time required to preheat a cooking utensil. The Cooking Zone will remember the power level setting for induction Cooking Zones POWER BOOST (Pb) HIGH (8.0 =Hi) MEDIUM HIGH (5.0 =8.0) MEDIUM (3.0 = 5.0) MEDIUM LOW (2.0 - 4.0) LOW.../SIMMER (Lo - 2.0) Type of Cooking Use when first starting to heat pans that induction may decrease the amount of the cooktop may cause the cooktop to display an error code and turn the Cooking Zone OFF. 2.... setting). Start most foods, bring large pans of the range when it has cooled sufficiently.
... lying on the controls area of time required to preheat a cooking utensil. The Cooking Zone will remember the power level setting for induction Cooking Zones POWER BOOST (Pb) HIGH (8.0 =Hi) MEDIUM HIGH (5.0 =8.0) MEDIUM (3.0 = 5.0) MEDIUM LOW (2.0 - 4.0) LOW.../SIMMER (Lo - 2.0) Type of Cooking Use when first starting to heat pans that induction may decrease the amount of the cooktop may cause the cooktop to display an error code and turn the Cooking Zone OFF. 2.... setting). Start most foods, bring large pans of the range when it has cooled sufficiently.
Use and Care Guide
Page 12
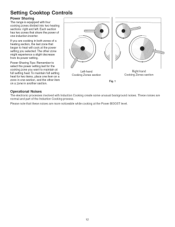
Setting Cooktop Controls Power Sharing The range is equipped with induction Cooking create some unusual background noises. These noises are normal and part of one induction inverter. Power Sharing Tips: Remember to maintain at full setting heat. Left-hand Cooking Zones section Fig. 1 Right-hand Cooking ...with four cooking zones divided into two heating sections: right and left. Each section has two zones that share the power of the Induction Cooking process. If you are more noticeable while cooking at the power setting you want to select the power setting last for two...
Setting Cooktop Controls Power Sharing The range is equipped with induction Cooking create some unusual background noises. These noises are normal and part of one induction inverter. Power Sharing Tips: Remember to maintain at full setting heat. Left-hand Cooking Zones section Fig. 1 Right-hand Cooking ...with four cooking zones divided into two heating sections: right and left. Each section has two zones that share the power of the Induction Cooking process. If you are more noticeable while cooking at the power setting you want to select the power setting last for two...
Use and Care Guide
Page 13
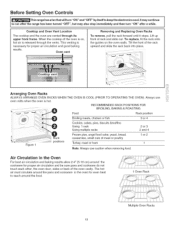
This venting is hot. Tilt the front of rack and slide out. Arranging Oven Racks ALWAYS ARRANGE OVEN RACKS WHEN THE OVEN IS COOL (PRIOR TO OPERATING THE OVEN). Air Circulation in the oven for even ... continue to keep the electronics cool. Lift up front of the rack upward and slide the rack back into place. Before Setting Oven Controls _This range has a fan that willturn "ON" and "OFF" by itself to run after the range has been turned "OFF", but may also stop immediately and then turn "ON...
This venting is hot. Tilt the front of rack and slide out. Arranging Oven Racks ALWAYS ARRANGE OVEN RACKS WHEN THE OVEN IS COOL (PRIOR TO OPERATING THE OVEN). Air Circulation in the oven for even ... continue to keep the electronics cool. Lift up front of the rack upward and slide the rack back into place. Before Setting Oven Controls _This range has a fan that willturn "ON" and "OFF" by itself to run after the range has been turned "OFF", but may also stop immediately and then turn "ON...
Use and Care Guide
Page 15
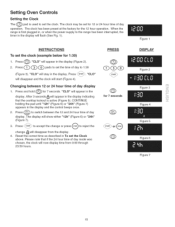
... v display. PRESS O dbQdb 0 for 7 seconds. "CLO" will appear in the display (Figure 2), 2, Press (_ (_ (_ pads to set the clock (example below for 1:30) 1, Press @. CONTINUE holding the pad until "12h" (Figure 6) or "24h" (Figure 7) appears in the display will start (Figure 4), "CLO" Changing between the 12 and... 24 hour time of day to 1:30 (Figure 3). I_1will disappear from 0:00 through 23:59 hours. "CLO" will appear in the display. When the range is first plugged in, or when the power supply to the range has been interrupted, the timer in the display and ...
... v display. PRESS O dbQdb 0 for 7 seconds. "CLO" will appear in the display (Figure 2), 2, Press (_ (_ (_ pads to set the clock (example below for 1:30) 1, Press @. CONTINUE holding the pad until "12h" (Figure 6) or "24h" (Figure 7) appears in the display will start (Figure 4), "CLO" Changing between the 12 and... 24 hour time of day to 1:30 (Figure 3). I_1will disappear from 0:00 through 23:59 hours. "CLO" will appear in the display. When the range is first plugged in, or when the power supply to the range has been interrupted, the timer in the display and ...
Use and Care Guide
Page 17
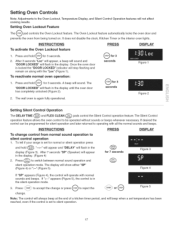
.... The "DOOR LOCKED'" will operate with all the normal sounds and beeps. INSTRUCTIONS PRESS DISPLAY To activate the Oven Lockout feature 1. To tell if your range is in the silent operation mode. , Press change, to accept the change control from being turned on along with the "Loc" (Figure 1 ). for 3 seconds Q for...
.... The "DOOR LOCKED'" will operate with all the normal sounds and beeps. INSTRUCTIONS PRESS DISPLAY To activate the Oven Lockout feature 1. To tell if your range is in the silent operation mode. , Press change, to accept the change control from being turned on along with the "Loc" (Figure 1 ). for 3 seconds Q for...
Use and Care Guide
Page 21
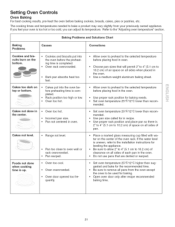
... burn on the bottom. • Cookies and biscuits put into the oven before baking cookies, breads, cakes, pies or pastries, etc. Cakes not level. • Range not level. If the water level is too hot or too cold, you feel your previously owned appliance. If you can adjust its temperature. Foods...
... burn on the bottom. • Cookies and biscuits put into the oven before baking cookies, breads, cakes, pies or pastries, etc. Cakes not level. • Range not level. If the water level is too hot or too cold, you feel your previously owned appliance. If you can adjust its temperature. Foods...
Use and Care Guide
Page 31
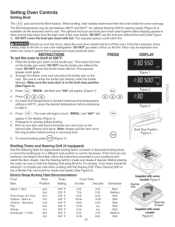
... sure to step 6. DO NOT cover the broil pan insert with the Searing Grill. Figure 3 ...ii.i...... 6. Broil on the fire or use a fire extinguisher. Electric Range Broiling Table Recommendations Food Rack Temp Cook Time Item Position Setting 1st side 2nd side Doneness Steak 1" thick 2nd 2nd Pork Chops 3/4" thick 2nd Chicken...
... sure to step 6. DO NOT cover the broil pan insert with the Searing Grill. Figure 3 ...ii.i...... 6. Broil on the fire or use a fire extinguisher. Electric Range Broiling Table Recommendations Food Rack Temp Cook Time Item Position Setting 1st side 2nd side Doneness Steak 1" thick 2nd 2nd Pork Chops 3/4" thick 2nd Chicken...

Use and Care Guide
Page 36
...oven heats to remain on . DO HAND CLEAN DOOR What to Expect during a self-clean cycle. If heavy spillovers are normal. Note: If your range is being removed. DO HAND CLEAN FRAME Self-Cleaning Oven A Self-Cleaning oven cleans itself with a damp cloth. Doing so could cause damage. &#...8226; Remove the broiler pan and insert, all utensils and any range. Large spillovers can cause heavy smoke or fire when subjected to a fine powdered ash you can damage the automatic door locking system. Clean with ...
...oven heats to remain on . DO HAND CLEAN DOOR What to Expect during a self-clean cycle. If heavy spillovers are normal. Note: If your range is being removed. DO HAND CLEAN FRAME Self-Cleaning Oven A Self-Cleaning oven cleans itself with a damp cloth. Doing so could cause damage. &#...8226; Remove the broiler pan and insert, all utensils and any range. Large spillovers can cause heavy smoke or fire when subjected to a fine powdered ash you can damage the automatic door locking system. Clean with ...
Use and Care Guide
Page 40
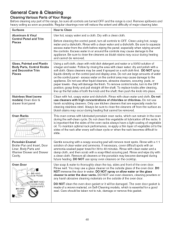
...damage the finish. Be sure to slide. Excess water in or around the controls. Follow by rinsing the area with clean water and cloth. Glass cleaners may be used if sprayed on the control area may use oven cleaners, cleaning powders or any part of the range, be damaged. excess water on... other liquid cleaners, abrasive cleaners, scouring pads, or paper towels - Always be sure to 40 minutes. Rinse with an ammonia-soaked paper towel for 30 to rinse the cleaners off from the cloth before wiping the panel; The oven door gasket is cool. Clean using hot, soapy water and a dishcloth...
...damage the finish. Be sure to slide. Excess water in or around the controls. Follow by rinsing the area with clean water and cloth. Glass cleaners may be used if sprayed on the control area may use oven cleaners, cleaning powders or any part of the range, be damaged. excess water on... other liquid cleaners, abrasive cleaners, scouring pads, or paper towels - Always be sure to 40 minutes. Rinse with an ammonia-soaked paper towel for 30 to rinse the cleaners off from the cloth before wiping the panel; The oven door gasket is cool. Clean using hot, soapy water and a dishcloth...
Use and Care Guide
Page 42
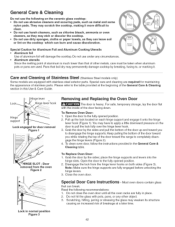
... cooktop by the sides; General Care & Cleaning Do not use the following recommendations: 1. Hinge lever J Hinge lever hook HINGE SLOT - Pull up and toward the range to the fully opened position. 2. To clean oven door, follow the instructions provided in normal position Figure 3 42 Disengage the lock from the oven Figure...
... cooktop by the sides; General Care & Cleaning Do not use the following recommendations: 1. Hinge lever J Hinge lever hook HINGE SLOT - Pull up and toward the range to the fully opened position. 2. To clean oven door, follow the instructions provided in normal position Figure 3 42 Disengage the lock from the oven Figure...
Use and Care Guide
Page 43
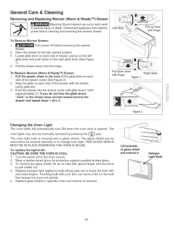
... BE IN PLACE WHENEVER THE OVEN IS IN USE. Lift backside of glass shield and remove it to the fully opened . Disconnect appliance from the range. To Replace Warmer (Warm & Ready TM) Drawer: 1. The glass shield can be removed to change oven light. Turn the power off before cleaning and servicing...
... BE IN PLACE WHENEVER THE OVEN IS IN USE. Lift backside of glass shield and remove it to the fully opened . Disconnect appliance from the range. To Replace Warmer (Warm & Ready TM) Drawer: 1. The glass shield can be removed to change oven light. Turn the power off before cleaning and servicing...
Use and Care Guide
Page 44
... is not level. The electronic processes involved with range. These are normal for induction cooking. Appliance must be accessible for use correct cookware type for induction cooking process. Surface elements do . Place a level on . When range is level, cooktop may create some unusual noises...of the cookware, the material type is ON for Induction cooking. The induction cooking zones will work . Induction cooking uses electromagnetic energy to induce heat directly to unlock the cooktop. Check steps under "Entire range or oven does not operate" in this Before ...
... is not level. The electronic processes involved with range. These are normal for induction cooking. Appliance must be accessible for use correct cookware type for induction cooking process. Surface elements do . Place a level on . When range is level, cooktop may create some unusual noises...of the cookware, the material type is ON for Induction cooking. The induction cooking zones will work . Induction cooking uses electromagnetic energy to induce heat directly to unlock the cooktop. Check steps under "Entire range or oven does not operate" in this Before ...


