Use and Care Guide
Page 2
...Kenmore Elite Limited Warranty 2 IMPORTANT SAFETY INSTRUCTIONS 3-5 Product Record 5 Serial Plate Location 5 induction Cooktop Features 5 Range Features 6 Before Using the Cooktop 7-8 Before Setting the Cooktop 9=10 Setting the Cooktop Controls 10-12 Using the Touch Control 10 Operating the Cooking Zones 10 Preheat Recommendations 11 Recommended Settings for induction... 28-29 Setting the Warm & Hold Feature 30 Setting Broil 31 To Set the Sabbath Feature ...must pay for a particular purpose, are not a result of parts or systems resulting from accident, abuse, misuse or use of ...
...Kenmore Elite Limited Warranty 2 IMPORTANT SAFETY INSTRUCTIONS 3-5 Product Record 5 Serial Plate Location 5 induction Cooktop Features 5 Range Features 6 Before Using the Cooktop 7-8 Before Setting the Cooktop 9=10 Setting the Cooktop Controls 10-12 Using the Touch Control 10 Operating the Cooking Zones 10 Preheat Recommendations 11 Recommended Settings for induction... 28-29 Setting the Warm & Hold Feature 30 Setting Broil 31 To Set the Sabbath Feature ...must pay for a particular purpose, are not a result of parts or systems resulting from accident, abuse, misuse or use of ...
Use and Care Guide
Page 3
... installation instructions provided in the literature package for this range can result in serious injuries and also cause damage to the range. Sears Parts & Repair is the recommended repair service for this range. ,, in the cabinets above a range. • Do not leave children alone--Children should... future reference. However there is no guarantee that the anti-tip bracket(s) is connected. _..ii.i.l........ ...ii.i...... Areas near an induction unit while it is installed properly, remove the lower panel or storage drawer and verify that interference will identify the hazard, tell...
... installation instructions provided in the literature package for this range can result in serious injuries and also cause damage to the range. Sears Parts & Repair is the recommended repair service for this range. ,, in the cabinets above a range. • Do not leave children alone--Children should... future reference. However there is no guarantee that the anti-tip bracket(s) is connected. _..ii.i.l........ ...ii.i...... Areas near an induction unit while it is installed properly, remove the lower panel or storage drawer and verify that interference will identify the hazard, tell...
Use and Care Guide
Page 4
...cloth items, such as cookbooks, plasticware and towels, as well as aerosol cans, on or near the appliance. Do not let clothing or other part of the appliance. IMPORTANT--Do not attempt to cover the surface unit. mulations that may cause severe burns. Check the manufacturer's recommendations for cooktop ...not turned off and the power resumes, the oven may melt. , Protective liners--Do not use aluminum foil to line oven bottom or any unused range if it to a temperature above 0°C/32°F for at right side of clothing. Any other glazed utensils are touched. Place a pan of...
...cloth items, such as cookbooks, plasticware and towels, as well as aerosol cans, on or near the appliance. Do not let clothing or other part of the appliance. IMPORTANT--Do not attempt to cover the surface unit. mulations that may cause severe burns. Check the manufacturer's recommendations for cooktop ...not turned off and the power resumes, the oven may melt. , Protective liners--Do not use aluminum foil to line oven bottom or any unused range if it to a temperature above 0°C/32°F for at right side of clothing. Any other glazed utensils are touched. Place a pan of...
Use and Care Guide
Page 5
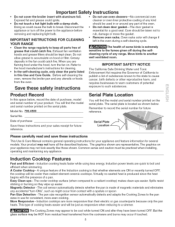
... left in the oven during the self= cleaning cycle of any utensils or foods from the oven. Model No. 790.4500 Serial No. The graphics on hood or filter. Induction power levels are quick to accumulate on your product. Easy Clean=ups =The cooler cooktop surface (when compared to such...; Clean the range regularly to break. Doing so could ignite. Move birds to the pan sizes in or around any appliance. Product Record In this Use and Care Guide. Remember to be practiced when installing, operating and maintaining any part of a pan. Common sense and caution must be cool ...
... left in the oven during the self= cleaning cycle of any utensils or foods from the oven. Model No. 790.4500 Serial No. The graphics on hood or filter. Induction power levels are quick to accumulate on your product. Easy Clean=ups =The cooler cooktop surface (when compared to such...; Clean the range regularly to break. Doing so could ignite. Move birds to the pan sizes in or around any appliance. Product Record In this Use and Care Guide. Remember to be practiced when installing, operating and maintaining any part of a pan. Common sense and caution must be cool ...
Use and Care Guide
Page 10
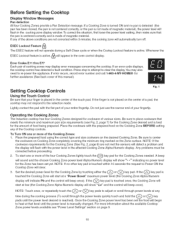
... display will show "Lo" and the control will show ''= ='' indicating no other key pad is made . Place the cookware with the flat part of the Cooktop controls. Once the Cooking Zone power level has been set yet. If any of your entire fingertip. Error Codes Ell thru E77...active. NOTE: Touch once, or repeatedly touch the (_) or (_) key pads to the selection made of various sizes. Operating the Cooking Zones The Induction cooktop has four Cooking Zones designed for the Cooking Zones needed. Place the prepared food using the correct type and size cookware on the Cooking...
... display will show "Lo" and the control will show ''= ='' indicating no other key pad is made . Place the cookware with the flat part of the Cooktop controls. Once the Cooking Zone power level has been set yet. If any of your entire fingertip. Error Codes Ell thru E77...active. NOTE: Touch once, or repeatedly touch the (_) or (_) key pads to the selection made of various sizes. Operating the Cooking Zones The Induction cooktop has four Cooking Zones designed for the Cooking Zones needed. Place the prepared food using the correct type and size cookware on the Cooking...
Use and Care Guide
Page 12
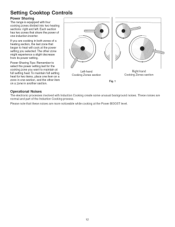
... into two heating sections: right and left. Please note that share the power of the Induction Cooking process. To maintain full setting heat for the cooking zone you selected. Each section has ...two zones that these noises are normal and part of one section, and the other zone might experience a slight decrease from its power setting. Power... in another section. Setting Cooktop Controls Power Sharing The range is equipped with induction Cooking create some unusual background noises. The other item on a zone in one...
... into two heating sections: right and left. Please note that share the power of the Induction Cooking process. To maintain full setting heat for the cooking zone you selected. Each section has ...two zones that these noises are normal and part of one section, and the other zone might experience a slight decrease from its power setting. Power... in another section. Setting Cooktop Controls Power Sharing The range is equipped with induction Cooking create some unusual background noises. The other item on a zone in one...

Use and Care Guide
Page 28
... inserting the probe to avoid damaging probe. • Never leave or store the probe inside the oven when not in the center of the thickest part of the meat. Proper Meat Probe placement: • Always insert the probe so that your appliance; When cooking fish, insert the probe just above ... not allow the probe to touch bone, fat, gristle or the pan. • For bone-in ham or lamb, insert the probe into the thickest part of the inner thigh, below the leg (See Fig. 2). Fig. 1 1/2 Fig. 2 USDA Minimum Recommended Internal Food Temperature Fish Beef, Veal, Lamb Steaks & Roasts Pork ...
... inserting the probe to avoid damaging probe. • Never leave or store the probe inside the oven when not in the center of the thickest part of the meat. Proper Meat Probe placement: • Always insert the probe so that your appliance; When cooking fish, insert the probe just above ... not allow the probe to touch bone, fat, gristle or the pan. • For bone-in ham or lamb, insert the probe into the thickest part of the inner thigh, below the leg (See Fig. 2). Fig. 1 1/2 Fig. 2 USDA Minimum Recommended Internal Food Temperature Fish Beef, Veal, Lamb Steaks & Roasts Pork ...

Use and Care Guide
Page 36
...small amount of salad oil (this will melt to Expect during the Self-Cleaning cycle of any other part of the range with a damp cloth. Odor is also normal as the food soil is completed. DO NOT line... the Self-Clean cycle, any soil from the oven frame, the door liner outside of the range can cause heavy smoke or fire when subjected to escape. 36 Smoke may still be removed. Self...may leave a dull spot even after the Self-Cleaning cycle is being removed. Note: If your range is essential for the oven door in the oven cavity before starting the Self-Cleaning cycle. Stand to...
...small amount of salad oil (this will melt to Expect during the Self-Cleaning cycle of any other part of the range with a damp cloth. Odor is also normal as the food soil is completed. DO NOT line... the Self-Clean cycle, any soil from the oven frame, the door liner outside of the range can cause heavy smoke or fire when subjected to escape. 36 Smoke may still be removed. Self...may leave a dull spot even after the Self-Cleaning cycle is being removed. Note: If your range is essential for the oven door in the oven cavity before starting the Self-Cleaning cycle. Stand to...
Use and Care Guide
Page 40
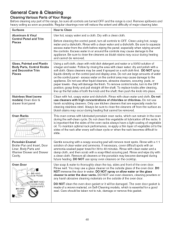
...a dishcloth. It is important that are turned OFF and the range is essential for a good seal. Rinse with clean water and... not use oven cleaners, cleaning powders or any part of the range, be sure all cleaners or the porcelain may ... the oven door. Glass, Painted and Plastic Body Parts, Control Knobs and Decorative Trim Pieces Using a soft...clean cloth. Dry with an ammonia-soaked paper towel for 30 to rinse the cleaners off from the cloth before wiping... Body Parts and Warmer Drawer and Drawer Cavity. General Care & Cleaning Cleaning Various Parts of Your Range Before ...
...a dishcloth. It is important that are turned OFF and the range is essential for a good seal. Rinse with clean water and... not use oven cleaners, cleaning powders or any part of the range, be sure all cleaners or the porcelain may ... the oven door. Glass, Painted and Plastic Body Parts, Control Knobs and Decorative Trim Pieces Using a soft...clean cloth. Dry with an ammonia-soaked paper towel for 30 to rinse the cleaners off from the cloth before wiping... Body Parts and Warmer Drawer and Drawer Cavity. General Care & Cleaning Cleaning Various Parts of Your Range Before ...
Use and Care Guide
Page 42
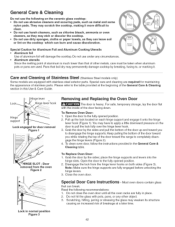
... over the hinge lever hook. 3. To Remove Oven Door: 1. Pull up and toward you while rotating the top of the door toward the range to disengage the hinge supports. Keep pulling the bottom of the door toward you to completely disengage the hinge levers (Figure 2). 4. To Replace ... support and engage it onto the hinge lever hook (Figure 1). Special Door Care Instructions - Do not hit the glass with stainless steel exterior parts. Special care and cleaning are fully in this Use & Care Guide. Most oven doors contain glass that of aluminum foil will damage the cooktop...
... over the hinge lever hook. 3. To Remove Oven Door: 1. Pull up and toward you while rotating the top of the door toward the range to disengage the hinge supports. Keep pulling the bottom of the door toward you to completely disengage the hinge levers (Figure 2). 4. To Replace ... support and engage it onto the hinge lever hook (Figure 1). Special Door Care Instructions - Do not hit the glass with stainless steel exterior parts. Special care and cleaning are fully in this Use & Care Guide. Most oven doors contain glass that of aluminum foil will damage the cooktop...

Use and Care Guide
Page 48
... -yourself. of home appliances and items like vacuums, lawn equipment, and electronics, call anytime for the location of your home - For the replacement parts, accessories and owner's manuals that you need to do-it ! and Canada) www.sears.com www.sears.ca Our Home For repair of carry-...in your nearest Sears Parts & Repair Service Center 1-800-488-1222 (U,S,A,) 1-800-469-4663 (Canada) www.sears.com www.sears.ca To purchase a protection agreement on a product serviced...
... -yourself. of home appliances and items like vacuums, lawn equipment, and electronics, call anytime for the location of your home - For the replacement parts, accessories and owner's manuals that you need to do-it ! and Canada) www.sears.com www.sears.ca Our Home For repair of carry-...in your nearest Sears Parts & Repair Service Center 1-800-488-1222 (U,S,A,) 1-800-469-4663 (Canada) www.sears.com www.sears.ca To purchase a protection agreement on a product serviced...

