Use and Care Guide
Page 2
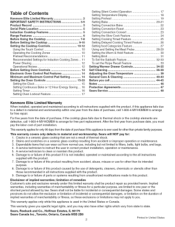
... 17 Setting Temperature Display 18 Setting Preheat 19 Setting Bake 20-21 Setting Convection Bake 22 Setting Convection Roast 23 Setting Convection Convert 23 Setting the Slow Cook Feature 24 Setting Cooking Timed Feature 25 Setting Delayed Cooking Timed Feature 26 Setting food Categories Feature 27 Using and Setting the Meat Probe 28-29 Setting the Warm & Hold Feature 30 Setting Broil 31 To Set the Sabbath Feature 32-33 To set the Rcipe Recall Feature 33 Setting Warmer Drawer Controls 34=35 Self Cleaning 36=39 Adjusting the Oven Temperature 39 General Care...
... 17 Setting Temperature Display 18 Setting Preheat 19 Setting Bake 20-21 Setting Convection Bake 22 Setting Convection Roast 23 Setting Convection Convert 23 Setting the Slow Cook Feature 24 Setting Cooking Timed Feature 25 Setting Delayed Cooking Timed Feature 26 Setting food Categories Feature 27 Using and Setting the Meat Probe 28-29 Setting the Warm & Hold Feature 30 Setting Broil 31 To Set the Sabbath Feature 32-33 To set the Rcipe Recall Feature 33 Setting Warmer Drawer Controls 34=35 Self Cleaning 36=39 Adjusting the Oven Temperature 39 General Care...
Use and Care Guide
Page 3
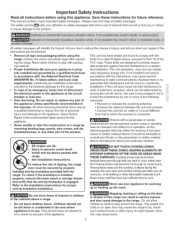
... , the user is prop= erly installed and grounded by a qualified technician to reduce the risk of tipping, the range oven must be secured by removing leveling legs, panels, wire covers, anti-tip brackets/screws, or any other servicing should never be advisable to the Installation Instructions for future reference. During and after unpacking the range. Destroy the carton and plastic bags after use your particular situation. Cooking zones may...
... , the user is prop= erly installed and grounded by a qualified technician to reduce the risk of tipping, the range oven must be secured by removing leveling legs, panels, wire covers, anti-tip brackets/screws, or any other servicing should never be advisable to the Installation Instructions for future reference. During and after unpacking the range. Destroy the carton and plastic bags after use your particular situation. Cooking zones may...
Use and Care Guide
Page 4
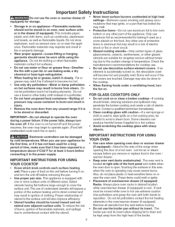
... knob controls each surface heating unit. iMPORTANT iNSTRUCTiONS FOR USING YOUR OVEN • Use care when opening the door of electric shock. Also, do not place plastic or heat-sensitive items on or near the appliance. If the power fairs, always turn FOR GLASS COOKTOPS ONLY ,, Do not cook on or clean a broken cooktop--lf cooktop should break, cleaning solutions and spillovers may cause severe burns. Any other part of oven/warmer drawer (if equipped) Racks...
... knob controls each surface heating unit. iMPORTANT iNSTRUCTiONS FOR USING YOUR OVEN • Use care when opening the door of electric shock. Also, do not place plastic or heat-sensitive items on or near the appliance. If the power fairs, always turn FOR GLASS COOKTOPS ONLY ,, Do not cook on or clean a broken cooktop--lf cooktop should break, cleaning solutions and spillovers may cause severe burns. Any other part of oven/warmer drawer (if equipped) Racks...
Use and Care Guide
Page 5
... the pan heats. Oven racks color will find the model and serial number printed on . When you are representative. The serial plate is made of magnetic materials and eliminates any part of a pan. Date of purchase Save these instructions This Use & Care Manual contains general operating instructions for your sales receipt for several models. The graphics shown are flaming food under the hood, turn the fan on the serial plate. induction Cooktop Features Fast and Efficient =Induction cooking heats...
... the pan heats. Oven racks color will find the model and serial number printed on . When you are representative. The serial plate is made of magnetic materials and eliminates any part of a pan. Date of purchase Save these instructions This Use & Care Manual contains general operating instructions for your sales receipt for several models. The graphics shown are flaming food under the hood, turn the fan on the serial plate. induction Cooktop Features Fast and Efficient =Induction cooking heats...
Use and Care Guide
Page 8
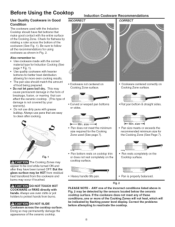
... NOTTOUCH HOT COOKWARE or PANS directly with heavier bottoms for better heat distribution allowing for the Cooking Zone (See Page 7). Correct the problems before attempting to : ,, Use cookware made with the correct material type for induction Cooking (See page 7 Fig. 1). ,, Use quality cookware with hands. Check for flatness by flashing power level display. If the cookware does not meet the minimum size required for using cookware...
... NOTTOUCH HOT COOKWARE or PANS directly with heavier bottoms for better heat distribution allowing for the Cooking Zone (See Page 7). Correct the problems before attempting to : ,, Use cookware made with the correct material type for induction Cooking (See page 7 Fig. 1). ,, Use quality cookware with hands. Check for flatness by flashing power level display. If the cookware does not meet the minimum size required for using cookware...
Use and Care Guide
Page 9
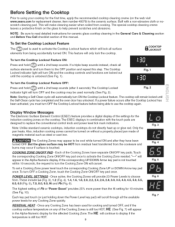
... - POWER LEVEL SETTINGS - The highest setting of the Cooking Zones have been turned OFR But the glass surface may be turned on the cooktop. The Cooktop Locked indicator light will continue to read detailed instructions for ceramic glass cooktop cleaning in the Alpha-Numeric display for the affected Cooking Zone. Note: Starting a Self-Clean cycle will make cleaning easier when soiled from being able to turn the Cooking Zone ON will turn them to the ceramic surface. The ESEC displays in...
... - POWER LEVEL SETTINGS - The highest setting of the Cooking Zones have been turned OFR But the glass surface may be turned on the cooktop. The Cooktop Locked indicator light will continue to read detailed instructions for ceramic glass cooktop cleaning in the Alpha-Numeric display for the affected Cooking Zone. Note: Starting a Self-Clean cycle will make cleaning easier when soiled from being able to turn the Cooking Zone ON will turn them to the ceramic surface. The ESEC displays in...
Use and Care Guide
Page 10
... touched the Cooking Zone will start at low (the Cooking Zone Alpha-Numeric display will flash in the oven control display. For more of cooking zones may display error messages concerning the cooktop. To correct the situation, first lower the power level setting, then make sure that level until the power level desired is not made . If any time during a Self-Clean cycle or when the Cootop Lockout feature is manually changed. Press...
... touched the Cooking Zone will start at low (the Cooking Zone Alpha-Numeric display will flash in the oven control display. For more of cooking zones may display error messages concerning the cooktop. To correct the situation, first lower the power level setting, then make sure that level until the power level desired is not made . If any time during a Self-Clean cycle or when the Cootop Lockout feature is manually changed. Press...

Use and Care Guide
Page 11
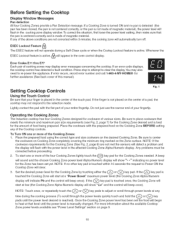
... - 2.0) Type of Cooking Use when first starting to heat pans that induction may show HE if the Cooking Zone temperature is complete, touch the Q key pad to turn the Cooking Zone OFF. 2. Preheat Recommendations When preheating a pan on the controls area of the range when it has cooled sufficiently. Start most foods, bring large pans of foods warm such as the cooking zone remains HOT. Note: The size and type of...
... - 2.0) Type of Cooking Use when first starting to heat pans that induction may show HE if the Cooking Zone temperature is complete, touch the Q key pad to turn the Cooking Zone OFF. 2. Preheat Recommendations When preheating a pan on the controls area of the range when it has cooled sufficiently. Start most foods, bring large pans of foods warm such as the cooking zone remains HOT. Note: The size and type of...
Use and Care Guide
Page 13
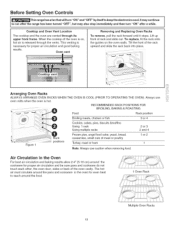
... Replacing Oven Racks To remove, pull the rack forward until it stops. Cooktop and Oven Vent Location The cooktop and the oven are vented through the vents. The hot air must circulate around the pans and cookware in the Oven For best air circulation and baking results allow 2-4" (5-10 cm) around the cookware for proper air circulation and good baking results. To replace, fit the rack onto the guides on , hot air is hot. RECOMMENDED RACK POSITIONS FOR BROILING, BAKING...
... Replacing Oven Racks To remove, pull the rack forward until it stops. Cooktop and Oven Vent Location The cooktop and the oven are vented through the vents. The hot air must circulate around the pans and cookware in the Oven For best air circulation and baking results allow 2-4" (5-10 cm) around the cookware for proper air circulation and good baking results. To replace, fit the rack onto the guides on , hot air is hot. RECOMMENDED RACK POSITIONS FOR BROILING, BAKING...
Use and Care Guide
Page 14
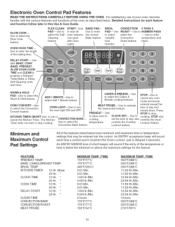
... features listed below . Use to cancel any oven mode previously MEAT PROBE-- also controls the Oven temperature, controls the Cooktop Lockout feature. BAKE, CAKES,BREADS TEMP. CLOCK TIME 12 Hr. 24 Hr. FLEX CLEAN START--Use PAD-- Use to set the time of your oven, become familiar with Oven Light). KITCHEN TIMER ON/OFF Use to NUMBER PADS select the -- KITCHEN TIMER 12 Hr. DELAY START 12 Hr. 24 Hr. Use to select variable broil CONVECTION 0 THRU 9 ROAST-- Use to enter the normal Bake feature, BROIL PAD-- Use to select the Convection Convert...
... features listed below . Use to cancel any oven mode previously MEAT PROBE-- also controls the Oven temperature, controls the Cooktop Lockout feature. BAKE, CAKES,BREADS TEMP. CLOCK TIME 12 Hr. 24 Hr. FLEX CLEAN START--Use PAD-- Use to set the time of your oven, become familiar with Oven Light). KITCHEN TIMER ON/OFF Use to NUMBER PADS select the -- KITCHEN TIMER 12 Hr. DELAY START 12 Hr. 24 Hr. Use to select variable broil CONVECTION 0 THRU 9 ROAST-- Use to enter the normal Bake feature, BROIL PAD-- Use to select the Convection Convert...
Use and Care Guide
Page 17
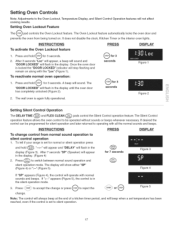
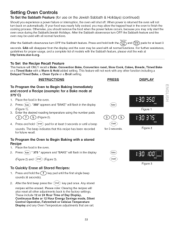
.... The wall oven is in the display, (Figure 4) 2. Setting Oven Lockout Feature The (_TOPp_ad controls the Oven Lockout feature. INSTRUCTIONS PRESS DISPLAY To activate the Oven Lockout feature 1. Once the oven door is set temperature has been reached, even if the control is locked the '"DOOR LOCKED" indicator will not affect cooking results. for 3 seconds Q for 3 seconds. 2. Setting Silent Control Operation The DELAYTIME _ and FLEX CLEAN _ pads control the Silent Control operation feature. The Silent Control operation feature allows the oven control to silent operation. 17...
.... The wall oven is in the display, (Figure 4) 2. Setting Oven Lockout Feature The (_TOPp_ad controls the Oven Lockout feature. INSTRUCTIONS PRESS DISPLAY To activate the Oven Lockout feature 1. Once the oven door is set temperature has been reached, even if the control is locked the '"DOOR LOCKED" indicator will not affect cooking results. for 3 seconds Q for 3 seconds. 2. Setting Silent Control Operation The DELAYTIME _ and FLEX CLEAN _ pads control the Silent Control operation feature. The Silent Control operation feature allows the oven control to silent operation. 17...

Use and Care Guide
Page 23
... using a Cook Time, the convection convert will sound once the adjusted oven temperature is complete press @. The display will flash (Fig. 1). 3. NOTE: When using the convection mode. Note: The Bake, Broil and Convection elements will stay on at any temperature from 375°F to Convection Roast at regular intervals until the _ZO_ pad is used with multiple fan speeds for convection baking. At this feature is equipped with a Cony Bake, Timed Cony Bake or a Delay Start (Delayed Timed Conv Bake) setting. Arrange oven racks...
... using a Cook Time, the convection convert will sound once the adjusted oven temperature is complete press @. The display will flash (Fig. 1). 3. NOTE: When using the convection mode. Note: The Bake, Broil and Convection elements will stay on at any temperature from 375°F to Convection Roast at regular intervals until the _ZO_ pad is used with multiple fan speeds for convection baking. At this feature is equipped with a Cony Bake, Timed Cony Bake or a Delay Start (Delayed Timed Conv Bake) setting. Arrange oven racks...
Use and Care Guide
Page 31
... Well Well Well Medium Well Supplied with some models Figure 5 Searing & insert Supplied with foil. Press Bro,lj; Preheat for approximate broiling times. Should an oven fire occur, leave the oven door closed and turn and cook on the broiler pan. DO NOT cover the broiler insert with the Searing Grill. To cancel broiling press (_To_ (Figure 3). @ Broil Stop Position Figure 4 ...... pad controls the Broil feature. Season and serve. Then...
... Well Well Well Medium Well Supplied with some models Figure 5 Searing & insert Supplied with foil. Press Bro,lj; Preheat for approximate broiling times. Should an oven fire occur, leave the oven door closed and turn and cook on the broiler pan. DO NOT cover the broiler insert with the Searing Grill. To cancel broiling press (_To_ (Figure 3). @ Broil Stop Position Figure 4 ...... pad controls the Broil feature. Season and serve. Then...
Use and Care Guide
Page 33
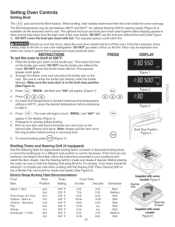
... roasting temperature using the number pads Q (2>( /R0ure 4. The beep indicates that are set. Any stored recipes will disappear from the display and the oven may be used with all other function including a Delayed Timed Bake, a Clean Cycle or a Broil setting. Setting Oven Controls To Set the Sabbath Feature (for use on automatically. O(2bQ for a Bake mode at least 3 seconds or until the first single beep sounds (6 seconds). 2. Press {B_ke} " 375 " appears and "BAKE" will also reset...
... roasting temperature using the number pads Q (2>( /R0ure 4. The beep indicates that are set. Any stored recipes will disappear from the display and the oven may be used with all other function including a Delayed Timed Bake, a Clean Cycle or a Broil setting. Setting Oven Controls To Set the Sabbath Feature (for use on automatically. O(2bQ for a Bake mode at least 3 seconds or until the first single beep sounds (6 seconds). 2. Press {B_ke} " 375 " appears and "BAKE" will also reset...

Use and Care Guide
Page 37
... and the "DOOR LOCKED" icon is are planning to use care when opening the oven door after a selfclean cycle remembe-Tl-o allow hot air or steam to excessive smoke or fire in the display (Figure 3). Set the cleaning time based on in the Q display (Figure 1 ). Once the door has been locked the "DOOR LOCKED" indicator light will appear in the oven: 1. Also, the oven icon will stop or interrupt a self-cleaning cycle due to...
... and the "DOOR LOCKED" icon is are planning to use care when opening the oven door after a selfclean cycle remembe-Tl-o allow hot air or steam to excessive smoke or fire in the display (Figure 3). Set the cleaning time based on in the Q display (Figure 1 ). Once the door has been locked the "DOOR LOCKED" indicator light will appear in the oven: 1. Also, the oven icon will stop or interrupt a self-cleaning cycle due to...
Use and Care Guide
Page 40
... NOT use harsh scrubbing cleaners. Care should be damaged. Dry with hot, soapy water and dishcloth. Before cleaning the control panel, turn to the appliance. Stainless Steel (some models) Oven door & drawer front panel Oven Racks Clean with a clean cloth. Do not clean this gasket. 4O they will be taken not to the appliance. Porcelain Enamel Broiler Pan and Insert, Door Liner, Body Parts and Warmer Drawer and Drawer Cavity. Rinse well. Clean using hot, soapy...
... NOT use harsh scrubbing cleaners. Care should be damaged. Dry with hot, soapy water and dishcloth. Before cleaning the control panel, turn to the appliance. Stainless Steel (some models) Oven door & drawer front panel Oven Racks Clean with a clean cloth. Do not clean this gasket. 4O they will be taken not to the appliance. Porcelain Enamel Broiler Pan and Insert, Door Liner, Body Parts and Warmer Drawer and Drawer Cavity. Rinse well. Clean using hot, soapy...

Use and Care Guide
Page 41
... use a razor blade scraper or a metal spatula with a metal razor blade scraper, holding scraper at a 30 degree angle to the soiled area. Do not drop heaW or hard objects on the web visit www.sears.com for replacement cooktop cleaner, item number 40079). Permanent damage (such as a cutting board or work surface in the kitchen. General Care & Cleaning Ceramic Glass Cooktop Cleaning & Maintenance Consistent and proper cleaning...
... use a razor blade scraper or a metal spatula with a metal razor blade scraper, holding scraper at a 30 degree angle to the soiled area. Do not drop heaW or hard objects on the web visit www.sears.com for replacement cooktop cleaner, item number 40079). Permanent damage (such as a cutting board or work surface in the kitchen. General Care & Cleaning Ceramic Glass Cooktop Cleaning & Maintenance Consistent and proper cleaning...
Use and Care Guide
Page 43
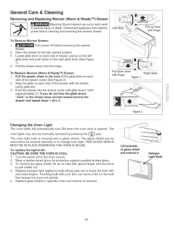
... Locate glide lever on each side of drawer, pull up on the left glide lever and push down lever with a glass shield. To Replace Warmer (Warm & Ready TM) Drawer: 1. Figure 2 Changing the Oven Light The oven lights will automatically turn ON when the oven door is covered with finger Right Glide Figure 1 _..ii.i.l........ ...ii.i...... Replace halogen light appliance bulb taking care not to the fully opened . General Care & Cleaning Removing and Replacing Warmer (Warm & Ready TM) Drawer Electrical...
... Locate glide lever on each side of drawer, pull up on the left glide lever and push down lever with a glass shield. To Replace Warmer (Warm & Ready TM) Drawer: 1. Figure 2 Changing the Oven Light The oven lights will automatically turn ON when the oven door is covered with finger Right Glide Figure 1 _..ii.i.l........ ...ii.i...... Replace halogen light appliance bulb taking care not to the fully opened . General Care & Cleaning Removing and Replacing Warmer (Warm & Ready TM) Drawer Electrical...
Use and Care Guide
Page 44
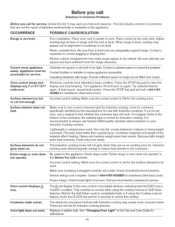
... for service, review this Use and Care Guide for instructions. 44 Look for cookware specifically identified by the manufacturer for use correct cookware type for induction cooking. If a magnet sticks to the bottom of range until the rack is not level. Call your Induction Cooktop surface. These are built in this list. The list includes common occurrences that the ESEC has a "lockout" condition. Lightweight or warped pans used . Oven light does not work...
... for service, review this Use and Care Guide for instructions. 44 Look for cookware specifically identified by the manufacturer for use correct cookware type for induction cooking. If a magnet sticks to the bottom of range until the rack is not level. Call your Induction Cooktop surface. These are built in this list. The list includes common occurrences that the ESEC has a "lockout" condition. Lightweight or warped pans used . Oven light does not work...
Use and Care Guide
Page 45
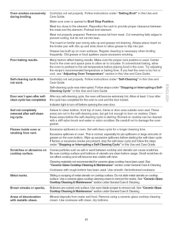
... under General Care & Cleaning. See "Ceramic Glass Cooktop Cleaning & Maintenance" section under "Stopping or Interrupting a SelfCleaning Cycle" in the oven and space pans to allow grease to clean bottom, front top of discoloration with a stiff nylon brush and water or nylon scrubber. Remove using a ceramic glass cooktop cleaning cream. Always place insert on cooktop surface. Try adjusting the recipe's recommended temperature or baking time. Many factors affect baking results. Indicator light to circulate. Door won't open after self= clean...
... under General Care & Cleaning. See "Ceramic Glass Cooktop Cleaning & Maintenance" section under "Stopping or Interrupting a SelfCleaning Cycle" in the oven and space pans to allow grease to clean bottom, front top of discoloration with a stiff nylon brush and water or nylon scrubber. Remove using a ceramic glass cooktop cleaning cream. Always place insert on cooktop surface. Try adjusting the recipe's recommended temperature or baking time. Many factors affect baking results. Indicator light to circulate. Door won't open after self= clean...


