
Operation Manual
Page 3
HD5212 TABLE OF CONTENTS Introduction 1 Preparation 2 Wiring ...3 Installation 4 Front Panel Release 7 Operation 8 Tuner Operation 11 Satellite Radio Operation 13 CD Player Operation 15 MP3/WMA Operation 17 iPod Operation 21 Remote Control 23 Care and Maintenance 24 Troubleshooting 25 Specifications 26 i
HD5212 TABLE OF CONTENTS Introduction 1 Preparation 2 Wiring ...3 Installation 4 Front Panel Release 7 Operation 8 Tuner Operation 11 Satellite Radio Operation 13 CD Player Operation 15 MP3/WMA Operation 17 iPod Operation 21 Remote Control 23 Care and Maintenance 24 Troubleshooting 25 Specifications 26 i
Operation Manual
Page 5
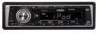
... Bass, Treble, Balance, Fader • jLink iPod Cable and 3.5mm Media Adapter Cables Included • Infrared remote control *HD Radio™ Technology Manufactured Under License From iBiquity Digital Corp. U.S. HD5212 Introduction Congratulations on your Jensen HD5212 installed by a reputable installation shop. It's a good idea to read all of the Jensen HD5212 Mobile Receiver. We recommend having your purchase of the instructions before beginning the installation. HD Radio™ and the HD Radio...
... Bass, Treble, Balance, Fader • jLink iPod Cable and 3.5mm Media Adapter Cables Included • Infrared remote control *HD Radio™ Technology Manufactured Under License From iBiquity Digital Corp. U.S. HD5212 Introduction Congratulations on your Jensen HD5212 installed by a reputable installation shop. It's a good idea to read all of the Jensen HD5212 Mobile Receiver. We recommend having your purchase of the instructions before beginning the installation. HD Radio™ and the HD Radio...
Operation Manual
Page 6
...; Volt meter/test light • Crimp connections • 18 gauge wire for power connections • 16-18 gauge speaker wire SPEAKER REQUIREMENTS: Only connect speakers rated in the load impedance of the radio. WARNING! WARNING! Using an improper fuse may be sure to turn off the ignition and remove the negative (-) battery cable prior to a 12-volt power supply with safe driving conditions. Never use extra caution during installation to dust...
...; Volt meter/test light • Crimp connections • 18 gauge wire for power connections • 16-18 gauge speaker wire SPEAKER REQUIREMENTS: Only connect speakers rated in the load impedance of the radio. WARNING! WARNING! Using an improper fuse may be sure to turn off the ignition and remove the negative (-) battery cable prior to a 12-volt power supply with safe driving conditions. Never use extra caution during installation to dust...

Operation Manual
Page 7
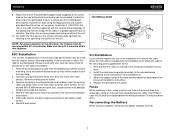
Power Antenna (BLUE) Connect to existing radio wire or radio fuse. Ground (BLACK) Connect to battery or 12 volt power source that is always live. Satellite Radio Tuner Amplifier Wiring (GRAY) Connect line out for the left. SiriusConnect SC-C1 tuner sold separately. If not used, tape bare end of chassis. The radio will not work if this wire is for optional external amplifiers. JLink iPod Cable (Included) White/Black (-) LF/AVG White (+) Gray/Black (-) Gray (+) RF...
Power Antenna (BLUE) Connect to existing radio wire or radio fuse. Ground (BLACK) Connect to battery or 12 volt power source that is always live. Satellite Radio Tuner Amplifier Wiring (GRAY) Connect line out for the left. SiriusConnect SC-C1 tuner sold separately. If not used, tape bare end of chassis. The radio will not work if this wire is for optional external amplifiers. JLink iPod Cable (Included) White/Black (-) LF/AVG White (+) Gray/Black (-) Gray (+) RF...
Operation Manual
Page 8
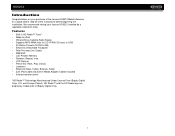
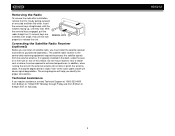
If you have trouble locating a kit or need installation assistance, contact Technical Support at electronics supply stores and car stereo specialty shops. Never combine (bridge) outputs for use with four speakers. Once proper operation is achieved, turn the unit on page 6. 3. Universal Installation Using Mounting Sleeve 1. Remove the detachable front panel, if it has not already been removed. If it to confirm operation (vehicle ignition switch must be on Saturday. If the...
If you have trouble locating a kit or need installation assistance, contact Technical Support at electronics supply stores and car stereo specialty shops. Never combine (bridge) outputs for use with four speakers. Once proper operation is achieved, turn the unit on page 6. 3. Universal Installation Using Mounting Sleeve 1. Remove the detachable front panel, if it has not already been removed. If it to confirm operation (vehicle ignition switch must be on Saturday. If the...
Operation Manual
Page 9
... of horizontal. Remove the existing factory radio from the front of installation. 1. Do not exceed M5 x 9 MM maximum screw size. Wire and test the radio as outlined in the installation kit. 3. Replace the dashboard trim panel. Fuses When replacing a fuse, make sure the new fuse is complete, reconnect the battery negative terminal. 5 Attach one 15 amp fuse located below the radio using the same screws. CAUTION: The 4 5 rear of the CD player, the...
... of horizontal. Remove the existing factory radio from the front of installation. 1. Do not exceed M5 x 9 MM maximum screw size. Wire and test the radio as outlined in the installation kit. 3. Replace the dashboard trim panel. Fuses When replacing a fuse, make sure the new fuse is complete, reconnect the battery negative terminal. 5 Attach one 15 amp fuse located below the radio using the same screws. CAUTION: The 4 5 rear of the CD player, the...
Operation Manual
Page 10
... connections. The satellite radio receiver is typically installed in the dash, under the seat, or in the trunk or rear of the vehicle. In addition, when running the wire for the external antenna do not kink or pinch the antenna cable. A sharp 90 degree bend or slight "nick" to extreme temperatures. The wiring diagram will help you must install the satellite receiver and antenna (purchased separately). Do not mount receiver...
... connections. The satellite radio receiver is typically installed in the dash, under the seat, or in the trunk or rear of the vehicle. In addition, when running the wire for the external antenna do not kink or pinch the antenna cable. A sharp 90 degree bend or slight "nick" to extreme temperatures. The wiring diagram will help you must install the satellite receiver and antenna (purchased separately). Do not mount receiver...

Operation Manual
Page 12
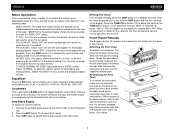
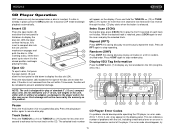
... unit on. "F=R" represents an equal balance between the front and rear speakers. Liquid Crystal Display (LCD) The liquid crystal display (LCD) panel (8) displays the frequency, time and activated functions of operation, as a number ranging from "10L" (full left and right speakers. Volume / Audio Control To increase the volume, rotate the rotary encoder (4) clockwise. "L=R" represents a center balance. Press and hold the power button to adjust the balance between the left ) to cancel MUTE. CDP mode appears in the menu...
... unit on. "F=R" represents an equal balance between the front and rear speakers. Liquid Crystal Display (LCD) The liquid crystal display (LCD) panel (8) displays the frequency, time and activated functions of operation, as a number ranging from "10L" (full left and right speakers. Volume / Audio Control To increase the volume, rotate the rotary encoder (4) clockwise. "L=R" represents a center balance. Press and hold the power button to adjust the balance between the left ) to cancel MUTE. CDP mode appears in the menu...
Operation Manual
Page 13
... display during playback. Connect the portable audio player to only search and broadcast digital stations. Select "SRC" to the 24 hour clock format. • S--MODE NORMAL/HD SEEK (adjustable only in the following pre-defined bass and treble curves: FLAT > CLASSICS > POP M > ROCK M > DSP OFF. "HOURS 12" is turned off . Select "HD SEEK" to the AUX IN jack on when the unit is the default setting. Auxiliary Input...
... display during playback. Connect the portable audio player to only search and broadcast digital stations. Select "SRC" to the 24 hour clock format. • S--MODE NORMAL/HD SEEK (adjustable only in the following pre-defined bass and treble curves: FLAT > CLASSICS > POP M > ROCK M > DSP OFF. "HOURS 12" is turned off . Select "HD SEEK" to the AUX IN jack on when the unit is the default setting. Auxiliary Input...
Operation Manual
Page 15
... 3 RPT 4 SHF 5 6 SAT READY PRESET NUMBER APPEARS PRESS AND HOLD About HD Radio™ Technology HD Radio technology allows CD-quality digital broadcasting of your HD5212 radio, you can include multiple channels on the same frequency, which is called multicasting. HD5212 Tuner Operation Press the SRC button (2) to switch to change between three FM bands and one AM band. Select a Band Press the BAND button (3) to HD RADIO mode.
... 3 RPT 4 SHF 5 6 SAT READY PRESET NUMBER APPEARS PRESS AND HOLD About HD Radio™ Technology HD Radio technology allows CD-quality digital broadcasting of your HD5212 radio, you can include multiple channels on the same frequency, which is called multicasting. HD5212 Tuner Operation Press the SRC button (2) to switch to change between three FM bands and one AM band. Select a Band Press the BAND button (3) to HD RADIO mode.

Operation Manual
Page 16
... each preset station. Press the PS button again to select the corresponding stored station. NOTE: The amount of music. 12 HD5212 Select a band (if needed ). Some stations broadcast their call letters (name), the artist's name, song title, and category of information displayed when receiving an HD Radio signal is dependent upon what is reached. Preset Scan Scans stations stored in the following order: • Band/Frequency...
... each preset station. Press the PS button again to select the corresponding stored station. NOTE: The amount of music. 12 HD5212 Select a band (if needed ). Some stations broadcast their call letters (name), the artist's name, song title, and category of information displayed when receiving an HD Radio signal is dependent upon what is reached. Preset Scan Scans stations stored in the following order: • Band/Frequency...

Operation Manual
Page 17
... to satellite radio, you must subscribe to the service using your radio's identification number. Listeners can subscribe to Sirius® Radio on the Web by visiting www.sirius.com, or by calling (800) 967-2346. To display the radio ID, press the TUNE/ CH > or TUNE/CH > or TUNE/CH Accessing Satellite Radio Mode To switch to -air channels without activation. Customers can listen to music samples by tuning to channel 184. HD5212 Satellite Radio Operation Listeners...
... to satellite radio, you must subscribe to the service using your radio's identification number. Listeners can subscribe to Sirius® Radio on the Web by visiting www.sirius.com, or by calling (800) 967-2346. To display the radio ID, press the TUNE/ CH > or TUNE/CH > or TUNE/CH Accessing Satellite Radio Mode To switch to -air channels without activation. Customers can listen to music samples by tuning to channel 184. HD5212 Satellite Radio Operation Listeners...
Operation Manual
Page 19
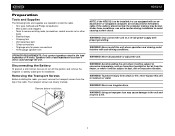
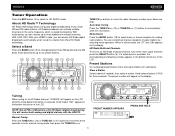
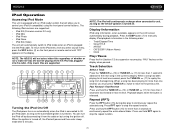
... for play . If the disc is inserted. Press the eject button (25) located to the right of standard 5" (12 cm.) compact discs only. HD5212 CD Player Operation CDP mode can only be accessed when a disc is not removed from the unit within 15 seconds, the disc will not be reloaded to access CDP mode and begin playing the disc. 9 TUNE/CH ENTER BAND DISP EQ SEL IPOD MONO MUTE HD5212 PR0A~E~9SZS AUX IN...
... for play . If the disc is inserted. Press the eject button (25) located to the right of standard 5" (12 cm.) compact discs only. HD5212 CD Player Operation CDP mode can only be accessed when a disc is not removed from the unit within 15 seconds, the disc will not be reloaded to access CDP mode and begin playing the disc. 9 TUNE/CH ENTER BAND DISP EQ SEL IPOD MONO MUTE HD5212 PR0A~E~9SZS AUX IN...

Operation Manual
Page 20
.... If this does not solve the problem, pressing the reset button may help, but will erase the time and preset memory. ejecting and reloading the disc into the player. If the suggested measures do not solve the problem, contact an authorized warranty station near you or contact customer service at 44.1kHz, 128kbps HD5212 16 While the disc is out of the unit, make sure it correctly.
.... If this does not solve the problem, pressing the reset button may help, but will erase the time and preset memory. ejecting and reloading the disc into the player. If the suggested measures do not solve the problem, contact an authorized warranty station near you or contact customer service at 44.1kHz, 128kbps HD5212 16 While the disc is out of the unit, make sure it correctly.
Operation Manual
Page 21
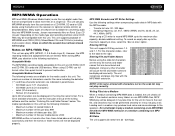
...to the speakers. For the character codes, refer to the table to play . MP3/WMA Encoder and CD Writer Settings Use the following formats are the only file names and folder names that are indicated in MP3 data with characters not on the receiver (or optional remote control) as ... right. HD5212 MP3/WMA Operation MP3 and WMA (Windows Media Audio) music files are digital audio files that can be entered and displayed. The media reproducible on a single CD. Jensen recommends Nero or Roxio Easy CD Creator. The maximum number of MP3/WMA and CDDA (CDA), Mixed-Mode CDs and CD-Extra ...
...to the speakers. For the character codes, refer to the table to play . MP3/WMA Encoder and CD Writer Settings Use the following formats are the only file names and folder names that are indicated in MP3 data with characters not on the receiver (or optional remote control) as ... right. HD5212 MP3/WMA Operation MP3 and WMA (Windows Media Audio) music files are digital audio files that can be entered and displayed. The media reproducible on a single CD. Jensen recommends Nero or Roxio Easy CD Creator. The maximum number of MP3/WMA and CDDA (CDA), Mixed-Mode CDs and CD-Extra ...

Operation Manual
Page 22
... your USB thumb drive into the SD slot located behind the front panel. "USb" is active. Standard USB memory sticks approved by Microsoft are supported by this unit. WARNING: Do not remove the device when USB PLAY mode is displayed in the order they were written by pressing the SRC button (2). When ID3 information is available, the unit will display the elapsed time. The unit will scroll through it down. To remove...
... your USB thumb drive into the SD slot located behind the front panel. "USb" is active. Standard USB memory sticks approved by Microsoft are supported by this unit. WARNING: Do not remove the device when USB PLAY mode is displayed in the order they were written by pressing the SRC button (2). When ID3 information is available, the unit will display the elapsed time. The unit will scroll through it down. To remove...
Operation Manual
Page 25
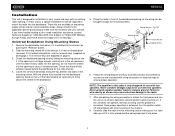
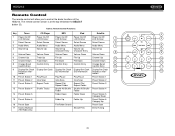
... during playback. To return to iPod mode when an iPod is connected to control your iPod (if compatible) using the front panel control buttons. NOTE: The HD5212 will continuously recharge when connected to suspend or resume play. Press the DISP button (7) to manually display iPod playback information in the following iPod versions are supported. 9 1 4 5 6 8 19 20 7 21 2 10 11 TUNE/CH ENTER BAND SEL IPOD MUTE MONO EQ HD5212 A~Z PRESS 0~9 DISP PS FILE/FOLDER...
... during playback. To return to iPod mode when an iPod is connected to control your iPod (if compatible) using the front panel control buttons. NOTE: The HD5212 will continuously recharge when connected to suspend or resume play. Press the DISP button (7) to manually display iPod playback information in the following iPod versions are supported. 9 1 4 5 6 8 19 20 7 21 2 10 11 TUNE/CH ENTER BAND SEL IPOD MUTE MONO EQ HD5212 A~Z PRESS 0~9 DISP PS FILE/FOLDER...
Operation Manual
Page 27
... functions of the HD5212. Table 2: Remote Control Functions Key Tuner CD Player MP3 iPod Satellite 1 Power On/Off LCD Dimmer Power On/Off LCD Dimmer Power On/Off LCD Dimmer Power On/Off LCD Dimmer Power On/Off LCD Dimmer 1 A~Z / 0~9 4 SRC AUD 3 2 Select Source Select Source Select Source Select Source Select Source 2 3 Audio Menu Audio Menu Audio Menu Audio Menu Audio Menu 7 6 4 Volume Up Volume Up Volume Up Volume Up Volume Up 5 Character Entry Character Entry 8 ENTER - 9 5 Volume Down Volume Down Volume Down Volume Down Volume Down 6 Channel...
... functions of the HD5212. Table 2: Remote Control Functions Key Tuner CD Player MP3 iPod Satellite 1 Power On/Off LCD Dimmer Power On/Off LCD Dimmer Power On/Off LCD Dimmer Power On/Off LCD Dimmer Power On/Off LCD Dimmer 1 A~Z / 0~9 4 SRC AUD 3 2 Select Source Select Source Select Source Select Source Select Source 2 3 Audio Menu Audio Menu Audio Menu Audio Menu Audio Menu 7 6 4 Volume Up Volume Up Volume Up Volume Up Volume Up 5 Character Entry Character Entry 8 ENTER - 9 5 Volume Down Volume Down Volume Down Volume Down Volume Down 6 Channel...
Operation Manual
Page 29
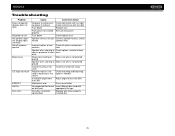
... ground Incorrect fuse/fuse too small Install fuse of correct rating Receiver mount is not Check mounting and backstrap, solid or backstrap is not tighten if needed secure Installation angle more Adjust angle to red wire check vehicle fuse with test light Fuse blown Replace fuse Front panel not installed Reinstall front panel properly Fuse blown Check/replace fuse Speaker harness not con- no power to less than 30% than 30% Mechanism error Press reset button No supported files...
... ground Incorrect fuse/fuse too small Install fuse of correct rating Receiver mount is not Check mounting and backstrap, solid or backstrap is not tighten if needed secure Installation angle more Adjust angle to red wire check vehicle fuse with test light Fuse blown Replace fuse Front panel not installed Reinstall front panel properly Fuse blown Check/replace fuse Speaker harness not con- no power to less than 30% than 30% Mechanism error Press reset button No supported files...
Operation Manual
Page 31
... in connection with any part thereof, under normal use of a warranty station serving your product. This Warranty is required in cosmetic, decorative or non-operative structural parts • Correction of antenna problems • Costs incurred for the location of your area. • You must prepay the initial shipping charges to prevent lost packages. Obtaining Warranty Service • To obtain repair or replacement...
... in connection with any part thereof, under normal use of a warranty station serving your product. This Warranty is required in cosmetic, decorative or non-operative structural parts • Correction of antenna problems • Costs incurred for the location of your area. • You must prepay the initial shipping charges to prevent lost packages. Obtaining Warranty Service • To obtain repair or replacement...


