Instruction Manual
Page 5
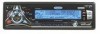
Electronic Skip Protection AM/FM Tuner • World Tuner • 30 station presets (18 FM/12AM) • JENSEN Plus Tuner II • Auto station store • Preset scan • One-touch memory • Auto stereo/mono • Manual local/distance • Manual tuning up/down • Auto seek tuning up to 32 character personal message • User friendly setup menu • LCD contrast control • LCD dimmer control • Clock • Selectable display priority • Switchable Bi-color illumination...
Electronic Skip Protection AM/FM Tuner • World Tuner • 30 station presets (18 FM/12AM) • JENSEN Plus Tuner II • Auto station store • Preset scan • One-touch memory • Auto stereo/mono • Manual local/distance • Manual tuning up/down • Auto seek tuning up to 32 character personal message • User friendly setup menu • LCD contrast control • LCD dimmer control • Clock • Selectable display priority • Switchable Bi-color illumination...
Instruction Manual
Page 6
... to remove existing radio (screwdriver, socket wrench set or other tools) • Electrical tape • Crimping tool • Volt meter/test light • Crimp connections • 18 gauge wire for power connections • 16-18 gauge speaker wire SPEAKER REQUIREMENTS: Only connect speakers rated in the load impedance of 4 ohms. Speakers with a load impedance less than 4 ohms could damage the unit. Remove Transport Screws 3. Disconnect Battery Before...
... to remove existing radio (screwdriver, socket wrench set or other tools) • Electrical tape • Crimping tool • Volt meter/test light • Crimp connections • 18 gauge wire for power connections • 16-18 gauge speaker wire SPEAKER REQUIREMENTS: Only connect speakers rated in the load impedance of 4 ohms. Speakers with a load impedance less than 4 ohms could damage the unit. Remove Transport Screws 3. Disconnect Battery Before...
Instruction Manual
Page 7
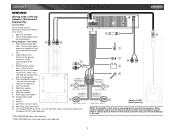
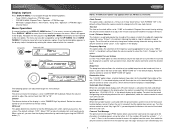
... Direct Connect Cable 13. Memory/Battery (yellow wire) - Connect to the battery or to Amplifier 10. Left front speaker 6. CD Changer/JPORT connector - Connect to the power antenna or a amplifier. Right front speaker 7. Right rear speaker 9. Antenna 12. Use this wire is not connected. 4. Never combine (bridge) outputs for use with four speakers. Connect to the existing radio wire or radio fuse. 5. Ground (black wire) Connect to the car wiring harness. Power Antenna (dark blue wire) - CDX6311 WIRING Wiring with a Wiring Adapter (Purchased Separately) Connect Wires...
... Direct Connect Cable 13. Memory/Battery (yellow wire) - Connect to the battery or to Amplifier 10. Left front speaker 6. CD Changer/JPORT connector - Connect to the power antenna or a amplifier. Right front speaker 7. Right rear speaker 9. Antenna 12. Use this wire is not connected. 4. Never combine (bridge) outputs for use with four speakers. Connect to the existing radio wire or radio fuse. 5. Ground (black wire) Connect to the car wiring harness. Power Antenna (dark blue wire) - CDX6311 WIRING Wiring with a Wiring Adapter (Purchased Separately) Connect Wires...
Instruction Manual
Page 8
... will help you have trouble locating a kit or need installation assistance, contact Technical Support at electronics supply stores and car stereo specialty shops. Fuses When replacing a fuse, make sure the kit works with an existing radio opening or cause it to disengage it has not already been removed. Reconnect Battery When wiring is the correct type and amperage. Connecting the Satellite Radio Receiver (optional) Before you must install the XM® Direct Receiver and antenna...
... will help you have trouble locating a kit or need installation assistance, contact Technical Support at electronics supply stores and car stereo specialty shops. Fuses When replacing a fuse, make sure the kit works with an existing radio opening or cause it to disengage it has not already been removed. Reconnect Battery When wiring is the correct type and amperage. Connecting the Satellite Radio Receiver (optional) Before you must install the XM® Direct Receiver and antenna...

Instruction Manual
Page 9
... radio operation by lifting in the Universal Installation instructions. 5. NOTE: For proper operation of the CD player, the chassis must be brought through the mounting sleeve. 6. Install the radio/mounting plate assembly to the sub-dashboard according to the new radio. Replace the dashboard trim panel. Remove the existing factory radio from the existing radio and attach them to the instructions in the Universal Installation instructions. 4. Remove and discard the frame. 3. Mount the new radio...
... radio operation by lifting in the Universal Installation instructions. 5. NOTE: For proper operation of the CD player, the chassis must be brought through the mounting sleeve. 6. Install the radio/mounting plate assembly to the sub-dashboard according to the new radio. Replace the dashboard trim panel. Remove the existing factory radio from the existing radio and attach them to the instructions in the Universal Installation instructions. 4. Remove and discard the frame. 3. Mount the new radio...
Instruction Manual
Page 10
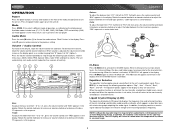
...), XM Radio, CDP and auxiliary (AUX). CD mode appears in the menu only if a CD is activated, "iX-BASS On" will be adjusted. "Mute" flashes in the CD player. Volume / Audio Control To increase the volume, rotate the volume control (4) clockwise. The unit automatically exits audio control mode after five seconds of human hearing. Rotate the control clockwise to increase or counter-clockwise to decrease the treble. "C00" represents a center balance. When listening to music at low volume levels, this...
...), XM Radio, CDP and auxiliary (AUX). CD mode appears in the menu only if a CD is activated, "iX-BASS On" will be adjusted. "Mute" flashes in the CD player. Volume / Audio Control To increase the volume, rotate the volume control (4) clockwise. The unit automatically exits audio control mode after five seconds of human hearing. Rotate the control clockwise to increase or counter-clockwise to decrease the treble. "C00" represents a center balance. When listening to music at low volume levels, this...
Instruction Manual
Page 11
... the screen. The default setting is set at which will illuminate the unit in the display, adjust that the clock and greeting not be set the unit to select only strong local stations during automatic tuning. Time Set The time on . Turn the volume control to select "Key Light Off" if you can also be heard each time a button is the default setting. The menu can view the display information by rotating the volume control clockwise to adjust the...
... the screen. The default setting is set at which will illuminate the unit in the display, adjust that the clock and greeting not be set the unit to select only strong local stations during automatic tuning. Time Set The time on . Turn the volume control to select "Key Light Off" if you can also be heard each time a button is the default setting. The menu can view the display information by rotating the volume control clockwise to adjust the...
Instruction Manual
Page 12
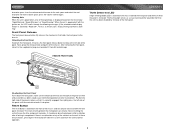
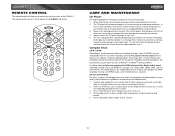
... is activated): "Radio Off", "Visit us at Jensen.com", "Enjoy Driving and Have a Safe Trip". Reset Button The reset button is removed. Since resetting the unit will erase the time and preset memories, it off with the front panel removed. Front Panel Release The front panel release button (9) releases the mechanism that holds the front panel to release the left side of the panel. CDX6311 Theft Deterrent LED A light-emitting diode (LED) is located...
... is activated): "Radio Off", "Visit us at Jensen.com", "Enjoy Driving and Have a Safe Trip". Reset Button The reset button is removed. Since resetting the unit will erase the time and preset memories, it off with the front panel removed. Front Panel Release The front panel release button (9) releases the mechanism that holds the front panel to release the left side of the panel. CDX6311 Theft Deterrent LED A light-emitting diode (LED) is located...

Instruction Manual
Page 13
... needed ). When in stereo mode, the "ST" icon (18) appears in that band. See "Frequency Spacing" on page 7 to learn how to change the World Tuner options. Automatically Store / Preset Scan Automatically Store Automatically select six strong stations and store them in the current band. Preset Scan Scan stations stored in the current band. Press a preset button (12-17) to receive channels in the display. CDX6311 TUNER OPERATION The CDX6311...
... needed ). When in stereo mode, the "ST" icon (18) appears in that band. See "Frequency Spacing" on page 7 to learn how to change the World Tuner options. Automatically Store / Preset Scan Automatically Store Automatically select six strong stations and store them in the current band. Preset Scan Scan stations stored in the current band. Press a preset button (12-17) to receive channels in the display. CDX6311 TUNER OPERATION The CDX6311...
Instruction Manual
Page 14
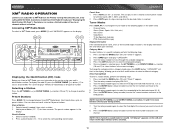
XM® RADIO OPERATION Listeners can receive a limited number of free-to-air channels without activation. To display the radio ID, press the DOWN TUNING (||) or DOWN TUNING (||) or DOWN TUNING (||) or DOWN TUNING (| Customers can subscribe to XM® Radio on the display. Displaying the Identification (ID) Code Before you listen to XM® Radio, you must subscribe to XM® Radio mode, press MODE (2) until "XM RADIO" appears on the Web...
XM® RADIO OPERATION Listeners can receive a limited number of free-to-air channels without activation. To display the radio ID, press the DOWN TUNING (||) or DOWN TUNING (||) or DOWN TUNING (||) or DOWN TUNING (| Customers can subscribe to XM® Radio on the display. Displaying the Identification (ID) Code Before you listen to XM® Radio, you must subscribe to XM® Radio mode, press MODE (2) until "XM RADIO" appears on the Web...
Instruction Manual
Page 15
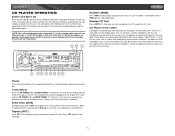
... player. The selected track number will appear on the display panel. Intro Scan (SCN) During disc play, press SCN (13) to play and eject the CD, press the eject button. After ejecting the CD, the unit will erase the time and preset memory. Do not attempt to stop CD play all tracks on the CD. If the suggested measures do not solve the problem, contact an approved warranty station near you can indicate a number...
... player. The selected track number will appear on the display panel. Intro Scan (SCN) During disc play, press SCN (13) to play and eject the CD, press the eject button. After ejecting the CD, the unit will erase the time and preset memory. Do not attempt to stop CD play all tracks on the CD. If the suggested measures do not solve the problem, contact an approved warranty station near you can indicate a number...
Instruction Manual
Page 16
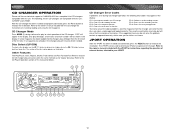
... preset memories. To resolve any of the above problems, eject the magazine from the first track of the first disc. JPORT OPERATION After the JPORT has been installed and connected, press the RESET button to the owner's manual included with the CD changer for instructions on installing, loading and using the CD magazine. Refer to initialize the installation. CD CHANGER OPERATION Please call Jensen technical support at 1-800-323-4815 for a complete list of CD changers compatible...
... preset memories. To resolve any of the above problems, eject the magazine from the first track of the first disc. JPORT OPERATION After the JPORT has been installed and connected, press the RESET button to the owner's manual included with the CD changer for instructions on installing, loading and using the CD magazine. Refer to initialize the installation. CD CHANGER OPERATION Please call Jensen technical support at 1-800-323-4815 for a complete list of CD changers compatible...
Instruction Manual
Page 17
... damage the disc's surface. 3. The unit is the standard format of sound quality. We recommend using the player. 3. The remote control sensor is selected. This will not scratch or damage the disc, and normal play due to take care of your CD player: 1. Compact Discs CD-R / CD-RW Depending on media type and method of "recording / burning", some CD-R/RWs may occur when driving on the unit. 2. Do not...
... damage the disc's surface. 3. The unit is the standard format of sound quality. We recommend using the player. 3. The remote control sensor is selected. This will not scratch or damage the disc, and normal play due to take care of your CD player: 1. Compact Discs CD-R / CD-RW Depending on media type and method of "recording / burning", some CD-R/RWs may occur when driving on the unit. 2. Do not...
Instruction Manual
Page 18
...TROUBLESHOOTING Problem Does not operate (display does not light) No power to unit No speakers operate (display lights normally) Not all speakers operate Blows fuses CD skips too much Cause Corrective Action No power to each wires. Speaker harness not con- other Power wire shorting to red wire check vehicle fuse with test light; Connect speaker harness; Check connection with test light. Speaker wires shorting to change without notice. 14 no power to ground Make sure wire is not tighten if needed. secure SPECIFICATIONS CDX6311 CEA Power Ratings Power Output...
...TROUBLESHOOTING Problem Does not operate (display does not light) No power to unit No speakers operate (display lights normally) Not all speakers operate Blows fuses CD skips too much Cause Corrective Action No power to each wires. Speaker harness not con- other Power wire shorting to red wire check vehicle fuse with test light; Connect speaker harness; Check connection with test light. Speaker wires shorting to change without notice. 14 no power to ground Make sure wire is not tighten if needed. secure SPECIFICATIONS CDX6311 CEA Power Ratings Power Output...
Instruction Manual
Page 19
... charge for parts and repair labor. Audiovox Electronics Corporation Hauppauge, NY 11788 Technical Assistance: 1-800-323-4815 www.jensen.com © 2006 Audiovox Ver. 120905 Printed in the opinion of the Company, has suffered or been damaged through alteration, improper installation, mishandling, misuse, neglect, accident, or by removal or defacement of the factory serial number/bar code label...
... charge for parts and repair labor. Audiovox Electronics Corporation Hauppauge, NY 11788 Technical Assistance: 1-800-323-4815 www.jensen.com © 2006 Audiovox Ver. 120905 Printed in the opinion of the Company, has suffered or been damaged through alteration, improper installation, mishandling, misuse, neglect, accident, or by removal or defacement of the factory serial number/bar code label...


