Instructions
Page 2
... may cause harmful interference to radio or television reception, which the receiver is turned on, the standby lamp goes off. NO USER SERVICEABLE PARTS INSIDE. Do not remove screws, covers or cabinet. 2. L'alimentation ne peut pas être commandée à distance. CAUTION To reduce the risk of Conformity: Trade Name: JVC Model Number: RX-D212B Responsible Party: JVC Americas Corp. Ne pas enlever...
... may cause harmful interference to radio or television reception, which the receiver is turned on, the standby lamp goes off. NO USER SERVICEABLE PARTS INSIDE. Do not remove screws, covers or cabinet. 2. L'alimentation ne peut pas être commandée à distance. CAUTION To reduce the risk of Conformity: Trade Name: JVC Model Number: RX-D212B Responsible Party: JVC Americas Corp. Ne pas enlever...

Instructions
Page 3
... batteries in the remote control 4 Connecting antennas 5 Connecting the speakers 6 Connecting audio/video components 7 Connecting the power cord 10 USB connection 11 Basic operations 12 1 Turn on the power 12 2 Select the source to play 12 3 Adjust the volume 13 Turning off the sounds temporarily 14 Changing the display brightness 14 Turning off the power with the Sleep Timer 14 FM/AM tuner operations 15 Tuning in to FM/AM stations manually 15 Using preset tuning 15 Selecting the FM reception mode 16 XM Satellite Radio operations 17 Preparation 17 Listening...
... batteries in the remote control 4 Connecting antennas 5 Connecting the speakers 6 Connecting audio/video components 7 Connecting the power cord 10 USB connection 11 Basic operations 12 1 Turn on the power 12 2 Select the source to play 12 3 Adjust the volume 13 Turning off the sounds temporarily 14 Changing the display brightness 14 Turning off the power with the Sleep Timer 14 FM/AM tuner operations 15 Tuning in to FM/AM stations manually 15 Using preset tuning 15 Selecting the FM reception mode 16 XM Satellite Radio operations 17 Preparation 17 Listening...

Instructions
Page 5
...9) • Input: TV/SIRIUS IN, DBS IN, VCR IN (PLAY), DVR/DVD IN (PLAY) • Output: VCR OUT (REC), DVR OUT (REC) 9 SUBWOOFER OUT jack (6) p Speakers terminals (6) SURROUND BACK SPEAKERS, SURROUND SPEAKERS, CENTER SPEAKER, FRONT SPEAKERS 3 Front panel 1 2 345 AUDIO/VIDEO CONTROL RECEIVER STANDBY/ON DIMMER SETTING ADJUST SURROUND PHONES USB 6 DVR / DVD VCR DBS TV/SIRIUS USB XM FM AM 7 SET / TUNER PRESET 8 9 SOURCE SELECTOR / MULTI JOG MASTER VOLUME pq 1 STANDBY/ON button and standby lamp (12) 2 DIMMER button (14) 3 SETTING button (20, 22) 4 ADJUST button (26...
...9) • Input: TV/SIRIUS IN, DBS IN, VCR IN (PLAY), DVR/DVD IN (PLAY) • Output: VCR OUT (REC), DVR OUT (REC) 9 SUBWOOFER OUT jack (6) p Speakers terminals (6) SURROUND BACK SPEAKERS, SURROUND SPEAKERS, CENTER SPEAKER, FRONT SPEAKERS 3 Front panel 1 2 345 AUDIO/VIDEO CONTROL RECEIVER STANDBY/ON DIMMER SETTING ADJUST SURROUND PHONES USB 6 DVR / DVD VCR DBS TV/SIRIUS USB XM FM AM 7 SET / TUNER PRESET 8 9 SOURCE SELECTOR / MULTI JOG MASTER VOLUME pq 1 STANDBY/ON button and standby lamp (12) 2 DIMMER button (14) 3 SETTING button (20, 22) 4 ADJUST button (26...

Instructions
Page 8
... each speaker cord. 2 Open the terminal (1), then insert the speaker cord (2). • For each speaker, connect the (+) and (-) terminals on the rear panel to the (+) and (-) terminals marked on the rear panel, using one surround back speaker, - After connecting all connections are completed. Connect the input jack of you like since bass sound is non-directional. Normally place it to the right surround back speaker terminal.) Connecting the powered subwoofer By connecting a subwoofer, you can place a subwoofer wherever you . 6 Speaker Layout Diagram...
... each speaker cord. 2 Open the terminal (1), then insert the speaker cord (2). • For each speaker, connect the (+) and (-) terminals on the rear panel to the (+) and (-) terminals marked on the rear panel, using one surround back speaker, - After connecting all connections are completed. Connect the input jack of you like since bass sound is non-directional. Normally place it to the right surround back speaker terminal.) Connecting the powered subwoofer By connecting a subwoofer, you can place a subwoofer wherever you . 6 Speaker Layout Diagram...
Instructions
Page 9
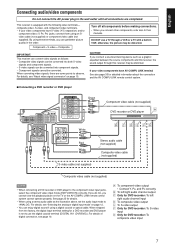
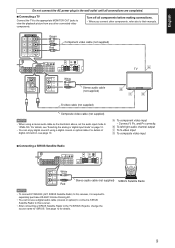
... DVD player to the component video input jacks, select the component video input mode (DVD VIDEO IN) correctly. English Connecting audio/video components Do not connect the AC power plug to the wall outlet until all components before making connections. • When you connect other components, refer also to their manuals. CAUTION: If you connect a sound-enhancing device such as follows: • Composite video signals can be converted into component signals. • Component signals cannot be distorted. If you do not, you can enjoy digital sound if using a stereo audio cable...
... DVD player to the component video input jacks, select the component video input mode (DVD VIDEO IN) correctly. English Connecting audio/video components Do not connect the AC power plug to the wall outlet until all components before making connections. • When you connect other components, refer also to their manuals. CAUTION: If you connect a sound-enhancing device such as follows: • Composite video signals can be converted into component signals. • Component signals cannot be distorted. If you do not, you can enjoy digital sound if using a stereo audio cable...
Instructions
Page 10
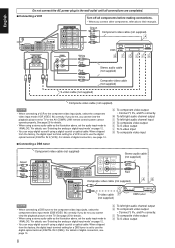
... connecting a DBS tuner to use the digital optical terminal (DIGITAL IN 2 (DBS)). When shipped from the factory, the digital input terminal setting for a VCR is set to the component video input jacks, select the component video input mode (DBS VIDEO IN) correctly. If you do not, you cannot view the playback picture on the TV or the AV COMPU LINK remote control system cannot operate properly. See page 25 for details. • When using a stereo audio cable as the illustration above , set...
... connecting a DBS tuner to use the digital optical terminal (DIGITAL IN 2 (DBS)). When shipped from the factory, the digital input terminal setting for a VCR is set to the component video input jacks, select the component video input mode (DBS VIDEO IN) correctly. If you do not, you cannot view the playback picture on the TV or the AV COMPU LINK remote control system cannot operate properly. See page 25 for details. • When using a stereo audio cable as the illustration above , set...
Instructions
Page 11
... component video input • Connect Y, PB, and PR correctly. ı To left/right audio channel output Ç To S-video input Î To composite video input 7 Connecting a SIRIUS Satellite Radio TV/SIRIUS DB L IN IN White 5 2 3 ∞ Stereo audio cable (not supplied) SIRIUS Satellite Radio R Red NOTES • To connect KT-SR2000 (JVC SIRIUS Satellite Radio) to this receiver, it is required to separately purchase KS-K6013 Home Docking Kit. • You cannot use a digital audio cable (coaxial or optical...
... component video input • Connect Y, PB, and PR correctly. ı To left/right audio channel output Ç To S-video input Î To composite video input 7 Connecting a SIRIUS Satellite Radio TV/SIRIUS DB L IN IN White 5 2 3 ∞ Stereo audio cable (not supplied) SIRIUS Satellite Radio R Red NOTES • To connect KT-SR2000 (JVC SIRIUS Satellite Radio) to this receiver, it is required to separately purchase KS-K6013 Home Docking Kit. • You cannot use a digital audio cable (coaxial or optical...

Instructions
Page 12
... the wall outlet. If this happens, connect the playback source component and TV using S-video cable for use the digital connection in red. Digital coaxial cable (not supplied) Digital optical cable (not supplied) Turn off all the audio/video connections have the power cord replaced with the following cases: - The standby lamp lights in addition to the analog connection methods described on pages 7 to 9. When a power failure occurs. • When you connect other components, change the digital input (DIGITAL IN) terminal setting correctly. Connecting the power cord...
... the wall outlet. If this happens, connect the playback source component and TV using S-video cable for use the digital connection in red. Digital coaxial cable (not supplied) Digital optical cable (not supplied) Turn off all the audio/video connections have the power cord replaced with the following cases: - The standby lamp lights in addition to the analog connection methods described on pages 7 to 9. When a power failure occurs. • When you connect other components, change the digital input (DIGITAL IN) terminal setting correctly. Connecting the power cord...
Instructions
Page 13
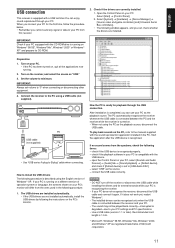
...-ROM. Set the volume to your PC is recognized properly. - To play back sounds on your PC, select [Sounds and Audio Devices] = [Audio] tab = [Sound playback] = [Default device], and check if [Default device] is compatible with the sound reproduction application installed in your PC: Select [Start] = [Control Panel]. 2. USB PC USB cable (not supplied) • Use "USB series A plug to the manuals supplied with the USB device. - select "USB" as the playback source, disconnect the USB cable. Recommended cord length is...
...-ROM. Set the volume to your PC is recognized properly. - To play back sounds on your PC, select [Sounds and Audio Devices] = [Audio] tab = [Sound playback] = [Default device], and check if [Default device] is compatible with the sound reproduction application installed in your PC: Select [Start] = [Control Panel]. 2. USB PC USB cable (not supplied) • Use "USB series A plug to the manuals supplied with the USB device. - select "USB" as the playback source, disconnect the USB cable. Recommended cord length is...

Instructions
Page 15
... and your speakers. DTS*3: ANALOG: Select to play back software encoded with DTS. The receiver automatically detects the incoming signal format, then the digital signal format indicator (LINEAR PCM, , , or 96/24) for the analog input mode. Select for the detected signal lights up when conventional DTS signal comes in . • Flashes when "DOLBY DIGITAL" is selected for any sources. on the remote control). • When you adjust the volume, the volume level indication appears on the display. 13...
... and your speakers. DTS*3: ANALOG: Select to play back software encoded with DTS. The receiver automatically detects the incoming signal format, then the digital signal format indicator (LINEAR PCM, , , or 96/24) for the analog input mode. Select for the detected signal lights up when conventional DTS signal comes in . • Flashes when "DOLBY DIGITAL" is selected for any sources. on the remote control). • When you adjust the volume, the volume level indication appears on the display. 13...

Instructions
Page 24
... MODE DIGITAL IN 2 DVD VIDEO IN DBS VIDEO IN 3 Press SET. ANALOG L R S.WFR 4 Turn MULTI JOG to the right surround back speaker terminal. 22 MULTI JOG now works for other items if necessary. 7 Press SETTING. Selecting this setting is a time limit in doing the following steps. SB OUT Select when you have disconnected a subwoofer. Ex.: When setting DIGITAL IN 1 terminal. 1 Press SETTING. The subwoofer indicator ( S.WFR ) lights up on page 20, this changes...
... MODE DIGITAL IN 2 DVD VIDEO IN DBS VIDEO IN 3 Press SET. ANALOG L R S.WFR 4 Turn MULTI JOG to the right surround back speaker terminal. 22 MULTI JOG now works for other items if necessary. 7 Press SETTING. Selecting this setting is a time limit in doing the following steps. SB OUT Select when you have disconnected a subwoofer. Ex.: When setting DIGITAL IN 1 terminal. 1 Press SETTING. The subwoofer indicator ( S.WFR ) lights up on page 20, this changes...

Instructions
Page 30
.... Initial setting: PANORAMA 28 Select to "Live." The INPUT ATT indicator lights up on the display. Normally, select "3." Normally, select "3." Adjusting the effect level for DSP modes-EFFECT This setting is available only when one of the DSP modes (except ALL CH STEREO) is memorized for each source. • You cannot use the remote control for this setting. English Adjusting the bass sounds Reinforcing the bass-BASS BOOST You can adjust the Surround/DSP sound parameters...
.... Initial setting: PANORAMA 28 Select to "Live." The INPUT ATT indicator lights up on the display. Normally, select "3." Normally, select "3." Adjusting the effect level for DSP modes-EFFECT This setting is available only when one of the DSP modes (except ALL CH STEREO) is memorized for each source. • You cannot use the remote control for this setting. English Adjusting the bass sounds Reinforcing the bass-BASS BOOST You can adjust the Surround/DSP sound parameters...

Instructions
Page 31
... center tone-CENTER TONE This setting is memorized separately for this setting. Center alignment is common to 7 (in use the remote control for this setting. Initial setting: C ALIGN 29 Adjustable range: OFF and 1 to all Surround modes, and is available when one of the center channel for this when you change the setting. • You cannot use the remote control for the analog or digital 2-channel sound signal. Normally, select "3." Adjusting the sound localization position for the analog or digital 2-channel sound signal...
... center tone-CENTER TONE This setting is memorized separately for this setting. Center alignment is common to 7 (in use the remote control for this setting. Initial setting: C ALIGN 29 Adjustable range: OFF and 1 to all Surround modes, and is available when one of the center channel for this when you change the setting. • You cannot use the remote control for the analog or digital 2-channel sound signal. Normally, select "3." Adjusting the sound localization position for the analog or digital 2-channel sound signal...

Instructions
Page 32
... digital input, the indicator lights up on the walls to reproduce impressive multi-channel sound, reaching you while viewing the video software. Suitable for the cutoff frequency of the surround treble and enables stereo surround sound. • This receiver provides three types of Dolby Laboratories. Suitable for playing any 2-channel stereo software. English Creating realistic sound fields Reproducing theater ambience In a movie theater, many speakers, sound localization and sound movement can create almost the same Surround sound as 0.1 channel. Surround/DSP modes...
... digital input, the indicator lights up on the walls to reproduce impressive multi-channel sound, reaching you while viewing the video software. Suitable for the cutoff frequency of the surround treble and enables stereo surround sound. • This receiver provides three types of Dolby Laboratories. Suitable for playing any 2-channel stereo software. English Creating realistic sound fields Reproducing theater ambience In a movie theater, many speakers, sound localization and sound movement can create almost the same Surround sound as 0.1 channel. Surround/DSP modes...

Instructions
Page 33
... format is now adopted in higher sampling rates both an analog and digital 2-channel signal. • To enjoy software encoded with Dolby Digital, connect the source component using the digital terminal on the rear of 16/20/24 bits. When Dolby Pro Logic IIx is another digital signal compression method, developed by Digital Theater Systems, Inc. NEO:6 CINEMA Suitable for playing music software. The 3D-PHONIC indicator lights up on the display. 3D HEADPHONE mode...
... format is now adopted in higher sampling rates both an analog and digital 2-channel signal. • To enjoy software encoded with Dolby Digital, connect the source component using the digital terminal on the rear of 16/20/24 bits. When Dolby Pro Logic IIx is another digital signal compression method, developed by Digital Theater Systems, Inc. NEO:6 CINEMA Suitable for playing music software. The 3D-PHONIC indicator lights up on the display. 3D HEADPHONE mode...

Instructions
Page 36
.... *3 If an incoming signal is a multi-channel (2 channel or more ) digital signal, "MONO FILM" is not available. *4 If "SURROUND SPK" is activated, the AUTO SURR indicator lights up on the display. Ex.: When "DOLBY DIGITAL" is selected for selecting Surround/DSP modes. 3 Turn MULTI JOG to "," "ALL CH STEREO" is not available. On the front panel: 2 1,3 Before you want . MULTI JOG now works for Dolby Digital multi-channel software: DIGITAL AUTO L C R S.WFR LFE DIGITAL LS RS AUTO SURROUND*1 Surround modes*2 HALL1 HALL2 LIVE CLUB...
.... *3 If an incoming signal is a multi-channel (2 channel or more ) digital signal, "MONO FILM" is not available. *4 If "SURROUND SPK" is activated, the AUTO SURR indicator lights up on the display. Ex.: When "DOLBY DIGITAL" is selected for selecting Surround/DSP modes. 3 Turn MULTI JOG to "," "ALL CH STEREO" is not available. On the front panel: 2 1,3 Before you want . MULTI JOG now works for Dolby Digital multi-channel software: DIGITAL AUTO L C R S.WFR LFE DIGITAL LS RS AUTO SURROUND*1 Surround modes*2 HALL1 HALL2 LIVE CLUB...
Instructions
Page 37
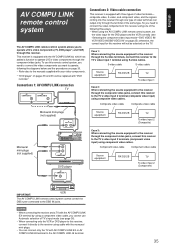
...receiver. Component video cable Component video cable Source equipment RX-D212B TV To video input 2 (Component) IMPORTANT: VCR The AV COMPU LINK remote control system cannot control the DBS tuner connected to the DBS IN jacks. English AV COMPU LINK remote control system The AV COMPU LINK remote control system allows you need to connect the video components you want to operate, following three ways. • When using the AV COMPU LINK remote control system, set the video input for this receiver, connect it directly to the receiver using cable with the monaural mini-plugs...
...receiver. Component video cable Component video cable Source equipment RX-D212B TV To video input 2 (Component) IMPORTANT: VCR The AV COMPU LINK remote control system cannot control the DBS tuner connected to the DBS IN jacks. English AV COMPU LINK remote control system The AV COMPU LINK remote control system allows you need to connect the video components you want to operate, following three ways. • When using the AV COMPU LINK remote control system, set the video input for this receiver, connect it directly to the receiver using cable with the monaural mini-plugs...

Instructions
Page 38
... video playback without setting other switches manually. Remote control of the TV, DVD player, and VCR using the TV volume control on the TV. 7 Turn on other connected components first, then turn on this receiver. • When turning on the VCR, use the five basic functions listed below. The TV automatically turns on and changes the input mode to "VCR." The receiver automatically turns on and changes the source to the appropriate position so that you can view...
... video playback without setting other switches manually. Remote control of the TV, DVD player, and VCR using the TV volume control on the TV. 7 Turn on other connected components first, then turn on this receiver. • When turning on the VCR, use the five basic functions listed below. The TV automatically turns on and changes the input mode to "VCR." The receiver automatically turns on and changes the source to the appropriate position so that you can view...
Instructions
Page 39
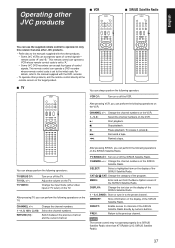
... remote control can operate a VCR whose remote control code is set to the initial code. TV/SIRIUS : Turn on the display of the program. CHANNEL +/-: Change the channel numbers on the TV. English 7 VCR Operating other JVC products 7 SIRIUS Satellite Radio You can use the supplied remote control to operate not only this receiver but also other JVC products. • Refer also to the manuals supplied with the DVD recorder. • To operate other products, aim the remote control directly...
... remote control can operate a VCR whose remote control code is set to the initial code. TV/SIRIUS : Turn on the display of the program. CHANNEL +/-: Change the channel numbers on the TV. English 7 VCR Operating other JVC products 7 SIRIUS Satellite Radio You can use the supplied remote control to operate not only this receiver but also other JVC products. • Refer also to the manuals supplied with the DVD recorder. • To operate other products, aim the remote control directly...
Instructions
Page 44
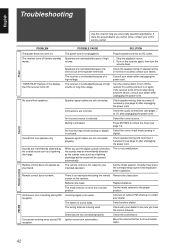
... display, then the receiver turns off (enters standby mode). Connect an outdoor FM antenna or contact your dealer after unplugging the power cord. The station is selected. Remote control FM/AM 42 Sound from speakers. Plug the power cord into an AC outlet. Stop the playback source. 2. Check the audio connections (see page 6) after unplugging the power cord. An incorrect input mode (analog or digital) Select the correct input mode (analog or is too far away. Speaker signal cables are weak. Check speaker wiring...
... display, then the receiver turns off (enters standby mode). Connect an outdoor FM antenna or contact your dealer after unplugging the power cord. The station is selected. Remote control FM/AM 42 Sound from speakers. Plug the power cord into an AC outlet. Stop the playback source. 2. Check the audio connections (see page 6) after unplugging the power cord. An incorrect input mode (analog or digital) Select the correct input mode (analog or is too far away. Speaker signal cables are weak. Check speaker wiring...


