
Instructions
Page 3
... to the radio 6 Storing stations in memory 7 Tuning in to a preset station 8 CD OPERATIONS 9 Playing a CD 9 Locating a track or a particular portion on a CD 10 Selecting CD playback modes 10 Prohibiting CD ejection 11 SOUND ADJUSTMENTS 12 Adjusting the sound 12 Turning on/off the loudness function 12 ...to ensure your own sound adjustments ........ 14 OTHER MAIN FUNCTIONS 15 Setting the clock 15 Canceling Advanced SCM - If you for purchasing a JVC product. ENGLISH Thank you have parked the car for a long time in hot or cold weather, wait until the functions mode is ...
... to the radio 6 Storing stations in memory 7 Tuning in to a preset station 8 CD OPERATIONS 9 Playing a CD 9 Locating a track or a particular portion on a CD 10 Selecting CD playback modes 10 Prohibiting CD ejection 11 SOUND ADJUSTMENTS 12 Adjusting the sound 12 Turning on/off the loudness function 12 ...to ensure your own sound adjustments ........ 14 OTHER MAIN FUNCTIONS 15 Setting the clock 15 Canceling Advanced SCM - If you for purchasing a JVC product. ENGLISH Thank you have parked the car for a long time in hot or cold weather, wait until the functions mode is ...
Instructions
Page 5
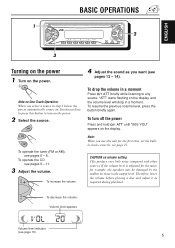
... again. To turn on the power. 2 Select the source. Volume level appears Volume level indicator (see pages 6 - 8. ENGLISH BASIC OPERATIONS 1 FM CD SSM 2 AM MO RPT RND MODE SCM 3 Turning on the power 1 Turn on the display, and the volume level will drop in a moment. You..., the power automatically comes on the display. To decrease the volume. If the volume level is adjusted for the tuner, for the first time, set the builtin clock correctly, see page 15. To increase the volume. 4 Adjust the sound as required during playback. CAUTION on One-Touch Operation...
... again. To turn on the power. 2 Select the source. Volume level appears Volume level indicator (see pages 6 - 8. ENGLISH BASIC OPERATIONS 1 FM CD SSM 2 AM MO RPT RND MODE SCM 3 Turning on the power 1 Turn on the display, and the volume level will drop in a moment. You..., the power automatically comes on the display. To decrease the volume. If the volume level is adjusted for the tuner, for the first time, set the builtin clock correctly, see page 15. To increase the volume. 4 Adjust the sound as required during playback. CAUTION on One-Touch Operation...
Instructions
Page 12
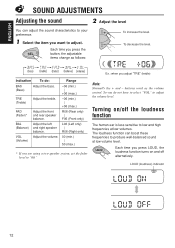
Adjust the volume. buttons work as follows: To increase the level. Each time you adjust "TRE" (treble) Indication To do not have to select "VOL" to "00." FAD (Fader)* BAL (Balance) VOL (Volume) Adjust the front and rear .... To decrease the level. TRE (Treble) Adjust the treble. LOUD (loudness) indicator @A 12 So you are using a two-speaker system, set the fader level to adjust the volume level. Each time you want to adjust. Adjust the left and right speaker balance. ENGLISH SOUND ADJUSTMENTS Adjusting the sound 2 Adjust the level You...
Adjust the volume. buttons work as follows: To increase the level. Each time you adjust "TRE" (treble) Indication To do not have to select "VOL" to "00." FAD (Fader)* BAL (Balance) VOL (Volume) Adjust the front and rear .... To decrease the level. TRE (Treble) Adjust the treble. LOUD (loudness) indicator @A 12 So you are using a two-speaker system, set the fader level to adjust the volume level. Each time you want to adjust. Adjust the left and right speaker balance. ENGLISH SOUND ADJUSTMENTS Adjusting the sound 2 Adjust the level You...

Instructions
Page 13
... select the source. The sound mode stored in memory for each of the following sources - SCM CD AM Each time you select a sound mode, it in memory. Select the sound mode you want. • Each time you want to use the same sound mode for the current source and the effect applies only... (SCM) You can select and store a preset sound adjustment suitable to each playback source. (Advanced SCM) Recalling the sound modes When "SCM LINK" is set to adjust and store your original sound mode, see "Storing your preference, and store it is stored in memory. SCM LINK" on the display.
... select the source. The sound mode stored in memory for each of the following sources - SCM CD AM Each time you select a sound mode, it in memory. Select the sound mode you want. • Each time you want to use the same sound mode for the current source and the effect applies only... (SCM) You can select and store a preset sound adjustment suitable to each playback source. (Advanced SCM) Recalling the sound modes When "SCM LINK" is set to adjust and store your original sound mode, see "Storing your preference, and store it is stored in memory. SCM LINK" on the display.
Instructions
Page 14
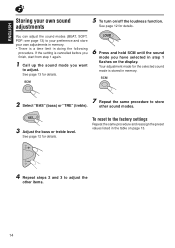
...SOFT, POP: see page 13) to adjust. See page 12 for details. See page 12 for details. If the setting is cancelled before you finish, start from step 1 again. 1 Call up the sound mode you have selected in step 1 ...flashes on /off the loudness function. To reset to the factory settings Repeat the same procedure and reassign the preset values listed in the table on page 13. 4 Repeat steps 2 and 3 to... in memory. ENGLISH Storing your own adjustments in memory. • There is a time limit in doing the following procedure.
...SOFT, POP: see page 13) to adjust. See page 12 for details. See page 12 for details. If the setting is cancelled before you finish, start from step 1 again. 1 Call up the sound mode you have selected in step 1 ...flashes on /off the loudness function. To reset to the factory settings Repeat the same procedure and reassign the preset values listed in the table on page 13. 4 Repeat steps 2 and 3 to... in memory. ENGLISH Storing your own adjustments in memory. • There is a time limit in doing the following procedure.
Instructions
Page 15
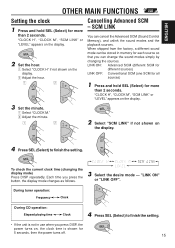
... display mode changes as follows. 3 Select the desire mode - To check the current clock time (changing the display mode) Press DISP repeatedly. "CLOCK H", "CLOCK M", "SCM LINK" or "LEVEL" appears on the display. 3 Set the minute. 1 Select "CLOCK M." 2 Adjust the minute. 1 2 2 Select "SCM...), and unlink the sound modes and the playback sources. During tuner operation: Frequency Clock During CD operation: Elapsed playing time Clock 4 Press SEL (Select) to finish the setting. ENGLISH OTHER MAIN FUNCTIONS Setting the clock 1 Press and hold SEL (Select) for more than 2 seconds.
... display mode changes as follows. 3 Select the desire mode - To check the current clock time (changing the display mode) Press DISP repeatedly. "CLOCK H", "CLOCK M", "SCM LINK" or "LEVEL" appears on the display. 3 Set the minute. 1 Select "CLOCK M." 2 Adjust the minute. 1 2 2 Select "SCM...), and unlink the sound modes and the playback sources. During tuner operation: Frequency Clock During CD operation: Elapsed playing time Clock 4 Press SEL (Select) to finish the setting. ENGLISH OTHER MAIN FUNCTIONS Setting the clock 1 Press and hold SEL (Select) for more than 2 seconds.


