
Instructions
Page 1
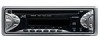
...;. INSTRUCTIONS MANUAL DE INSTRUCCIONES MANUEL D'INSTRUCTIONS For customer Use: Enter below the Model No. and Serial No. Retain this information for future reference. Serial No. GET0171-001B [J] which are located on the top or bottom of the cabinet. FRANÇAIS ESPAÑOL ENGLISH CD RECEIVER RECEPTOR CON CD RECEPTEUR CD KD-S5050/KD-S10 SEL DISP DIRECT TRACK ACCESS 7 8 9 10 11 12 KD-S5050...
...;. INSTRUCTIONS MANUAL DE INSTRUCCIONES MANUEL D'INSTRUCTIONS For customer Use: Enter below the Model No. and Serial No. Retain this information for future reference. Serial No. GET0171-001B [J] which are located on the top or bottom of the cabinet. FRANÇAIS ESPAÑOL ENGLISH CD RECEIVER RECEPTOR CON CD RECEPTEUR CD KD-S5050/KD-S10 SEL DISP DIRECT TRACK ACCESS 7 8 9 10 11 12 KD-S5050...

Instructions
Page 2
... PRODUCT 2. will also be determined by turning the equipment off and on a circuit different from that interference will not occur in a particular installation. However, there is connected. - Reorient or relocate the receiving antenna. - IMPORTANT FOR LASER PRODUCTS 1. such as preset channels or sound adjustments - Connect the equipment into an outlet on , the user is in a residential installation. CAUTION: Do not open and...
... PRODUCT 2. will also be determined by turning the equipment off and on a circuit different from that interference will not occur in a particular installation. However, there is connected. - Reorient or relocate the receiving antenna. - IMPORTANT FOR LASER PRODUCTS 1. such as preset channels or sound adjustments - Connect the equipment into an outlet on , the user is in a residential installation. CAUTION: Do not open and...

Instructions
Page 3
... 3 LOCATION OF THE BUTTONS 4 Control panel 4 BASIC OPERATIONS 5 Turning on the power 5 RADIO OPERATIONS 6 Listening to use these buttons as different function buttons. SCM LINK .... 15 Selecting the level display 16 Detaching the control panel 17 MAINTENANCE 18 Handling discs 18 TROUBLESHOOTING 19 SPECIFICATIONS 20 How to the radio 6 Storing stations in memory 7 Tuning in the car becomes normal before operating the unit. 3 If you for purchasing a JVC product. CONTENTS How to reset your own sound adjustments ........ 14 OTHER MAIN FUNCTIONS 15 Setting the clock...
... 3 LOCATION OF THE BUTTONS 4 Control panel 4 BASIC OPERATIONS 5 Turning on the power 5 RADIO OPERATIONS 6 Listening to use these buttons as different function buttons. SCM LINK .... 15 Selecting the level display 16 Detaching the control panel 17 MAINTENANCE 18 Handling discs 18 TROUBLESHOOTING 19 SPECIFICATIONS 20 How to the radio 6 Storing stations in memory 7 Tuning in the car becomes normal before operating the unit. 3 If you for purchasing a JVC product. CONTENTS How to reset your own sound adjustments ........ 14 OTHER MAIN FUNCTIONS 15 Setting the clock...
Instructions
Page 4
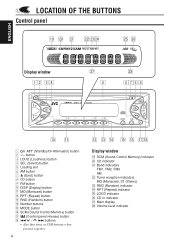
... RND (Random) button r Number buttons t MODE button y SCM (Sound Control Memory) button u (Control panel release) button i 4 / ¢ buttons • Also functions as SSM buttons when pressed together. 4 w e r t y ui Display window o SCM (Sound Control Memory) indicator ; CD indicator a Band indicators FM1, FM2, FM3 AM s Tuner reception indicators MO (Monaural), ST (Stereo) d RND (Random) indicator f RPT (Repeat) indicator g LOUD indicator h CD-in indicator j Main display k Volume level indicator ENGLISH LOCATION OF THE BUTTONS Control panel o ; a s df gh Display window 12 34...
... RND (Random) button r Number buttons t MODE button y SCM (Sound Control Memory) button u (Control panel release) button i 4 / ¢ buttons • Also functions as SSM buttons when pressed together. 4 w e r t y ui Display window o SCM (Sound Control Memory) indicator ; CD indicator a Band indicators FM1, FM2, FM3 AM s Tuner reception indicators MO (Monaural), ST (Stereo) d RND (Random) indicator f RPT (Repeat) indicator g LOUD indicator h CD-in indicator j Main display k Volume level indicator ENGLISH LOCATION OF THE BUTTONS Control panel o ; a s df gh Display window 12 34...
Instructions
Page 5
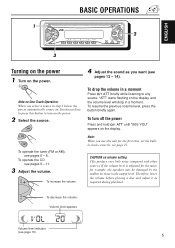
... the previous volume level, press the button briefly again. Note: When you want (see page 16) 5 To turn on the display. To decrease the volume. ENGLISH BASIC OPERATIONS 1 FM CD SSM 2 AM MO RPT RND MODE SCM 3 Turning on the power 1 Turn on . To increase the volume. 4 Adjust the sound as required during playback. Therefore, lower the volume before playing a disc and adjust it as you use this button to any source.
... the previous volume level, press the button briefly again. Note: When you want (see page 16) 5 To turn on the display. To decrease the volume. ENGLISH BASIC OPERATIONS 1 FM CD SSM 2 AM MO RPT RND MODE SCM 3 Turning on the power 1 Turn on . To increase the volume. 4 Adjust the sound as required during playback. Therefore, lower the volume before playing a disc and adjust it as you use this button to any source.

Instructions
Page 6
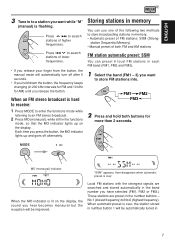
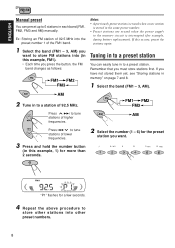
... a station manually: Manual search 1 Select the band (FM 1 - 3, AM). You can use any one of higher frequencies. Selected band appears 6 When a station is received, press the same button you have pressed for searching. Searching a station automatically: Auto search 1 Select the band (FM 1 - 3, AM). RADIO OPERATIONS ENGLISH FM CD SSM AM MO RPT RND MODE SCM Listening to the radio You can use either automatic searching or manual searching to tune in...
... a station manually: Manual search 1 Select the band (FM 1 - 3, AM). You can use any one of higher frequencies. Selected band appears 6 When a station is received, press the same button you have pressed for searching. Searching a station automatically: Auto search 1 Select the band (FM 1 - 3, AM). RADIO OPERATIONS ENGLISH FM CD SSM AM MO RPT RND MODE SCM Listening to the radio You can use either automatic searching or manual searching to tune in...
Instructions
Page 7
... number buttons - Each time you want to store FM stations into. MODE MO Storing stations in memory You can use one of the following two methods to store broadcasting stations in memory. • Automatic preset of both buttons for AM) until you want while "M" (manual) is flashing. station Sequential Memory) • Manual preset of FM stations: SSM (Strong- When the MO indicator is hard to receive: 1 Press MODE to enter the functions mode...
... number buttons - Each time you want to store FM stations into. MODE MO Storing stations in memory You can use one of the following two methods to store broadcasting stations in memory. • Automatic preset of both buttons for AM) until you want while "M" (manual) is flashing. station Sequential Memory) • Manual preset of FM stations: SSM (Strong- When the MO indicator is hard to receive: 1 Press MODE to enter the functions mode...
Instructions
Page 8
... preset numbers. 8 Remember that you want to tune AM AM stations of lower frequencies. 3 Press and hold the number button (in memory" on page 7 and 8. 1 Select the band (FM1 - 3, AM). Press 4 to the memory circuit is stored in the same preset number. • Preset stations are erased when the power supply to tune stations of higher frequencies. If this example, 1) for more than 2 seconds. 2 Select the number (1 - 6) for example, during battery replacement...
... preset numbers. 8 Remember that you want to tune AM AM stations of lower frequencies. 3 Press and hold the number button (in memory" on page 7 and 8. 1 Select the band (FM1 - 3, AM). Press 4 to the memory circuit is stored in the same preset number. • Preset stations are erased when the power supply to tune stations of higher frequencies. If this example, 1) for more than 2 seconds. 2 Select the number (1 - 6) for example, during battery replacement...
Instructions
Page 9
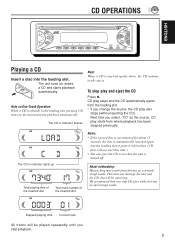
... CD turns on the unit and starts playback automatically. The CD-in indicator lights up Total playing time of the inserted disc Total track number of the inserted disc Notes: • If the ejected disc is not removed for about 15 seconds, the disc is automatically inserted again into the loading slot. We recommend that you select "CD" as the source, CD play also stops (without ejecting the CD). Next time you...
... CD turns on the unit and starts playback automatically. The CD-in indicator lights up Total playing time of the inserted disc Total track number of the inserted disc Notes: • If the ejected disc is not removed for about 15 seconds, the disc is automatically inserted again into the loading slot. We recommend that you select "CD" as the source, CD play also stops (without ejecting the CD). Next time you...
Instructions
Page 10
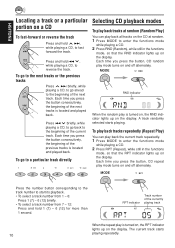
...; To select a track number from 7 - 12: Press and hold 4 , while playing a CD, to enter the functions mode while playing a CD. 2 Press RND (Random), while still in the functions mode, so that the RND indicator lights up on the display. Each time you press the button, CD random play mode turns on and off alternately. Each time you press the button, CD repeat play mode turns on and off alternately. MODE RPT Press the number button corresponding to...
...; To select a track number from 7 - 12: Press and hold 4 , while playing a CD, to enter the functions mode while playing a CD. 2 Press RND (Random), while still in the functions mode, so that the RND indicator lights up on the display. Each time you press the button, CD random play mode turns on and off alternately. Each time you press the button, CD repeat play mode turns on and off alternately. MODE RPT Press the number button corresponding to...
Instructions
Page 12
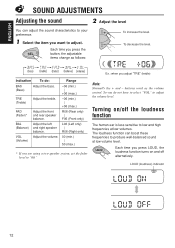
... function turns on /off alternatively. Each time you want to produce well-balanced sound at low volumes. TRE (Treble) Adjust the treble. Range -06 (min.) | +06 (max.) -06 (min.) | +06 (max.) R06 (Rear only) | F06 (Front only) L06 (Left only) | R06 (Right only) 00 (min.) | 50 (max.) * If you press the button, the adjustable items change as the volume control. Turning on and off the loudness function...
... function turns on /off alternatively. Each time you want to produce well-balanced sound at low volumes. TRE (Treble) Adjust the treble. Range -06 (min.) | +06 (max.) -06 (min.) | +06 (max.) R06 (Rear only) | F06 (Front only) L06 (Left only) | R06 (Right only) 00 (min.) | 50 (max.) * If you press the button, the adjustable items change as the volume control. Turning on and off the loudness function...

Instructions
Page 13
... OFF Light music +04 +01 OFF 13 ENGLISH Using the Sound Control Memory (SCM) You can adjust each sound mode to your own sound adjustments" on page 14. • To adjust the bass and treble reinforcement levels or to turn on the display. FM Selecting and storing the sound modes Once you press the button, the sound mode changes as follows. Notes: • You can select and store a preset sound adjustment suitable to each of the following sources - The sound mode...
... OFF Light music +04 +01 OFF 13 ENGLISH Using the Sound Control Memory (SCM) You can adjust each sound mode to your own sound adjustments" on page 14. • To adjust the bass and treble reinforcement levels or to turn on the display. FM Selecting and storing the sound modes Once you press the button, the sound mode changes as follows. Notes: • You can select and store a preset sound adjustment suitable to each of the following sources - The sound mode...
Instructions
Page 14
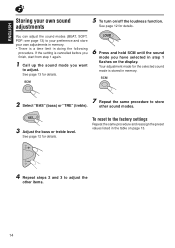
... factory settings Repeat the same procedure and reassign the preset values listed in the table on the display. Your adjustment made for details. See page 12 for the selected sound mode is stored in memory. See page 13 for details. Repeat the same procedure to adjust the other sound modes. 3 Adjust the bass or treble level. See page 12 for details. SCM 2 7 Select "BAS" (bass) or "TRE" (treble). To reset...
... factory settings Repeat the same procedure and reassign the preset values listed in the table on the display. Your adjustment made for details. See page 12 for the selected sound mode is stored in memory. See page 13 for details. Repeat the same procedure to adjust the other sound modes. 3 Adjust the bass or treble level. See page 12 for details. SCM 2 7 Select "BAS" (bass) or "TRE" (treble). To reset...
Instructions
Page 15
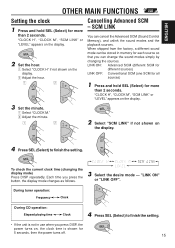
... (Sound Control Memory), and unlink the sound modes and the playback sources. "CLOCK H", "CLOCK M", "SCM LINK" or "LEVEL" appears on the display. 3 Set the minute. 1 Select "CLOCK M." 2 Adjust the minute. 1 2 2 Select "SCM LINK" if not shown on the display. 2 Adjust the hour. 1 2 Cancelling Advanced SCM - To check the current clock time (changing the display mode) Press DISP repeatedly. ENGLISH OTHER MAIN FUNCTIONS Setting the clock 1 Press and hold SEL (Select) for more than 2 seconds. During tuner operation: Frequency Clock During CD operation...
... (Sound Control Memory), and unlink the sound modes and the playback sources. "CLOCK H", "CLOCK M", "SCM LINK" or "LEVEL" appears on the display. 3 Set the minute. 1 Select "CLOCK M." 2 Adjust the minute. 1 2 2 Select "SCM LINK" if not shown on the display. 2 Adjust the hour. 1 2 Cancelling Advanced SCM - To check the current clock time (changing the display mode) Press DISP repeatedly. ENGLISH OTHER MAIN FUNCTIONS Setting the clock 1 Press and hold SEL (Select) for more than 2 seconds. During tuner operation: Frequency Clock During CD operation...

Instructions
Page 16
OFF : Erases the volume level indicator. 1 Press and hold SEL for more than 2 seconds. "CLOCK H", "CLOCK M", "SCM LINK" or "LEVEL" appears on the display. 16 VOL 1 : Shows the volume level indicator. ENGLISH Selecting the level display You can select the level display according to finish the setting. 2 Select "LEVEL" if not shown on the display. 3 Select the desired mode - VOL 2 : Alternates "VOL 1" setting and illumination display. "VOL 1", "VOL 2" or "OFF". 4 Press SEL (Select) to your preference. When shipped from the factory, "VOL 2" is selected.
OFF : Erases the volume level indicator. 1 Press and hold SEL for more than 2 seconds. "CLOCK H", "CLOCK M", "SCM LINK" or "LEVEL" appears on the display. 16 VOL 1 : Shows the volume level indicator. ENGLISH Selecting the level display You can select the level display according to finish the setting. 2 Select "LEVEL" if not shown on the display. 3 Select the desired mode - VOL 2 : Alternates "VOL 1" setting and illumination display. "VOL 1", "VOL 2" or "OFF". 4 Press SEL (Select) to your preference. When shipped from the factory, "VOL 2" is selected.
Instructions
Page 17
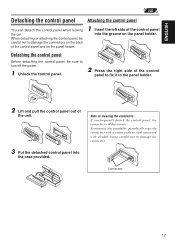
... the control panel into the case provided. Connectors 17 Note on the panel holder. When detaching or attaching the control panel, be sure to turn off the power. 1 Unlock the control panel. 2 Press the right side of the control panel to fix it to the panel holder. 2 Lift and pull the control panel out of the control panel and on the panel holder. Detaching the control panel Before detaching the control panel...
... the control panel into the case provided. Connectors 17 Note on the panel holder. When detaching or attaching the control panel, be sure to turn off the power. 1 Unlock the control panel. 2 Press the right side of the control panel to fix it to the panel holder. 2 Lift and pull the control panel out of the control panel and on the panel holder. Detaching the control panel Before detaching the control panel...
Instructions
Page 18
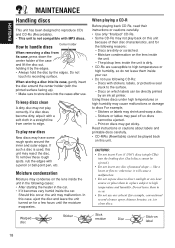
... their instructions or cautions carefully. • Use only "finalized" CD-Rs. • Some CD-Rs may shrink and warp a disc. - In this case, eject the disc and leave the unit turned on for the following cases: • After starting the heater in the car. • If it will cause a malfunction. • Do not expose discs to direct sunlight or any heat source or...
... their instructions or cautions carefully. • Use only "finalized" CD-Rs. • Some CD-Rs may shrink and warp a disc. - In this case, eject the disc and leave the unit turned on for the following cases: • After starting the heater in the car. • If it will cause a malfunction. • Do not expose discs to direct sunlight or any heat source or...
Instructions
Page 19
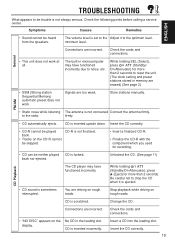
... a finalized CD-R. • Finalize the CD-R with the component which you used for more than 2 seconds to reset the unit. (The clock setting and preset stations stored in memory are erased) (See page 2) • SSM (Strong-station Sequential Memory) automatic preset does not work at all. display. firmly. • CD automatically ejects. You are incorrect. Insert the CD correctly. 19 Connections are too weak. CD-R is not always serious. TROUBLESHOOTING ENGLISH...
... a finalized CD-R. • Finalize the CD-R with the component which you used for more than 2 seconds to reset the unit. (The clock setting and preset stations stored in memory are erased) (See page 2) • SSM (Strong-station Sequential Memory) automatic preset does not work at all. display. firmly. • CD automatically ejects. You are incorrect. Insert the CD correctly. 19 Connections are too weak. CD-R is not always serious. TROUBLESHOOTING ENGLISH...
Instructions
Page 20
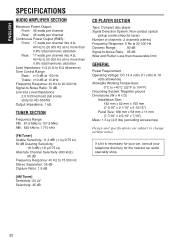
... Capture Ratio: 1.5 dB [AM Tuner] Sensitivity: 20 µV Selectivity: 35 dB CD PLAYER SECTION Type: Compact disc player Signal Detection System: Non-contact optical pickup (semiconductor laser) Number of channels: 2 channels (stereo) Frequency Response: 5 Hz to 20 000 Hz Dynamic Range: 90 dB Signal-to-Noise Ratio: 95 dB Wow and Flutter: Less than measurable limit GENERAL Power Requirement Operating Voltage: DC 14.4 volts...
... Capture Ratio: 1.5 dB [AM Tuner] Sensitivity: 20 µV Selectivity: 35 dB CD PLAYER SECTION Type: Compact disc player Signal Detection System: Non-contact optical pickup (semiconductor laser) Number of channels: 2 channels (stereo) Frequency Response: 5 Hz to 20 000 Hz Dynamic Range: 90 dB Signal-to-Noise Ratio: 95 dB Wow and Flutter: Less than measurable limit GENERAL Power Requirement Operating Voltage: DC 14.4 volts...

Instructions
Page 59
Please reset your unit Refer to page of How to Reset Still having trouble?? USA ONLY Call 1-800-252-5722 http://www.jvc.com We can help you! EN, SP, FR VICTOR COMPANY OF JAPAN, LIMITED © 2003 VICTOR COMPANY OF JAPAN, LIMITED 1103KKSFLEJEIN jvc m o b i le .c o m Visit us on-line for Technical Support & Customer Satisfaction Survey. US RESIDENTS ONLY Having TROUBLE with operation? h t t p : / / w w w .
Please reset your unit Refer to page of How to Reset Still having trouble?? USA ONLY Call 1-800-252-5722 http://www.jvc.com We can help you! EN, SP, FR VICTOR COMPANY OF JAPAN, LIMITED © 2003 VICTOR COMPANY OF JAPAN, LIMITED 1103KKSFLEJEIN jvc m o b i le .c o m Visit us on-line for Technical Support & Customer Satisfaction Survey. US RESIDENTS ONLY Having TROUBLE with operation? h t t p : / / w w w .


