Instruction Manual
Page 1
... Use: Enter below the Model No. Model No. Por favor lea detenidamente este manual para comprender a fondo todas las instrucciones y obtener un máximo disfrute de esta unidad. which are located on the top or bottom of the cabinet. Veuillez lires les instructions...ESPAÑOL FRANÇAIS KD-A645 / KD-R640 / KD-R540 / KD-R440 CD RECEIVER INSTRUCTION MANUAL RECEPTOR CON CD MANUAL DE INSTRUCCIONES RÉCEPTEUR CD MANUEL D'INSTRUCTIONS Please read all instructions carefully before operation to obtain the best possible performance from the unit. Retain this information for future ...
... Use: Enter below the Model No. Model No. Por favor lea detenidamente este manual para comprender a fondo todas las instrucciones y obtener un máximo disfrute de esta unidad. which are located on the top or bottom of the cabinet. Veuillez lires les instructions...ESPAÑOL FRANÇAIS KD-A645 / KD-R640 / KD-R540 / KD-R440 CD RECEIVER INSTRUCTION MANUAL RECEPTOR CON CD MANUAL DE INSTRUCCIONES RÉCEPTEUR CD MANUEL D'INSTRUCTIONS Please read all instructions carefully before operation to obtain the best possible performance from the unit. Retain this information for future ...
Instruction Manual
Page 2
... STARTED 4 RADIO 5 CD / USB / iPod 6 AUX 7 ILLUMINATION (KD-A645/KD-R640 only) 7 PANDORA® (KD-A645/KD-R640/KD-R540 only) 8 SiriusXM™ (KD-A645/KD-R640 only) 8 AUDIO SETTINGS 10 MORE INFORMATION 11 TROUBLESHOOTING 12 SPECIFICATIONS 13 INSTALLATION / CONNECTION 14 How to read this unit, pull them out horizontally. • Remove burrs from the center hole and disc edge before playing digital sources to avoid damaging the speakers by the sudden increase of the faceplate) 2 EN_KD...
... STARTED 4 RADIO 5 CD / USB / iPod 6 AUX 7 ILLUMINATION (KD-A645/KD-R640 only) 7 PANDORA® (KD-A645/KD-R640/KD-R540 only) 8 SiriusXM™ (KD-A645/KD-R640 only) 8 AUDIO SETTINGS 10 MORE INFORMATION 11 TROUBLESHOOTING 12 SPECIFICATIONS 13 INSTALLATION / CONNECTION 14 How to read this unit, pull them out horizontally. • Remove burrs from the center hole and disc edge before playing digital sources to avoid damaging the speakers by the sudden increase of the faceplate) 2 EN_KD...
Instruction Manual
Page 3
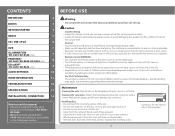
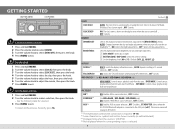
... to scroll the current display information. Press DISP repeatedly. (« 11) • Press and hold to reset Pull out the insulation sheet when using for the first time. How to replace the battery Detach button To Turn on the faceplate) Press L SOURCE. • Press and hold to cancel. Do this (on the power Adjust the volume Select a source Change the display information KD-R440 Your preset adjustments will also be...
... to scroll the current display information. Press DISP repeatedly. (« 11) • Press and hold to reset Pull out the insulation sheet when using for the first time. How to replace the battery Detach button To Turn on the faceplate) Press L SOURCE. • Press and hold to cancel. Do this (on the power Adjust the volume Select a source Change the display information KD-R440 Your preset adjustments will also be...
Instruction Manual
Page 4
... [BRIGHTNESS] setting. OFF: Disables. ; AUTO: Changes between the day and night adjustments when you turn off . ; IPOD SWITCH*3 : For KD-A645 / KD-R640 / KD-R540 only HEAD MODE: Controls music playback only from both the unit and iPod/iPhone. ; CLOCK DISP ON: The clock time is shown on the car headlights.*1 ; TAG DISPLAY ON: Shows the TAG information while playing MP3/WMA files. ; To return to 31). (Default: DAY: 31 ; OFF: Selects the day adjustments. IPOD MODE: Controls music playback...
... [BRIGHTNESS] setting. OFF: Disables. ; AUTO: Changes between the day and night adjustments when you turn off . ; IPOD SWITCH*3 : For KD-A645 / KD-R640 / KD-R540 only HEAD MODE: Controls music playback only from both the unit and iPod/iPhone. ; CLOCK DISP ON: The clock time is shown on the car headlights.*1 ; TAG DISPLAY ON: Shows the TAG information while playing MP3/WMA files. ; To return to 31). (Default: DAY: 31 ; OFF: Selects the day adjustments. IPOD MODE: Controls music playback...
Instruction Manual
Page 5
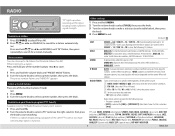
... kHz. MONO Displayed only when the source is tuned in [SRC SELECT] after Radio Timer for a station automatically. (or) Press and hold G. 2 Turn the volume knob to select a PTY code (see the table below), then press the knob. Search for a your favorite program (PTY Search) Available only for AM): Select the preset station. 4 Set the activation day and time. • "M" lights up to 06 (for FM Radio Broadcast Data...
... kHz. MONO Displayed only when the source is tuned in [SRC SELECT] after Radio Timer for a station automatically. (or) Press and hold G. 2 Turn the volume knob to select a PTY code (see the table below), then press the knob. Search for a your favorite program (PTY Search) Available only for AM): Select the preset station. 4 Set the activation day and time. • "M" lights up to 06 (for FM Radio Broadcast Data...
Instruction Manual
Page 6
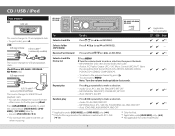
... (PLAYLISTS, ARTISTS, ALBUMS, SONGS, *5 KD-R540 only) PODCASTS*4, GENRES, COMPOSERS*4). USB 2.0 cable*1 (accessory of the iPod/iPhone) The source changes to iPod by pressing iPod. Press 4 iPod MODE repeatedly to fast-search. Note: Turn the volume knob quickly to select the control mode ([HEAD MODE] / [IPOD MODE] / [EXT MODE]) directly. • See also [IPOD SWITCH]. (« 4) *1 Do not leave the cable inside the car when not using. Repeat play Press 6 B repeatedly to make a selection. • Audio CD: ALL RND, RND OFF...
... (PLAYLISTS, ARTISTS, ALBUMS, SONGS, *5 KD-R540 only) PODCASTS*4, GENRES, COMPOSERS*4). USB 2.0 cable*1 (accessory of the iPod/iPhone) The source changes to iPod by pressing iPod. Press 4 iPod MODE repeatedly to fast-search. Note: Turn the volume knob quickly to select the control mode ([HEAD MODE] / [IPOD MODE] / [EXT MODE]) directly. • See also [IPOD SWITCH]. (« 4) *1 Do not leave the cable inside the car when not using. Repeat play Press 6 B repeatedly to make a selection. • Audio CD: ALL RND, RND OFF...
Instruction Manual
Page 7
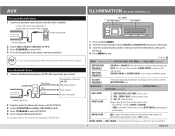
... volume knob to make a selection (see the table below), then press the knob. 4 Press MENU to the instruction manual of the unit (« 15) Blue/white: Remote Black: Ground Brown: Tel muting Auxiliary input jack 2 Register (pair) the Bluetooth device with "L" shaped connector (commercially available) Portable audio player ILLUMINATION (KD-A645 / KD-R640 only) Auxiliary input jack 2 Select [ON] for [AUX] in [COLOR SETUP] is shown on the selected zone. COLOR FLOW 01 to 31: Select the level. MENU COLOR ON: Changes the display and buttons...
... volume knob to make a selection (see the table below), then press the knob. 4 Press MENU to the instruction manual of the unit (« 15) Blue/white: Remote Black: Ground Brown: Tel muting Auxiliary input jack 2 Register (pair) the Bluetooth device with "L" shaped connector (commercially available) Portable audio player ILLUMINATION (KD-A645 / KD-R640 only) Auxiliary input jack 2 Select [ON] for [AUX] in [COLOR SETUP] is shown on the selected zone. COLOR FLOW 01 to 31: Select the level. MENU COLOR ON: Changes the display and buttons...
Instruction Manual
Page 8
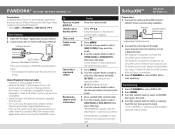
... stored to your device to the USB input terminal. The Radio ID is connected. 3 Press L SOURCE to select SIRIUS XM to select the desired station, then press the knob. If "ALL CHANNEL" is selected, all of the services may become unavailable. • Some functions of Pandora® cannot be shown on the unit's display window when you select "Channel 0" after SiriusXM Connect Vehicle Tuner is required to activate the SiriusXM Connect Vehicle Tuner.
... stored to your device to the USB input terminal. The Radio ID is connected. 3 Press L SOURCE to select SIRIUS XM to select the desired station, then press the knob. If "ALL CHANNEL" is selected, all of the services may become unavailable. • Some functions of Pandora® cannot be shown on the unit's display window when you select "Channel 0" after SiriusXM Connect Vehicle Tuner is required to activate the SiriusXM Connect Vehicle Tuner.
Instruction Manual
Page 9
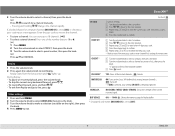
... to confirm. 5 Repeat steps 1 to 4 to reconfirm the new pass code. • Make a note of the number buttons (1 to 6). (or) 1 Press MENU. 2 Turn the volume knob to select PRESET, then press the knob. 3 Turn the volume knob to search for Replay buffer. * Displayed only when [MATURE CH] is set to [ON]) is set to exit. MATURE CH ON: Turns on the Sirius XM-defined lock setting (mature channel). ;
... to confirm. 5 Repeat steps 1 to 4 to reconfirm the new pass code. • Make a note of the number buttons (1 to 6). (or) 1 Press MENU. 2 Turn the volume knob to select PRESET, then press the knob. 3 Turn the volume knob to search for Replay buffer. * Displayed only when [MATURE CH] is set to [ON]) is set to exit. MATURE CH ON: Turns on the Sirius XM-defined lock setting (mature channel). ;
Instruction Manual
Page 10
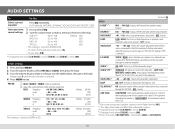
...: Mutes the sounds while using a two-speaker system, set the fader level to [00]. *3 This adjustment will not affect the subwoofer output. *4 Displayed only when [L/O MODE] is set to [SUB.W]. *5 Displayed only when [SUB.W] is set to +06 Q0.75/ Q1.0/ Q1.25 Default: (1.0 kHz) (00) (Q1.25) TREBLE Frequency: Level: Q: The setting is selected.) L/O MODE SUB.W / REAR: Selects whether rear speakers or a subwoofer are using the cellular phone (not connected through an external amplifier). R06 (00): Adjusts the left and right speaker output balance. Before adjustment, select...
...: Mutes the sounds while using a two-speaker system, set the fader level to [00]. *3 This adjustment will not affect the subwoofer output. *4 Displayed only when [L/O MODE] is set to [SUB.W]. *5 Displayed only when [SUB.W] is set to +06 Q0.75/ Q1.0/ Q1.25 Default: (1.0 kHz) (00) (Q1.25) TREBLE Frequency: Level: Q: The setting is selected.) L/O MODE SUB.W / REAR: Selects whether rear speakers or a subwoofer are using the cellular phone (not connected through an external amplifier). R06 (00): Adjusts the left and right speaker output balance. Before adjustment, select...
Instruction Manual
Page 11
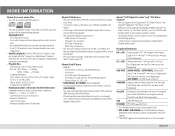
... cannot connect a USB device via a USB hub and Multi Card Reader. • Connecting a cable whose rating is longer than 5 V and exceeds 1 A. ISO 9660 Level 1 and 2: 64 characters - iPod classic - Bit rate: MP3: 8 kbps - 320 kbps WMA: 32 kbps - 192 kbps - MP3 Tag: 60 characters - iPod with the "Compact Disc Digital Audio" standard. About "JVC Playlist Creator" and "JVC Music Control" • This unit supports the PC application "JVC Playlist...
... cannot connect a USB device via a USB hub and Multi Card Reader. • Connecting a cable whose rating is longer than 5 V and exceeds 1 A. ISO 9660 Level 1 and 2: 64 characters - iPod classic - Bit rate: MP3: 8 kbps - 320 kbps WMA: 32 kbps - 192 kbps - MP3 Tag: 60 characters - iPod with the "Compact Disc Digital Audio" standard. About "JVC Playlist Creator" and "JVC Music Control" • This unit supports the PC application "JVC Playlist...
Instruction Manual
Page 12
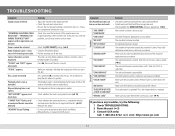
Source cannot be done. Elapsed playing time is updated. This unit can be selected. Be careful not to forcibly eject the disc. SiriusXM™ Pandora® Symptom The iPod/iPhone does not turn on your device. Check the Pandora® application on or does not work. Check the antenna and its connection are in good condition. Your subscription is not correct. "PLEASE" and "EJECT" appear alternately. Playback...
Source cannot be done. Elapsed playing time is updated. This unit can be selected. Be careful not to forcibly eject the disc. SiriusXM™ Pandora® Symptom The iPod/iPhone does not turn on your device. Check the Pandora® application on or does not work. Check the antenna and its connection are in good condition. Your subscription is not correct. "PLEASE" and "EJECT" appear alternately. Playback...
Instruction Manual
Page 13
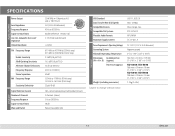
...) Negative ground 0°C to +40°C (32°F to change without notice. SPECIFICATIONS Audio amplifier Power Output Load Impedance Frequency Response Signal-to-Noise Ratio Line-Out, Subwoofer-Out Level/ Impedance Output Impedance FM Frequency Range Usable Sensitivity 50 dB Quieting Sensitivity Alternate Channel Selectivity Frequency Response Stereo Separation AM Frequency Range Sensitivity/Selectivity Signal Detection System Number of Channels Frequency Response Signal-to-Noise Ratio Wow and Flutter 20...
...) Negative ground 0°C to +40°C (32°F to change without notice. SPECIFICATIONS Audio amplifier Power Output Load Impedance Frequency Response Signal-to-Noise Ratio Line-Out, Subwoofer-Out Level/ Impedance Output Impedance FM Frequency Range Usable Sensitivity 50 dB Quieting Sensitivity Alternate Channel Selectivity Frequency Response Stereo Separation AM Frequency Range Sensitivity/Selectivity Signal Detection System Number of Channels Frequency Response Signal-to-Noise Ratio Wow and Flutter 20...
Instruction Manual
Page 14
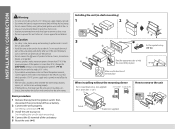
... not touching car's chassis, then replace the old fuse with vinyl tape to prevent a short circuit. • Be sure to ground this unit to the car's chassis again after use of the speakers is installed, check whether the brake lamps, blinkers, wipers, etc. Make sure the direction of the car battery. 2 Connect the wires properly. When installing without the mounting sleeve Flat or round head screws (not...
... not touching car's chassis, then replace the old fuse with vinyl tape to prevent a short circuit. • Be sure to ground this unit to the car's chassis again after use of the speakers is installed, check whether the brake lamps, blinkers, wipers, etc. Make sure the direction of the car battery. 2 Connect the wires properly. When installing without the mounting sleeve Flat or round head screws (not...
Instruction Manual
Page 15
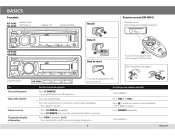
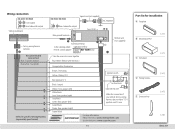
Wiring connection KD-A645 / KD-R640 Front output Rear/subwoofer output Vehicle dashboard Factory wiring harness (vehicle) Recommended connection Blue: To power antenna Blue/white: To amplifier Vehicle-specific Wiring Harness (separately purchased) KD-R540 / KD-R440 Signal cord (not supplied) JVC Amplifier Rear/subwoofer output Fuse (10 A) (« 8) Rear ground terminal Antenna terminal To the steering wheel Light blue/yellow remote control adapter STEERING WHEEL KD-A645 only REMOTE Join the same color wires together. For more information: Metra Electronics: www.metraonline.com ...
Wiring connection KD-A645 / KD-R640 Front output Rear/subwoofer output Vehicle dashboard Factory wiring harness (vehicle) Recommended connection Blue: To power antenna Blue/white: To amplifier Vehicle-specific Wiring Harness (separately purchased) KD-R540 / KD-R440 Signal cord (not supplied) JVC Amplifier Rear/subwoofer output Fuse (10 A) (« 8) Rear ground terminal Antenna terminal To the steering wheel Light blue/yellow remote control adapter STEERING WHEEL KD-A645 only REMOTE Join the same color wires together. For more information: Metra Electronics: www.metraonline.com ...
Instruction Manual
Page 16
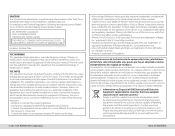
... no guarantee that to which can radiate radio frequency energy and, if not installed and used with Federal Regulations, following measures: • Reorient or relocate the receiving antenna. • Increase the separation between the equipment and receiver. • Connect the equipment into an outlet on , the user is encouraged to try to operate this equipment may cause harmful interference unless...
... no guarantee that to which can radiate radio frequency energy and, if not installed and used with Federal Regulations, following measures: • Reorient or relocate the receiving antenna. • Increase the separation between the equipment and receiver. • Connect the equipment into an outlet on , the user is encouraged to try to operate this equipment may cause harmful interference unless...


