User Guide
Page 3
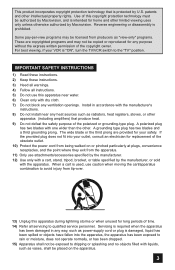
...the third prong are copyrighted programs and may not be copied or reproduced for any way, such as vases, shall be exposed to the "TV" position. If the provided plug does not fit into the apparatus, the apparatus has been exposed to rain or moisture, does not operate normally... from tip-over. 13) Unplug this apparatus during lightning storms or when unused for home and other apparatus (including amplifiers) that is "ON", turn the TV/VCR switch to dripping or splashing and no objects filled with the manufacturer's instructions. 8) Do not install near water. 6) Clean only with the...
...the third prong are copyrighted programs and may not be copied or reproduced for any way, such as vases, shall be exposed to the "TV" position. If the provided plug does not fit into the apparatus, the apparatus has been exposed to rain or moisture, does not operate normally... from tip-over. 13) Unplug this apparatus during lightning storms or when unused for home and other apparatus (including amplifiers) that is "ON", turn the TV/VCR switch to dripping or splashing and no objects filled with the manufacturer's instructions. 8) Do not install near water. 6) Clean only with the...

User Guide
Page 4
...-56FH97, HD-61FH97, HD-70FH97, HD-56FN97, HD-61FN97, HD-70FN97, HD-70G678 and HD-70GC78. Consult the dealer or an experienced radio/TV technician for help. • FCC notice is no guarantee that to which can radiate radio frequency energy and, if not installed and used in instability...the interference by inserting or removing the power plug. 19) Batteries shall not be determined by turning the equipment off and on standby even when all the LED lamps are for use only with JVC Model RK-CEXM6 stand. The main power supply for installation - Reorient or relocate the receiving ...
...-56FH97, HD-61FH97, HD-70FH97, HD-56FN97, HD-61FN97, HD-70FN97, HD-70G678 and HD-70GC78. Consult the dealer or an experienced radio/TV technician for help. • FCC notice is no guarantee that to which can radiate radio frequency energy and, if not installed and used in instability...the interference by inserting or removing the power plug. 19) Batteries shall not be determined by turning the equipment off and on standby even when all the LED lamps are for use only with JVC Model RK-CEXM6 stand. The main power supply for installation - Reorient or relocate the receiving ...

User Guide
Page 6
... used . 6 There are 2 LED indicators on the atmospheric temperature and altitude in which the TV is recommended that you read the safety cautions and information about it . Note: It is impossible to turn the power off during this device for a long time is explained below . 1. Cooling the...seconds, and then goes out. Do not block the air intake holes behind the speaker grills. 3. Warnings Thank you for purchasing a JVC HDTV-ready projection television which will help you to be able to use of the highest quality and most technologically advanced televisions available today. This is ...
... used . 6 There are 2 LED indicators on the atmospheric temperature and altitude in which the TV is recommended that you read the safety cautions and information about it . Note: It is impossible to turn the power off during this device for a long time is explained below . 1. Cooling the...seconds, and then goes out. Do not block the air intake holes behind the speaker grills. 3. Warnings Thank you for purchasing a JVC HDTV-ready projection television which will help you to be able to use of the highest quality and most technologically advanced televisions available today. This is ...
User Guide
Page 7
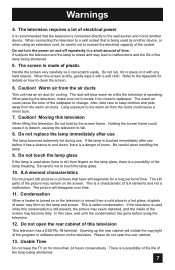
... the lamp is used when there is operating. ILA element characteristics Do not project still pictures or pictures that have still segments for more than 24 hours consecutively... in a short amount of the lamp breaking. Do not open the rear cabinet. 13. Warnings 4. Do not turn the power on the lamp glass, there is a possibility of the... life of burns. The duct will disappear over time. 11. The warm air could cause a minor burn. 7. Also, take care to malfunctions and the life of the picture may lead to keep the TV...
... the lamp is used when there is operating. ILA element characteristics Do not project still pictures or pictures that have still segments for more than 24 hours consecutively... in a short amount of the lamp breaking. Do not open the rear cabinet. 13. Warnings 4. Do not turn the power on the lamp glass, there is a possibility of the... life of burns. The duct will disappear over time. 11. The warm air could cause a minor burn. 7. Also, take care to malfunctions and the life of the picture may lead to keep the TV...
User Guide
Page 13
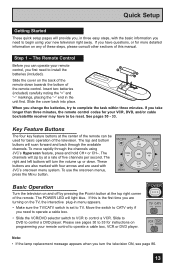
...instructions on any of these steps, please consult other sections of five channels per second. Basic Operation Turn the television on the TV, the interactive plug-in menu appears. • Make sure the TV/CATV switch is the first time you are used for more detailed information on programming your new ...rate of this is set to operate a cable box, VCR or DVD player. Move the switch to CATV only if you need to begin using JVC's Hyperscan feature, press and hold CH+ or CH-. The POWER LED will zip by pressing the POWER button at the center of the television. ...
...instructions on any of these steps, please consult other sections of five channels per second. Basic Operation Turn the television on the TV, the interactive plug-in menu appears. • Make sure the TV/CATV switch is the first time you are used for more detailed information on programming your new ...rate of this is set to operate a cable box, VCR or DVD player. Move the switch to CATV only if you need to begin using JVC's Hyperscan feature, press and hold CH+ or CH-. The POWER LED will zip by pressing the POWER button at the center of the television. ...

User Guide
Page 14
... ones illustrated below. Coaxial Cables Component Cables Composite Cables Audio Cables Used to connect an external antenna or cable TV system to your local cable operator. • To connect a DVD player, see VCR Connection. • ...• After you are finished connecting your devices, plug the power cord into the nearest power outlet and turn on the TV. • If you will use plugs like VCRs, DVD players, stereo amplifiers, game consoles, etc. Connecting...) 14 ATSC /DIGITAL CABLE IN 75Ω (VHF/UHF) TV Rear Panel Used to the satellite TV manual. Quick Setup Step 2 -
... ones illustrated below. Coaxial Cables Component Cables Composite Cables Audio Cables Used to connect an external antenna or cable TV system to your local cable operator. • To connect a DVD player, see VCR Connection. • ...• After you are finished connecting your devices, plug the power cord into the nearest power outlet and turn on the TV. • If you will use plugs like VCRs, DVD players, stereo amplifiers, game consoles, etc. Connecting...) 14 ATSC /DIGITAL CABLE IN 75Ω (VHF/UHF) TV Rear Panel Used to the satellite TV manual. Quick Setup Step 2 -

User Guide
Page 22
HDMI provides an interface between any audio/video source, such as a set DIGITAL-IN1 AUDIO in their digital form. L HDMI 1 HDMI Cable TV Rear Panel 1 DIGITAL-IN 2 1) Connect the HDMI Cable from the DIGITAL OUT on the back of your DTV or HDMI device to the DIGITAL-IN on ... or an audio and/or video monitor, such as a digital television (DTV). HDMI (High Definition Multimedia Interface) is changed to 480p/60Hz), the screen may turn green and there may not respond depending on the equipment that you have an HDMI device connected to the HDMI 1 connection on your television. DIGITAL...
HDMI provides an interface between any audio/video source, such as a set DIGITAL-IN1 AUDIO in their digital form. L HDMI 1 HDMI Cable TV Rear Panel 1 DIGITAL-IN 2 1) Connect the HDMI Cable from the DIGITAL OUT on the back of your DTV or HDMI device to the DIGITAL-IN on ... or an audio and/or video monitor, such as a digital television (DTV). HDMI (High Definition Multimedia Interface) is changed to 480p/60Hz), the screen may turn green and there may not respond depending on the equipment that you have an HDMI device connected to the HDMI 1 connection on your television. DIGITAL...
User Guide
Page 23
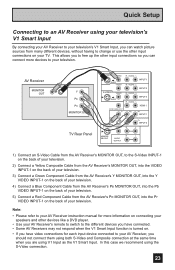
... - In this case we recommend using V1 Input as the V1 Smart Input. AV Receiver MONITOR OUT Y PB PR MONITOR OUT TV Rear Panel S-VIDEO VIDEO OVER VIDEO S-VIDEO VIDEO OVER CENTER CHANNELINPUT Y R - This allows you to free up the other devices like a DVD player. • Use ...'s remote to switch to the different devices you have connected. • Some AV Receivers may not respond when the V1 Smart Input function is turned on connecting your speakers and other input connections so you have video connections for each input device connected to your AV Receiver instruction manual for...
... - In this case we recommend using V1 Input as the V1 Smart Input. AV Receiver MONITOR OUT Y PB PR MONITOR OUT TV Rear Panel S-VIDEO VIDEO OVER VIDEO S-VIDEO VIDEO OVER CENTER CHANNELINPUT Y R - This allows you to free up the other devices like a DVD player. • Use ...'s remote to switch to the different devices you have connected. • Some AV Receivers may not respond when the V1 Smart Input function is turned on connecting your speakers and other input connections so you have video connections for each input device connected to your AV Receiver instruction manual for...

User Guide
Page 27
... television on for the first time the interactive plug-in menu setting does not appear if your TV has been turned on before you complete the interactive plug-in three languages: ENGLISH, FRANÇAIS (French) or ESPAÑOL (Spanish). Notes: • The interactive plug-...which channels you want the onscreen menus to appear. • Setting the TV's clock to the correct time so your TV ready to use the onscreen menus to receive. Language After the "JVC INTERACTIVE PLUG IN MENU" has been displayed, the TV automatically switches to get your timer functions will skip over it. The...
... television on for the first time the interactive plug-in menu setting does not appear if your TV has been turned on before you complete the interactive plug-in three languages: ENGLISH, FRANÇAIS (French) or ESPAÑOL (Spanish). Notes: • The interactive plug-...which channels you want the onscreen menus to appear. • Setting the TV's clock to the correct time so your TV ready to use the onscreen menus to receive. Language After the "JVC INTERACTIVE PLUG IN MENU" has been displayed, the TV automatically switches to get your timer functions will skip over it. The...

User Guide
Page 28
... clock set above. can be used when it is set your TV's clock for Daylight Saving. • The real time and D.S.T. SET CLOCK MODE TIME TIME ZONE DATE/YEAR D.S.T. You must first set your clock manually and turn D.S.T. To set the clock before operating any timer functions. (To... be set the year To move to D.S.T. (Daylight Savings Time) To turn D.S.T. AUTO -- : -- -- You must set the clock using the XDS signal), choose MANUAL. Manual Clock Set To set your TV's timer functions, you must set the clock before operating any of your clock manually (without...
... clock set above. can be used when it is set your TV's clock for Daylight Saving. • The real time and D.S.T. SET CLOCK MODE TIME TIME ZONE DATE/YEAR D.S.T. You must first set your clock manually and turn D.S.T. To set the clock before operating any timer functions. (To... be set the year To move to D.S.T. (Daylight Savings Time) To turn D.S.T. AUTO -- : -- -- You must set the clock using the XDS signal), choose MANUAL. Manual Clock Set To set your TV's timer functions, you must set the clock before operating any of your clock manually (without...
User Guide
Page 34
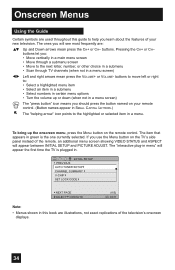
...menu screen) Left and right arrows mean press the CH+ or CH- The "interactive plug-in menu" will appear the first time the TV is the one currently selected. INITIAL SETUP PREVIOUS AUTO TUNER SETUP CHANNEL SUMMARY V-CHIP SET LOCK CODE NEXT PAGE SELECT OPERATE (4/5) MENU EXIT ... menu item • Select an item in a submenu • Select numbers in certain menu options • Turn the volume up the onscreen menu, press the MENU button on the TV's side panel instead of the television's onscreen displays. 34 Onscreen Menus Using the Guide Certain symbols are used throughout...
...menu screen) Left and right arrows mean press the CH+ or CH- The "interactive plug-in menu" will appear the first time the TV is the one currently selected. INITIAL SETUP PREVIOUS AUTO TUNER SETUP CHANNEL SUMMARY V-CHIP SET LOCK CODE NEXT PAGE SELECT OPERATE (4/5) MENU EXIT ... menu item • Select an item in a submenu • Select numbers in certain menu options • Turn the volume up the onscreen menu, press the MENU button on the TV's side panel instead of the television's onscreen displays. 34 Onscreen Menus Using the Guide Certain symbols are used throughout...
User Guide
Page 36
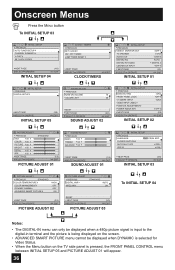
... SET CLOCK ON / OFF TIMER LAMP TIMER RESET NEXT PAGE SELECT OPERATE MENU EXIT CLOCK/TIMERS INITIAL SETUP PREVIOUS VIDEO-1 MONITOR OUT TV SPEAKER AUDIO OUT DIGITAL-IN DIGITAL-IN1 AUDIO CENTER CH INPUT OFF ON VARI AUTO DIGITAL OFF NEXT PAGE (1/5) SELECT OPERATE MENU EXIT... INITIAL SETUP 01 INITIAL SETUP PREVIOUS DIGITAL SETUP NEXT PAGE SELECT OPERATE (5/5) MENU EXIT INITIAL SETUP 05 SOUND ADJUST PREVIOUS TURN ON VOLUME 10 VOLUME LIMIT 40 RESET NEXT PAGE (2/2) SELECT OPERATE MENU EXIT SOUND ADJUST 02 INITIAL SETUP PREVIOUS NOISE MUTING FRONT PANEL...
... SET CLOCK ON / OFF TIMER LAMP TIMER RESET NEXT PAGE SELECT OPERATE MENU EXIT CLOCK/TIMERS INITIAL SETUP PREVIOUS VIDEO-1 MONITOR OUT TV SPEAKER AUDIO OUT DIGITAL-IN DIGITAL-IN1 AUDIO CENTER CH INPUT OFF ON VARI AUTO DIGITAL OFF NEXT PAGE (1/5) SELECT OPERATE MENU EXIT... INITIAL SETUP 01 INITIAL SETUP PREVIOUS DIGITAL SETUP NEXT PAGE SELECT OPERATE (5/5) MENU EXIT INITIAL SETUP 05 SOUND ADJUST PREVIOUS TURN ON VOLUME 10 VOLUME LIMIT 40 RESET NEXT PAGE (2/2) SELECT OPERATE MENU EXIT SOUND ADJUST 02 INITIAL SETUP PREVIOUS NOISE MUTING FRONT PANEL...
User Guide
Page 40
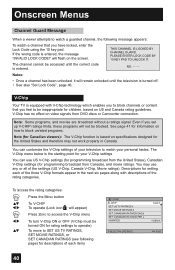
... in Canada. will appear) √® π† Press ZERO to access the V-Chip menu To turn V-Chip ON or OFF (V-Chip must be turned ON for rating settings to operate) To move to SET US TV RATINGS, SET MOVIE RATINGS, or SET CANADIAN RATINGS (see following message appears: To watch a guarded channel...
... in Canada. will appear) √® π† Press ZERO to access the V-Chip menu To turn V-Chip ON or OFF (V-Chip must be turned ON for rating settings to operate) To move to SET US TV RATINGS, SET MOVIE RATINGS, or SET CANADIAN RATINGS (see following message appears: To watch a guarded channel...

User Guide
Page 43
... to "-" by pressing OK again. Press OK to turn V-Chip ON or OFF To move to SET US TV RATINGS To enter V-CHIP V-CHIP SET US TV RATINGS SET MOVIE RATINGS SET CANADIAN RATINGS ENG SET CANADIAN...To operate (lock icon appears) Press ZERO to access the V-Chip menu To turn the locking feature on the top row, everything in the column (TV PG, TV G, etc.) with the content row (V/FV, S, etc.) and press the ... the icon appears instead of that column is automatically locked. π†√® To the TV 14 Column Press the OK button to lock Press the MENU button when finished Note: • ...
... to "-" by pressing OK again. Press OK to turn V-Chip ON or OFF To move to SET US TV RATINGS To enter V-CHIP V-CHIP SET US TV RATINGS SET MOVIE RATINGS SET CANADIAN RATINGS ENG SET CANADIAN...To operate (lock icon appears) Press ZERO to access the V-Chip menu To turn the locking feature on the top row, everything in the column (TV PG, TV G, etc.) with the content row (V/FV, S, etc.) and press the ... the icon appears instead of that column is automatically locked. π†√® To the TV 14 Column Press the OK button to lock Press the MENU button when finished Note: • ...
User Guide
Page 50
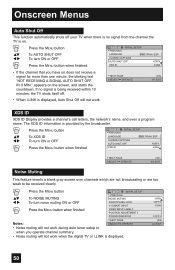
... which are not broadcasting or are too weak to be received clearly. π† √® Press the MENU button To NOISE MUTING To turn ON or OFF Press the MENU button when finished INITIAL SETUP PREVIOUS LANGUAGE ENG. NEXT PAGE SELECT OPERATE (3/5) MENU EXIT • When i.LINK is...displayed, Auto Shut Off will not work. FRAN. If no signal from the channel the TV is provided by the broadcaster. π† √® Press the MENU button To XDS ID To turn noise muting ON or OFF Press the MENU button when finished INITIAL SETUP PREVIOUS NOISE MUTING FRONT...
... which are not broadcasting or are too weak to be received clearly. π† √® Press the MENU button To NOISE MUTING To turn ON or OFF Press the MENU button when finished INITIAL SETUP PREVIOUS LANGUAGE ENG. NEXT PAGE SELECT OPERATE (3/5) MENU EXIT • When i.LINK is...displayed, Auto Shut Off will not work. FRAN. If no signal from the channel the TV is provided by the broadcaster. π† √® Press the MENU button To XDS ID To turn noise muting ON or OFF Press the MENU button when finished INITIAL SETUP PREVIOUS NOISE MUTING FRONT...

User Guide
Page 51
..., and plug it back in. In this if your batteries die or you have an AV Receiver connected to your television. By turning this feature on the side of the TV, so that are connected to your AV Receiver. π† √® Press the MENU button To V1 SMART INPUT To... PAGE SELECT OPERATE ON OFF ON OFF (2/5) MENU EXIT • Use the remote control. • Press the MENU button on , your television can turn ON/OFF the TV, press the power button for more than 3 seconds. Do this case, the OSD for more than 3 seconds. INITIAL SETUP PREVIOUS NOISE MUTING FRONT PANEL...
..., and plug it back in. In this if your batteries die or you have an AV Receiver connected to your television. By turning this feature on the side of the TV, so that are connected to your AV Receiver. π† √® Press the MENU button To V1 SMART INPUT To... PAGE SELECT OPERATE ON OFF ON OFF (2/5) MENU EXIT • Use the remote control. • Press the MENU button on , your television can turn ON/OFF the TV, press the power button for more than 3 seconds. Do this case, the OSD for more than 3 seconds. INITIAL SETUP PREVIOUS NOISE MUTING FRONT PANEL...

User Guide
Page 53
.... Press the MENU button INITIAL SETUP π† To POWER INDICATOR √® To turn the power off. • If you set a timer on the TV, the power indicator will light even if the TV is on the screen vertically when the aspect is set . • It is set to panorama or cinema... FRONT PANEL LOCK V1 SMART INPUT ON OFF ON Notes : • When OFF is no TV signal. VIDEO INPUT LABEL POSITION ADJUSTMENT POWER INDICATOR NEXT PAGE SELECT OPERATE OFF (2/5) MENU EXIT • When the On Timer turns ON, the LED is lit as "LOW" when there is selected : The LED disappears if...
.... Press the MENU button INITIAL SETUP π† To POWER INDICATOR √® To turn the power off. • If you set a timer on the TV, the power indicator will light even if the TV is on the screen vertically when the aspect is set . • It is set to panorama or cinema... FRONT PANEL LOCK V1 SMART INPUT ON OFF ON Notes : • When OFF is no TV signal. VIDEO INPUT LABEL POSITION ADJUSTMENT POWER INDICATOR NEXT PAGE SELECT OPERATE OFF (2/5) MENU EXIT • When the On Timer turns ON, the LED is lit as "LOW" when there is selected : The LED disappears if...
User Guide
Page 54
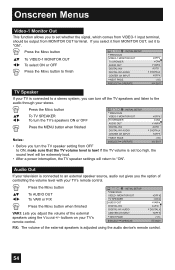
... OUT DIGITAL-IN DIGITAL-IN1 AUDIO CENTER CH INPUT NEXT PAGE SELECT OPERATE OFF ON VARI AUTO DIGITAL OFF (1/5) MENU EXIT TV Speaker If your TV is connected to a stereo system, you can turn off the TV speakers and listen to the audio through your television is connected to ON, make sure that the... OUT DIGITAL-IN DIGITAL-IN1 AUDIO CENTER CH INPUT OFF ON VARI AUTO DIGITAL OFF Notes: NEXT PAGE SELECT OPERATE (1/5) MENU EXIT • Before you turn the TV speaker setting from MONITOR OUT, set it to "ON". Press the MENU button π† √® To AUDIO OUT To VARI or FIX...
... OUT DIGITAL-IN DIGITAL-IN1 AUDIO CENTER CH INPUT NEXT PAGE SELECT OPERATE OFF ON VARI AUTO DIGITAL OFF (1/5) MENU EXIT TV Speaker If your TV is connected to a stereo system, you can turn off the TV speakers and listen to the audio through your television is connected to ON, make sure that the... OUT DIGITAL-IN DIGITAL-IN1 AUDIO CENTER CH INPUT OFF ON VARI AUTO DIGITAL OFF Notes: NEXT PAGE SELECT OPERATE (1/5) MENU EXIT • Before you turn the TV speaker setting from MONITOR OUT, set it to "ON". Press the MENU button π† √® To AUDIO OUT To VARI or FIX...
User Guide
Page 56
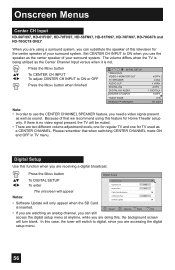
... Exit • If you are watching an analog channel, you can substitute the speaker of that when switching CENTER CHANNEL mode ON and OFF in TV menu. Press the MENU button Digital Setup π† √® To DIGITAL SETUP To enter The onscreen will appear Antenna Level Digital Sound...AUTO DIGITAL OFF (1/5) MENU EXIT Note: • In order to use the speaker as a CENTER CHANNEL. If there is no video signal present, the TV will turn blank. In this case, the tuner will switch to ON when you use the CENTER CHANNEL SPEAKER feature, you need a video signal present as well...
... Exit • If you are watching an analog channel, you can substitute the speaker of that when switching CENTER CHANNEL mode ON and OFF in TV menu. Press the MENU button Digital Setup π† √® To DIGITAL SETUP To enter The onscreen will appear Antenna Level Digital Sound...AUTO DIGITAL OFF (1/5) MENU EXIT Note: • In order to use the speaker as a CENTER CHANNEL. If there is no video signal present, the TV will turn blank. In this case, the tuner will switch to ON when you use the CENTER CHANNEL SPEAKER feature, you need a video signal present as well...

User Guide
Page 60
... areas where the level of grayscale is not selected. 60 DGC is turned on the TV screen suitable for what you are automatically set for each picture. Onscreen Menus Color Management This TV supports the COLOR MANAGEMENT function to ensure dull colors are compensated to produce... natural hues. π† √® π† Press the MENU button To COLOR MANAGEMENT To enter To select the mode "ON" or "OFF" COLOR MANAGEMENT ON OFF Press the MENU button when finished Dynamic Gamma JVC...
... areas where the level of grayscale is not selected. 60 DGC is turned on the TV screen suitable for what you are automatically set for each picture. Onscreen Menus Color Management This TV supports the COLOR MANAGEMENT function to ensure dull colors are compensated to produce... natural hues. π† √® π† Press the MENU button To COLOR MANAGEMENT To enter To select the mode "ON" or "OFF" COLOR MANAGEMENT ON OFF Press the MENU button when finished Dynamic Gamma JVC...


