Instructions
Page 6
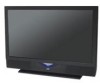
... information about it . When the television is pressed to project the picture onto the screen. Once the screen is dark, cooling is a user replaceable item. The lamp is performed for a long time This television uses a lamp to turn off the power, the following operations are summarized...has been performed for purchasing JVC's model HD-61Z585 , HD-52Z585, HD-61Z575 or HD-52Z575 HDTV-ready projection television which are performed. The life of the device and important information which the TV is turned off. There are included with the replacement lamp kit. After 1 or ...
... information about it . When the television is pressed to project the picture onto the screen. Once the screen is dark, cooling is a user replaceable item. The lamp is performed for a long time This television uses a lamp to turn off the power, the following operations are summarized...has been performed for purchasing JVC's model HD-61Z585 , HD-52Z585, HD-61Z575 or HD-52Z575 HDTV-ready projection television which are performed. The life of the device and important information which the TV is turned off. There are included with the replacement lamp kit. After 1 or ...
Instructions
Page 7
...a danger of time. Refer to exceed the electrical capacity of the lamp breaking. ILA element characteristics Do not project still pictures or pictures that the television is dirt from the air ducts.... Holding the screen frame could cause it can scratch easily. Please do not open the rear cabinet of plastic Handle the screen very carefully as it to detach, causing the television to...replace the lamp immediately after use . Warm air from fingers on the screen. Caution! Also, take care to keep the TV on how to fall. 8. Do not touch the lamp glass If the lamp...
...a danger of time. Refer to exceed the electrical capacity of the lamp breaking. ILA element characteristics Do not project still pictures or pictures that the television is dirt from the air ducts.... Holding the screen frame could cause it can scratch easily. Please do not open the rear cabinet of plastic Handle the screen very carefully as it to detach, causing the television to...replace the lamp immediately after use . Warm air from fingers on the screen. Caution! Also, take care to keep the TV on how to fall. 8. Do not touch the lamp glass If the lamp...
Instructions
Page 8
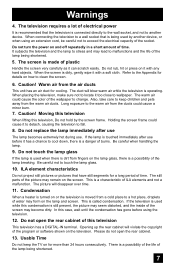
...of Contents Sound Adjust 51 Sound Settings 51 Adjust Sound Settings 51 MTS (Multi-channel Sound 51 Reset 51 Clock Timers 52 Set Clock 52 On/Off Timer 53 Lamp Reset 54 Button Functions 55 Multi Screen Function 55 Index 55 Twin 55 Freeze 56 Swap 56 Select 56 Power 57 ...62 Back 62 Channel 62 Volume 62 TV/CATV Slide Switch 63 VCR/DVD Slide Switch 63 VCR Buttons 63 DVD Buttons 63 Light 63 Appendices 64 No Program 64 Troubleshooting 65 Changing The Lamp 67 Replacement Lamp Kit 68 Lamp Messages 68 How To Replace The Lamp 69 Warning LED Messages 72 Specifications 73...
...of Contents Sound Adjust 51 Sound Settings 51 Adjust Sound Settings 51 MTS (Multi-channel Sound 51 Reset 51 Clock Timers 52 Set Clock 52 On/Off Timer 53 Lamp Reset 54 Button Functions 55 Multi Screen Function 55 Index 55 Twin 55 Freeze 56 Swap 56 Select 56 Power 57 ...62 Back 62 Channel 62 Volume 62 TV/CATV Slide Switch 63 VCR/DVD Slide Switch 63 VCR Buttons 63 DVD Buttons 63 Light 63 Appendices 64 No Program 64 Troubleshooting 65 Changing The Lamp 67 Replacement Lamp Kit 68 Lamp Messages 68 How To Replace The Lamp 69 Warning LED Messages 72 Specifications 73...
Instructions
Page 13
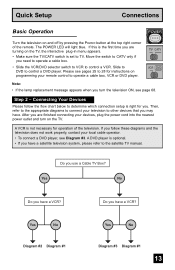
...nearest power outlet and turn the television ON, see page 68. A DVD player is right for you may have a satellite television system, please refer to TV. Yes No Diagram #2 Diagram #1 Yes No Diagram #3 Diagram #1 13 Slide to DVD to control a VCR. Then, refer to the appropriate diagrams to...to the satellite TV manual. Do you are finished connecting your local cable operator. • To connect a DVD player, see pages 25 to 28 for operation of the remote. If this is the first time you have a VCR? TV CATV VCR DVD A Note: • If the lamp replacement message appears when...
...nearest power outlet and turn the television ON, see page 68. A DVD player is right for you may have a satellite television system, please refer to TV. Yes No Diagram #2 Diagram #1 Yes No Diagram #3 Diagram #1 13 Slide to DVD to control a VCR. Then, refer to the appropriate diagrams to...to the satellite TV manual. Do you are finished connecting your local cable operator. • To connect a DVD player, see pages 25 to 28 for operation of the remote. If this is the first time you have a VCR? TV CATV VCR DVD A Note: • If the lamp replacement message appears when...

Instructions
Page 54
...OFF TIMER LAMP TIMER RESET PRESS OK TO RESET THE LAMP TIMER. The lamp timer has now been reset. Note: • You can use the Lamp Timer Reset only after replacing the lamp. • See Page 68 for instructions on the television screen. Clock/Timers Lamp Timer Reset The lamp replacement message ...will appear when you need to reset the timer which is built into your television. π† √® Press the MENU button To LAMP TIMER RESET To Enter The following message will...
...OFF TIMER LAMP TIMER RESET PRESS OK TO RESET THE LAMP TIMER. The lamp timer has now been reset. Note: • You can use the Lamp Timer Reset only after replacing the lamp. • See Page 68 for instructions on the television screen. Clock/Timers Lamp Timer Reset The lamp replacement message ...will appear when you need to reset the timer which is built into your television. π† √® Press the MENU button To LAMP TIMER RESET To Enter The following message will...
Instructions
Page 65
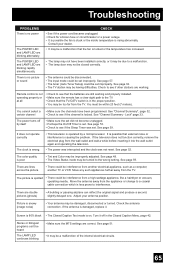
...off in the proper position. • You may be interference from the TV. There are lines across the picture • There could be within 23 feet (7 meters). Turn it off by a microprocessor. The POWER LED and LAMP LED are correct. Lock" page 33. • Make sure the set... become unplugged. • Perhaps the On/Off Timer is rising abnormally. Troubleshooting PROBLEMS There is damaged, replace it. Remote control is in the Closed Caption Menu, page 42. See page 52. See page 48. • The Video Status mode may be damaged, disconnected or turned. The picture...
...off in the proper position. • You may be interference from the TV. There are lines across the picture • There could be within 23 feet (7 meters). Turn it off by a microprocessor. The POWER LED and LAMP LED are correct. Lock" page 33. • Make sure the set... become unplugged. • Perhaps the On/Off Timer is rising abnormally. Troubleshooting PROBLEMS There is damaged, replace it. Remote control is in the Closed Caption Menu, page 42. See page 52. See page 48. • The Video Status mode may be damaged, disconnected or turned. The picture...
Instructions
Page 67
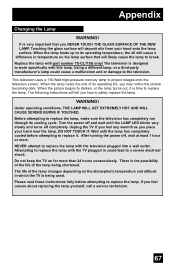
... plugged into a wall outlet. This television uses a 110-Watt high-pressure mercury lamp to replace the lamp, make sure the television has completely run through its cooling cycle. WARNING! Before attempting to project images onto the television screen. Do not keep the TV on for more . There is the possibility of the life of the...
... plugged into a wall outlet. This television uses a 110-Watt high-pressure mercury lamp to replace the lamp, make sure the television has completely run through its cooling cycle. WARNING! Before attempting to project images onto the television screen. Do not keep the TV on for more . There is the possibility of the life of the...

Instructions
Page 68
... to www.jvc.com. Appendix Replacement Lamp Kit Before replacing the lamp, you will include the following: 1 High-Pressure Mercury Lamp 1 Instruction Manual Because the lamp contains a small amount of mercury, it cannot be replaced. Lamp Message LAMP NEEDS TO BE REPLACED. Press the OK button to purchase a replacement kit, part number TS-CL110U. AFTER REPLACING THE LAMP, PLEASE RESET TIMER IN THE TV MENU...
... to www.jvc.com. Appendix Replacement Lamp Kit Before replacing the lamp, you will include the following: 1 High-Pressure Mercury Lamp 1 Instruction Manual Because the lamp contains a small amount of mercury, it cannot be replaced. Lamp Message LAMP NEEDS TO BE REPLACED. Press the OK button to purchase a replacement kit, part number TS-CL110U. AFTER REPLACING THE LAMP, PLEASE RESET TIMER IN THE TV MENU...
Instructions
Page 69
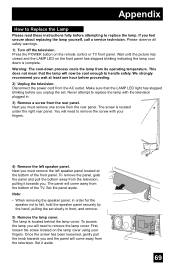
... panel. We strongly recommend you wait at the bottom of the TV. Set it towards you feel unsure about replacing the lamp yourself, call a service technician. To remove the panel, grab the panel and pull the bottom away from the rear panel. Note: • When removing the speaker panel, in ...order for the speaker not to replace the lamp with your fingers. Warning: The cool-down is located behind the lamp cover. Once the screw has been loosened, gently pull the...
... panel. We strongly recommend you wait at the bottom of the TV. Set it towards you feel unsure about replacing the lamp yourself, call a service technician. To remove the panel, grab the panel and pull the bottom away from the rear panel. Note: • When removing the speaker panel, in ...order for the speaker not to replace the lamp with your fingers. Warning: The cool-down is located behind the lamp cover. Once the screw has been loosened, gently pull the...

Instructions
Page 70
...environmental considerations. If you . Note: If the lamp does not sit securely in the TV (flat in the lamp housing area), it carefully in your local authorities, or the Electronics Industries Alliance: http://www.eiae.org To purchase a replacement lamp kit, please call 1-800-252-5722. 70 ...Because the lamp contains a small amount of mercury. NOTICE (for...
...environmental considerations. If you . Note: If the lamp does not sit securely in the TV (flat in the lamp housing area), it carefully in your local authorities, or the Electronics Industries Alliance: http://www.eiae.org To purchase a replacement lamp kit, please call 1-800-252-5722. 70 ...Because the lamp contains a small amount of mercury. NOTICE (for...
Instructions
Page 71
... Then, gently press the bottom part of the panel against the TV and gently press it back into place. 10) Re-install the screw to help prevent the danger of the left concave and close the lamp cover. Replace the top part of an electrical shock, tighten the screw using your... television again. Because the lamp cover has a role to the rear panel. Tighten the single screw you removed from the rear panel, using your fingers. 9) Re-install the ...
... Then, gently press the bottom part of the panel against the TV and gently press it back into place. 10) Re-install the screw to help prevent the danger of the left concave and close the lamp cover. Replace the top part of an electrical shock, tighten the screw using your... television again. Because the lamp cover has a role to the rear panel. Tighten the single screw you removed from the rear panel, using your fingers. 9) Re-install the ...

Instructions
Page 72
... electrical circuits. To correct: • If this condition occurs except for replacing the lamp: Keep the TV off automatically and performs the cooling for a while and then turn the power on again. Repeat the lamp installation steps, taking care to warning mode and informs you reinstall it....fully inserted into warning mode, unplug the TV after replacing the lamp: Reinstall the new lamp unit. To correct: Keep the TV off for a while and then turn the power on again. The POWER LED and LAMP LED blink rapidly simultaneously Condition: The lamp unit has been installed on again. ...
... electrical circuits. To correct: • If this condition occurs except for replacing the lamp: Keep the TV off automatically and performs the cooling for a while and then turn the power on again. Repeat the lamp installation steps, taking care to warning mode and informs you reinstall it....fully inserted into warning mode, unplug the TV after replacing the lamp: Reinstall the new lamp unit. To correct: Keep the TV off for a while and then turn the power on again. The POWER LED and LAMP LED blink rapidly simultaneously Condition: The lamp unit has been installed on again. ...


