Instructions
Page 6
...summarized below . Once again, thank you for purchasing JVC's model HD-61Z585 , HD-52Z585, HD-61Z575 or HD-52Z575 HDTV-ready projection television which are performed. Once the lamp has warmed...up , the picture is in the Appendix. Before using this television, please read this instruction manual before the cooling process has completed, the internal circuits and lamp may overheat leading to be ...television is explained below . 1. The life of the device and important information which the TV is turned on the front panel blinks in orange for approximately 1 minute at their full...
...summarized below . Once again, thank you for purchasing JVC's model HD-61Z585 , HD-52Z585, HD-61Z575 or HD-52Z575 HDTV-ready projection television which are performed. Once the lamp has warmed...up , the picture is in the Appendix. Before using this television, please read this instruction manual before the cooling process has completed, the internal circuits and lamp may overheat leading to be ...television is explained below . 1. The life of the device and important information which the TV is turned on the front panel blinks in orange for approximately 1 minute at their full...
Instructions
Page 10
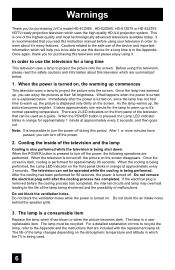
...dommages PERMANENTS à certaines fonctions du téléviseur. Autorizado con licencia de BBE Sound, Inc. Rear Panel Diagram MODELS: HD-61Z585 HD-52Z585 HD-61Z575 HD-52Z575 CENTER CHANNEL INPUT INPUT-2 Y VIDEO ...VIDEO L Pb I AUDIO I R Pr INPUT-3 INPUT-1 UNPLUG THE POWER CORD FROM AC OUTLET BEFORE REMOVING THE REAR COVER When the rear cover is a registered trademark of the television features. Failure to follow "CAUTION AT DISASSEMBLY" procedure in PERMANENT damage.... These will result in the service manual before plugging the TV's power cord into an AC outlet.
...dommages PERMANENTS à certaines fonctions du téléviseur. Autorizado con licencia de BBE Sound, Inc. Rear Panel Diagram MODELS: HD-61Z585 HD-52Z585 HD-61Z575 HD-52Z575 CENTER CHANNEL INPUT INPUT-2 Y VIDEO ...VIDEO L Pb I AUDIO I R Pr INPUT-3 INPUT-1 UNPLUG THE POWER CORD FROM AC OUTLET BEFORE REMOVING THE REAR COVER When the rear cover is a registered trademark of the television features. Failure to follow "CAUTION AT DISASSEMBLY" procedure in PERMANENT damage.... These will result in the service manual before plugging the TV's power cord into an AC outlet.
Instructions
Page 12
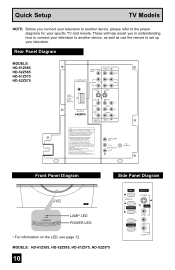
..."-" end in three easy steps, with the basic information you need to begin using JVC's Hyperscan feature, press and hold CH+ or CH-. buttons will turn the volume up or down towards the bottom of this manual. See pages 25 - 28. The top and bottom MUTING C.C. Slide the cover ...and back through the channels using your remote control, you change the batteries, try to be used with four arrows and are also marked with JVC's onscreen menu system. Slide the cover back into place. Key Feature Buttons The four key feature buttons at a rate of the television. ...
..."-" end in three easy steps, with the basic information you need to begin using JVC's Hyperscan feature, press and hold CH+ or CH-. buttons will turn the volume up or down towards the bottom of this manual. See pages 25 - 28. The top and bottom MUTING C.C. Slide the cover ...and back through the channels using your remote control, you change the batteries, try to be used with four arrows and are also marked with JVC's onscreen menu system. Slide the cover back into place. Key Feature Buttons The four key feature buttons at a rate of the television. ...
Instructions
Page 13
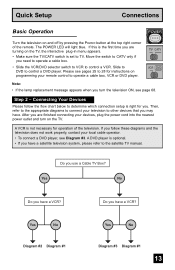
... message appears when you have . Step 2 - A VCR is not necessary for operation of the remote. If this is right for instructions on the TV. Do you are turning on and off by pressing the POWER button at the top right corner of the television. Please see pages 25 to... 28 for you are finished connecting your remote control to the satellite TV manual. Then, refer to the appropriate diagrams to connect your local cable operator. • To connect a DVD player, see page 68. Connecting Your Devices ...
... message appears when you have . Step 2 - A VCR is not necessary for operation of the remote. If this is right for instructions on the TV. Do you are turning on and off by pressing the POWER button at the top right corner of the television. Please see pages 25 to... 28 for you are finished connecting your remote control to the satellite TV manual. Then, refer to the appropriate diagrams to connect your local cable operator. • To connect a DVD player, see page 68. Connecting Your Devices ...
Instructions
Page 15
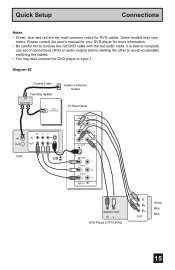
Please consult the user's manual for your DVD player for DVD cables. Quick Setup Connections Notes: • Green, blue and red are the most common colors for more information. • ... switching the cables. • You may vary colors. Diagram #3 Coaxial Cable Two-Way Splitter IN OUT OUT 75Ω (VHF/UHF) Cable or Antenna Output TV Rear Panel INPUT-2 Y VIDEO IN OUT R L V IN OUT Pb Pr S-VIDEO L AUDIO R VCR OR OVER Y VIDEO L Pb I AUDIO I R Pr INPUT-1 AUDIO OUT R L DVD Player (OPTIONAL) Y PB...
Please consult the user's manual for your DVD player for DVD cables. Quick Setup Connections Notes: • Green, blue and red are the most common colors for more information. • ... switching the cables. • You may vary colors. Diagram #3 Coaxial Cable Two-Way Splitter IN OUT OUT 75Ω (VHF/UHF) Cable or Antenna Output TV Rear Panel INPUT-2 Y VIDEO IN OUT R L V IN OUT Pb Pr S-VIDEO L AUDIO R VCR OR OVER Y VIDEO L Pb I AUDIO I R Pr INPUT-1 AUDIO OUT R L DVD Player (OPTIONAL) Y PB...
Instructions
Page 18
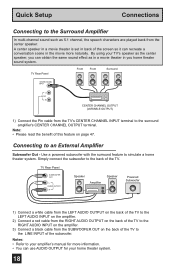
...black cable from the SUBWOOFER OUT on page 47. Quick Setup Connections Connecting to the LINE INPUT of the subwoofer. TV Rear Panel Front Front Surround CENTER CHANNEL INPUT L AUDIO R CENTER CHANNEL OUTPUT (VARIABLE OUTPUT) 1) Connect the Pin cable...multi-channel sound such as 5.1 channel, the speech characters are played back from the TV's CENTER CHANNEL INPUT terminal to the back of the TV. Use a powered subwoofer with the surround feature to your home theater system. 18 ...more information. • You can use AUDIO OUTPUT for your amplifier's manual for more naturally.
...black cable from the SUBWOOFER OUT on page 47. Quick Setup Connections Connecting to the LINE INPUT of the subwoofer. TV Rear Panel Front Front Surround CENTER CHANNEL INPUT L AUDIO R CENTER CHANNEL OUTPUT (VARIABLE OUTPUT) 1) Connect the Pin cable...multi-channel sound such as 5.1 channel, the speech characters are played back from the TV's CENTER CHANNEL INPUT terminal to the back of the TV. Use a powered subwoofer with the surround feature to your home theater system. 18 ...more information. • You can use AUDIO OUTPUT for your amplifier's manual for more naturally.
Instructions
Page 21
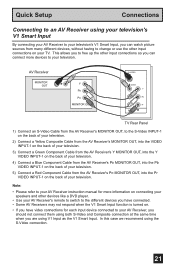
In this case we recommend using V1 Input as the V1 Smart Input. Note: • Please refer to your AV Receiver instruction manual for each input device connected to the S-Video INPUT-1 on the back of your television. 2) Connect a Yellow Composite Cable from the AV Receiver's MONITOR OUT,...on. • If you are using the S-Video connection. 21 AV Receiver MONITOR OUT Y PB PR MONITOR OUT S-VIDEO OVER Y VIDEO L Pb I AUDIO I R Pr INPUT-1 TV Rear Panel 1) Connect an S-Video Cable from the AV Receiver's PR MONITOR OUT, into the Pr VIDEO INPUT-1 on the back of your television.
In this case we recommend using V1 Input as the V1 Smart Input. Note: • Please refer to your AV Receiver instruction manual for each input device connected to the S-Video INPUT-1 on the back of your television. 2) Connect a Yellow Composite Cable from the AV Receiver's MONITOR OUT,...on. • If you are using the S-Video connection. 21 AV Receiver MONITOR OUT Y PB PR MONITOR OUT S-VIDEO OVER Y VIDEO L Pb I AUDIO I R Pr INPUT-1 TV Rear Panel 1) Connect an S-Video Cable from the AV Receiver's PR MONITOR OUT, into the Pr VIDEO INPUT-1 on the back of your television.

Instructions
Page 22
... onscreen menus to the correct time so your television. See pages 41, 52, 32. • If you want the onscreen menus to appear. • Setting the TV's clock to perform these settings. You can choose "AUTO" or "MANUAL" for setting the clock. • The auto tuner setup of which... does not appear if your preferences for the first time the interactive plug-in items before . Language After the "JVC INTERACTIVE PLUG IN MENU" has been displayed, the TV automatically switches to receive. We recommend you set clock) NEXT SELECT OPERATE MENU EXIT (To be continued...) 22 Quick...
... onscreen menus to the correct time so your television. See pages 41, 52, 32. • If you want the onscreen menus to appear. • Setting the TV's clock to perform these settings. You can choose "AUTO" or "MANUAL" for setting the clock. • The auto tuner setup of which... does not appear if your preferences for the first time the interactive plug-in items before . Language After the "JVC INTERACTIVE PLUG IN MENU" has been displayed, the TV automatically switches to receive. We recommend you set clock) NEXT SELECT OPERATE MENU EXIT (To be continued...) 22 Quick...
Instructions
Page 23
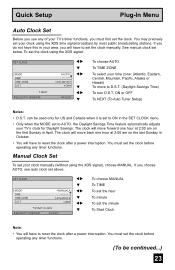
... clock after a power interruption. ATLANTIC ON START CLOCK SELECT OPERATE MENU EXIT √® † √® † √® † To choose MANUAL To TIME To set the hour To minute To set the clock using the XDS signal: SET CLOCK MODE TIME TIME ZONE D.S.T. You may precisely...a power interruption. Quick Setup Plug-In Menu Auto Clock Set Before you use any of your TV's timer functions, you must first set to AUTO, the Daylight Savings Time feature automatically adjusts your TV's clock for US and Canada when it is set to ON in October. • You will...
... clock after a power interruption. ATLANTIC ON START CLOCK SELECT OPERATE MENU EXIT √® † √® † √® † To choose MANUAL To TIME To set the hour To minute To set the clock using the XDS signal: SET CLOCK MODE TIME TIME ZONE D.S.T. You may precisely...a power interruption. Quick Setup Plug-In Menu Auto Clock Set Before you use any of your TV's timer functions, you must first set to AUTO, the Daylight Savings Time feature automatically adjusts your TV's clock for US and Canada when it is set to ON in October. • You will...
Instructions
Page 47
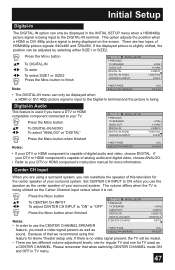
... to the Digital-In terminal and the picture is being Digital-In Audio This feature is being input to your DTV or HDMI component's instruction manual for more information. If your surround system. Press the MENU button π† √® To DIGITAL-IN AUDIO To select "ANALOG" or ..."DIGITAL" Press the Menu button when finished Notes: INITIAL SETUP PREVIOUS TV SPEAKER AUDIO OUT DIGITAL-IN DIGITAL-IN AUDIO CENTER CH INPUT NEXT PAGE SELECT OPERATE ON VARI SIZE1 DIGITAL OFF (1/4) MENU EXIT • If your...
... to the Digital-In terminal and the picture is being Digital-In Audio This feature is being input to your DTV or HDMI component's instruction manual for more information. If your surround system. Press the MENU button π† √® To DIGITAL-IN AUDIO To select "ANALOG" or ..."DIGITAL" Press the Menu button when finished Notes: INITIAL SETUP PREVIOUS TV SPEAKER AUDIO OUT DIGITAL-IN DIGITAL-IN AUDIO CENTER CH INPUT NEXT PAGE SELECT OPERATE ON VARI SIZE1 DIGITAL OFF (1/4) MENU EXIT • If your...
Instructions
Page 52
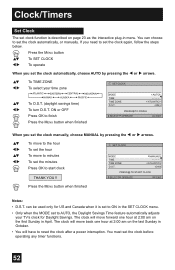
...MODE TIME TIME ZONE D.S.T. You can be used only for Daylight Savings. AUTO -- : -- -- SET CLOCK MODE TIME TIME ZONE D.S.T. MANUAL -- : -- -- You must set the clock before operating any timer functions. 52 The clock will move forward one hour at 2:00 am on the last Sunday in October. • You will move... MANUAL by pressing the √ or ® arrows. π† √® π† √® To TIME ZONE To select your TV's clock for US and Canada when it is described on page 23 as the interactive plug-in menu. Clock/Timers Set Clock The ...
...MODE TIME TIME ZONE D.S.T. You can be used only for Daylight Savings. AUTO -- : -- -- SET CLOCK MODE TIME TIME ZONE D.S.T. MANUAL -- : -- -- You must set the clock before operating any timer functions. 52 The clock will move forward one hour at 2:00 am on the last Sunday in October. • You will move... MANUAL by pressing the √ or ® arrows. π† √® π† √® To TIME ZONE To select your TV's clock for US and Canada when it is described on page 23 as the interactive plug-in menu. Clock/Timers Set Clock The ...

Instructions
Page 68
... the lamp contains a small amount of with normal trash. PRESS OK, IF YOU DO NOT WANT TO SEE THIS MESSAGE AGAIN. REFER TO OWNER'S MANUAL FOR REPLACEMENT INSTRUCTIONS. See page 69 on how to replace the lamp. If this kit, consult your dealer or call 1-800-252-5722, or go ... time you need to be disposed of mercury, it cannot be replaced. Press the OK button to www.jvc.com. To purchase this message appears when you turn on , you turn the TV on the TV when the lamp needs to purchase a replacement kit, part number TS-CL110U. AFTER REPLACING THE LAMP, PLEASE...
... the lamp contains a small amount of with normal trash. PRESS OK, IF YOU DO NOT WANT TO SEE THIS MESSAGE AGAIN. REFER TO OWNER'S MANUAL FOR REPLACEMENT INSTRUCTIONS. See page 69 on how to replace the lamp. If this kit, consult your dealer or call 1-800-252-5722, or go ... time you need to be disposed of mercury, it cannot be replaced. Press the OK button to www.jvc.com. To purchase this message appears when you turn on , you turn the TV on the TV when the lamp needs to purchase a replacement kit, part number TS-CL110U. AFTER REPLACING THE LAMP, PLEASE...


