Instructions
Page 6
...power off during this device for purchasing JVC's model HD-52G886, HD-52G786, HD-56G886 or HD-56G786 HDTV-ready projection television which are performed. If the electrical plug is a user replaceable item. Do not block the air intake holes behind the speaker grills. 3. The lamp must be used . 6 For a... detailed explanation on how to recycle the lamp, refer to warm up , you for a long time is in which the TV is being shortened and the possibility of the television and the lamp Cooling is also performed while the ...
...power off during this device for purchasing JVC's model HD-52G886, HD-52G786, HD-56G886 or HD-56G786 HDTV-ready projection television which are performed. If the electrical plug is a user replaceable item. Do not block the air intake holes behind the speaker grills. 3. The lamp must be used . 6 For a... detailed explanation on how to recycle the lamp, refer to warm up , you for a long time is in which the TV is being shortened and the possibility of the television and the lamp Cooling is also performed while the ...
Instructions
Page 7
...ILA element characteristics Do not project still pictures or pictures that the television is a characteristic of the lamp being shortened. 5. This is...lamp breaking. Refer to keep the TV on the television. Also, take care to the Appendix for more than 24 hours consecutively. Do not touch the lamp glass If the lamp... time. 11. Caution! Be careful when handling the lamp. 9. Do not replace the lamp immediately after use . Condensation When a heater is turned...detach, causing the television to touch the lamp glass. 10. Do not open the rear cabinet. 13. There is moved from the...
...ILA element characteristics Do not project still pictures or pictures that the television is a characteristic of the lamp being shortened. 5. This is...lamp breaking. Refer to keep the TV on the television. Also, take care to the Appendix for more than 24 hours consecutively. Do not touch the lamp glass If the lamp... time. 11. Caution! Be careful when handling the lamp. 9. Do not replace the lamp immediately after use . Condensation When a heater is turned...detach, causing the television to touch the lamp glass. 10. Do not open the rear cabinet. 13. There is moved from the...
Instructions
Page 9
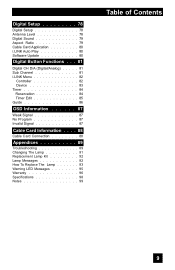
... Information 87 Weak Signal 87 No Program 87 Invalid Signal 87 Cable Card Information . . . . 88 Cable Card Connection 88 Appendices 89 Troubleshooting 89 Changing The Lamp 91 Replacement Lamp Kit 92 Lamp Messages 92 How To Replace The Lamp 93 Warning LED Messages 95 Warranty 96 Specifications 98 Notes 99 Table of Contents 9
... Information 87 Weak Signal 87 No Program 87 Invalid Signal 87 Cable Card Information . . . . 88 Cable Card Connection 88 Appendices 89 Troubleshooting 89 Changing The Lamp 91 Replacement Lamp Kit 92 Lamp Messages 92 How To Replace The Lamp 93 Warning LED Messages 95 Warranty 96 Specifications 98 Notes 99 Table of Contents 9
Instructions
Page 15
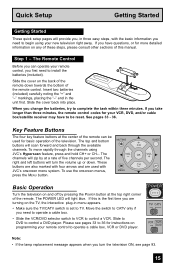
...back into place. The channels will zip by pressing the POWER button at the top right corner of the remote. POWER T TV CATV MUL VCR DVD Note: • If the lamp replacement message appears when you need to operate a cable box. • Slide the VCR/DVD selector switch to VCR to install ... any of these steps, please consult other sections of this is set to complete the task within three minutes. Move the switch to begin using JVC's Hyperscan feature, press and hold CH+ or CH-. Quick Setup Getting Started Getting Started These quick setup pages will provide you, in menu appears. ...
...back into place. The channels will zip by pressing the POWER button at the top right corner of the remote. POWER T TV CATV MUL VCR DVD Note: • If the lamp replacement message appears when you need to operate a cable box. • Slide the VCR/DVD selector switch to VCR to install ... any of these steps, please consult other sections of this is set to complete the task within three minutes. Move the switch to begin using JVC's Hyperscan feature, press and hold CH+ or CH-. Quick Setup Getting Started Getting Started These quick setup pages will provide you, in menu appears. ...

Instructions
Page 66
CLOCK / TIMERS PREVIOUS SET CLOCK ON / OFF TIMER LAMP TIMER RESET PRESS OK TO RESET THE LAMP TIMER. THE LAMP TIMER IS RESET SUCCESSFULLY. Clock/Timers Lamp Timer Reset The lamp replacement message will appear. Notes: • You can use the Lamp Timer Reset only after replacing the lamp. • See Page 93 for instructions on the television screen. The...
CLOCK / TIMERS PREVIOUS SET CLOCK ON / OFF TIMER LAMP TIMER RESET PRESS OK TO RESET THE LAMP TIMER. THE LAMP TIMER IS RESET SUCCESSFULLY. Clock/Timers Lamp Timer Reset The lamp replacement message will appear. Notes: • You can use the Lamp Timer Reset only after replacing the lamp. • See Page 93 for instructions on the television screen. The...
Instructions
Page 89
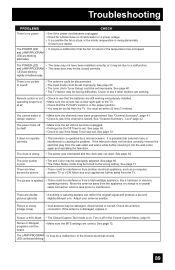
... causing the problem. If the antenna is not operating properly or at all • Check to a malfunction. • The lamp door may not be too far from the TV. Troubleshooting PROBLEMS CHECK There is no picture or sound • The antenna could be disconnected. • The input mode could ...be within 23 feet (7 meters). Remote control is damaged, replace it may be due to see if the Sleep Timer was not reset. See page 65. • Check to the wrong setting. The POWER LED and LAMP/PROGRAM LED are working and properly installed. • Make sure the...
... causing the problem. If the antenna is not operating properly or at all • Check to a malfunction. • The lamp door may not be too far from the TV. Troubleshooting PROBLEMS CHECK There is no picture or sound • The antenna could be disconnected. • The input mode could ...be within 23 feet (7 meters). Remote control is damaged, replace it may be due to see if the Sleep Timer was not reset. See page 65. • Check to the wrong setting. The POWER LED and LAMP/PROGRAM LED are working and properly installed. • Make sure the...

Instructions
Page 91
... will cause a difference in which the TV is time to replace the lamp with this lamp. Attempting to replace the lamp. Using a different lamp, or a third-party manufacturer's lamp could lead to replace it is being shortened. After turning the... power off completely. Please read these instructions fully before attempting to a severe electrical shock. The life of the lamp being used. Appendix Changing the Lamp WARNING! WARNING! Turn the power off and wait until the lamp has completely cooled before attempting to project...
... will cause a difference in which the TV is time to replace the lamp with this lamp. Attempting to replace the lamp. Using a different lamp, or a third-party manufacturer's lamp could lead to replace it is being shortened. After turning the... power off completely. Please read these instructions fully before attempting to a severe electrical shock. The life of the lamp being used. Appendix Changing the Lamp WARNING! WARNING! Turn the power off and wait until the lamp has completely cooled before attempting to project...

Instructions
Page 92
... TO SEE THIS MESSAGE AGAIN. Lamp Message LAMP NEEDS TO BE REPLACED. Note: • This message will appear every time you turn the TV on the TV when the lamp needs to replace the lamp. To purchase this message appears when you turn on , you need to www.jvc.com. Appendix Replacement Lamp Kit Before replacing the lamp, you will need to be...
... TO SEE THIS MESSAGE AGAIN. Lamp Message LAMP NEEDS TO BE REPLACED. Note: • This message will appear every time you turn the TV on the TV when the lamp needs to replace the lamp. To purchase this message appears when you turn on , you need to www.jvc.com. Appendix Replacement Lamp Kit Before replacing the lamp, you will need to be...
Instructions
Page 93
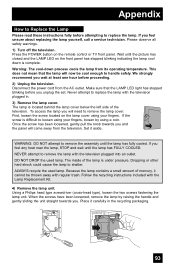
... hour before you feel any heat near the lamp, STOP and wait until the lamp has FULLY COOLED. NEVER attempt to replace the lamp with the Lamp Replacement Kit. 4) Remove the lamp unit. First, loosen the screw located on the remote control or TV front panel. Appendix How to Replace the Lamp Please read these instructions fully before attempting to...
... hour before you feel any heat near the lamp, STOP and wait until the lamp has FULLY COOLED. NEVER attempt to replace the lamp with the Lamp Replacement Kit. 4) Remove the lamp unit. First, loosen the screw located on the remote control or TV front panel. Appendix How to Replace the Lamp Please read these instructions fully before attempting to...

Instructions
Page 94
... not sit securely in the TV (flat in the lamp housing area), it is designed to work specifically with part number TS-CL110U only! Make sure the lamp sits securely and flat in the right concave and close the lamp cover. Disposal of these materials may cause malfunctions... information, please contact your local authorities, or the Electronics Industries Alliance: http://www.eiae.org To purchase a replacement lamp kit, please call 1-800-252-5722. 6) Re-install the lamp cover. Holding the handle attached to the television. The television is very important that contains a small amount of...
... not sit securely in the TV (flat in the lamp housing area), it is designed to work specifically with part number TS-CL110U only! Make sure the lamp sits securely and flat in the right concave and close the lamp cover. Disposal of these materials may cause malfunctions... information, please contact your local authorities, or the Electronics Industries Alliance: http://www.eiae.org To purchase a replacement lamp kit, please call 1-800-252-5722. 6) Re-install the lamp cover. Holding the handle attached to the television. The television is very important that contains a small amount of...
Instructions
Page 95
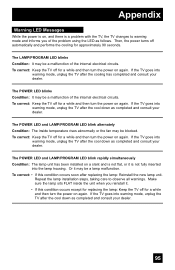
... of the internal electrical circuits. To correct: Keep the TV off for a while and then turn the power on again. If the TV goes into the lamp housing. To correct: • If this condition occurs except for replacing the lamp: Keep the TV off for a while and then turn the power on again.... To correct: Keep the TV off for a while and then turn the power...
... of the internal electrical circuits. To correct: Keep the TV off for a while and then turn the power on again. If the TV goes into the lamp housing. To correct: • If this condition occurs except for replacing the lamp: Keep the TV off for a while and then turn the power on again.... To correct: Keep the TV off for a while and then turn the power...


