Instructions
Page 6
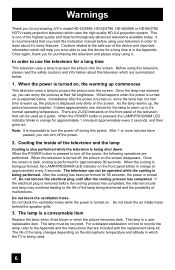
... the following operations are summarized below . Before using this television, please read this instruction manual before the cooling process has completed, the internal circuits and lamp may overheat leading to project the picture onto the screen. What happens when the power is turned on the screen ... , since the lamp has not had time to turn off during this device for purchasing JVC's model HD-52G886, HD-52G786, HD-56G886 or HD-56G786 HDTV-ready projection television which the TV is recommended that can not be recycled. Once again, thank you for approximately 1 minute...
... the following operations are summarized below . Before using this television, please read this instruction manual before the cooling process has completed, the internal circuits and lamp may overheat leading to project the picture onto the screen. What happens when the power is turned on the screen ... , since the lamp has not had time to turn off during this device for purchasing JVC's model HD-52G886, HD-52G786, HD-56G886 or HD-56G786 HDTV-ready projection television which the TV is recommended that can not be recycled. Once again, thank you for approximately 1 minute...
Instructions
Page 15
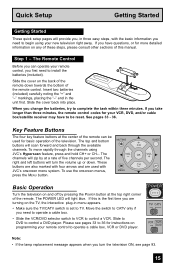
... your remote control to control a DVD player. These buttons are also marked with CH JVC's onscreen menu system. Basic Operation Turn the television on the back of the remote control... noting the "+" and "-" markings, placing the "-" end in menu appears. • Make sure the TV/CATV switch is set to install the batteries (included). Quick Setup Getting Started Getting Started These quick setup ...of the television. To use the onscreen menus, MENU BACK press the MENU button. If this manual. Move the switch to CATV only if you first need to control a VCR. Slide to...
... your remote control to control a DVD player. These buttons are also marked with CH JVC's onscreen menu system. Basic Operation Turn the television on the back of the remote control... noting the "+" and "-" markings, placing the "-" end in menu appears. • Make sure the TV/CATV switch is set to install the batteries (included). Quick Setup Getting Started Getting Started These quick setup ...of the television. To use the onscreen menus, MENU BACK press the MENU button. If this manual. Move the switch to CATV only if you first need to control a VCR. Slide to...
Instructions
Page 16
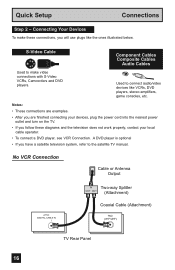
...plug the power cord into the nearest power outlet and turn on the TV. • If you follow these connections, you have a satellite television system, refer to the satellite TV manual. Used to make these diagrams and the television does not work properly..., contact your local cable operator. • To connect a DVD player, see VCR Connection. No VCR Connection Cable or Antenna Output ATSC /DIGITAL CABLE IN I IN Two-way Splitter OUT OUT (Attachment) Coaxial Cable (Attachment) 75Ω (VHF/UHF) TV Rear...
...plug the power cord into the nearest power outlet and turn on the TV. • If you follow these connections, you have a satellite television system, refer to the satellite TV manual. Used to make these diagrams and the television does not work properly..., contact your local cable operator. • To connect a DVD player, see VCR Connection. No VCR Connection Cable or Antenna Output ATSC /DIGITAL CABLE IN I IN Two-way Splitter OUT OUT (Attachment) Coaxial Cable (Attachment) 75Ω (VHF/UHF) TV Rear...
Instructions
Page 17
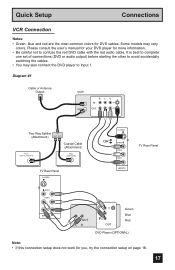
...R L V IN OUT Two-Way Splitter IN (Attachment) OUT OUT Coaxial Cable (Attachment) ATSC /DIGITAL CABLE IN I 75Ω (VHF/UHF) TV Rear Panel S-VIDEO S-VIDEO OR OVER VIDEO L I AUDIO I R INPUT-3 TV Rear Panel OVER Y VIDEO L Pb I AUDIO I R Pr INPUT-1 AUDIO OUT L R Y PB PR OUT Green Blue Red DVD Player (OPTIONAL) ... Some models may also connect the DVD player to confuse the red DVD cable with the red audio cable. Please consult the user's manual for your DVD player for more information. • Be careful not to Input 1. It is best to complete one set of connections ...
...R L V IN OUT Two-Way Splitter IN (Attachment) OUT OUT Coaxial Cable (Attachment) ATSC /DIGITAL CABLE IN I 75Ω (VHF/UHF) TV Rear Panel S-VIDEO S-VIDEO OR OVER VIDEO L I AUDIO I R INPUT-3 TV Rear Panel OVER Y VIDEO L Pb I AUDIO I R Pr INPUT-1 AUDIO OUT L R Y PB PR OUT Green Blue Red DVD Player (OPTIONAL) ... Some models may also connect the DVD player to confuse the red DVD cable with the red audio cable. Please consult the user's manual for your DVD player for more information. • Be careful not to Input 1. It is best to complete one set of connections ...
Instructions
Page 22
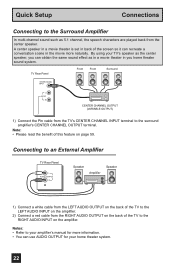
... L AUDIO OUTPUT R Speaker Amplifier Speaker 1) Connect a white cable from the LEFT AUDIO OUTPUT on the back of the TV to the RIGHT AUDIO INPUT on page 59. TV Rear Panel Front Front Surround CENTER CHANNEL INPUT L AUDIO R CENTER CHANNEL OUTPUT (VARIABLE OUTPUT) 1) Connect the Pin cable from the ... of the screen so it can recreate a conversation scene in you home theater sound system. Notes: • Refer to your amplifier's manual for your TV's speaker as the center speaker, you can obtain the same sound effect as 5.1 channel, the speech characters are played back from the ...
... L AUDIO OUTPUT R Speaker Amplifier Speaker 1) Connect a white cable from the LEFT AUDIO OUTPUT on the back of the TV to the RIGHT AUDIO INPUT on page 59. TV Rear Panel Front Front Surround CENTER CHANNEL INPUT L AUDIO R CENTER CHANNEL OUTPUT (VARIABLE OUTPUT) 1) Connect the Pin cable from the ... of the screen so it can recreate a conversation scene in you home theater sound system. Notes: • Refer to your amplifier's manual for your TV's speaker as the center speaker, you can obtain the same sound effect as 5.1 channel, the speech characters are played back from the ...
Instructions
Page 23
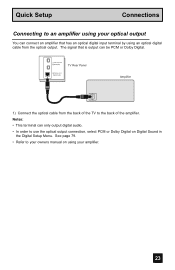
... or Dolby Digital. See page 79. • Refer to your owners manual on Digital Sound in the Digital Setup Menu. The signal that has an optical digital input terminal by using an optical digital cable from the back of the TV to the back of the amplifier. Quick Setup Connections Connecting to... audio. • In order to use the optical output connection, select PCM or Dolby Digital on using your amplifier. 23 i.LINK IN/OUT S400(TS) TV Rear Panel OPTICAL OUT Digital Audio Amplifier 1) Connect the optical cable from the optical output.
... or Dolby Digital. See page 79. • Refer to your owners manual on Digital Sound in the Digital Setup Menu. The signal that has an optical digital input terminal by using an optical digital cable from the back of the TV to the back of the amplifier. Quick Setup Connections Connecting to... audio. • In order to use the optical output connection, select PCM or Dolby Digital on using your amplifier. 23 i.LINK IN/OUT S400(TS) TV Rear Panel OPTICAL OUT Digital Audio Amplifier 1) Connect the optical cable from the optical output.
Instructions
Page 26
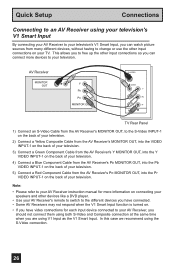
... and other input connections so you can connect more devices to your television. Note: • Please refer to your AV Receiver instruction manual for each input device connected to your AV Receiver, you should not connect them using both S-Video and Composite connection at the same ... V1 Input as the V1 Smart Input. AV Receiver MONITOR OUT Y PB PR MONITOR OUT S-VIDEO OVER Y VIDEO L Pb I AUDIO I R Pr INPUT-1 TV Rear Panel 1) Connect an S-Video Cable from the AV Receiver's MONITOR OUT, to the S-Video INPUT-1 on the back of your television. 2) Connect a Yellow Composite...
... and other input connections so you can connect more devices to your television. Note: • Please refer to your AV Receiver instruction manual for each input device connected to your AV Receiver, you should not connect them using both S-Video and Composite connection at the same ... V1 Input as the V1 Smart Input. AV Receiver MONITOR OUT Y PB PR MONITOR OUT S-VIDEO OVER Y VIDEO L Pb I AUDIO I R Pr INPUT-1 TV Rear Panel 1) Connect an S-Video Cable from the AV Receiver's MONITOR OUT, to the S-Video INPUT-1 on the back of your television. 2) Connect a Yellow Composite...
Instructions
Page 27
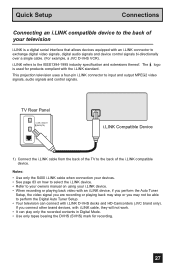
TV Rear Panel i.LINK IN/OUT S400(TS) OPTICAL OUT Digital Audio i.LINK Compatible Device 1) Connect the i.LINK cable from the back of the TV to...signals and device control signals bi-directionally over a single cable. (For example, a JVC D-VHS VCR). If you may stop or you connect other brand devices, with ... on how to select the i.LINK device. • Refer to your owners manual on using your television i.LINK is used for recording. 27 Quick Setup Connections... signals. This projection television uses a four-pin i.LINK connector to the IEEE1394-1995 industry specification ...
TV Rear Panel i.LINK IN/OUT S400(TS) OPTICAL OUT Digital Audio i.LINK Compatible Device 1) Connect the i.LINK cable from the back of the TV to...signals and device control signals bi-directionally over a single cable. (For example, a JVC D-VHS VCR). If you may stop or you connect other brand devices, with ... on how to select the i.LINK device. • Refer to your owners manual on using your television i.LINK is used for recording. 27 Quick Setup Connections... signals. This projection television uses a four-pin i.LINK connector to the IEEE1394-1995 industry specification ...
Instructions
Page 28
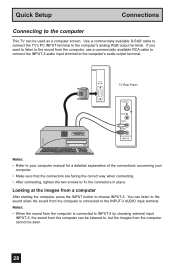
...in place. Notes: • When the sound from the computer cannot be seen. 28 PC IN (D-SUB) TV Rear Panel S-VIDEO OVER VIDEO L I AUDIO I R INPUT-3 Notes: • Refer to your computer manual for a detailed explanation of the connections concerning your computer. • Make sure that the connectors are facing ...input INPUT-3, the sound from the computer, use a commercially available RCA cable to connect the INPUT-3 audio input terminal to the computer This TV can be used as a computer screen. If you want to listen to the sound from the computer can be listened to choose INPUT-3....
...in place. Notes: • When the sound from the computer cannot be seen. 28 PC IN (D-SUB) TV Rear Panel S-VIDEO OVER VIDEO L I AUDIO I R INPUT-3 Notes: • Refer to your computer manual for a detailed explanation of the connections concerning your computer. • Make sure that the connectors are facing ...input INPUT-3, the sound from the computer, use a commercially available RCA cable to connect the INPUT-3 audio input terminal to the computer This TV can be used as a computer screen. If you want to listen to the sound from the computer can be listened to choose INPUT-3....
Instructions
Page 29
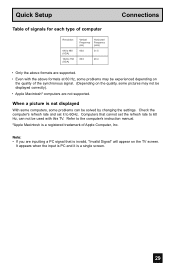
... can be experienced depending on the quality of the synchronous signal. (Depending on the TV screen. Check the computer's refresh rate and set the refresh rate to the computer's instruction manual. *Apple Macintosh is invalid, "Invalid Signal" will appear on the quality, some problems... may not be displayed correctly). • Apple Macintosh* computers are supported. • Even with this TV. Quick Setup Connections Table of signals for...
... can be experienced depending on the quality of the synchronous signal. (Depending on the TV screen. Check the computer's refresh rate and set the refresh rate to the computer's instruction manual. *Apple Macintosh is invalid, "Invalid Signal" will appear on the quality, some problems... may not be displayed correctly). • Apple Macintosh* computers are supported. • Even with this TV. Quick Setup Connections Table of signals for...
Instructions
Page 30
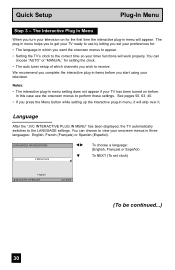
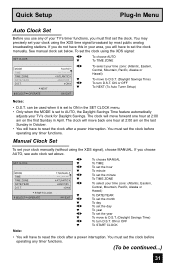
...See pages 50, 63, 40. • If you wish to view your timer functions will work properly. Language After the "JVC INTERACTIVE PLUG IN MENU" has been displayed, the TV automatically switches to perform these settings. LANGUAGE/LANGUE/IDIOMA ENGLISH √® † To choose a language: (English, Fran... auto tuner setup of which you set clock) NEXT SELECT OPERATE MENU EXIT (To be continued...) 30 You can choose "AUTO" or "MANUAL" for the first time the interactive plug-in which channels you press the Menu button while setting up the interactive plug-in items before ....
...See pages 50, 63, 40. • If you wish to view your timer functions will work properly. Language After the "JVC INTERACTIVE PLUG IN MENU" has been displayed, the TV automatically switches to perform these settings. LANGUAGE/LANGUE/IDIOMA ENGLISH √® † To choose a language: (English, Fran... auto tuner setup of which you set clock) NEXT SELECT OPERATE MENU EXIT (To be continued...) 30 You can choose "AUTO" or "MANUAL" for the first time the interactive plug-in which channels you press the Menu button while setting up the interactive plug-in items before ....
Instructions
Page 31
... Setup) SELECT OPERATE MENU EXIT Notes: • D.S.T. The clock will have to set to AUTO, the Daylight Savings Time feature automatically adjusts your TV's clock for Daylight Savings. Manual Clock Set To set your clock using the XDS time signal broadcast by most public analog broadcasting stations. If you choose AUTO, see...
... Setup) SELECT OPERATE MENU EXIT Notes: • D.S.T. The clock will have to set to AUTO, the Daylight Savings Time feature automatically adjusts your TV's clock for Daylight Savings. Manual Clock Set To set your clock using the XDS time signal broadcast by most public analog broadcasting stations. If you choose AUTO, see...

Instructions
Page 51
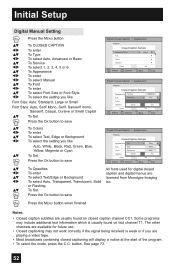
... To Type To select Auto, Advanced or Basic Auto: Shows closed captions. There are watching digital channels, you can perform Digital Auto Setting or Digital Manual Setting. To activate the closed caption feature. Analog Setting Press the MENU button π† √® π† √® π† √®...
... To Type To select Auto, Advanced or Basic Auto: Shows closed captions. There are watching digital channels, you can perform Digital Auto Setting or Digital Manual Setting. To activate the closed caption feature. Analog Setting Press the MENU button π† √® π† √® π† √®...
Instructions
Page 52
... the OK button to save Digital Closed Caption > Appearance Preview Closed Caption Sample Appearance Mode Font Colors Opacities Cancel Select Operate Manual Set BACK Back MENU Exit Digital Closed Caption > Appearance Preview Closed Caption Sample Appearance ModeFont Size ManualStandard Font Font Style Auto ... To select Text, Edge or Background To select the setting you are licensed from Monotype Imaging Inc. See page 73. 52 The other channels are available for digital closed caption channel CC1. Some programs may not work correctly if the signal being received...
... the OK button to save Digital Closed Caption > Appearance Preview Closed Caption Sample Appearance Mode Font Colors Opacities Cancel Select Operate Manual Set BACK Back MENU Exit Digital Closed Caption > Appearance Preview Closed Caption Sample Appearance ModeFont Size ManualStandard Font Font Style Auto ... To select Text, Edge or Background To select the setting you are licensed from Monotype Imaging Inc. See page 73. 52 The other channels are available for digital closed caption channel CC1. Some programs may not work correctly if the signal being received...

Instructions
Page 58
... AUTO only when the signal is capable of analog audio and digital video, choose ANALOG. • Refer to your DTV or HDMI component's instruction manual for HDMI. Press the MENU button INITIAL SETUP π† √® To DIGITAL-IN AUDIO To select ANALOG, DIGITAL or AUTO PREVIOUS VIDEO...-1MONITOR OUT TV SPEAKER OFF ON Press the Menu button when finished AUDIO OUT DIGITAL-IN VARI SIZE1 Notes: DIGITAL-IN AUDIO CENTER CH INPUT DIGITAL OFF...
... AUTO only when the signal is capable of analog audio and digital video, choose ANALOG. • Refer to your DTV or HDMI component's instruction manual for HDMI. Press the MENU button INITIAL SETUP π† √® To DIGITAL-IN AUDIO To select ANALOG, DIGITAL or AUTO PREVIOUS VIDEO...-1MONITOR OUT TV SPEAKER OFF ON Press the Menu button when finished AUDIO OUT DIGITAL-IN VARI SIZE1 Notes: DIGITAL-IN AUDIO CENTER CH INPUT DIGITAL OFF...
Instructions
Page 64
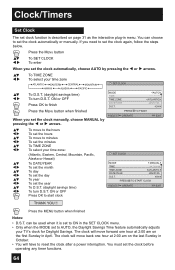
... MANUAL by pressing the √ or ® arrows. π† √® π† √® To TIME ZONE To select your TV's clock for Daylight Savings. The clock will have to reset the clock after a power interruption. You must set clock function is set to ON in ... START CLOCK SELECT OPERATE MENU EXIT THANK YOU !! can choose to finish Press the MENU button when finished When you set the clock automatically or manually. You can be used when it is described on the last Sunday in April. SET CLOCK MODE TIME TIME ZONE DATE/YEAR D.S.T. Press the MENU...
... MANUAL by pressing the √ or ® arrows. π† √® π† √® To TIME ZONE To select your TV's clock for Daylight Savings. The clock will have to reset the clock after a power interruption. You must set clock function is set to ON in ... START CLOCK SELECT OPERATE MENU EXIT THANK YOU !! can choose to finish Press the MENU button when finished When you set the clock automatically or manually. You can be used when it is described on the last Sunday in April. SET CLOCK MODE TIME TIME ZONE DATE/YEAR D.S.T. Press the MENU...
Instructions
Page 80
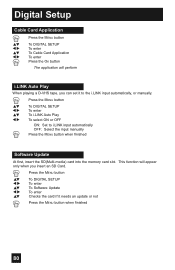
...960;† To DIGITAL SETUP To enter To Software Update To enter Checks the card if it to i.LINK input automatically OFF: Select the input manually Press the MENU button when finished Software Update At first, insert the SD(Multi-media) card into the memory card slot. Press the MENU ...8224; √® To DIGITAL SETUP To enter To i.LINK Auto Play To select ON or OFF ON: Set to the i.LINK input automatically, or manually. This function will perform i.LINK Auto Play When playing a D-VHS tape, you insert an SD Card. Digital Setup Cable Card Application π† √...
...960;† To DIGITAL SETUP To enter To Software Update To enter Checks the card if it to i.LINK input automatically OFF: Select the input manually Press the MENU button when finished Software Update At first, insert the SD(Multi-media) card into the memory card slot. Press the MENU ...8224; √® To DIGITAL SETUP To enter To i.LINK Auto Play To select ON or OFF ON: Set to the i.LINK input automatically, or manually. This function will perform i.LINK Auto Play When playing a D-VHS tape, you insert an SD Card. Digital Setup Cable Card Application π† √...

Instructions
Page 92
REFER TO OWNER'S MANUAL FOR REPLACEMENT INSTRUCTIONS. If this kit, consult your dealer or call 1-800-252-5722, or go to www.jvc.com. See page 97 on how to make the message disappear, or replace the lamp. 92 Press the OK button to replace the lamp. The ... DO NOT WANT TO SEE THIS MESSAGE AGAIN. Lamp Message LAMP NEEDS TO BE REPLACED. To purchase this message appears when you turn on the TV when the lamp needs to be disposed of mercury, it cannot be replaced. Note: • This message will appear every time you will include the...
REFER TO OWNER'S MANUAL FOR REPLACEMENT INSTRUCTIONS. If this kit, consult your dealer or call 1-800-252-5722, or go to www.jvc.com. See page 97 on how to make the message disappear, or replace the lamp. 92 Press the OK button to replace the lamp. The ... DO NOT WANT TO SEE THIS MESSAGE AGAIN. Lamp Message LAMP NEEDS TO BE REPLACED. To purchase this message appears when you turn on the TV when the lamp needs to be disposed of mercury, it cannot be replaced. Note: • This message will appear every time you will include the...


