
Instruction Manual
Page 4
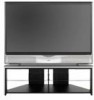
...on the right. Connect only to avoid overheating "Installation requirements" (P. 7) Never dismantle the rear panel! The power buttons on the TV! To prevent fire or electric shock, never allow the TV to fall! Ensure ample room to a 220-240V, 50Hz AC outlet. Handle screen with ...not hold by inserting or removing the power plug. 2 Never place anything on the remote control and the TV unit cannot completely turn off the TV. (Make appropriate arrangements for this manual regarding setup! "Technical information (P. 20) To change the fuse in "Troubleshooting" (P. 19), unplug the ...
...on the right. Connect only to avoid overheating "Installation requirements" (P. 7) Never dismantle the rear panel! The power buttons on the TV! To prevent fire or electric shock, never allow the TV to fall! Ensure ample room to a 220-240V, 50Hz AC outlet. Handle screen with ...not hold by inserting or removing the power plug. 2 Never place anything on the remote control and the TV unit cannot completely turn off the TV. (Make appropriate arrangements for this manual regarding setup! "Technical information (P. 20) To change the fuse in "Troubleshooting" (P. 19), unplug the ...

Instruction Manual
Page 6
...lamp with the TV plugged in use with JVC model televisions. ...the TV. AFTER REPLACING THE LAMP, PLEASE RESET THE TIMER IN THE TV MENU.... the TV plugged in a short amount of the lamp has reached to project the ...not drop the lamp! 4 The TV uses a lamp to 6500 hours,...TV repeatedly in ! To make the message disappear After the usage time of time Keeping the TV turned on for more than 24 hours consecutively 1 Turn the TV off the TV..., wait for at least 1 hour until the LAMP indicator stops blinking Unplug the TV...
...lamp with the TV plugged in use with JVC model televisions. ...the TV. AFTER REPLACING THE LAMP, PLEASE RESET THE TIMER IN THE TV MENU.... the TV plugged in a short amount of the lamp has reached to project the ...not drop the lamp! 4 The TV uses a lamp to 6500 hours,...TV repeatedly in ! To make the message disappear After the usage time of time Keeping the TV turned on for more than 24 hours consecutively 1 Turn the TV off the TV..., wait for at least 1 hour until the LAMP indicator stops blinking Unplug the TV...
Instruction Manual
Page 7
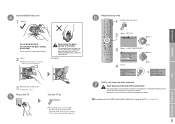
... lamp unit. 6 Reset the lamp timer 1 Display the menu bar 2 Select "SET-UP" SET UP select 3 Select "LAMP TIMER RESET" SET UP AUTO PROGRAM EDIT/MANUAL LANGUAGE DECODER(EXT-2) COMPONENT AUTO SELECT EXT SETTING HDMI SETTING LAMP TIMER RESET OFF ON 4 Finish PRESS OK TO RESET THE LAMP TIMER next select...not drop the lamp! Never touch the glass surface of the lamp! Re-tighten 3 Reinstall the lamp cover Tighten the screw. 5 Plug in the TV Turn the TV on If the lamp unit is not installed securely (e.g. flat in the same way as disposing of fluorescent lamps. Dispose of it...
... lamp unit. 6 Reset the lamp timer 1 Display the menu bar 2 Select "SET-UP" SET UP select 3 Select "LAMP TIMER RESET" SET UP AUTO PROGRAM EDIT/MANUAL LANGUAGE DECODER(EXT-2) COMPONENT AUTO SELECT EXT SETTING HDMI SETTING LAMP TIMER RESET OFF ON 4 Finish PRESS OK TO RESET THE LAMP TIMER next select...not drop the lamp! Never touch the glass surface of the lamp! Re-tighten 3 Reinstall the lamp cover Tighten the screw. 5 Plug in the TV Turn the TV on If the lamp unit is not installed securely (e.g. flat in the same way as disposing of fluorescent lamps. Dispose of it...

Instruction Manual
Page 9
Basic connections Please read the user manuals of the wallpaper. It is T-V LINK?" (P. 8) IMPORTANT! Do not place the TV too close to wallpaper The warm air from the air ducts Long exposure to watch TV. Keep children or pets away from the air ducts may cause a minor burn. PREPARE USE EXT-3 EXT-2 After all...
Basic connections Please read the user manuals of the wallpaper. It is T-V LINK?" (P. 8) IMPORTANT! Do not place the TV too close to wallpaper The warm air from the air ducts Long exposure to watch TV. Keep children or pets away from the air ducts may cause a minor burn. PREPARE USE EXT-3 EXT-2 After all...

Instruction Manual
Page 11
...settings next select next select 7 Finish T-V LINK DOWNLOAD TV RECORDING DEVICE When using T-V LINK Move a channel's position MOVE Edit a channel name ID Insert a channel INSERT Delete a channel DELETE Register a new channel MANUAL Begin Select a destination move out >EDIT PR ID ...From low frequencies >EDIT PR ID 10 11 12 13 14 15 16 17 CH CH 29 CH 35 >MANUAL PR ID 10 11 12 13 14 15 16 17 CH CH 29 CH 35 Auto-search begins, and... >EDIT PR AV 01 02 03 04 05 06 07 08 09 ID BBC1 BBC2 ITV CH4 CH5 JVC CH CH 21 CH 22 CH 23 CH 24 CH 25 CH 26 CH 27 CH 28 enter next...
...settings next select next select 7 Finish T-V LINK DOWNLOAD TV RECORDING DEVICE When using T-V LINK Move a channel's position MOVE Edit a channel name ID Insert a channel INSERT Delete a channel DELETE Register a new channel MANUAL Begin Select a destination move out >EDIT PR ID ...From low frequencies >EDIT PR ID 10 11 12 13 14 15 16 17 CH CH 29 CH 35 >MANUAL PR ID 10 11 12 13 14 15 16 17 CH CH 29 CH 35 Auto-search begins, and... >EDIT PR AV 01 02 03 04 05 06 07 08 09 ID BBC1 BBC2 ITV CH4 CH5 JVC CH CH 21 CH 22 CH 23 CH 24 CH 25 CH 26 CH 27 CH 28 enter next...

Instruction Manual
Page 12
Please read the user manuals of each device before setting up. (Connecting cables are not supplied with this TV.) : signal direction DVD player VCR / DVD / other devices Plug in headphones Rear panel DVD player (HDMI compatible) Amplifier (L) (R) (Y) (Pb) EXT-4 (L) (Pr) (R) EXT-3 EXT-2... S-VIDEO · Sound L / R Use S-VIDEO "S-IN" (P. 14) 10 AUDIO OUT Listening to the rear panel of the TV. Connecting external devices You can connect many different devices to the TV on external speakers Output · Sound L / R EXT-2 Dubbing videos Using T-V LINK Output Input · ...
Please read the user manuals of each device before setting up. (Connecting cables are not supplied with this TV.) : signal direction DVD player VCR / DVD / other devices Plug in headphones Rear panel DVD player (HDMI compatible) Amplifier (L) (R) (Y) (Pb) EXT-4 (L) (Pr) (R) EXT-3 EXT-2... S-VIDEO · Sound L / R Use S-VIDEO "S-IN" (P. 14) 10 AUDIO OUT Listening to the rear panel of the TV. Connecting external devices You can connect many different devices to the TV on external speakers Output · Sound L / R EXT-2 Dubbing videos Using T-V LINK Output Input · ...

Instruction Manual
Page 16
... SET UP Select "EXT SETTING" select SET UP AUTO PROGRAM EDIT/MANUAL LANGUAGE DECODER(EXT-2) COMPONENT AUTO SELECT EXT SETTING HDMI SETTING LAMP TIMER RESET OFF ON next select next Operate the VCR (DVD) To TV Operate JVC VCRs and other devices 1 DVD players VCRs and DVD recorders 2 Turn... on EXT-2 DUBBING Select the arrow > EXT SETTING EXT-1 EXT-3 EXT-5 TV DUBBING EXT-2 EXT-4 select Select the dubbing source > EXT SETTING EXT-1 EXT-3 EXT-5 TV DUBBING EXT-2 EXT-4 select 14 Edit names of JVC devices cannot be operated with this mode Press in again Set the S-VIDEO mode...
... SET UP Select "EXT SETTING" select SET UP AUTO PROGRAM EDIT/MANUAL LANGUAGE DECODER(EXT-2) COMPONENT AUTO SELECT EXT SETTING HDMI SETTING LAMP TIMER RESET OFF ON next select next Operate the VCR (DVD) To TV Operate JVC VCRs and other devices 1 DVD players VCRs and DVD recorders 2 Turn... on EXT-2 DUBBING Select the arrow > EXT SETTING EXT-1 EXT-3 EXT-5 TV DUBBING EXT-2 EXT-4 select Select the dubbing source > EXT SETTING EXT-1 EXT-3 EXT-5 TV DUBBING EXT-2 EXT-4 select 14 Edit names of JVC devices cannot be operated with this mode Press in again Set the S-VIDEO mode...

Instruction Manual
Page 19
...Select an item select PICTURE PICTURE MODE CONTRAST BRIGHT SHARP COLOUR HUE COLOUR TEMP. set select The item will change. Customizing your TV 1 Display the menu bar PICTURE SOUND FEATURES SET UP 2 Select a menu select PICTURE next 3 To the previous screen ...menu disappears after one minute of the power lamp (P. 6) (BRIGHT / SOFT) AUTO PROGRAM Select a country, it automatically registers channels (P. 8, ) EDIT / MANUAL Change registered channels or add new ones (P. 9) LANGUAGE Select a language for on-screen menus (P. 8, ) DECODER(EXT-2) For when connected to VCR with ...
...Select an item select PICTURE PICTURE MODE CONTRAST BRIGHT SHARP COLOUR HUE COLOUR TEMP. set select The item will change. Customizing your TV 1 Display the menu bar PICTURE SOUND FEATURES SET UP 2 Select a menu select PICTURE next 3 To the previous screen ...menu disappears after one minute of the power lamp (P. 6) (BRIGHT / SOFT) AUTO PROGRAM Select a country, it automatically registers channels (P. 8, ) EDIT / MANUAL Change registered channels or add new ones (P. 9) LANGUAGE Select a language for on-screen menus (P. 8, ) DECODER(EXT-2) For when connected to VCR with ...
Instruction Manual
Page 22
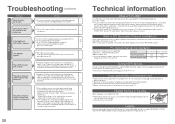
...inputs and PC mode cannot be a lamp malfunction.) 20 Technical information What is T-V LINK? By using T-V LINK : You can easily record the TV programme you accidentally cut the power cord Never connect to share information easily with a connected T-V LINK compatible device. For more details, refer to EXT...background) in HDMI SETTING to Analogue or AUTO (P. 17) If you are registered trademarks of the DVI device to the external device's manual. Keep the TV off for a while and then turn the power on a T-V LINK compatible device by BBE Sound, Inc. after the cooling has ...
...inputs and PC mode cannot be a lamp malfunction.) 20 Technical information What is T-V LINK? By using T-V LINK : You can easily record the TV programme you accidentally cut the power cord Never connect to share information easily with a connected T-V LINK compatible device. For more details, refer to EXT...background) in HDMI SETTING to Analogue or AUTO (P. 17) If you are registered trademarks of the DVI device to the external device's manual. Keep the TV off for a while and then turn the power on a T-V LINK compatible device by BBE Sound, Inc. after the cooling has ...

Instruction Manual
Page 23
...Audio L / R Headphone output We may change to the correct broadcast system using "MANUAL". Specifications Main unit Model HD-70ZR7J HD-56ZR7J Broadcasting systems CCIR I ) (See "COUNTRY setting" on this page) The EXT... 50 CH 51 CH 52 CH 53 CH 54 CH 55 CH 56 CH 57 CH 58 CH 59 CH 60 CH 61 CH 62 ...(IN) Composite video, S-video, Analog RGB AUDIO L / R Composite video, S-video, Analog RGB AUDIO L / R Signal type (OUT) Notes TV out Dubbing out T-V LINK compatible Euroconnector x 1 Composite video (SCART connector) AUDIO L / R RCA connectors x 5 Analogue component (576i (625i) / ...
...Audio L / R Headphone output We may change to the correct broadcast system using "MANUAL". Specifications Main unit Model HD-70ZR7J HD-56ZR7J Broadcasting systems CCIR I ) (See "COUNTRY setting" on this page) The EXT... 50 CH 51 CH 52 CH 53 CH 54 CH 55 CH 56 CH 57 CH 58 CH 59 CH 60 CH 61 CH 62 ...(IN) Composite video, S-video, Analog RGB AUDIO L / R Composite video, S-video, Analog RGB AUDIO L / R Signal type (OUT) Notes TV out Dubbing out T-V LINK compatible Euroconnector x 1 Composite video (SCART connector) AUDIO L / R RCA connectors x 5 Analogue component (576i (625i) / ...


