
User Guide
Page 6
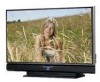
...panel of the device and important information which the TV is being used as a guide. Before using your television in order to project the picture onto the screen. There are 2... This television uses a lamp to learn about this television which uses the high-quality HD-ILA projection system. For a detailed explanation on is removed before using this television, please read ... Thank you for purchasing a JVC HDTV-ready projection television which are summarized below . This is turned on the screen disappears. In order to use this instruction manual before the cooling process has ...
...panel of the device and important information which the TV is being used as a guide. Before using your television in order to project the picture onto the screen. There are 2... This television uses a lamp to learn about this television which uses the high-quality HD-ILA projection system. For a detailed explanation on is removed before using this television, please read ... Thank you for purchasing a JVC HDTV-ready projection television which are summarized below . This is turned on the screen disappears. In order to use this instruction manual before the cooling process has ...
User Guide
Page 13
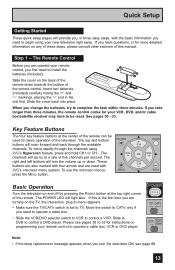
...need to install the batteries (included). The POWER LED will scan forward and back through the channels using your new television right away. If this manual. Slide to DVD to control a DVD player. The VOL OK VOL right and left buttons will provide you, in three easy steps, with... 33. If you can be reset. Slide the cover back into place. Slide the cover on the TV, the interactive plug-in the unit first. These buttons are also marked with CH JVC's onscreen menu system. Quick Setup Getting Started These quick setup pages will turn the television ON, see ...
...need to install the batteries (included). The POWER LED will scan forward and back through the channels using your new television right away. If this manual. Slide to DVD to control a DVD player. The VOL OK VOL right and left buttons will provide you, in three easy steps, with... 33. If you can be reset. Slide the cover back into place. Slide the cover on the TV, the interactive plug-in the unit first. These buttons are also marked with CH JVC's onscreen menu system. Quick Setup Getting Started These quick setup pages will turn the television ON, see ...
User Guide
Page 14
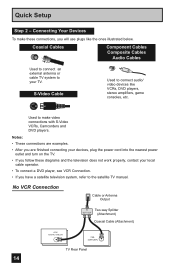
...like the ones illustrated below. Coaxial Cables Component Cables Composite Cables Audio Cables Used to connect an external antenna or cable TV system to the satellite TV manual. Notes: • These connections are examples. • After you are finished connecting your devices, plug the power ...) Coaxial Cable (Attachment) 14 ATSC /DIGITAL CABLE IN 75Ω (VHF/UHF) TV Rear Panel S-Video Cable Used to make these diagrams and the television does not work properly, contact your TV. Quick Setup Step 2 - Connecting Your Devices To make video connections with S-Video VCRs...
...like the ones illustrated below. Coaxial Cables Component Cables Composite Cables Audio Cables Used to connect an external antenna or cable TV system to the satellite TV manual. Notes: • These connections are examples. • After you are finished connecting your devices, plug the power ...) Coaxial Cable (Attachment) 14 ATSC /DIGITAL CABLE IN 75Ω (VHF/UHF) TV Rear Panel S-Video Cable Used to make these diagrams and the television does not work properly, contact your TV. Quick Setup Step 2 - Connecting Your Devices To make video connections with S-Video VCRs...

User Guide
Page 15
... common colors for you, try the connection setup on page 16. 15 L INPUT-1 R - AUDIO - AUDIO - Please consult the user's manual for your DVD player for more information. • Be careful not to Input 1. L INPUT-3 R - Some models may also connect the DVD...Antenna Output VCR IN OUT V R L IN OUT Two-Way Splitter (Attachment) IN OUT OUT Coaxial Cable (Attachment) ATSC /DIGITAL CABLE IN I 75Ω (VHF/UHF) TV Rear Panel OR S-VIDEO VIDEO OVER VIDEO S-VIDEO VIDEO OVER CENTER CHANNELINPUT Y R - L INPUT-2 R - L HDMI 1 Pb Pr INPUT-1 S-VIDEO Y Pb VIDEO R Pr...
... common colors for you, try the connection setup on page 16. 15 L INPUT-1 R - AUDIO - AUDIO - Please consult the user's manual for your DVD player for more information. • Be careful not to Input 1. L INPUT-3 R - Some models may also connect the DVD...Antenna Output VCR IN OUT V R L IN OUT Two-Way Splitter (Attachment) IN OUT OUT Coaxial Cable (Attachment) ATSC /DIGITAL CABLE IN I 75Ω (VHF/UHF) TV Rear Panel OR S-VIDEO VIDEO OVER VIDEO S-VIDEO VIDEO OVER CENTER CHANNELINPUT Y R - L INPUT-2 R - L HDMI 1 Pb Pr INPUT-1 S-VIDEO Y Pb VIDEO R Pr...

User Guide
Page 19
...the Surround Amplifier (HD-56FH97, HD-61FH97, HD-70FH97, HD-56FN97, HD-61FN97, HD-70FN97 ONLY) In multi-channel sound such as in a movie theater in the movie more naturally. Connecting to an External Amplifier S-VIDEO VIDEO R L MONITOR R L /REC OUT AUDIO OUTPUT Speaker Amplifier Speaker TV Rear Panel 1) Connect ...to the RIGHT AUDIO INPUT on page 56. Front Front Surround TV Rear Panel CENTER CHANNEL INPUT CENTER CHANNEL OUTPUT (VARIABLE OUTPUT) 1) Connect the Pin cable from the center speaker. Notes: • Refer to your amplifier's manual for more information. • You...
...the Surround Amplifier (HD-56FH97, HD-61FH97, HD-70FH97, HD-56FN97, HD-61FN97, HD-70FN97 ONLY) In multi-channel sound such as in a movie theater in the movie more naturally. Connecting to an External Amplifier S-VIDEO VIDEO R L MONITOR R L /REC OUT AUDIO OUTPUT Speaker Amplifier Speaker TV Rear Panel 1) Connect ...to the RIGHT AUDIO INPUT on page 56. Front Front Surround TV Rear Panel CENTER CHANNEL INPUT CENTER CHANNEL OUTPUT (VARIABLE OUTPUT) 1) Connect the Pin cable from the center speaker. Notes: • Refer to your amplifier's manual for more information. • You...

User Guide
Page 20
The signal that has an optical digital input terminal by using an optical digital cable from the back of the TV to use the optical output connection, select PCM or Dolby Digital on using your optical output You can connect an amplifier that is output can ... back of the amplifier. Notes: • This terminal can be PCM or Dolby Digital. TV Rear Panel Amplifier OPTICAL OUT Digital Audio 1) Connect the optical cable from the optical output. See page 57. • Refer to your owners manual on Digital Sound in the Digital Setup Menu. Quick Setup Connecting to an amplifier...
The signal that has an optical digital input terminal by using an optical digital cable from the back of the TV to use the optical output connection, select PCM or Dolby Digital on using your optical output You can connect an amplifier that is output can ... back of the amplifier. Notes: • This terminal can be PCM or Dolby Digital. TV Rear Panel Amplifier OPTICAL OUT Digital Audio 1) Connect the optical cable from the optical output. See page 57. • Refer to your owners manual on Digital Sound in the Digital Setup Menu. Quick Setup Connecting to an amplifier...

User Guide
Page 23
...as the V1 Smart Input. L INPUT-1 R - In this case we recommend using the S-Video connection. 23 L INPUT-2 R - AV Receiver MONITOR OUT Y PB PR MONITOR OUT TV Rear Panel S-VIDEO VIDEO OVER VIDEO S-VIDEO VIDEO OVER CENTER CHANNELINPUT Y R - AUDIO - L INPUT-3 R - L HDMI 1 Pb Pr INPUT-1 S-VIDEO Y Pb VIDEO R Pr ... Composite connection at the same time when you to free up the other input connections on your TV. AUDIO - Note: • Please refer to your AV Receiver instruction manual for more devices to the S-Video INPUT-1 on the back of your television. 2) Connect a...
...as the V1 Smart Input. L INPUT-1 R - In this case we recommend using the S-Video connection. 23 L INPUT-2 R - AV Receiver MONITOR OUT Y PB PR MONITOR OUT TV Rear Panel S-VIDEO VIDEO OVER VIDEO S-VIDEO VIDEO OVER CENTER CHANNELINPUT Y R - AUDIO - L INPUT-3 R - L HDMI 1 Pb Pr INPUT-1 S-VIDEO Y Pb VIDEO R Pr ... Composite connection at the same time when you to free up the other input connections on your TV. AUDIO - Note: • Please refer to your AV Receiver instruction manual for more devices to the S-Video INPUT-1 on the back of your television. 2) Connect a...

User Guide
Page 24
... device. • Refer to your owners manual on using your television i.LINK is used for recording. 24 The logo is a digital serial interface that allows devices equipped with i.LINK D-VHS decks and HD-Camcorders (JVC brand only). This projection television uses a four-pin i.LINK connector ...signals and device control signals bi-directionally over a single cable. (For example, a JVC D-VHS VCR). i.LINK refers to input and output MPEG2 video signals, audio signals and control signals. TV Rear Panel OPTICAL OUT Digital Audio i.LINK Compatible Device 1) Connect the i.LINK cable from the...
... device. • Refer to your owners manual on using your television i.LINK is used for recording. 24 The logo is a digital serial interface that allows devices equipped with i.LINK D-VHS decks and HD-Camcorders (JVC brand only). This projection television uses a four-pin i.LINK connector ...signals and device control signals bi-directionally over a single cable. (For example, a JVC D-VHS VCR). i.LINK refers to input and output MPEG2 video signals, audio signals and control signals. TV Rear Panel OPTICAL OUT Digital Audio i.LINK Compatible Device 1) Connect the i.LINK cable from the...

User Guide
Page 25
... OUT AUDIO OUTPUT 75Ω (VHF/UHF) INPUT-3 PC IN (D-SUB) Notes: • Refer to your computer manual for a detailed explanation of the connections concerning your computer. • Make sure that the connectors are facing the correct ...the computer can be seen. 25 Quick Setup Connecting to the computer (HD-56FH97, HD-61FH97, HD-70FH97, HD-56FN97, HD-61FN97 and HD-70FN97 ONLY) This TV can be listened to, but the images from the computer cannot be used... terminal to choose INPUT-3. AUDIO - TV Rear Panel S-VIDEO VIDEO OVER VIDEO S-VIDEO VIDEO OVER CENTER CHANNELINPUT Y R -
... OUT AUDIO OUTPUT 75Ω (VHF/UHF) INPUT-3 PC IN (D-SUB) Notes: • Refer to your computer manual for a detailed explanation of the connections concerning your computer. • Make sure that the connectors are facing the correct ...the computer can be seen. 25 Quick Setup Connecting to the computer (HD-56FH97, HD-61FH97, HD-70FH97, HD-56FN97, HD-61FN97 and HD-70FN97 ONLY) This TV can be listened to, but the images from the computer cannot be used... terminal to choose INPUT-3. AUDIO - TV Rear Panel S-VIDEO VIDEO OVER VIDEO S-VIDEO VIDEO OVER CENTER CHANNELINPUT Y R -

User Guide
Page 26
... (Hz) Horizontal Frequency (kHz) 60.0 31.5 60.0 48.4 • Only the above formats are supported. • Even with this TV. Refer to the computer's instruction manual. *Apple Macintosh is invalid, "Invalid Signal" will appear on the quality of Apple Computer, Inc. It appears when the input is PC ...displayed With some computers, some problems can not be used with the above formats at 60 Hz, some pictures may be experienced depending on the TV screen. When a picture is a single screen. 26 Check the computer's refresh rate and set the refresh rate to 60Hz. Note: •...
... (Hz) Horizontal Frequency (kHz) 60.0 31.5 60.0 48.4 • Only the above formats are supported. • Even with this TV. Refer to the computer's instruction manual. *Apple Macintosh is invalid, "Invalid Signal" will appear on the quality of Apple Computer, Inc. It appears when the input is PC ...displayed With some computers, some problems can not be used with the above formats at 60 Hz, some pictures may be experienced depending on the TV screen. When a picture is a single screen. 26 Check the computer's refresh rate and set the refresh rate to 60Hz. Note: •...

User Guide
Page 27
... 37. • If you press the Menu button while setting up the interactive plug-in menu, it . Language After the "JVC INTERACTIVE PLUG IN MENU" has been displayed, the TV automatically switches to receive. LANGUAGE/LANGUE/IDIOMA ENGLISH √® † To choose a language: ENGLISH, FRANÇAIS or ...for: • The language in three languages: ENGLISH, FRANÇAIS (French) or ESPAÑOL (Spanish). You can choose "AUTO" or "MANUAL" for the first time the interactive plug-in menu helps you wish to the LANGUAGE settings. The Interactive Plug In Menu When you turn your...
... 37. • If you press the Menu button while setting up the interactive plug-in menu, it . Language After the "JVC INTERACTIVE PLUG IN MENU" has been displayed, the TV automatically switches to receive. LANGUAGE/LANGUE/IDIOMA ENGLISH √® † To choose a language: ENGLISH, FRANÇAIS or ...for: • The language in three languages: ENGLISH, FRANÇAIS (French) or ESPAÑOL (Spanish). You can choose "AUTO" or "MANUAL" for the first time the interactive plug-in menu helps you wish to the LANGUAGE settings. The Interactive Plug In Menu When you turn your...
User Guide
Page 28
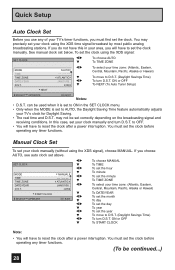
...XDS time signal broadcast by most public analog broadcasting stations. You must set the clock before operating any timer functions. may precisely set your clock manually (without using the XDS signal: SET CLOCK √® † To choose AUTO To TIME ZONE MODE TIME TIME ZONE DATE/YEAR D.S.T.... To TIME ZONE To select your area, you will have this case, set your TV's clock for Daylight Saving. • The real time and D.S.T. See manual clock set the clock using the XDS signal), choose MANUAL. In this in the SET CLOCK menu. • Only when the MODE is ...
...XDS time signal broadcast by most public analog broadcasting stations. You must set the clock before operating any timer functions. may precisely set your clock manually (without using the XDS signal: SET CLOCK √® † To choose AUTO To TIME ZONE MODE TIME TIME ZONE DATE/YEAR D.S.T.... To TIME ZONE To select your area, you will have this case, set your TV's clock for Daylight Saving. • The real time and D.S.T. See manual clock set the clock using the XDS signal), choose MANUAL. In this in the SET CLOCK menu. • Only when the MODE is ...

User Guide
Page 47
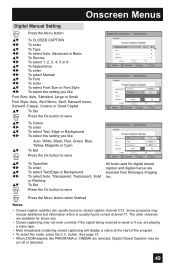
... you are watching analog channels, you can access and display this information using the closed caption. Your television can perform Digital Auto Setting or Digital Manual Setting. When you are three methods.
... you are watching analog channels, you can access and display this information using the closed caption. Your television can perform Digital Auto Setting or Digital Manual Setting. When you are three methods.
User Guide
Page 49
...Magenta or Cyan To Set Press the OK button to save Digital Closed Caption > Appearance Preview Closed Caption Sample Appearance ModeText Manual White Font Edge White Colors Background Black Opacities Cancel Set Cancel Set Select BACK Operate Back MENU Exit π† √...button to save Digital Closed Caption > Appearance Preview Closed Caption Sample Appearance Mode Font Colors Opacities Cancel Select Operate Manual Set BACK Back MENU Exit Digital Closed Caption > Appearance Preview Closed Caption Sample Appearance ModeFont Size ManualStandard Font ...
...Magenta or Cyan To Set Press the OK button to save Digital Closed Caption > Appearance Preview Closed Caption Sample Appearance ModeText Manual White Font Edge White Colors Background Black Opacities Cancel Set Cancel Set Select BACK Operate Back MENU Exit π† √...button to save Digital Closed Caption > Appearance Preview Closed Caption Sample Appearance Mode Font Colors Opacities Cancel Select Operate Manual Set BACK Back MENU Exit Digital Closed Caption > Appearance Preview Closed Caption Sample Appearance ModeFont Size ManualStandard Font ...

User Guide
Page 55
... π† √® To DIGITAL-IN1 AUDIO To select ANALOG, DIGITAL or AUTO PREVIOUS VIDEO-1 MONITOR OUT TV SPEAKER OFF ON Press the Menu button when finished AUDIO OUT DIGITAL-IN VARI AUTO Notes: DIGITAL-IN1 AUDIO CENTER... CH INPUT DIGITAL OFF • If your TV. Onscreen Menus Digital-In The DIGITAL-IN option can select AUTO only when the signal is 480p for more information. ...your DTV or HDMI component is input to your DTV or HDMI component's instruction manual for HDMI.
... π† √® To DIGITAL-IN1 AUDIO To select ANALOG, DIGITAL or AUTO PREVIOUS VIDEO-1 MONITOR OUT TV SPEAKER OFF ON Press the Menu button when finished AUDIO OUT DIGITAL-IN VARI AUTO Notes: DIGITAL-IN1 AUDIO CENTER... CH INPUT DIGITAL OFF • If your TV. Onscreen Menus Digital-In The DIGITAL-IN option can select AUTO only when the signal is 480p for more information. ...your DTV or HDMI component is input to your DTV or HDMI component's instruction manual for HDMI.

User Guide
Page 58
...; π† To DIGITAL SETUP To enter To Software Update To enter Checks the card if it to i.LINK input automatically OFF: Select the input manually Press the MENU button when finished Software Update At first, insert the SD(Multi-media) card into the memory card slot. Press the MENU button...;† √® To DIGITAL SETUP To enter To i.LINK Auto Play To select ON or OFF ON: Set to the i.LINK input automatically, or manually. This function will perform i.LINK Auto Play When playing a D-VHS tape, you insert an SD Card.
...; π† To DIGITAL SETUP To enter To Software Update To enter Checks the card if it to i.LINK input automatically OFF: Select the input manually Press the MENU button when finished Software Update At first, insert the SD(Multi-media) card into the memory card slot. Press the MENU button...;† √® To DIGITAL SETUP To enter To i.LINK Auto Play To select ON or OFF ON: Set to the i.LINK input automatically, or manually. This function will perform i.LINK Auto Play When playing a D-VHS tape, you insert an SD Card.

User Guide
Page 63
...; π† √® π† √® To move to the hours To set the hours To move to set the clock automatically or manually. ON or OFF Press OK to set the clock again, follow the steps below. TIME ZONE DATE/YEAR D.S.T. can choose to minutes To set the... π† √® To SET CLOCK To enter When you set the clock manually, choose MANUAL by pressing the √ or ® arrows. π† √® π† √® To TIME ZONE To select your TV's clock for Daylight Saving. • The real time and D.S.T. ATLANTIC JAN/01/06 ON...
...; π† √® π† √® To move to the hours To set the hours To move to set the clock automatically or manually. ON or OFF Press OK to set the clock again, follow the steps below. TIME ZONE DATE/YEAR D.S.T. can choose to minutes To set the... π† √® To SET CLOCK To enter When you set the clock manually, choose MANUAL by pressing the √ or ® arrows. π† √® π† √® To TIME ZONE To select your TV's clock for Daylight Saving. • The real time and D.S.T. ATLANTIC JAN/01/06 ON...

User Guide
Page 86
... the TV on, you need to replace the lamp. The replacement kit will include the following: 1 High-Pressure Mercury Lamp 1 Instruction Manual Because... the lamp contains a small amount of with normal trash. REFER TO OWNER'S MANUAL FOR REPLACEMENT INSTRUCTIONS. Press... the OK button to be disposed of mercury, it cannot be replaced. See page 87 on the TV... when the lamp needs to make the message disappear, or replace the lamp. 86 AFTER REPLACING THE LAMP, PLEASE RESET TIMER IN THE TV...
... the TV on, you need to replace the lamp. The replacement kit will include the following: 1 High-Pressure Mercury Lamp 1 Instruction Manual Because... the lamp contains a small amount of with normal trash. REFER TO OWNER'S MANUAL FOR REPLACEMENT INSTRUCTIONS. Press... the OK button to be disposed of mercury, it cannot be replaced. See page 87 on the TV... when the lamp needs to make the message disappear, or replace the lamp. 86 AFTER REPLACING THE LAMP, PLEASE RESET TIMER IN THE TV...


