User Guide
Page 2
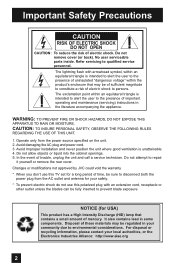
...the AC outlet and antenna for your safety. * To prevent electric shock do not use this TV set for USA) This product has a High Intensity Discharge (HID) lamp that may be fully ... "dangerous voltage" within an equilateral triangle is unattainable. 4. Changes or modifications not approved by JVC could void the warranty. * When you don't use this polarized plug with arrowhead symbol, within... technician. In the event of electric shock. Refer servicing to repair it yourself or remove the rear cover. Do not allow objects or liquid into the cabinet openings. 5. It also contains lead...
...the AC outlet and antenna for your safety. * To prevent electric shock do not use this TV set for USA) This product has a High Intensity Discharge (HID) lamp that may be fully ... "dangerous voltage" within an equilateral triangle is unattainable. 4. Changes or modifications not approved by JVC could void the warranty. * When you don't use this polarized plug with arrowhead symbol, within... technician. In the event of electric shock. Refer servicing to repair it yourself or remove the rear cover. Do not allow objects or liquid into the cabinet openings. 5. It also contains lead...

User Guide
Page 3
...technology that produce heat. 9) Do not defeat the safety purpose of the copyright owner. Reverse engineering or disassembly is "ON", turn the TV/VCR switch to avoid injury from producers as radiators, heat registers, stoves, or other . Install in any heat sources such as "...plugs, convenience receptacles, and the point where they exit from the apparatus. 11) Only use caution when moving the cart/apparatus combination to the "TV" position. IMPORTANT SAFETY INSTRUCTIONS 1) Read these instructions. 2) Keep these instructions. 3) Heed all warnings. 4) Follow all servicing to rain or ...
...technology that produce heat. 9) Do not defeat the safety purpose of the copyright owner. Reverse engineering or disassembly is "ON", turn the TV/VCR switch to avoid injury from producers as radiators, heat registers, stoves, or other . Install in any heat sources such as "...plugs, convenience receptacles, and the point where they exit from the apparatus. 11) Only use caution when moving the cart/apparatus combination to the "TV" position. IMPORTANT SAFETY INSTRUCTIONS 1) Read these instructions. 2) Keep these instructions. 3) Heed all warnings. 4) Follow all servicing to rain or ...

User Guide
Page 4
...) Make enough room for use only with JVC Model RK-CPRM7 and RK-CEXM7 stand. Ensure that sufficient space is for inserting and removing the power plug. The main power supply for HD-56FH97, HD-61FH97, HD-70FH97, HD-56FN97, HD-61FN97 and HD-70FN97. Consult the dealer or an experienced radio/TV technician for help. • FCC notice...
...) Make enough room for use only with JVC Model RK-CPRM7 and RK-CEXM7 stand. Ensure that sufficient space is for inserting and removing the power plug. The main power supply for HD-56FH97, HD-61FH97, HD-70FH97, HD-56FN97, HD-61FN97 and HD-70FN97. Consult the dealer or an experienced radio/TV technician for help. • FCC notice...

User Guide
Page 5
... wipe it . If the screen is treated with a soft, non-scratching duster will remove the coating layer and cause discolorations. These will keep your TV clean. You can add a few drops of mild liquid detergent to the water to help remove spots of oily dirt. • DO NOT allow liquid...on the screen surface and image distortions. 5 Wipe the set gently with a soft cloth. This could cause scratches on the TV's surface. • DO NOT rub or scrub the TV harshly. Warnings Caring for the Screen The screen is very dirty, wipe it down the television, first unplug it gently with...
... wipe it . If the screen is treated with a soft, non-scratching duster will remove the coating layer and cause discolorations. These will keep your TV clean. You can add a few drops of mild liquid detergent to the water to help remove spots of oily dirt. • DO NOT allow liquid...on the screen surface and image distortions. 5 Wipe the set gently with a soft cloth. This could cause scratches on the TV's surface. • DO NOT rub or scrub the TV harshly. Warnings Caring for the Screen The screen is very dirty, wipe it down the television, first unplug it gently with...

User Guide
Page 6
...recommended that you can be operated while the cooling is pressed to learn about this television which the TV is displayed only dimly on the front panel of the television that are performed. What happens when ... a lamp to the life of malfunctions. Note: It is impossible to the safe use the television for purchasing a JVC HDTV-ready projection television which will help you can not be used . 6 The lamp is being shortened and the possibility of the ... takes approximately one of the device and important information which uses the high-quality HD-ILA projection system.
...recommended that you can be operated while the cooling is pressed to learn about this television which the TV is displayed only dimly on the front panel of the television that are performed. What happens when ... a lamp to the life of malfunctions. Note: It is impossible to the safe use the television for purchasing a JVC HDTV-ready projection television which will help you can not be used . 6 The lamp is being shortened and the possibility of the ... takes approximately one of the device and important information which uses the high-quality HD-ILA projection system.

User Guide
Page 7
...still parts of time. This is a possibility of the socket. Please do not open the rear cabinet of this case, wait until the condensation has gone before it with a soft cloth....use . If the television is used by the screen frame. Caution! ILA element characteristics Do not project still pictures or pictures that is called condensation. In this television This television has a DIGITAL-IN ...becomes extremely hot during use before using an extension cord, be careful not to keep the TV on the lamp and screen. This is being used while this television, Do not hold...
...still parts of time. This is a possibility of the socket. Please do not open the rear cabinet of this case, wait until the condensation has gone before it with a soft cloth....use . If the television is used by the screen frame. Caution! ILA element characteristics Do not project still pictures or pictures that is called condensation. In this television This television has a DIGITAL-IN ...becomes extremely hot during use before using an extension cord, be careful not to keep the TV on the lamp and screen. This is being used while this television, Do not hold...

User Guide
Page 9
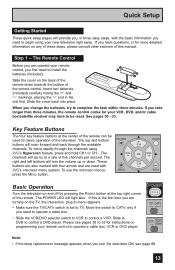
... to this guide, your television box should include: Television x 1 Remote Control x 1 AA Batteries x 2 AA Alkaline AA Alkaline TV CATV VCR DVD POWER ASPECT MULTI SCREEN TWIN INDEX SELECT SLEEP FREEZE SWAP ML/MTS DISPLAY + INPUT 123 D/A 4 5 6 i.LINK... MENU 78 TIMER TUNE 0 THEATER VIDEO FAVORITE PRO STATUS C.C. Quick Setup Unpacking your TV Thank you 're anxious to start using your television right away, a quick setup guide follows on the next few pages. 9... about your entire User's Guide so you have all of a JVC Color Television.
... to this guide, your television box should include: Television x 1 Remote Control x 1 AA Batteries x 2 AA Alkaline AA Alkaline TV CATV VCR DVD POWER ASPECT MULTI SCREEN TWIN INDEX SELECT SLEEP FREEZE SWAP ML/MTS DISPLAY + INPUT 123 D/A 4 5 6 i.LINK... MENU 78 TIMER TUNE 0 THEATER VIDEO FAVORITE PRO STATUS C.C. Quick Setup Unpacking your TV Thank you 're anxious to start using your television right away, a quick setup guide follows on the next few pages. 9... about your entire User's Guide so you have all of a JVC Color Television.

User Guide
Page 10
... - Quick Setup TV Models Before you in understanding how to connect your television to another device, please refer to update the software version. • For governing the usage of the RS-232C terminal, consult your dealer. (HD-56FH97, HD-61FH97 or HD-70FH97 ONLY) • HD-56FC97 or HD-61FC97 does not .../UHF) INPUT-3 PC IN (D-SUB) i.LINK IN/OUT S400(TS) 1 DIGITAL-IN 2 RS-232C LICENSED UNDER THE FOLLOWING U.S. L INPUT-2 R - L INPUT-3 R - AUDIO - L INPUT-1 R - Rear Panel Diagram SERVICE ONLY S-VIDEO VIDEO OVER VIDEO S-VIDEO VIDEO OVER CENTER CHANNELINPUT Y R -
... - Quick Setup TV Models Before you in understanding how to connect your television to another device, please refer to update the software version. • For governing the usage of the RS-232C terminal, consult your dealer. (HD-56FH97, HD-61FH97 or HD-70FH97 ONLY) • HD-56FC97 or HD-61FC97 does not .../UHF) INPUT-3 PC IN (D-SUB) i.LINK IN/OUT S400(TS) 1 DIGITAL-IN 2 RS-232C LICENSED UNDER THE FOLLOWING U.S. L INPUT-2 R - L INPUT-3 R - AUDIO - L INPUT-1 R - Rear Panel Diagram SERVICE ONLY S-VIDEO VIDEO OVER VIDEO S-VIDEO VIDEO OVER CENTER CHANNELINPUT Y R -

User Guide
Page 12
... CHANNEL SUB LIGHT MUTING CH GUIDE VOL OK VOL CH MENU VCR CHANNEL PREV NEXT BACK VCR DVD POWER TV VCR REW PLAY FF REC STOP PAUSE OPEN CLOSE STILL PAUSE RM-C14G RM-C14G • For information on remote control buttons, see pages 66 - ...82. • i.LINK MENU, TIMER, SUB CHANNEL and GUIDE buttons are for digital channels. If your TV is connected to an ATSC antenna or Digital Cable, you can use these buttons. 12 Quick Setup Remote Control...
... CHANNEL SUB LIGHT MUTING CH GUIDE VOL OK VOL CH MENU VCR CHANNEL PREV NEXT BACK VCR DVD POWER TV VCR REW PLAY FF REC STOP PAUSE OPEN CLOSE STILL PAUSE RM-C14G RM-C14G • For information on remote control buttons, see pages 66 - ...82. • i.LINK MENU, TIMER, SUB CHANNEL and GUIDE buttons are for digital channels. If your TV is connected to an ATSC antenna or Digital Cable, you can use these buttons. 12 Quick Setup Remote Control...
User Guide
Page 13
...four arrows and are turning on any of these steps, please consult other sections of the television. These buttons are also marked with CH JVC's onscreen menu system. The POWER LED will turn the television ON, see pages 30 to 33 for instructions on programming your remote control... Basic Operation Turn the television on the back of the remote down . The Remote Control Before you are used for more detailed information on the TV, the interactive plug-in the unit first. Slide the cover back into place. Insert two batteries (included) carefully noting the "+" and "-" markings,...
...four arrows and are turning on any of these steps, please consult other sections of the television. These buttons are also marked with CH JVC's onscreen menu system. The POWER LED will turn the television ON, see pages 30 to 33 for instructions on programming your remote control... Basic Operation Turn the television on the back of the remote down . The Remote Control Before you are used for more detailed information on the TV, the interactive plug-in the unit first. Slide the cover back into place. Insert two batteries (included) carefully noting the "+" and "-" markings,...
User Guide
Page 14
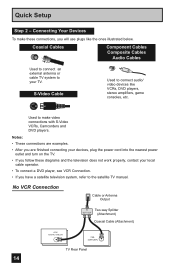
... Cable or Antenna Output IN Two-way Splitter OUT OUT (Attachment) Coaxial Cable (Attachment) 14 ATSC /DIGITAL CABLE IN 75Ω (VHF/UHF) TV Rear Panel Quick Setup Step 2 - Connecting Your Devices To make these diagrams and the television does not work properly, contact your...connections are examples. • After you are finished connecting your devices, plug the power cord into the nearest power outlet and turn on the TV. • If you follow these connections, you have a satellite television system, refer to make video connections with S-Video VCRs, Camcorders and DVD players...
... Cable or Antenna Output IN Two-way Splitter OUT OUT (Attachment) Coaxial Cable (Attachment) 14 ATSC /DIGITAL CABLE IN 75Ω (VHF/UHF) TV Rear Panel Quick Setup Step 2 - Connecting Your Devices To make these diagrams and the television does not work properly, contact your...connections are examples. • After you are finished connecting your devices, plug the power cord into the nearest power outlet and turn on the TV. • If you follow these connections, you have a satellite television system, refer to make video connections with S-Video VCRs, Camcorders and DVD players...

User Guide
Page 15
... Antenna Output VCR IN OUT V R L IN OUT Two-Way Splitter (Attachment) IN OUT OUT Coaxial Cable (Attachment) ATSC /DIGITAL CABLE IN I 75Ω (VHF/UHF) TV Rear Panel OR S-VIDEO VIDEO OVER VIDEO S-VIDEO VIDEO OVER CENTER CHANNELINPUT Y R - AUDIO - L INPUT-2 R - L INPUT-3 R - It is best to complete one set of connections (DVD or...
... Antenna Output VCR IN OUT V R L IN OUT Two-Way Splitter (Attachment) IN OUT OUT Coaxial Cable (Attachment) ATSC /DIGITAL CABLE IN I 75Ω (VHF/UHF) TV Rear Panel OR S-VIDEO VIDEO OVER VIDEO S-VIDEO VIDEO OVER CENTER CHANNELINPUT Y R - AUDIO - L INPUT-2 R - L INPUT-3 R - It is best to complete one set of connections (DVD or...

User Guide
Page 17
...you try and record copyright protected programs using a VCR, the picture will not be distorted on the TV. This is not a malfunction of the copyright protection system. Quick Setup Connecting to Monitor/Recording Output Terminal TV Rear Panel S-VIDEO VIDEO R L MONITOR R L /REC OUT AUDIO OUTPUT OR VCR IN OUT IN ... signal, it can be outputted to the S-Video output terminal or Video (composite video) terminal. • If you are receiving Analog TV signal, it can not be outputted to the S-Video output terminal. • No signal will be outputted through the S-Video output terminal...
...you try and record copyright protected programs using a VCR, the picture will not be distorted on the TV. This is not a malfunction of the copyright protection system. Quick Setup Connecting to Monitor/Recording Output Terminal TV Rear Panel S-VIDEO VIDEO R L MONITOR R L /REC OUT AUDIO OUTPUT OR VCR IN OUT IN ... signal, it can be outputted to the S-Video output terminal or Video (composite video) terminal. • If you are receiving Analog TV signal, it can not be outputted to the S-Video output terminal. • No signal will be outputted through the S-Video output terminal...
User Guide
Page 18
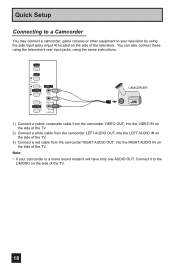
... from the camcorder LEFT AUDIO OUT, into the LEFT AUDIO IN on the side of the TV. 3) Connect a red cable from the camcorder RIGHT AUDIO OUT, into the RIGHT AUDIO IN on the side of the TV. INPUT MENU OPERATE + CHANNEL - Connect it to your camcorder is a mono sound model it will... have only one AUDIO OUT. You can also connect these using the television's rear input jacks, using the side input jacks (Input 4) located on the...
... from the camcorder LEFT AUDIO OUT, into the LEFT AUDIO IN on the side of the TV. 3) Connect a red cable from the camcorder RIGHT AUDIO OUT, into the RIGHT AUDIO IN on the side of the TV. INPUT MENU OPERATE + CHANNEL - Connect it to your camcorder is a mono sound model it will... have only one AUDIO OUT. You can also connect these using the television's rear input jacks, using the side input jacks (Input 4) located on the...

User Guide
Page 19
... sound from the center speaker. Front Front Surround TV Rear Panel CENTER CHANNEL INPUT CENTER CHANNEL OUTPUT (VARIABLE OUTPUT) 1) Connect the Pin cable from the TV's CENTER CHANNEL INPUT terminal to the Surround Amplifier (HD-56FH97, HD-61FH97, HD-70FH97, HD-56FN97, HD-61FN97, HD-70FN97 ONLY) In multi-channel sound such as in... can use AUDIO OUTPUT for your TV's speaker as the center speaker, you can obtain the same sound effect as 5.1 channel, the speech characters are played back from an HDMI device connected to the RIGHT AUDIO INPUT on page 56. By using your home theater system...
... sound from the center speaker. Front Front Surround TV Rear Panel CENTER CHANNEL INPUT CENTER CHANNEL OUTPUT (VARIABLE OUTPUT) 1) Connect the Pin cable from the TV's CENTER CHANNEL INPUT terminal to the Surround Amplifier (HD-56FH97, HD-61FH97, HD-70FH97, HD-56FN97, HD-61FN97, HD-70FN97 ONLY) In multi-channel sound such as in... can use AUDIO OUTPUT for your TV's speaker as the center speaker, you can obtain the same sound effect as 5.1 channel, the speech characters are played back from an HDMI device connected to the RIGHT AUDIO INPUT on page 56. By using your home theater system...

User Guide
Page 20
... terminal by using an optical digital cable from the back of the amplifier. See page 57. • Refer to the back of the TV to your owners manual on Digital Sound in the Digital Setup Menu. Quick Setup Connecting to an amplifier using your optical output You can be... PCM or Dolby Digital. TV Rear Panel Amplifier OPTICAL OUT Digital Audio 1) Connect the optical cable from the optical output. Notes: • This terminal can only output digital audio. &#...
... terminal by using an optical digital cable from the back of the amplifier. See page 57. • Refer to the back of the TV to your owners manual on Digital Sound in the Digital Setup Menu. Quick Setup Connecting to an amplifier using your optical output You can be... PCM or Dolby Digital. TV Rear Panel Amplifier OPTICAL OUT Digital Audio 1) Connect the optical cable from the optical output. Notes: • This terminal can only output digital audio. &#...
User Guide
Page 21
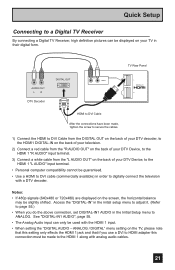
..." input terminal. 3) Connect a white cable from the "L AUDIO OUT" on the back of your TV in their digital form. Quick Setup Connecting to a Digital TV Receiver By connecting a Digital TV Receiver, high definition pictures can only be slightly shifted. Notes: • If 480p signals (640x480 or... to DVI cable (commercially available) in order to digitally connect the television with the HDMI 1 input. • When setting the "DIGITAL AUDIO - TV Rear Panel AUDIO OUT LR DTV Decoder DIGITAL OUT R - ANALOG / DIGITAL" menu setting on the screen, the horizontal balance may be used with a ...
..." input terminal. 3) Connect a white cable from the "L AUDIO OUT" on the back of your TV in their digital form. Quick Setup Connecting to a Digital TV Receiver By connecting a Digital TV Receiver, high definition pictures can only be slightly shifted. Notes: • If 480p signals (640x480 or... to DVI cable (commercially available) in order to digitally connect the television with the HDMI 1 input. • When setting the "DIGITAL AUDIO - TV Rear Panel AUDIO OUT LR DTV Decoder DIGITAL OUT R - ANALOG / DIGITAL" menu setting on the screen, the horizontal balance may be used with a ...

User Guide
Page 22
L HDMI 1 HDMI Cable TV Rear Panel 1 DIGITAL-IN 2 1) Connect the HDMI Cable from the HDMI device. 22 Quick Setup Connecting to an HDMI Compatible Device By connecting an HDMI compatible ... "HDMI 1" jacks, while you have an HDMI device connected to the HDMI 1 connection on the back of your TV in the Initial Setup menu to the DIGITAL-IN on the back of your TV, your TV detects it, and blocks the analog audio signal coming into the "HDMI 1" jacks. Therefore, you do the...
L HDMI 1 HDMI Cable TV Rear Panel 1 DIGITAL-IN 2 1) Connect the HDMI Cable from the HDMI device. 22 Quick Setup Connecting to an HDMI Compatible Device By connecting an HDMI compatible ... "HDMI 1" jacks, while you have an HDMI device connected to the HDMI 1 connection on the back of your TV in the Initial Setup menu to the DIGITAL-IN on the back of your TV, your TV detects it, and blocks the analog audio signal coming into the "HDMI 1" jacks. Therefore, you do the...

User Guide
Page 23
AUDIO - In this case we recommend using V1 Input as the V1 Smart Input. L INPUT-3 R - AUDIO - L INPUT-2 R - AV Receiver MONITOR OUT Y PB PR MONITOR OUT TV Rear Panel S-VIDEO VIDEO OVER VIDEO S-VIDEO VIDEO OVER CENTER CHANNELINPUT Y R - L INPUT-1 R - L HDMI 1 Pb Pr INPUT-1 S-VIDEO Y Pb VIDEO R Pr INPUT-2 L MONITOR R L /REC OUT AUDIO OUTPUT 1) ... INPUT-1 on the back of your television. AUDIO - Note: • Please refer to your AV Receiver instruction manual for each input device connected to your TV.
AUDIO - In this case we recommend using V1 Input as the V1 Smart Input. L INPUT-3 R - AUDIO - L INPUT-2 R - AV Receiver MONITOR OUT Y PB PR MONITOR OUT TV Rear Panel S-VIDEO VIDEO OVER VIDEO S-VIDEO VIDEO OVER CENTER CHANNELINPUT Y R - L INPUT-1 R - L HDMI 1 Pb Pr INPUT-1 S-VIDEO Y Pb VIDEO R Pr INPUT-2 L MONITOR R L /REC OUT AUDIO OUTPUT 1) ... INPUT-1 on the back of your television. AUDIO - Note: • Please refer to your AV Receiver instruction manual for each input device connected to your TV.

User Guide
Page 24
TV Rear Panel OPTICAL OUT Digital Audio i.LINK Compatible Device 1) Connect the i.LINK cable from the back of the TV to the back of your i.LINK device. • When recording or playing back video with an i.LINK connector to exchange digital video ...recorded contents in Digital Mode. • Use only tapes bearing the DVHS (SVHS) mark for products compliant with i.LINK D-VHS decks and HD-Camcorders (JVC brand only). This projection television uses a four-pin i.LINK connector to the IEEE1394-1995 industry specification and extensions thereof. Notes: • Use only the S400 i....
TV Rear Panel OPTICAL OUT Digital Audio i.LINK Compatible Device 1) Connect the i.LINK cable from the back of the TV to the back of your i.LINK device. • When recording or playing back video with an i.LINK connector to exchange digital video ...recorded contents in Digital Mode. • Use only tapes bearing the DVHS (SVHS) mark for products compliant with i.LINK D-VHS decks and HD-Camcorders (JVC brand only). This projection television uses a four-pin i.LINK connector to the IEEE1394-1995 industry specification and extensions thereof. Notes: • Use only the S400 i....


