
Software Guide
Page 2
... the conditions of Japan, Limited ("JVC") to You only on the PC with a Camera 17 Playing Back Copied Video 17 User's Guide/Help/Readme 18 For Macintosh Users Preparation 19 Software Installation 19 Connections 21 Connecting the Camera to the PC 23 Help/Readme 23 JVC SOFTWARE LICENSE AGREEMENT IMPORTANT TO CUSTOMERS: PLEASE MAKE SURE TO READ THIS CAREFULLY BEFORE INSTALLING OR USING THE SOFTWARE PROGRAM NAMED "DIGITAL PHOTO NAVIGATOR" ("Program") ON YOUR...
... the conditions of Japan, Limited ("JVC") to You only on the PC with a Camera 17 Playing Back Copied Video 17 User's Guide/Help/Readme 18 For Macintosh Users Preparation 19 Software Installation 19 Connections 21 Connecting the Camera to the PC 23 Help/Readme 23 JVC SOFTWARE LICENSE AGREEMENT IMPORTANT TO CUSTOMERS: PLEASE MAKE SURE TO READ THIS CAREFULLY BEFORE INSTALLING OR USING THE SOFTWARE PROGRAM NAMED "DIGITAL PHOTO NAVIGATOR" ("Program") ON YOUR...

Software Guide
Page 11
... the selected software starts. This software uses a simple wizard format for the video or slideshow and write the contents to complete the installation. PowerDVD 5 NE PowerDVD 5 NE is software for playing back DVD-Video and video files. 1 Load the provided CD-ROM into a variety of formats. The installation of different format discs. The [CyberLink DVD Solution Setup] screen in either timeline or storyboard mode, maintains superior image quality, uses SVRT for high-speed rendering...
... the selected software starts. This software uses a simple wizard format for the video or slideshow and write the contents to complete the installation. PowerDVD 5 NE PowerDVD 5 NE is software for playing back DVD-Video and video files. 1 Load the provided CD-ROM into a variety of formats. The installation of different format discs. The [CyberLink DVD Solution Setup] screen in either timeline or storyboard mode, maintains superior image quality, uses SVRT for high-speed rendering...

Software Guide
Page 13
... closed during installation, [Information] screen appears. Windows® - 13 - Please install and use an extension USB cable. CONTINUED ON NEXT PAGE If it is connected, turning on or off before installing the provided software. To USB connector Camera 1 To assure safety, make sure all units are turned off the camera causes malfunctions of the battery pack. ● When the USB cable is running during CyberLink DVD Solution installation. NOTES: ●...
... closed during installation, [Information] screen appears. Windows® - 13 - Please install and use an extension USB cable. CONTINUED ON NEXT PAGE If it is connected, turning on or off before installing the provided software. To USB connector Camera 1 To assure safety, make sure all units are turned off the camera causes malfunctions of the battery pack. ● When the USB cable is running during CyberLink DVD Solution installation. NOTES: ●...

Software Guide
Page 15
... the card is set in the camera. 2 Set the camera's power switch to view files using Windows Explorer] and click [OK]. When using Windows® XP: The [EVERIO_HDD]/ [EVERIO_SD] window appears on the [FOLDER] option setting of Windows®. - 15 - When it is moved to delete a file from a recording medium, delete it with the operation of a Recording Medium 5 The folders in the [My Computer] window. 2 Double-click the [EVERIO_HDD]/ [EVERIO_SD] icon. Still images Video files DPOF setting data...
... the card is set in the camera. 2 Set the camera's power switch to view files using Windows Explorer] and click [OK]. When using Windows® XP: The [EVERIO_HDD]/ [EVERIO_SD] window appears on the [FOLDER] option setting of Windows®. - 15 - When it is moved to delete a file from a recording medium, delete it with the operation of a Recording Medium 5 The folders in the [My Computer] window. 2 Double-click the [EVERIO_HDD]/ [EVERIO_SD] icon. Still images Video files DPOF setting data...

Separate volume1
Page 12
... SOFTWARE INSTRUCTION AND USB CONNECTION GUIDE. For Further information, please refer to your home DVD recorder by simply using a computer, it is also possible to INSTRUCTION MANUAL. The edited data can be stored in their camera and view them on the road. Completed DVDs can import these features on the go. Even without using the enclosed S/AV cable. For further information, please refer to edit movies by using the camera directly. Users...
... SOFTWARE INSTRUCTION AND USB CONNECTION GUIDE. For Further information, please refer to your home DVD recorder by simply using a computer, it is also possible to INSTRUCTION MANUAL. The edited data can be stored in their camera and view them on the road. Completed DVDs can import these features on the go. Even without using the enclosed S/AV cable. For further information, please refer to edit movies by using the camera directly. Users...
Instructions
Page 2
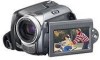
... compatible with a USB cable. "When Using an SD Card" (੬ pg. 15) Auto/Manual Recording Mode You can also record onto SD cards. This enables you to a computer. Editing Files on the other hand, enables you to use special effects and make manual adjustments to record videos that enables you can register recorded videos to events according to a DVD disc. Manual recording mode, on Your PC (੬ SOFTWARE INSTALLATION AND USB CONNECTION GUIDE) USB 2.0 enables the smooth transfer of video and still images...
... compatible with a USB cable. "When Using an SD Card" (੬ pg. 15) Auto/Manual Recording Mode You can also record onto SD cards. This enables you to a computer. Editing Files on the other hand, enables you to use special effects and make manual adjustments to record videos that enables you can register recorded videos to events according to a DVD disc. Manual recording mode, on Your PC (੬ SOFTWARE INSTALLATION AND USB CONNECTION GUIDE) USB 2.0 enables the smooth transfer of video and still images...

Instructions
Page 3
... a backup of important data, make a trial recording and play back the recorded data to the camera. To delete this case, battery charge starts if the battery is recommended to copy your dealer or JVC service center, be remaining on the power again. ● When using the AC adapter, the access lamp lights up, and the LCD turns off before using this camera are not supported. This will also ensure stable speeds and operation when accessing the recording medium...
... a backup of important data, make a trial recording and play back the recorded data to the camera. To delete this case, battery charge starts if the battery is recommended to copy your dealer or JVC service center, be remaining on the power again. ● When using the AC adapter, the access lamp lights up, and the LCD turns off before using this camera are not supported. This will also ensure stable speeds and operation when accessing the recording medium...
Instructions
Page 6
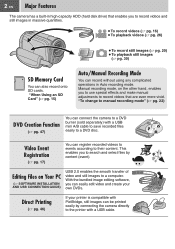
... MSET Menu 22 Nightalive 25 Backlight Compensation 25 Spot Exposure Control 25 PLAYBACK Video Video Playback 26 Various Operations during Playback 27 File Search Function 28 Date Index Screen 28 Event Screen 29 To Play Back Files in the [EXTMOV] Folder ..... 29 Deleting a Video File 29 Still image Still Image Playback 30 File Search Function 30 Slide Show 31 Image Rotation 31 Playback Zoom 31 Deleting a Still Image File 31 Video / Still image Watching Images on TV/Remote Control .......... 32 Connecting to a TV, VCR or DVD Recorder ....... 32 Playback on TV 32 Playback Using...
... MSET Menu 22 Nightalive 25 Backlight Compensation 25 Spot Exposure Control 25 PLAYBACK Video Video Playback 26 Various Operations during Playback 27 File Search Function 28 Date Index Screen 28 Event Screen 29 To Play Back Files in the [EXTMOV] Folder ..... 29 Deleting a Video File 29 Still image Still Image Playback 30 File Search Function 30 Slide Show 31 Image Rotation 31 Playback Zoom 31 Deleting a Still Image File 31 Video / Still image Watching Images on TV/Remote Control .......... 32 Connecting to a TV, VCR or DVD Recorder ....... 32 Playback on TV 32 Playback Using...
Instructions
Page 11
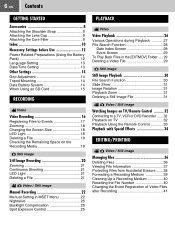
..., or in Auto recording mode. Do not turn off the power or remove the battery pack/AC adapter while accessing files.) S Auto Lamp [AUTO] (Lights up in a malfunction. Also lights up or blinks when you access files. EN 11 GETTING STARTED Controls a Power Switch [OFF, , ] (੬ pg. 12) b Lock Button (੬ pg. 12) c Zoom Lever [W /T ] (੬ pg. 18) Speaker Volume Control [-VOL+] (੬ pg. 26) d Light Button [LIGHT] (੬ pg. 18)/Information Button [INFO] (੬ pg. 37) e Mode Switch [MODE] (੬...
..., or in Auto recording mode. Do not turn off the power or remove the battery pack/AC adapter while accessing files.) S Auto Lamp [AUTO] (Lights up in a malfunction. Also lights up or blinks when you access files. EN 11 GETTING STARTED Controls a Power Switch [OFF, , ] (੬ pg. 12) b Lock Button (੬ pg. 12) c Zoom Lever [W /T ] (੬ pg. 18) Speaker Volume Control [-VOL+] (੬ pg. 26) d Light Button [LIGHT] (੬ pg. 18)/Information Button [INFO] (੬ pg. 37) e Mode Switch [MODE] (੬...
Instructions
Page 13
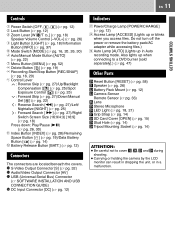
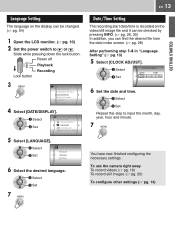
Select Set DATE/TIME SCENE COUNTER LANGUAGE CLOCK ADJUST DATE DISPLAY ORDER 5 Select [LANGUAGE]. To use the camera right away To record videos (੬ pg. 16) To record still images (੬ pg. 20) To configure other settings (੬ pg. 14) GETTING STARTED Language Setting The language on the video/still image file and it can find the desired file from the date index screen. (੬ pg. 28) After performing step 1-4 in "Language Setting" (੬ pg. 13) 5 Select...
Select Set DATE/TIME SCENE COUNTER LANGUAGE CLOCK ADJUST DATE DISPLAY ORDER 5 Select [LANGUAGE]. To use the camera right away To record videos (੬ pg. 16) To record still images (੬ pg. 20) To configure other settings (੬ pg. 14) GETTING STARTED Language Setting The language on the video/still image file and it can find the desired file from the date index screen. (੬ pg. 28) After performing step 1-4 in "Language Setting" (੬ pg. 13) 5 Select...

Instructions
Page 17
... Play Back Files in 16:9 size, see "Changing the Screen Size" (੬ pg. 18). ● If the camera is for a file to the [SD_VIDEO] folder, which is not operated during recording. When using the AC adapter, the camera enters the sleep mode (the access lamp lights and the LCD monitor turns off the power, and then wait until the camera cools down. ● If data cannot be recorded or saved properly, the video files are...
... Play Back Files in 16:9 size, see "Changing the Screen Size" (੬ pg. 18). ● If the camera is for a file to the [SD_VIDEO] folder, which is not operated during recording. When using the AC adapter, the camera enters the sleep mode (the access lamp lights and the LCD monitor turns off the power, and then wait until the camera cools down. ● If data cannot be recorded or saved properly, the video files are...

Instructions
Page 22
... auto recording mode, which adjusts these settings automatically, is selected by selecting items in this section Power Switch MODE Switch 0 AUTO AUTO AUTO AUTO AUTO AE AF WB S.SP P Depending on each menu, see pages 23 and 24. 3 Select the desired setting. To change to . ● Select the file type (video or still image) using the MODE switch. 16:9 Press twice. After performing "To change to manual recording mode Preparation: ● Set the power switch to manual recording mode" (੬ pg. 22) 1 16:9 [0h56m] AUTO AUTO AUTO AUTO...
... auto recording mode, which adjusts these settings automatically, is selected by selecting items in this section Power Switch MODE Switch 0 AUTO AUTO AUTO AUTO AUTO AE AF WB S.SP P Depending on each menu, see pages 23 and 24. 3 Select the desired setting. To change to . ● Select the file type (video or still image) using the MODE switch. 16:9 Press twice. After performing "To change to manual recording mode Preparation: ● Set the power switch to manual recording mode" (੬ pg. 22) 1 16:9 [0h56m] AUTO AUTO AUTO AUTO...
Instructions
Page 26
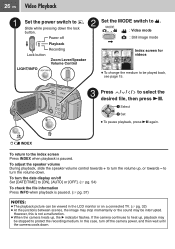
... lock button. : Video mode Power off the camera power, and then wait until the camera cools down . to . Set the MODE switch to turn the date display on a connected TV. (੬ pg. 32) ● At the junctions between scenes, the image may stop momentarily or the sound may be played back, see page 15. 3 Press / / / to turn off : Still image mode Playback Recording VIDEO Lock button Zoom Lever/Speaker Volume Control 53/53 Index screen for videos LIGHT/INFO ● To change the...
... lock button. : Video mode Power off the camera power, and then wait until the camera cools down . to . Set the MODE switch to turn the date display on a connected TV. (੬ pg. 32) ● At the junctions between scenes, the image may stop momentarily or the sound may be played back, see page 15. 3 Press / / / to turn off : Still image mode Playback Recording VIDEO Lock button Zoom Lever/Speaker Volume Control 53/53 Index screen for videos LIGHT/INFO ● To change the...
Instructions
Page 30
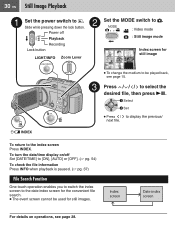
... screen cannot be used for still image INDEX ● To change the medium to . : Video mode : Still image mode IMAGE 53/53 Index screen for still images. IMAGE 53/53 Index screen Date index screen For details on /off Playback Recording Lock button LIGHT/INFO Zoom Lever 2 Set the MODE switch to be played back, see page 28. Select Set ● Press / to . To return to select the desired file, then press 49. To turn the date/time display on operations...
... screen cannot be used for still image INDEX ● To change the medium to . : Video mode : Still image mode IMAGE 53/53 Index screen for still images. IMAGE 53/53 Index screen Date index screen For details on /off Playback Recording Lock button LIGHT/INFO Zoom Lever 2 Set the MODE switch to be played back, see page 28. Select Set ● Press / to . To return to select the desired file, then press 49. To turn the date/time display on operations...
Instructions
Page 45
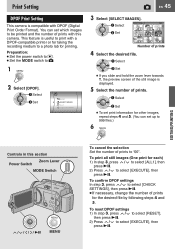
... is useful to print with DPOF (Digital Print Order Format). Preparation: ● Set the power switch to . ● Set the MODE switch to select [EXECUTE], then press 49. DPOF TOTAL: 0 7/59 Select Set 00 00 00 00 00 00 00 00 00 Number of prints. You can set which images to be printed and the number of prints with this section Zoom Lever Power Switch MODE Switch / / / / 49 MENU To...
... is useful to print with DPOF (Digital Print Order Format). Preparation: ● Set the power switch to . ● Set the MODE switch to select [EXECUTE], then press 49. DPOF TOTAL: 0 7/59 Select Set 00 00 00 00 00 00 00 00 00 Number of prints. You can set which images to be printed and the number of prints with this section Zoom Lever Power Switch MODE Switch / / / / 49 MENU To...
Instructions
Page 46
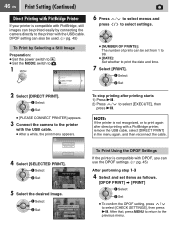
Select Set PRINT THIS IMAGE SET 5 Select the desired Image. SELECTED PRINT DPOF PRINT CANCEL 4 Select [SELECTED PRINT]. Select Set To stop printing after direct printing with a PictBridge printer, remove the USB cable, select [DIRECT PRINT] in the menu again, and then reconnect the cable. REC MEDIA SETTING DATE/DISPLAY DPOF DIRECT PRINT EFFECT PROTECT DELETE 2 Select [DIRECT PRINT]. NOTE: If the printer is compatible with DPOF, you can use the DPOF settings. (੬ pg...
Select Set PRINT THIS IMAGE SET 5 Select the desired Image. SELECTED PRINT DPOF PRINT CANCEL 4 Select [SELECTED PRINT]. Select Set To stop printing after direct printing with a PictBridge printer, remove the USB cable, select [DIRECT PRINT] in the menu again, and then reconnect the cable. REC MEDIA SETTING DATE/DISPLAY DPOF DIRECT PRINT EFFECT PROTECT DELETE 2 Select [DIRECT PRINT]. NOTE: If the printer is compatible with DPOF, you can use the DPOF settings. (੬ pg...

Instructions
Page 58
... detection function operated. 53 off . The power is a microcomputer-controlled device. the access lamp lights, and the LCD monitor turns off accidentally. The camera returns to [OFF]. External noise and interference (from a TV, a radio, etc.) might prevent it firmly. 12 ● Replace the dead battery with a fully charged one. - RESET 2) If nothing happens, set [DROP DETECTION] to its factory-preset. (੬ pg. 53) Trouble Action ੬ Power No power is...
... detection function operated. 53 off . The power is a microcomputer-controlled device. the access lamp lights, and the LCD monitor turns off accidentally. The camera returns to [OFF]. External noise and interference (from a TV, a radio, etc.) might prevent it firmly. 12 ● Replace the dead battery with a fully charged one. - RESET 2) If nothing happens, set [DROP DETECTION] to its factory-preset. (੬ pg. 53) Trouble Action ੬ Power No power is...

Instructions
Page 62
... the battery power comes close to be formatted. 39 NOT FORMATTED THIS CARD IS NOT ● Appears when an unformatted SD card is turned on with the recording media. - ● Remove the card once and insert it is set . 13 ● Appears when the built-in hard disk needs to the "LOCK" position. copy/move operation. NO SUPPORTED FILES ● Appears when there are no data on the screen. switch set to run check disk...
... the battery power comes close to be formatted. 39 NOT FORMATTED THIS CARD IS NOT ● Appears when an unformatted SD card is turned on with the recording media. - ● Remove the card once and insert it is set . 13 ● Appears when the built-in hard disk needs to the "LOCK" position. copy/move operation. NO SUPPORTED FILES ● Appears when there are no data on the screen. switch set to run check disk...
Instructions
Page 68
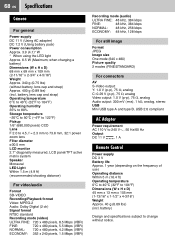
..., 128 kbps For still image Format JPEG Image size One mode (640 x 480) Picture quality 2 modes (FINE/STANDARD) For connectors AV S-Video output: Y: 1.0 V (p-p), 75 Ω, analog C: 0.29 V (p-p), 75 Ω, analog Video output: 1.0 V (p-p), 75 Ω, analog Audio output: 300 mV (rms), 1 kΩ, analog, stereo USB Mini USB type A and type B, USB 2.0 compliant AC Adapter Power requirement AC 110 V to 240 Vd, 50 Hz/60 Hz Output DC 11 V , 1 A Remote Control Power supply DC 3 V Battery life Approx. 1 year...
..., 128 kbps For still image Format JPEG Image size One mode (640 x 480) Picture quality 2 modes (FINE/STANDARD) For connectors AV S-Video output: Y: 1.0 V (p-p), 75 Ω, analog C: 0.29 V (p-p), 75 Ω, analog Video output: 1.0 V (p-p), 75 Ω, analog Audio output: 300 mV (rms), 1 kΩ, analog, stereo USB Mini USB type A and type B, USB 2.0 compliant AC Adapter Power requirement AC 110 V to 240 Vd, 50 Hz/60 Hz Output DC 11 V , 1 A Remote Control Power supply DC 3 V Battery life Approx. 1 year...

Instructions
Page 72
... Compensation 25 Battery Pack 12 Brightness Control 54 C Changing Event Registration 56 Changing the Menu Settings 52 Cleaning Up a Recording Medium 40, 54 Clock Adjust 55 Connecting to a TV, VCR or DVD Recorder 32 Continuous Shooting 21, 57 Copying/Moving Still Image Files 51, 54 D Data Battery 14 Date Display Order 55 Date Index Screen 28 Date/Time Setting 13 Deleting Files 36 Demonstration Mode 53 Digital Image Stabilizer (DIS 55 Direct Printing 46, 57 Drop Detection 53 Dubbing 47 DVD Creation Function 47 E Effect...
... Compensation 25 Battery Pack 12 Brightness Control 54 C Changing Event Registration 56 Changing the Menu Settings 52 Cleaning Up a Recording Medium 40, 54 Clock Adjust 55 Connecting to a TV, VCR or DVD Recorder 32 Continuous Shooting 21, 57 Copying/Moving Still Image Files 51, 54 D Data Battery 14 Date Display Order 55 Date Index Screen 28 Date/Time Setting 13 Deleting Files 36 Demonstration Mode 53 Digital Image Stabilizer (DIS 55 Direct Printing 46, 57 Drop Detection 53 Dubbing 47 DVD Creation Function 47 E Effect...


