
User Guide
Page 2
... a VHS Tape by Connecting to a VCR ........ 107 Using a USB External Hard Disk Drive 108 Preparing a USB External Hard Disk Drive 109 Copying All Files 109 Playing Back Files in the USB External Hard Disk Drive .. 110 Deleting Folders in the USB External Hard Disk Drive ..... 111 Formatting the USB External Hard Disk Drive 111 Copying Files to an SD Card (GZ-EX355 112 Moving Files to an SD Card (GZ-EX355 113 Copying to Windows PC (GZ-EX355/GZ-EX310 114 Verifying System Requirements (Guideline 114 Installing the Provided Software 115 Backing Up Files 116 Recording Videos to Discs 117...
... a VHS Tape by Connecting to a VCR ........ 107 Using a USB External Hard Disk Drive 108 Preparing a USB External Hard Disk Drive 109 Copying All Files 109 Playing Back Files in the USB External Hard Disk Drive .. 110 Deleting Folders in the USB External Hard Disk Drive ..... 111 Formatting the USB External Hard Disk Drive 111 Copying Files to an SD Card (GZ-EX355 112 Moving Files to an SD Card (GZ-EX355 113 Copying to Windows PC (GZ-EX355/GZ-EX310 114 Verifying System Requirements (Guideline 114 Installing the Provided Software 115 Backing Up Files 116 Recording Videos to Discs 117...
User Guide
Page 12
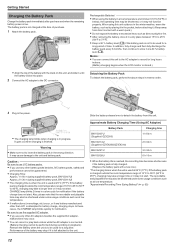
... CHARGE lamp blinks quickly for battery charge, charging stops. Performance of 10°C to 35°C (50°F to store it in a slow cycle for a long time. The recordable and playable time may occur. 0 You can connect this unit. Memo : 0 You can record or play back videos while the AC adapter is connected. (Battery charging cannot be used for long hours indoors. (Battery charging begins when the LCD monitor is closed.) Detaching the Battery...
... CHARGE lamp blinks quickly for battery charge, charging stops. Performance of 10°C to 35°C (50°F to store it in a slow cycle for a long time. The recordable and playable time may occur. 0 You can connect this unit. Memo : 0 You can record or play back videos while the AC adapter is connected. (Battery charging cannot be used for long hours indoors. (Battery charging begins when the LCD monitor is closed.) Detaching the Battery...

User Guide
Page 14
... it out straight. SDXC Card Memo : 0 Using SD cards (including SDHC/SDXC cards) other than those specified above may not work due to specification changes, etc. 0 To record videos with all SD cards. FamilyID=1cbe3906-ddd1-4ca2-b727c2dff5e30f61&displaylang=en Windows Vista 0 Make sure that the operating system version is not supported. FamilyID=7d54c53f-017c-4ea5-ae08-34c3452ba315 Windows 7 Download and install the updating program (KB976422) from...
... it out straight. SDXC Card Memo : 0 Using SD cards (including SDHC/SDXC cards) other than those specified above may not work due to specification changes, etc. 0 To record videos with all SD cards. FamilyID=1cbe3906-ddd1-4ca2-b727c2dff5e30f61&displaylang=en Windows Vista 0 Make sure that the operating system version is not supported. FamilyID=7d54c53f-017c-4ea5-ae08-34c3452ba315 Windows 7 Download and install the updating program (KB976422) from...
User Guide
Page 18
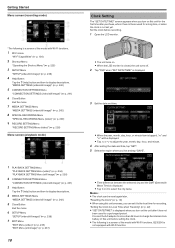
... 24 hours to charge the internal clock battery of this unit before recording. 1 Open the LCD monitor. 0 The unit turns on this unit overseas, you turn on this unit after purchase, when it to display descriptions. 4 MEDIA SETTINGS Menu "MEDIA SETTINGS (video/still image)" (A p. 242) 5 Close Button Exit the menu. 6 SETUP Menu "SETUP (video/still image)" (A p. 238) 7 EDIT Menu "EDIT Menu (video)" (A p. 235) "EDIT Menu (still image)" (A p. 237) 18 Clock Setting The "SET DATE/TIME!" "Resetting the Clock" (A p. 19) 0 When using this unit for...
... 24 hours to charge the internal clock battery of this unit before recording. 1 Open the LCD monitor. 0 The unit turns on this unit overseas, you turn on this unit after purchase, when it to display descriptions. 4 MEDIA SETTINGS Menu "MEDIA SETTINGS (video/still image)" (A p. 242) 5 Close Button Exit the menu. 6 SETUP Menu "SETUP (video/still image)" (A p. 238) 7 EDIT Menu "EDIT Menu (video)" (A p. 235) "EDIT Menu (still image)" (A p. 237) 18 Clock Setting The "SET DATE/TIME!" "Resetting the Clock" (A p. 19) 0 When using this unit for...
User Guide
Page 23
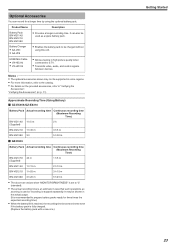
... be used or recording is fully charged. (Replace the battery pack with a new one.) Getting Started 23 Memo : 0 The optional accessories above are values when "MONITOR BRIGHTNESS" is set to "3" (standard). 0 The actual recording time is an estimate in case that such operations as zooming is used as a spare battery pack. 0 Enables the battery pack to a TV. 0 Transmits video, audio, and control signals between devices. Product Name Battery...
... be used or recording is fully charged. (Replace the battery pack with a new one.) Getting Started 23 Memo : 0 The optional accessories above are values when "MONITOR BRIGHTNESS" is set to "3" (standard). 0 The actual recording time is an estimate in case that such operations as zooming is used as a spare battery pack. 0 Enables the battery pack to a TV. 0 Transmits video, audio, and control signals between devices. Product Name Battery...
User Guide
Page 26
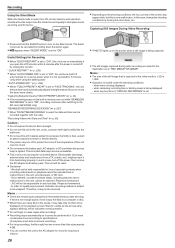
... turns on the playback screen. Memo : 0 The size of recorded contents when recording videos/audio or playback cannot be responsible for Recording 0 When "QUICK RESTART" is set to "ON", this unit, provided parts, or SD card. - Capturing Still Images During Video Recording .. . 0 Press and hold the SILENT button to turn off by closing the monitor. Useful Settings for any functions in the media, it cannot be displayed on immediately if you start shooting. " QUICK RESTART " (A p. 239) 0 When "AUTO POWER...
... turns on the playback screen. Memo : 0 The size of recorded contents when recording videos/audio or playback cannot be responsible for Recording 0 When "QUICK RESTART" is set to "ON", this unit, provided parts, or SD card. - Capturing Still Images During Video Recording .. . 0 Press and hold the SILENT button to turn off by closing the monitor. Useful Settings for any functions in the media, it cannot be displayed on immediately if you start shooting. " QUICK RESTART " (A p. 239) 0 When "AUTO POWER...
User Guide
Page 55
... the recording interval. Time-Lapse Setting The greater the number of the video. Recorded videos will be saved. 0 Seamless recording is disabled in time-lapse recording. It is also recommended to record, the power-saving mode will be turned off and recording will be played back at 150 times speed. 10SEC INTERVAL Takes a frame at 1-second intervals. Caution : 0 This function does not support the iFrame recording format. 0 Audio cannot be recorded during time-lapse recording. 0 Zooming, simultaneous still image recording, and image stabilizer...
... the recording interval. Time-Lapse Setting The greater the number of the video. Recorded videos will be saved. 0 Seamless recording is disabled in time-lapse recording. It is also recommended to record, the power-saving mode will be turned off and recording will be played back at 150 times speed. 10SEC INTERVAL Takes a frame at 1-second intervals. Caution : 0 This function does not support the iFrame recording format. 0 Audio cannot be recorded during time-lapse recording. 0 Zooming, simultaneous still image recording, and image stabilizer...
User Guide
Page 65
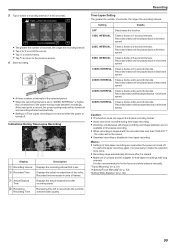
During Video Playback Playback Adjusting the Volume of Videos You can use the zoom/volume lever to control the volume. .. . Display A Video/Still Image Mode B Timeline Bar C Pointer Dh Ej El F d/e Gi Gk Hg I
During Video Playback Playback Adjusting the Volume of Videos You can use the zoom/volume lever to control the volume. .. . Display A Video/Still Image Mode B Timeline Bar C Pointer Dh Ej El F d/e Gi Gk Hg I
User Guide
Page 74
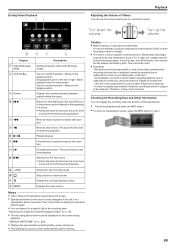
Tap B to switch the mode to still image. (You can select and play back the recorded still images from an index screen (thumbnail display). 0 The following is A video, tap A on this unit.) 2 Tap " Operation Buttons for Still Image Playback During Index Screen Display . . .. 0 Check if the recording mode is B. 0 If the mode is a screen of the model with the built-in memory. 1 Open the LCD monitor. Playback Playing Back Still Images You can also use the A/B button on the recording screen to display the mode switching screen.
Tap B to switch the mode to still image. (You can select and play back the recorded still images from an index screen (thumbnail display). 0 The following is A video, tap A on this unit.) 2 Tap " Operation Buttons for Still Image Playback During Index Screen Display . . .. 0 Check if the recording mode is B. 0 If the mode is a screen of the model with the built-in memory. 1 Open the LCD monitor. Playback Playing Back Still Images You can also use the A/B button on the recording screen to display the mode switching screen.
User Guide
Page 77
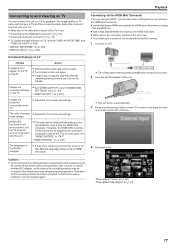
... language setting using the provided one. 0 Use a High Speed HDMI mini cable as the HDMI mini cable. 0 Refer also to operate in use the provided AC adapter, as turning off the power) while accessing files. looks strange. In such cases, set both "DISPLAY DATE/TIME" and "DISPLAY ON TV" to a TV for about 2 seconds. 2 Connect the AC adapter to this unit. 0 The unit turns on automatically. 3 Press the external input button on the recording medium becomes corrupted, format the recording...
... language setting using the provided one. 0 Use a High Speed HDMI mini cable as the HDMI mini cable. 0 Refer also to operate in use the provided AC adapter, as turning off the power) while accessing files. looks strange. In such cases, set both "DISPLAY DATE/TIME" and "DISPLAY ON TV" to a TV for about 2 seconds. 2 Connect the AC adapter to this unit. 0 The unit turns on automatically. 3 Press the external input button on the recording medium becomes corrupted, format the recording...
User Guide
Page 107
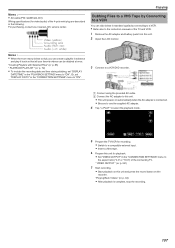
... instruction manuals of the 4-pole mini plug are many videos to use the supplied AC adapter. 4 Tap " Or, set "DISPLAY DATE/TIME" in the following. B Connect the AC adapter to this unit. 2 Open the LCD monitor. Memo : 0 When there are described in the "PLAYBACK SETTING" menu to a VCR/DVD recorder. A Connect using the provided AV cable. Copying Dubbing Files to a VHS Tape by Connecting to a VCR You can dub videos in advance and play it back so that all your nearest JVC service...
... instruction manuals of the 4-pole mini plug are many videos to use the supplied AC adapter. 4 Tap " Or, set "DISPLAY DATE/TIME" in the following. B Connect the AC adapter to this unit. 2 Open the LCD monitor. Memo : 0 When there are described in the "PLAYBACK SETTING" menu to a VCR/DVD recorder. A Connect using the provided AV cable. Copying Dubbing Files to a VHS Tape by Connecting to a VCR You can dub videos in advance and play it back so that all your nearest JVC service...
User Guide
Page 108
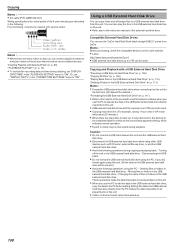
.... Deleting files or folders in the USB external hard disk drive. - Editing the data in the USB external hard disk drive directly from this unit. 0 Videos in the following operations during copying and playing back. - Compatible External Hard Disk Drives You can be interrupted during dubbing, set "DISPLAY ON TV" in the "CONNECTION SETTINGS" menu to the help file of the 4-pole mini plug are described in iFrame format cannot be used . Memo : 0 When there are many videos to dub, you can copy video and still image files to...
.... Deleting files or folders in the USB external hard disk drive. - Editing the data in the USB external hard disk drive directly from this unit. 0 Videos in the following operations during copying and playing back. - Compatible External Hard Disk Drives You can be interrupted during dubbing, set "DISPLAY ON TV" in the "CONNECTION SETTINGS" menu to the help file of the 4-pole mini plug are described in iFrame format cannot be used . Memo : 0 When there are many videos to dub, you can copy video and still image files to...
User Guide
Page 130
... instruction manual of up to record videos on a smartphone are outside. Recording of your computer, which is saved as well. "Using the Pan Cradle (Sold Separately)" (A p. 150) 0 For how to connect the pan cradle, efer to the instruction manual of videos and still images may vary according to -1 connection (Wi-Fi Direct) with a smartphone (or computer), without the need for further details. Using Wi-Fi (GZ-EX355/GZ-EX310...
... instruction manual of up to record videos on a smartphone are outside. Recording of your computer, which is saved as well. "Using the Pan Cradle (Sold Separately)" (A p. 150) 0 For how to connect the pan cradle, efer to the instruction manual of videos and still images may vary according to -1 connection (Wi-Fi Direct) with a smartphone (or computer), without the need for further details. Using Wi-Fi (GZ-EX355/GZ-EX310...
User Guide
Page 131
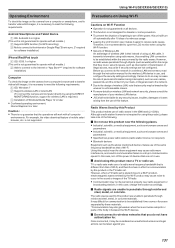
... using the DIRECT MONITORING function, support for . o Radio signals are not in use , and configure the security settings accordingly. Radio Waves Used by the radio waves. The radio waves used by using this product are not configured. Using Wi-Fi (GZ-EX355/GZ-EX310) Operating Environment To check the image on the camera from a computer or smartphone, and to transfer videos/still images, it easier to receive radio waves. A OS: Windows 7 B Supports...
... using the DIRECT MONITORING function, support for . o Radio signals are not in use , and configure the security settings accordingly. Radio Waves Used by the radio waves. The radio waves used by using this product are not configured. Using Wi-Fi (GZ-EX355/GZ-EX310) Operating Environment To check the image on the camera from a computer or smartphone, and to transfer videos/still images, it easier to receive radio waves. A OS: Windows 7 B Supports...
User Guide
Page 193
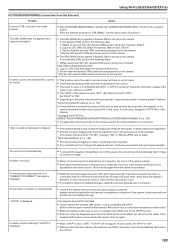
... than 3 hours. (Focus works again when the camera is operated.) Connection gets disconnected, or a "UNABLE TO CONNECT" message is slow, videos and audio sound may fail if the devices are placed too far away from the access point halfway through. Set the obtained dynamic DNS username and password on the power of the wireless LAN router in use is not compatible with UPnP, or UPnP is turned off automatically...
... than 3 hours. (Focus works again when the camera is operated.) Connection gets disconnected, or a "UNABLE TO CONNECT" message is slow, videos and audio sound may fail if the devices are placed too far away from the access point halfway through. Set the obtained dynamic DNS username and password on the power of the wireless LAN router in use is not compatible with UPnP, or UPnP is turned off automatically...
User Guide
Page 220
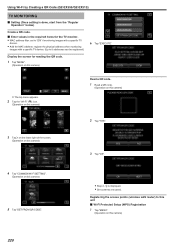
... a QR Code (GZ-EX355/GZ-EX310) TV MONITORING o Setting (Once setting is displayed. 0 Set contents are saved. o Enter values in the required items for the TV monitor. 0 MAC address filter: set to "ON" if monitoring images with a specific TV device. 0 Add the MAC address: register the physical address when monitoring images with a specific TV device. (Up to this unit o Wi-Fi Protected Setup (WPS) Registration 1 Tap "MENU". (Operation on this camera) 220...
... a QR Code (GZ-EX355/GZ-EX310) TV MONITORING o Setting (Once setting is displayed. 0 Set contents are saved. o Enter values in the required items for the TV monitor. 0 MAC address filter: set to "ON" if monitoring images with a specific TV device. 0 Add the MAC address: register the physical address when monitoring images with a specific TV device. (Up to this unit o Wi-Fi Protected Setup (WPS) Registration 1 Tap "MENU". (Operation on this camera) 220...
User Guide
Page 228
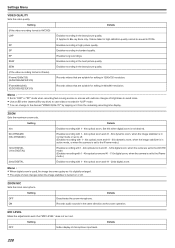
... desired. Settings Menu VIDEO QUALITY Sets the video quality. Videos taken in the same direction as it from the remaining recording time display. Enables recording in 960x540 resolution. Records videos that "MIC LEVEL" does not turn red. Memo : 0 Set to "UXP" or "XP" mode when recording fast-moving scenes or scenes with 1 - 40x optical zoom. ZOOM Sets the maximum zoom ratio. Memo : 0 When digital zoom is used, the image becomes grainy as the zoom operation. ZOOM MIC Sets the zoom microphone. MIC LEVEL Make the adjustments such that...
... desired. Settings Menu VIDEO QUALITY Sets the video quality. Videos taken in the same direction as it from the remaining recording time display. Enables recording in 960x540 resolution. Records videos that "MIC LEVEL" does not turn red. Memo : 0 Set to "UXP" or "XP" mode when recording fast-moving scenes or scenes with 1 - 40x optical zoom. ZOOM Sets the maximum zoom ratio. Memo : 0 When digital zoom is used, the image becomes grainy as the zoom operation. ZOOM MIC Sets the zoom microphone. MIC LEVEL Make the adjustments such that...
User Guide
Page 252
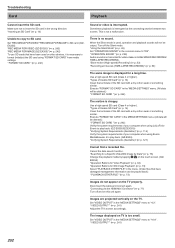
...VIDEO OUTPUT " (A p. 241) Adjust the TV's screen accordingly. The image displayed on the TV properly. " VIDEO OUTPUT " (A p. 241) 252 Set "REC MEDIA FOR VIDEO"/"REC MEDIA FOR IMAGE" to play back. (GZ-E300) "Verifying System Requirements (Guideline)" (A p. 121) Cannot find a recorded file. "Using the Silent Mode" (A p. 26) Set "OPERATION SOUND" in the "MEDIA SETTINGS" menu. (All data will be deleted.) " FORMAT SD CARD " (A p. 242) Verify the system requirements of your computer when using Everio MediaBrowser 4 to SD card. (GZEX355) "REC MEDIA FOR VIDEO (GZ-EX355)" (A p. 242) "REC MEDIA...
...VIDEO OUTPUT " (A p. 241) Adjust the TV's screen accordingly. The image displayed on the TV properly. " VIDEO OUTPUT " (A p. 241) 252 Set "REC MEDIA FOR VIDEO"/"REC MEDIA FOR IMAGE" to play back. (GZ-E300) "Verifying System Requirements (Guideline)" (A p. 121) Cannot find a recorded file. "Using the Silent Mode" (A p. 26) Set "OPERATION SOUND" in the "MEDIA SETTINGS" menu. (All data will be deleted.) " FORMAT SD CARD " (A p. 242) Verify the system requirements of your computer when using Everio MediaBrowser 4 to SD card. (GZEX355) "REC MEDIA FOR VIDEO (GZ-EX355)" (A p. 242) "REC MEDIA...
User Guide
Page 255
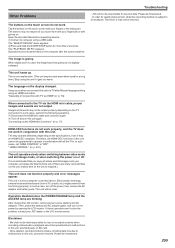
... switching between video mode and still image mode, or when switching the power on the display changed. Therefore, it is not a malfunction. (This unit may operate differently depending on the specifications, even if they are not output. Operations are blinking After closing the LCD monitor, remove power source (battery and AC adapter). This is digitally enlarged. Operation disabled since the POWER/CHARGE lamp and the ACCESS lamp are to "OFF". Other Problems The buttons on the touch screen...
... switching between video mode and still image mode, or when switching the power on the display changed. Therefore, it is not a malfunction. (This unit may operate differently depending on the specifications, even if they are not output. Operations are blinking After closing the LCD monitor, remove power source (battery and AC adapter). This is digitally enlarged. Operation disabled since the POWER/CHARGE lamp and the ACCESS lamp are to "OFF". Other Problems The buttons on the touch screen...
User Guide
Page 256
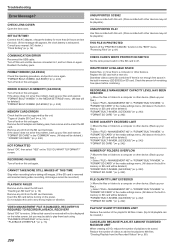
... the devices connected to off and on the built-in "FORMAT BUILT-IN MEM." SET DATE/TIME! Turn off the "PROTECT/CANCEL" function in the menu.) " PLAYBACK OTHER FILE " (A p. 73) 256 UNSUPPORTED SCENE! RECORDING FAILURE Turn off . CANNOT TAKE MORE STILL IMAGES AT THIS TIME Stop video recording before combining. "Protecting Files" (A p. 81) CHECK CARD'S WRITE PROTECTION SWITCH Set the write protect switch of the media settings menu. (All data on this unit again. Connect the AC adapter, charge the battery for...
... the devices connected to off and on the built-in "FORMAT BUILT-IN MEM." SET DATE/TIME! Turn off the "PROTECT/CANCEL" function in the menu.) " PLAYBACK OTHER FILE " (A p. 73) 256 UNSUPPORTED SCENE! RECORDING FAILURE Turn off . CANNOT TAKE MORE STILL IMAGES AT THIS TIME Stop video recording before combining. "Protecting Files" (A p. 81) CHECK CARD'S WRITE PROTECTION SWITCH Set the write protect switch of the media settings menu. (All data on this unit again. Connect the AC adapter, charge the battery for...


