
Installation Manual
Page 4
Software Installation (Windows®) Follow the procedure described below to connect the USB cable between the camcorder and the PC before installing the driver. USB Video Streaming driver This driver allows you to record camcorder's audio and video output on your PC's hard disk instead of other application icons on screen instructions to install this driver, the item is not displayed. Windows® XP: The installation procedure differs from a camcorder through a USB connector or IEEE1394 (i.LINK) connector, and is no...
Software Installation (Windows®) Follow the procedure described below to connect the USB cable between the camcorder and the PC before installing the driver. USB Video Streaming driver This driver allows you to record camcorder's audio and video output on your PC's hard disk instead of other application icons on screen instructions to install this driver, the item is not displayed. Windows® XP: The installation procedure differs from a camcorder through a USB connector or IEEE1394 (i.LINK) connector, and is no...
Installation Manual
Page 8
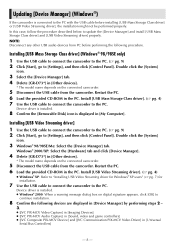
... update the [Device Manager] and install [USB Mass Storage Class driver] and [USB Video Streaming driver] properly. Updating [Device Manager] (Windows®) If the camcorder is connected to the PC with the USB cable before performing the following devices are displayed in [Device Manager] by performing steps 2 - 3. ● [JVC PIX-MCV Video Capture] in [Imaging Devices] ● [JVC PIX-MCV Audio Capture] in [Sound, video and game controllers] ● [JVC Composite PIX-MCV Device] and [JVC Communication PIX-MCV Video Driver] in [Universal Serial Bus Controllers...
... update the [Device Manager] and install [USB Mass Storage Class driver] and [USB Video Streaming driver] properly. Updating [Device Manager] (Windows®) If the camcorder is connected to the PC with the USB cable before performing the following devices are displayed in [Device Manager] by performing steps 2 - 3. ● [JVC PIX-MCV Video Capture] in [Imaging Devices] ● [JVC PIX-MCV Audio Capture] in [Sound, video and game controllers] ● [JVC Composite PIX-MCV Device] and [JVC Communication PIX-MCV Video Driver] in [Universal Serial Bus Controllers...
Installation Manual
Page 10
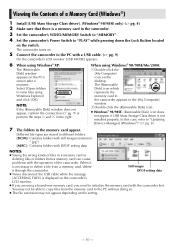
...]. Viewing the Contents of a Memory Card (Windows®) 1 Install [USB Mass Storage Class driver]. (Windows® 98/98SE only) (੬ pg. 4) 2 Make sure that there is not installed properly. Different file types are using represents the Windows Explorer] memory card in the camcorder. 3 Set the camcorder's VIDEO/MEMORY Switch to "MEMORY". 4 Set the camcorder's Power Switch to "PLAY" while pressing down the Lock Button located on the camcorder's LCD monitor. ● If you need to the PC with the operation of the camcorder.
...]. Viewing the Contents of a Memory Card (Windows®) 1 Install [USB Mass Storage Class driver]. (Windows® 98/98SE only) (੬ pg. 4) 2 Make sure that there is not installed properly. Different file types are using represents the Windows Explorer] memory card in the camcorder. 3 Set the camcorder's VIDEO/MEMORY Switch to "MEMORY". 4 Set the camcorder's Power Switch to "PLAY" while pressing down the Lock Button located on the camcorder's LCD monitor. ● If you need to the PC with the operation of the camcorder.
Instructions
Page 2
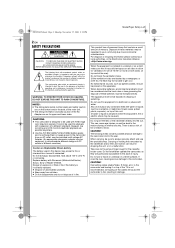
.... Connecting cables (Audio/Video, S-Video, etc.) to fall, resulting in the cassette holder cover. WARNING: TO PREVENT FIRE OR SHOCK HAZARD, DO NOT EXPOSE THIS UNIT TO RAIN OR MOISTURE. This product has a fluorescent lamp that may be of sufficient magnitude to constitute a risk of electric shock to be regulated in a bathroom or places with NTSC-type color television...
.... Connecting cables (Audio/Video, S-Video, etc.) to fall, resulting in the cassette holder cover. WARNING: TO PREVENT FIRE OR SHOCK HAZARD, DO NOT EXPOSE THIS UNIT TO RAIN OR MOISTURE. This product has a fluorescent lamp that may be of sufficient magnitude to constitute a risk of electric shock to be regulated in a bathroom or places with NTSC-type color television...
Instructions
Page 4
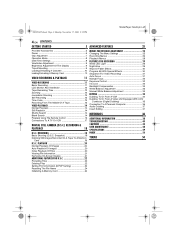
... 14 Playback Using The Remote Control 15 Connections To A TV Or VCR 17 DIGITAL STILL CAMERA (D.S.C.) RECORDING & PLAYBACK 18 D.S.C. RECORDING 18 Basic Shooting (D.S.C. PLAYBACK 20 Normal Playback Of Images 20 Auto Playback Of Images 20 Index Playback Of Files 20 Viewing File Information 21 Removing On-Screen Display 21 ADDITIONAL FEATURES FOR D.S.C 22 Protecting Files 22 Deleting Files 22 Setting Print Information (DPOF Setting 23 Resetting The File Name 24 Initializing A Memory Card 24 MENUS FOR DETAILED ADJUSTMENT 25 Changing The Menu Settings 25 Recording Menus...
... 14 Playback Using The Remote Control 15 Connections To A TV Or VCR 17 DIGITAL STILL CAMERA (D.S.C.) RECORDING & PLAYBACK 18 D.S.C. RECORDING 18 Basic Shooting (D.S.C. PLAYBACK 20 Normal Playback Of Images 20 Auto Playback Of Images 20 Index Playback Of Files 20 Viewing File Information 21 Removing On-Screen Display 21 ADDITIONAL FEATURES FOR D.S.C 22 Protecting Files 22 Deleting Files 22 Setting Print Information (DPOF Setting 23 Resetting The File Name 24 Initializing A Memory Card 24 MENUS FOR DETAILED ADJUSTMENT 25 Changing The Menu Settings 25 Recording Menus...

Instructions
Page 8
... first date/ time parameter (month), the clock stops. If "REC SELECT" is no indication on the switch. If you to set various recording functions using NO special effects or manual adjustments. LCD / T V DATE / T I GHT ON SCREEN - Suitable for "Month" is recorded onto the tape at all times, but its display can also turn on the camcorder, set the Power Switch to any operation mode except "OFF (CHARGE)" while pressing down the Lock Button located on the switch. 2 Open the LCD...
... first date/ time parameter (month), the clock stops. If "REC SELECT" is no indication on the switch. If you to set various recording functions using NO special effects or manual adjustments. LCD / T V DATE / T I GHT ON SCREEN - Suitable for "Month" is recorded onto the tape at all times, but its display can also turn on the camcorder, set the Power Switch to any operation mode except "OFF (CHARGE)" while pressing down the Lock Button located on the switch. 2 Open the LCD...

Instructions
Page 10
...; When the battery pack's charge is low, you may not be able to close the cassette holder; This prevents the tape from being recorded over . For other parts may cause the memory card to be powered up to load or eject a cassette. This prevents the memory card from being recorded over . Do not apply force. Card Cover (MEMORY CARD) Memory card PUSH HERE Cassette holder Make sure the window side is...
...; When the battery pack's charge is low, you may not be able to close the cassette holder; This prevents the tape from being recorded over . For other parts may cause the memory card to be powered up to load or eject a cassette. This prevents the memory card from being recorded over . Do not apply force. Card Cover (MEMORY CARD) Memory card PUSH HERE Cassette holder Make sure the window side is...

Instructions
Page 17
... memory card, set the camcorder's Power Switch to "A" or "M", then set your VCR and TV instruction manuals. If using a VCR, go to step 4. 3 Connect the VCR output to the TV input, referring to your TV/VCR has S-VIDEO IN and A/V input connectors. To choose whether or not the following displays appear on the connected TV ● Date/Time Set "DATE/TIME" to "AUTO", "ON" or "OFF". (੬ pg. 25, 28) Or, press DISPLAY on the remote control to turn on/off . 2 Connect...
... memory card, set the camcorder's Power Switch to "A" or "M", then set your VCR and TV instruction manuals. If using a VCR, go to step 4. 3 Connect the VCR output to the TV input, referring to your TV/VCR has S-VIDEO IN and A/V input connectors. To choose whether or not the following displays appear on the connected TV ● Date/Time Set "DATE/TIME" to "AUTO", "ON" or "OFF". (੬ pg. 25, 28) Or, press DISPLAY on the remote control to turn on/off . 2 Connect...
Instructions
Page 20
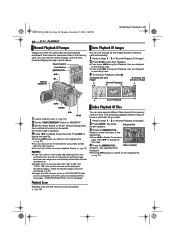
... display the previous image Normal Playback 100-0013 100-0014 100-0015 Auto Playback INFO INDEX Index Playback Of Files 5 4/9 1 Load a memory card. (੬ pg. 10) 2 Set the VIDEO/MEMORY Switch to "MEMORY". 3 Set the Power Switch to locate a particular file you press 5 during Auto Playback, files are not compatible with DCF cannot be viewed with another devices will be displayed thumbnail images. Press 5 to display the previous file. Index number Wheel in the memory card. The selected file is displayed. 4 Press 3 to display...
... display the previous image Normal Playback 100-0013 100-0014 100-0015 Auto Playback INFO INDEX Index Playback Of Files 5 4/9 1 Load a memory card. (੬ pg. 10) 2 Set the VIDEO/MEMORY Switch to "MEMORY". 3 Set the Power Switch to locate a particular file you press 5 during Auto Playback, files are not compatible with DCF cannot be viewed with another devices will be displayed thumbnail images. Press 5 to display the previous file. Index number Wheel in the memory card. The selected file is displayed. 4 Press 3 to display...

Instructions
Page 26
... DETAILED ADJUSTMENT Recording Menus CAMERA The "m" settings are effective when the Power Switch is set to a subject where the lens is in focus depends on the zoom magnification. AUTO : The shutter speed is displayed. When set to "16X" while using The indicator appears. During playback/ recording on 4:3 TVs/LCD monitor/viewfinder, black bands are possible on the procedure, refer to "M". [ ] = Factory-preset REC MODE [SP]: To record in the SP (Standard Play) mode LP: Long Play-more...
... DETAILED ADJUSTMENT Recording Menus CAMERA The "m" settings are effective when the Power Switch is set to a subject where the lens is in focus depends on the zoom magnification. AUTO : The shutter speed is displayed. When set to "16X" while using The indicator appears. During playback/ recording on 4:3 TVs/LCD monitor/viewfinder, black bands are possible on the procedure, refer to "M". [ ] = Factory-preset REC MODE [SP]: To record in the SP (Standard Play) mode LP: Long Play-more...
Instructions
Page 27
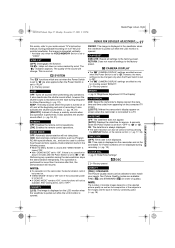
... Picture Quality modes are effective even when the Power Switch is recorded onto the tape during Snapshot for shooting except "BRIGHT". [ ] = Factory-preset BRIGHT ੬ pg. 9, "Brightness Adjustment Of The Display" ON SCREEN LCD: Keeps the camcorder's display (except the date, time and time code) from "OFF" to "A" or "M". Demonstration starts in the images and the type of memory card being used to confirm how these functions operate. The quality of storable images depends on the connected...
... Picture Quality modes are effective even when the Power Switch is recorded onto the tape during Snapshot for shooting except "BRIGHT". [ ] = Factory-preset BRIGHT ੬ pg. 9, "Brightness Adjustment Of The Display" ON SCREEN LCD: Keeps the camcorder's display (except the date, time and time code) from "OFF" to "A" or "M". Demonstration starts in the images and the type of memory card being used to confirm how these functions operate. The quality of storable images depends on the connected...
Instructions
Page 31
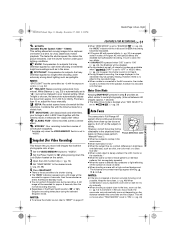
... image displayed in brightness and darkness), such as well, all snapshot modes are disabled during recording. SPOTLIGHT: Compensates for a classic look like old photos. Combine this with the Cinema mode, it enhances the "classic film" effect. SEPIA: Recorded scenes have a brownish tint like photographs onto a tape. 1 Set the VIDEO/MEMORY Switch to "VIDEO". 2 Set the Power Switch to "M" while pressing down the Lock Button located on the switch. 3 Open the LCD...
... image displayed in brightness and darkness), such as well, all snapshot modes are disabled during recording. SPOTLIGHT: Compensates for a classic look like old photos. Combine this with the Cinema mode, it enhances the "classic film" effect. SEPIA: Recorded scenes have a brownish tint like photographs onto a tape. 1 Set the VIDEO/MEMORY Switch to "VIDEO". 2 Set the Power Switch to "M" while pressing down the Lock Button located on the switch. 3 Open the LCD...

Instructions
Page 32
... camcorder will enter the focus adjustment mode again. Wheel in . The " " indicator appears and blinks. The " " indicator appears and blinks. If FOCUS is complete. To return to select "MANUAL", and press it. ● The exposure control indicator appears. 6 To brighten the image, rotate the MMENU/VOL. Wheel for over 2 seconds. While focusing on a nearer subject To reset to Auto Focus Press FOCUS twice or set to...
... camcorder will enter the focus adjustment mode again. Wheel in . The " " indicator appears and blinks. The " " indicator appears and blinks. If FOCUS is complete. To return to select "MANUAL", and press it. ● The exposure control indicator appears. 6 To brighten the image, rotate the MMENU/VOL. Wheel for over 2 seconds. While focusing on a nearer subject To reset to Auto Focus Press FOCUS twice or set to...

Instructions
Page 36
.... [B] Using DV cable It is displayed on the LCD monitor since this camcorder as the power supply instead of the PC and Software. ● The still images can result in product damage. NOTES: ● Refer to "SOFTWARE INSTALLATION AND USB CONNECTION GUIDE" for the installation of the bundled software and drivers. ● The software operation manual is provided as PDF file on the CD-ROM. ● It is recommended to use the optional JVC...
.... [B] Using DV cable It is displayed on the LCD monitor since this camcorder as the power supply instead of the PC and Software. ● The still images can result in product damage. NOTES: ● Refer to "SOFTWARE INSTALLATION AND USB CONNECTION GUIDE" for the installation of the bundled software and drivers. ● The software operation manual is provided as PDF file on the CD-ROM. ● It is recommended to use the optional JVC...

Instructions
Page 40
... its VIDEO mode. The LCD monitor or viewfinder indications blink. ● Certain Wipe/Fader effects, certain modes of light (red, green or blue) may occur when the Night-Alive function is activated during shooting, the screen becomes red or black for charging if the battery pack is set to "SAVE". HPush back and pull out the viewfinder again or close and re-open . For Video Recording - ● The tape's erase protection...
... its VIDEO mode. The LCD monitor or viewfinder indications blink. ● Certain Wipe/Fader effects, certain modes of light (red, green or blue) may occur when the Night-Alive function is activated during shooting, the screen becomes red or black for charging if the battery pack is set to "SAVE". HPush back and pull out the viewfinder again or close and re-open . For Video Recording - ● The tape's erase protection...
Instructions
Page 41
...) mode is set the Power Switch to "M". (੬ pg. 8) The image taken using the MENU/VOL. HSet the Power Switch to turn it . HRemove protection from the files stored in the memory card cannot be avoided. HBy recording with special effects does not work . ● The Sepia (SEPIA) or Monotone (MONOTONE) mode is connected via the DV connector, the camcorder does not operate. ● The DV cable was plugged/unplugged with power turned...
...) mode is set the Power Switch to "M". (੬ pg. 8) The image taken using the MENU/VOL. HSet the Power Switch to turn it . HRemove protection from the files stored in the memory card cannot be avoided. HBy recording with special effects does not work . ● The Sepia (SEPIA) or Monotone (MONOTONE) mode is connected via the DV connector, the camcorder does not operate. ● The DV cable was plugged/unplugged with power turned...

Instructions
Page 43
TROUBLESHOOTING EN 43 A. Remaining power level High Exhausted As the battery power comes close to nil, the battery indicator blinks. DUB ERROR! GR-D94US.book Page 43 Monday, November 17, 2003 2:12 PM MasterPage: Ref_Right Warning Indications Displays the battery remaining power. When the battery power is exhausted, power turns off automatically.
TROUBLESHOOTING EN 43 A. Remaining power level High Exhausted As the battery power comes close to nil, the battery indicator blinks. DUB ERROR! GR-D94US.book Page 43 Monday, November 17, 2003 2:12 PM MasterPage: Ref_Right Warning Indications Displays the battery remaining power. When the battery power is exhausted, power turns off automatically.

Instructions
Page 46
... from direct sunlight. ... near a television set. ... drop the unit or strike it by holding the LCD monitor or the viewfinder. ... keep the lens directed at all times, periodic checkups are not malfunctions... ... After the camcorder plays back for a long time, the surface around the LCD monitor and/or the back of the following problems: In such cases, use conventional disc cleaners or cleaning spray...
... from direct sunlight. ... near a television set. ... drop the unit or strike it by holding the LCD monitor or the viewfinder. ... keep the lens directed at all times, periodic checkups are not malfunctions... ... After the camcorder plays back for a long time, the surface around the LCD monitor and/or the back of the following problems: In such cases, use conventional disc cleaners or cleaning spray...

Instructions
Page 49
... mm (2-13/16" x 3-5/8" x 4-11/16") (with 0.24" color LCD Speaker Monaural White LED Light Effective distance: 1.5 m SPECIFICATIONS EN 49 For Digital Video Camera Format DV format (SD mode) Signal format NTSC standard Recording/Playback format Video: Digital component recording Audio: PCM digital recording, 32 kHz 4-channel (12-bit), 48 kHz 2-channel (16-bit) Cassette Mini DV cassette Tape speed SP: 18.8 mm/s, LP: 12.5 mm/s Maximum recording time (using 80 min. Design and specifications subject to 240 Vd, 50 Hz/60...
... mm (2-13/16" x 3-5/8" x 4-11/16") (with 0.24" color LCD Speaker Monaural White LED Light Effective distance: 1.5 m SPECIFICATIONS EN 49 For Digital Video Camera Format DV format (SD mode) Signal format NTSC standard Recording/Playback format Video: Digital component recording Audio: PCM digital recording, 32 kHz 4-channel (12-bit), 48 kHz 2-channel (16-bit) Cassette Mini DV cassette Tape speed SP: 18.8 mm/s, LP: 12.5 mm/s Maximum recording time (using 80 min. Design and specifications subject to 240 Vd, 50 Hz/60...

Instructions
Page 54
... Adapter 6, 7 Audio Dubbing 37 Auto Focus 31 Auto Playback Of Images 20 Auto Shut Off 11, 39 B Backlight Compensation 33 Battery Pack 6, 7, 45 Beep (BEEP 27 Blank search 14 Brightness Adjustment Of The Display (BRIGHT) .........9 C Changing The Menu Settings 25 Charging The Battery Pack 6 Cleaning The Camcorder 48 Clock adjustment (CLOCK ADJ 8 Connections Charging 6 Dubbing 34, 35 To A PC 36 To A TV Or VCR 17 D Date/Time Display (DATE/TIME 27, 28 Settings 8 DCF (Design rule for Camera File system...
... Adapter 6, 7 Audio Dubbing 37 Auto Focus 31 Auto Playback Of Images 20 Auto Shut Off 11, 39 B Backlight Compensation 33 Battery Pack 6, 7, 45 Beep (BEEP 27 Blank search 14 Brightness Adjustment Of The Display (BRIGHT) .........9 C Changing The Menu Settings 25 Charging The Battery Pack 6 Cleaning The Camcorder 48 Clock adjustment (CLOCK ADJ 8 Connections Charging 6 Dubbing 34, 35 To A PC 36 To A TV Or VCR 17 D Date/Time Display (DATE/TIME 27, 28 Settings 8 DCF (Design rule for Camera File system...


