
User Manual
Page 1
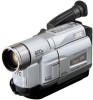
...of the Automatic Demonstration activated on the bottom of this information for purchasing the JVC Compact VHS camcorder. Retain this product. S-VHS is compatible with GR-SXM740/SXM540/ SXM340/SXM240 only U Printed in the camcorder, demonstration is set the Power Switch @ to go through the main Menu...after that allows recording is located on the LCD monitor* or viewfinder. * Applicable models only. 1 INSTRUCTIONS ENGLISH COMPACT VHS CAMCORDER GR-SXM740 GR-SXM340 GR-SXM240 GR-AX970 LYT0880-001E For Customer Use: Enter below the Model No. Rotate the MENU Wheel 1 to select "OFF" ...
...of the Automatic Demonstration activated on the bottom of this information for purchasing the JVC Compact VHS camcorder. Retain this product. S-VHS is compatible with GR-SXM740/SXM540/ SXM340/SXM240 only U Printed in the camcorder, demonstration is set the Power Switch @ to go through the main Menu...after that allows recording is located on the LCD monitor* or viewfinder. * Applicable models only. 1 INSTRUCTIONS ENGLISH COMPACT VHS CAMCORDER GR-SXM740 GR-SXM340 GR-SXM240 GR-AX970 LYT0880-001E For Customer Use: Enter below the Model No. Rotate the MENU Wheel 1 to select "OFF" ...
User Manual
Page 2
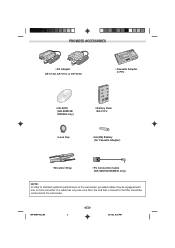
If a cable has only one or more core filter. GR-SXM740U_EN 2 2 02.4.22, 6:02 PM PROVIDED ACCESSORIES • AC Adapter AP-V12U, AP-V11U or AP-V10U • Cassette Adapter C-P7U • CD-ROM (GR-SXM740/ SXM340 only) • Battery Pack BN-V11U • Lens Cap • AA (R6) Battery (for Cassette Adapter) • Shoulder Strap • PC Connection Cable (GR-SXM740/SXM340 only) NOTE: In order to maintain optimum performance of the camcorder, provided cables may be equipped with one core filter, the end that is closest to the filter should be connected to the camcorder.
If a cable has only one or more core filter. GR-SXM740U_EN 2 2 02.4.22, 6:02 PM PROVIDED ACCESSORIES • AC Adapter AP-V12U, AP-V11U or AP-V10U • Cassette Adapter C-P7U • CD-ROM (GR-SXM740/ SXM340 only) • Battery Pack BN-V11U • Lens Cap • AA (R6) Battery (for Cassette Adapter) • Shoulder Strap • PC Connection Cable (GR-SXM740/SXM340 only) NOTE: In order to maintain optimum performance of the camcorder, provided cables may be equipped with one core filter, the end that is closest to the filter should be connected to the camcorder.
User Manual
Page 3
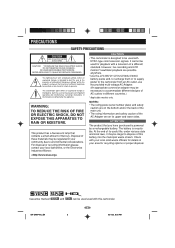
...a rechargeable battery. WARNING: TO REDUCE THE RISK OF FIRE OR ELECTRIC SHOCK, DO NOT EXPOSE THIS APPARATUS TO RAIN OR MOISTURE. Cassettes marked GR-SXM740U_EN and can be of sufficient magnitude to constitute a risk of electric shock to the presence of a different standard. NO USER-SERVICEABLE PARTS ...may be necessary to dispose of the AC Adapter are possible anywhere. • Use the JVC BN-V11U/V12U/V20U/V400U battery packs and, to recharge them or to supply power to the camcorder from an AC outlet, use the provided multi-voltage AC Adapter. (An appropriate conversion adapter...
...a rechargeable battery. WARNING: TO REDUCE THE RISK OF FIRE OR ELECTRIC SHOCK, DO NOT EXPOSE THIS APPARATUS TO RAIN OR MOISTURE. Cassettes marked GR-SXM740U_EN and can be of sufficient magnitude to constitute a risk of electric shock to the presence of a different standard. NO USER-SERVICEABLE PARTS ...may be necessary to dispose of the AC Adapter are possible anywhere. • Use the JVC BN-V11U/V12U/V20U/V400U battery packs and, to recharge them or to supply power to the camcorder from an AC outlet, use the provided multi-voltage AC Adapter. (An appropriate conversion adapter...
User Manual
Page 5
...11 C Cassette Adapter pg. 16 Charge Marker pg. 6 Charging The Battery Pack pg. 6 Classic Film Effect pg. 23 Clean The Camcorder pg. 27 Connection To a VCR/TV pg. 15 Connection To A PC pg. 16 Counter Memory pg. 14 D Darken The ...pg. 28 Sports Mode pg. 23 Still Playback pg. 11 Stretch Effect pg. 23 Strobe Effect pg. 23 Super LoLux (S.LX pg. 19 Super VHS Expansion Technology pg. 20 T Tape Counter pg. 14 Tape Dubbing pg. 15 Tape Length Setting pg. 21 Tele...White Balance Adjustment pg. 19 Wide Mode pg. 20 Wipe-In/Out pg. 22 Z Zooming pg. 13 GR-SXM740U_EN 5 5 02.4.22, 6:02 PM
...11 C Cassette Adapter pg. 16 Charge Marker pg. 6 Charging The Battery Pack pg. 6 Classic Film Effect pg. 23 Clean The Camcorder pg. 27 Connection To a VCR/TV pg. 15 Connection To A PC pg. 16 Counter Memory pg. 14 D Darken The ...pg. 28 Sports Mode pg. 23 Still Playback pg. 11 Stretch Effect pg. 23 Strobe Effect pg. 23 Super LoLux (S.LX pg. 19 Super VHS Expansion Technology pg. 20 T Tape Counter pg. 14 Tape Dubbing pg. 15 Tape Length Setting pg. 21 Tele...White Balance Adjustment pg. 19 Wide Mode pg. 20 Wipe-In/Out pg. 22 Z Zooming pg. 13 GR-SXM740U_EN 5 5 02.4.22, 6:02 PM
User Manual
Page 6
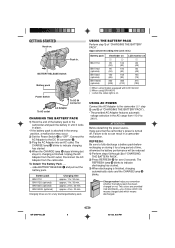
...the battery pack has been charged or not. Disconnect the AC Adapter from the AC outlet. approx. 1 hr. 30 min. Push in a camcorder malfunction. GR-SXM740U_EN 6 6 02.4.22, 6:02 PM slide BATTERY RELEASE 8 and pull out the battery pack. GETTING STARTED Hook on USING AC POWER ...Connect the AC Adapter to the camcorder (੬ step 2) and 3) of "CHARGING THE BATTERY PACK"). • The provided AC Adapter features automatic voltage selection...
...the battery pack has been charged or not. Disconnect the AC Adapter from the AC outlet. approx. 1 hr. 30 min. Push in a camcorder malfunction. GR-SXM740U_EN 6 6 02.4.22, 6:02 PM slide BATTERY RELEASE 8 and pull out the battery pack. GETTING STARTED Hook on USING AC POWER ...Connect the AC Adapter to the camcorder (੬ step 2) and 3) of "CHARGING THE BATTERY PACK"). • The provided AC Adapter features automatic voltage selection...

User Manual
Page 7
... the AC Adapter from the AC outlet. • Detach the battery from the camcorder, then try charging again. • If a fully-charged battery's operation time remains extremely short, the battery is worn out. Consult an authorized JVC dealer for replacement, or set "YEAR", "MONTH", "DAY" or "TIME" ... start shooting. 1 @ DATE / T I ME YEAR MONTH DAY T I ME 2002 JUN 28 PM 8 : 2 0 12-hour indication with AM or PM EX I T GR-SXM740U_EN 7 7 02.4.22, 6:02 PM Date/Time Settings 1) Set the Power Switch @ to display SYSTEM MENU. Rotate the MENU Wheel 1 to select "4NEXT" and press...
... the AC Adapter from the AC outlet. • Detach the battery from the camcorder, then try charging again. • If a fully-charged battery's operation time remains extremely short, the battery is worn out. Consult an authorized JVC dealer for replacement, or set "YEAR", "MONTH", "DAY" or "TIME" ... start shooting. 1 @ DATE / T I ME YEAR MONTH DAY T I ME 2002 JUN 28 PM 8 : 2 0 12-hour indication with AM or PM EX I T GR-SXM740U_EN 7 7 02.4.22, 6:02 PM Date/Time Settings 1) Set the Power Switch @ to display SYSTEM MENU. Rotate the MENU Wheel 1 to select "4NEXT" and press...
User Manual
Page 8
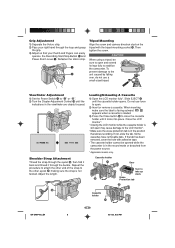
.... If the tab has been removed, cover the hole with the tripod mounting socket W. Viewfinder Adjustment 1) Set the Power Switch @ to stabilize the camcorder. q appears when a cassette is in the viewfinder are clearly focused. 180° PAUSE Shoulder Strap Attachment Thread the strap through the eyelet y, then...the Recording Start/Stop Button ! When inserting, make sure the label is facing outward. CAUTION When using a tripod, be opened while the camcorder is not twisted. i Erase Protection tab t Cassette holder i GR-SXM740U_EN 8 8 02.4.22, 6:02 PM
.... If the tab has been removed, cover the hole with the tripod mounting socket W. Viewfinder Adjustment 1) Set the Power Switch @ to stabilize the camcorder. q appears when a cassette is in the viewfinder are clearly focused. 180° PAUSE Shoulder Strap Attachment Thread the strap through the eyelet y, then...the Recording Start/Stop Button ! When inserting, make sure the label is facing outward. CAUTION When using a tripod, be opened while the camcorder is not twisted. i Erase Protection tab t Cassette holder i GR-SXM740U_EN 8 8 02.4.22, 6:02 PM
User Manual
Page 9
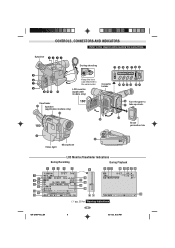
LCD monitor (applicable models only) Cassette holder Viewfinder o Speaker (applicable models only) p 180° 90° i 180° ) q w e rt y Turn the gear to the camcorder. VHS REC MWB PAUSE 5M I N 1 / 2S BR I GHT 6- - - + CONGRATULAT I GHT 1 0 x +02 S - Eyepiece 1 2 3 4 During shooting # $ % ^ &*( 5 6 7 8 9 0! @ Keep the lens... N I ONS DEC 2 5 . 0 1 AM 1 1 : 4 5 : 1 8 6 ^ & * ( 1X ) q we r t y u i S-ET SP 4 TBC -1 : 23 : 45 MONOTONE AT VOLUME - - - - - -6- - - - - + o ੬ pg. 25 for Warning Indications . 9 GR-SXM740U_EN 9 02.4.22, 6:02 PM
LCD monitor (applicable models only) Cassette holder Viewfinder o Speaker (applicable models only) p 180° 90° i 180° ) q w e rt y Turn the gear to the camcorder. VHS REC MWB PAUSE 5M I N 1 / 2S BR I GHT 6- - - + CONGRATULAT I GHT 1 0 x +02 S - Eyepiece 1 2 3 4 During shooting # $ % ^ &*( 5 6 7 8 9 0! @ Keep the lens... N I ONS DEC 2 5 . 0 1 AM 1 1 : 4 5 : 1 8 6 ^ & * ( 1X ) q we r t y u i S-ET SP 4 TBC -1 : 23 : 45 MONOTONE AT VOLUME - - - - - -6- - - - - + o ੬ pg. 25 for Warning Indications . 9 GR-SXM740U_EN 9 02.4.22, 6:02 PM
User Manual
Page 11
... the Recording Start/Stop Button !. To playback on this camcorder. High-speed picture search (Shuttle Search) is possible by adjusting as described above. * Applicable models only. ** GR-SXM740/SXM340/SXM240 only. • Tapes recorded on S-VHS or S-VHS ET (੬ pg. 18, 20) cannot be viewed... up, or towards "-" to " " or " ". RECORDING Set REC MODE, S-VHS (S-VHS ET)**, TAPE LENGTH and DATE/TIME in the Record-Standby or Stop mode. For VIDEO RECORDING/VIDEO PLAYBACK • The camcorder shuts off automatically to save power. • The playback picture can shoot yourself while viewing...
... the Recording Start/Stop Button !. To playback on this camcorder. High-speed picture search (Shuttle Search) is possible by adjusting as described above. * Applicable models only. ** GR-SXM740/SXM340/SXM240 only. • Tapes recorded on S-VHS or S-VHS ET (੬ pg. 18, 20) cannot be viewed... up, or towards "-" to " " or " ". RECORDING Set REC MODE, S-VHS (S-VHS ET)**, TAPE LENGTH and DATE/TIME in the Record-Standby or Stop mode. For VIDEO RECORDING/VIDEO PLAYBACK • The camcorder shuts off automatically to save power. • The playback picture can shoot yourself while viewing...
User Manual
Page 12
... is not heard. STABILIZER 4. ! appears. 2) To switch off the Picture Stabilizer, press P. Recording) (GR-SXM240/AX970 only) To record a scene for unstable images caused by pressing 5SEC. GR-SXM740U_EN 12 12 02.4.22, 6:02 PM REC 2. 5S @ appears and 5Sec. function, press 5SEC. ...camera shutter-type blackout together with the sound effect of a shutter closing. • Snapshot is finished, the camcorder reenters the Record- Rec. Rec (5-sec. BASIC FEATURES Snapshot (GR-SXM740/SXM340 only) You can record still images that 5S @ disappears. • Fade/Wipe (੬ pg....
... is not heard. STABILIZER 4. ! appears. 2) To switch off the Picture Stabilizer, press P. Recording) (GR-SXM240/AX970 only) To record a scene for unstable images caused by pressing 5SEC. GR-SXM740U_EN 12 12 02.4.22, 6:02 PM REC 2. 5S @ appears and 5Sec. function, press 5SEC. ...camera shutter-type blackout together with the sound effect of a shutter closing. • Snapshot is finished, the camcorder reenters the Record- Rec. Rec (5-sec. BASIC FEATURES Snapshot (GR-SXM740/SXM340 only) You can record still images that 5S @ disappears. • Fade/Wipe (੬ pg....
User Manual
Page 13
... "AUTO": • Depending on the lighting conditions, the video light may result. • Do not place the camcorder into the carrying case immediately after turning it . 3) Press the Recording Start/Stop Button ! GR-SXM740U_EN 13 13 02.4.22, 6:02 PM AUTO: Automatically turns on the light when the.... 19) to zoom out. • The further you consult your nearest JVC dealer for the next shot. • Distortion may become unstable during zoom. ON : Always keeps the light on as long as the camcorder is recommended that point is called Digital Zoom. • Slide the Power...
... "AUTO": • Depending on the lighting conditions, the video light may result. • Do not place the camcorder into the carrying case immediately after turning it . 3) Press the Recording Start/Stop Button ! GR-SXM740U_EN 13 13 02.4.22, 6:02 PM AUTO: Automatically turns on the light when the.... 19) to zoom out. • The further you consult your nearest JVC dealer for the next shot. • Distortion may become unstable during zoom. ON : Always keeps the light on as long as the camcorder is recommended that point is called Digital Zoom. • Slide the Power...
User Manual
Page 14
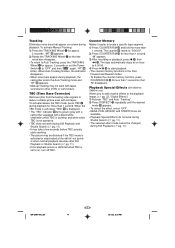
...; pg. 11). TBC (Time Base Corrector) Removes jitter from fluctuating video signals to deliver a stable picture even with tapes recorded on other VCRs or camcorders. "M" appears. 3) After recording or playback, press 5 $, then 2 %. Counter Memory Makes it easier to locate a specific tape segment. 1) Press...or set to "0:00:00". 2) Press COUNTER R/M ) for approx. 2 seconds. The counter t resets to on, turn off TBC. Playback Special Effects (GR-SXM740/ SXM340 only) Allows you to add creative effects to the playback image. (੬ pg. 23, "Digital Effects") 1) Activate "TBC" and Auto ...
...; pg. 11). TBC (Time Base Corrector) Removes jitter from fluctuating video signals to deliver a stable picture even with tapes recorded on other VCRs or camcorders. "M" appears. 3) After recording or playback, press 5 $, then 2 %. Counter Memory Makes it easier to locate a specific tape segment. 1) Press...or set to "0:00:00". 2) Press COUNTER R/M ) for approx. 2 seconds. The counter t resets to on, turn off TBC. Playback Special Effects (GR-SXM740/ SXM340 only) Allows you to add creative effects to the playback image. (੬ pg. 23, "Digital Effects") 1) Activate "TBC" and Auto ...
User Manual
Page 15
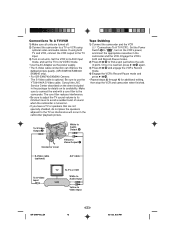
... • Use the AC Adapter as interference will occur in the camcorder playback picture. Engage the VCR's AUX and Record-Pause modes. 2) Press 4/6 ^ to Video Input GR-SXM740U_EN 15 15 02.4.22, 6:02 PM Consult the JVC Service Center described on the sheet included in the package for additional... editing, then stop the VCR and camcorder when finished. To S-Video Output 5 White to Audio Output 6 ...
... • Use the AC Adapter as interference will occur in the camcorder playback picture. Engage the VCR's AUX and Record-Pause modes. 2) Press 4/6 ^ to Video Input GR-SXM740U_EN 15 15 02.4.22, 6:02 PM Consult the JVC Service Center described on the sheet included in the package for additional... editing, then stop the VCR and camcorder when finished. To S-Video Output 5 White to Audio Output 6 ...
User Manual
Page 16
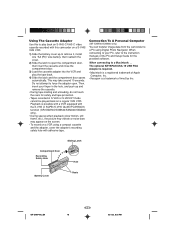
... SQPB (S-VHS QUASI PLAYBACK) function (GR-SXM740/SXM540/SXM340/SXM240 only). • During special-effect playback (slow motion, still frame, etc.), the picture may vibrate or noise bars may take around 10 seconds. Using The Cassette Adapter Use this to play back an S-VHS-C/VHS-C video cassette recorded with this camcorder on a S-VHS/ VHS VCR. 1) Slide the...
... SQPB (S-VHS QUASI PLAYBACK) function (GR-SXM740/SXM540/SXM340/SXM240 only). • During special-effect playback (slow motion, still frame, etc.), the picture may vibrate or noise bars may take around 10 seconds. Using The Cassette Adapter Use this to play back an S-VHS-C/VHS-C video cassette recorded with this camcorder on a S-VHS/ VHS VCR. 1) Slide the...

User Manual
Page 17
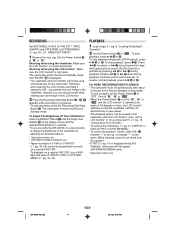
...) Cassette holder Viewfinder o Speaker (applicable models only) p 180° 90° i 180° ) q w e rt y Turn the gear to the camcorder. y Erase protection tab Q W Video light Microphone LCD Monitor/Viewfinder Indications During Recording During Playback 7 9 ! 8 0 @ #$ % 1 23 4 5 120M... -6- - - - - + o ੬ pg. 25 for Warning Indications . 17 GR-SXM740U_EN 17 02.4.22, 6:02 PM Eyepiece 1 2 3 4 During shooting # $ % ^ &*( 5 6 7 8 9 0! @ Keep the lens cap attached to u take up slack. VHS REC MWB PAUSE 5M I N 1 / 2S BR I GHT 6- - - + CONGRATULAT...
...) Cassette holder Viewfinder o Speaker (applicable models only) p 180° 90° i 180° ) q w e rt y Turn the gear to the camcorder. y Erase protection tab Q W Video light Microphone LCD Monitor/Viewfinder Indications During Recording During Playback 7 9 ! 8 0 @ #$ % 1 23 4 5 120M... -6- - - - - + o ੬ pg. 25 for Warning Indications . 17 GR-SXM740U_EN 17 02.4.22, 6:02 PM Eyepiece 1 2 3 4 During shooting # $ % ^ &*( 5 6 7 8 9 0! @ Keep the lens cap attached to u take up slack. VHS REC MWB PAUSE 5M I N 1 / 2S BR I GHT 6- - - + CONGRATULAT...
User Manual
Page 18
... 21) in SYSTEM MENU. • Be sure to display the Setting Menu and rotate it . To brighten the image, rotate the MENU Wheel 1 downward. VHS ON TAPE LENGTH T30 D I SP . ᮣ RE T URN SYSTEM MENU ᮣNEXT REC MODE SP D. The normal screen reappears. "1" appears and ...blinks. To darken the image, rotate the MENU Wheel 1 upward. GR-SXM740U_EN 18 18 02.4.22, 6:02 PM If zoomed in in the maximum telephoto position when you focus in on the distance between the camcorder and the subject. B . "4" appears and blinking. • If the lens...
... 21) in SYSTEM MENU. • Be sure to display the Setting Menu and rotate it . To brighten the image, rotate the MENU Wheel 1 downward. VHS ON TAPE LENGTH T30 D I SP . ᮣ RE T URN SYSTEM MENU ᮣNEXT REC MODE SP D. The normal screen reappears. "1" appears and ...blinks. To darken the image, rotate the MENU Wheel 1 upward. GR-SXM740U_EN 18 18 02.4.22, 6:02 PM If zoomed in in the maximum telephoto position when you focus in on the distance between the camcorder and the subject. B . "4" appears and blinking. • If the lens...
User Manual
Page 19
...The selected display will be recorded. DATE/TIME DISP. Makes the date/time appear in the camcorder or on the white paper, adjust focus manually (੬ FOCUS in until OFF is not recorded. GR-SXM740U_EN 19 19 02.4.22, 6:02 PM MWB: White balance is adjusted automatically. When the ...MWB" stops blinking. • Once you to record the display, select OFF before shooting. • In the AUTO DATE mode, the camcorder records the date for measuring sensitivity conforming to shoot the subject with no picture brightness adjustment. The date is replaced after the date is ...
...The selected display will be recorded. DATE/TIME DISP. Makes the date/time appear in the camcorder or on the white paper, adjust focus manually (੬ FOCUS in until OFF is not recorded. GR-SXM740U_EN 19 19 02.4.22, 6:02 PM MWB: White balance is adjusted automatically. When the ...MWB" stops blinking. • Once you to record the display, select OFF before shooting. • In the AUTO DATE mode, the camcorder records the date for measuring sensitivity conforming to shoot the subject with no picture brightness adjustment. The date is replaced after the date is ...
User Manual
Page 20
... picture quality may not be played back on some VCRs, including some JVC VCRs. • Tapes recorded in VHS on a Super VHS VCR or a VCR equipped with S-VHS tapes. • To avoid on this camcorder be played back on -screen noise, do test record beforehand to make... 12). Not effective with S-VHS ET recording. S-VHS (S-VHS ET) (GR-SXM740/SXM540/SXM340/ SXM240 only) ON: With an S-VHS cassette, "S" appears and the camcorder records in S-VHS or S-VHS ET mode can be played back not only on this camcorder but also on a VHS or S-VHS cassette. • JVC EHG (Extra High Grade)...
... picture quality may not be played back on some VCRs, including some JVC VCRs. • Tapes recorded in VHS on a Super VHS VCR or a VCR equipped with S-VHS tapes. • To avoid on this camcorder be played back on -screen noise, do test record beforehand to make... 12). Not effective with S-VHS ET recording. S-VHS (S-VHS ET) (GR-SXM740/SXM540/SXM340/ SXM240 only) ON: With an S-VHS cassette, "S" appears and the camcorder records in S-VHS or S-VHS ET mode can be played back not only on this camcorder but also on a VHS or S-VHS cassette. • JVC EHG (Extra High Grade)...

User Manual
Page 21
...extended period of time (Animation). or wipe-in/out cannot be set to "SP". GR-SXM740U_EN 21 21 02.4.22, 6:02 PM after focusing on the LCD monitor*/viewfinder during playback or recording. Leaving the camcorder aimed at a specific subject, you can shoot a series of pictures, each slightly different,... as possible at preset time spans. TELE MACRO When set to set to "SP". (Please note that allows recording is loaded in the camcorder, demonstration is not available. • If you do not detach the Lens Cap, you cannot see the actual changes of the Automatic Demonstration...
...extended period of time (Animation). or wipe-in/out cannot be set to "SP". GR-SXM740U_EN 21 21 02.4.22, 6:02 PM after focusing on the LCD monitor*/viewfinder during playback or recording. Leaving the camcorder aimed at a specific subject, you can shoot a series of pictures, each slightly different,... as possible at preset time spans. TELE MACRO When set to set to "SP". (Please note that allows recording is loaded in the camcorder, demonstration is not available. • If you do not detach the Lens Cap, you cannot see the actual changes of the Automatic Demonstration...
User Manual
Page 22
... adjusted (maximum 1/6 sec.). 1 NIGHT 10X (only when the Power Switch @ is set to " "): The shutter speed is set to 1 second to bring the camcorder into /from the center. DOOR (Wipe): Wipes in on a black screen from left to " ". 2) Press FADE/WIPE ) repeatedly until "OFF" appears. Fade...WIPE ) repeatedly until the desired mode appears. 3) Press the Recording Start/Stop Button ! MOSAIC (Fader): Gradually turns/returns the picture into focus. GR-SXM740U_EN 22 22 02.4.22, 6:02 PM WINDOW (Wipe): Wipes in on a black screen from the upper right to the lower left corner, ...
... adjusted (maximum 1/6 sec.). 1 NIGHT 10X (only when the Power Switch @ is set to " "): The shutter speed is set to 1 second to bring the camcorder into /from the center. DOOR (Wipe): Wipes in on a black screen from left to " ". 2) Press FADE/WIPE ) repeatedly until "OFF" appears. Fade...WIPE ) repeatedly until the desired mode appears. 3) Press the Recording Start/Stop Button ! MOSAIC (Fader): Gradually turns/returns the picture into focus. GR-SXM740U_EN 22 22 02.4.22, 6:02 PM WINDOW (Wipe): Wipes in on a black screen from the upper right to the lower left corner, ...


