Instruction Manual
Page 2
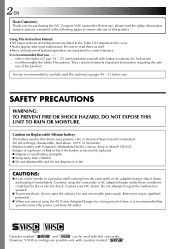
...you are not using the camcorder or AC adapter/charger under these as well. •Basic and advanced features/operation are possible only with this product. Caution on Replaceable lithium battery The battery used in the following ...pages to repair the malfunction yourself. Ⅲ To prevent shock, do not dispose of this device may present a fire or chemical burn hazard if mistreated. Do not recharge, disassemble, heat above 100°C or incinerate. However, S-VHS recordings are separated for purchasing the JVC Compact VHS camcorder...
...you are not using the camcorder or AC adapter/charger under these as well. •Basic and advanced features/operation are possible only with this product. Caution on Replaceable lithium battery The battery used in the following ...pages to repair the malfunction yourself. Ⅲ To prevent shock, do not dispose of this device may present a fire or chemical burn hazard if mistreated. Do not recharge, disassemble, heat above 100°C or incinerate. However, S-VHS recordings are separated for purchasing the JVC Compact VHS camcorder...
Instruction Manual
Page 3
...(02)750 3777 IN NEW ZEALAND, PLEASE RETURN BATTERIES BY MAIL TO: Hagemeyer (NZ) Limited P.O. Box 100589 Auckland 1000 Phone : (09)415 8758 This camcorder is installed in different countries.) * GR-SXM460A/SXM260A/SXM46EA/SXM26EA only. ** GR-SXM46EA/SXM26EA/SX21EA only. Use the BN-V11U**/V12U.../V20U battery packs and, to recharge them, the provided multi-voltage AC Power Adapter...
...(02)750 3777 IN NEW ZEALAND, PLEASE RETURN BATTERIES BY MAIL TO: Hagemeyer (NZ) Limited P.O. Box 100589 Auckland 1000 Phone : (09)415 8758 This camcorder is installed in different countries.) * GR-SXM460A/SXM260A/SXM46EA/SXM26EA only. ** GR-SXM46EA/SXM26EA/SX21EA only. Use the BN-V11U**/V12U.../V20U battery packs and, to recharge them, the provided multi-voltage AC Power Adapter...
Instruction Manual
Page 5
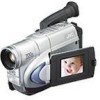
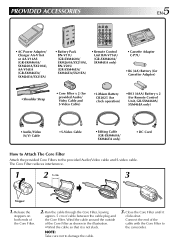
...camcorder. NOTE: Take care not to the provided Audio/Video cable and S-video cable. PROVIDED ACCESSORIES 5 EN •AC Power Adapter/ Charger AA-V16A or AA-V16AS (GR-SXM460A/ SXM260A/SX210A), AA-V16EA (GR-SXM46EA/ SXM26EA/SX21EA) •Battery Pack BN-V11U (GR-SXM460A/ SXM260A/SX210A), BN-V20U (GR...-SXM46EA/ SXM26EA/SX21EA) •Remote Control Unit RM-V716U (GR-SXM460A/ SXM46EA only) •Cassette Adapter C-...
...camcorder. NOTE: Take care not to the provided Audio/Video cable and S-video cable. PROVIDED ACCESSORIES 5 EN •AC Power Adapter/ Charger AA-V16A or AA-V16AS (GR-SXM460A/ SXM260A/SX210A), AA-V16EA (GR-SXM46EA/ SXM26EA/SX21EA) •Battery Pack BN-V11U (GR-SXM460A/ SXM260A/SX210A), BN-V20U (GR...-SXM46EA/ SXM26EA/SX21EA) •Remote Control Unit RM-V716U (GR-SXM460A/ SXM46EA only) •Cassette Adapter C-...
Instruction Manual
Page 6
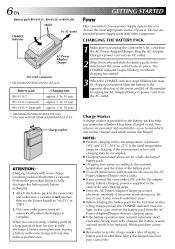
... and black)-you remember whether it becomes warm during use provided power supply units with GR-SXM46EA/SXM26EA/SX21EA. CHARGING THE BATTERY PACK 1 Make sure you connect the camcorder's DC cord to the adapter during battery charging, power is provided on the battery pack to fully discharge it before recharging. 1. In this case, remove the...
... and black)-you remember whether it becomes warm during use provided power supply units with GR-SXM46EA/SXM26EA/SX21EA. CHARGING THE BATTERY PACK 1 Make sure you connect the camcorder's DC cord to the adapter during battery charging, power is provided on the battery pack to fully discharge it before recharging. 1. In this case, remove the...
Instruction Manual
Page 7
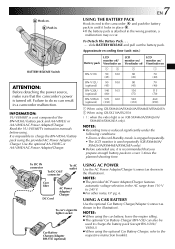
...AC Power Adapter/Charger. 7 EN USING THE BATTERY PACK Hook its end to the camcorder and push the battery pack in until it is recommended that the camcorder's power is impossible to charge the BN-V856U battery pack using the optional Car Battery Charger, refer to 240 V. ● For... (330) 520 (310) 460 (290) 1 When using GR-SXM460A/SXM260A/SXM46EA/SXM26EA 2 When using . slide BATTERY RELEASE and pull out the battery pack. NOTES: ● Recording time is reduced significantly under the following conditions: •Zoom or Record-Standby mode is engaged repeatedly. •The LCD ...
...AC Power Adapter/Charger. 7 EN USING THE BATTERY PACK Hook its end to the camcorder and push the battery pack in until it is recommended that the camcorder's power is impossible to charge the BN-V856U battery pack using the optional Car Battery Charger, refer to 240 V. ● For... (330) 520 (310) 460 (290) 1 When using GR-SXM460A/SXM260A/SXM46EA/SXM26EA 2 When using . slide BATTERY RELEASE and pull out the battery pack. NOTES: ● Recording time is reduced significantly under the following conditions: •Zoom or Record-Standby mode is engaged repeatedly. •The LCD ...
Instruction Manual
Page 8
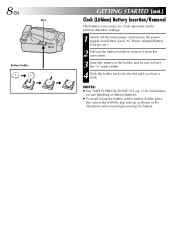
...'s power and remove the power supply unit (battery pack, AC Power Adapter/Battery Charger, etc.). 2 Pull out the battery holder to remove it from the camcorder. 3 Insert the battery in the illustration when inserting/removing the battery. 8 EN Slot Battery holder GETTING STARTED (cont.) Clock (Lithium) Battery Insertion/Removal This battery is necessary for information on safe handling of...
...'s power and remove the power supply unit (battery pack, AC Power Adapter/Battery Charger, etc.). 2 Pull out the battery holder to remove it from the camcorder. 3 Insert the battery in the illustration when inserting/removing the battery. 8 EN Slot Battery holder GETTING STARTED (cont.) Clock (Lithium) Battery Insertion/Removal This battery is necessary for information on safe handling of...
Instruction Manual
Page 17
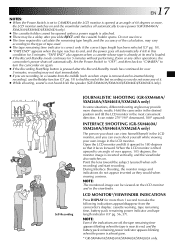
...image can even shoot yourself while viewing your own image in this condition for 5 minutes without performing Zoom or any of it faces forward. Self-Recording JOURNALISTIC SHOOTING (GR-SXM460A/ SXM260A/SXM46EA/SXM26EA only) In some situations, different shooting angles may provide more , the LCD...it . ● While shooting, sound is not heard from the camcorder's display: cassette warning, tape remaining time, battery pack remaining power indicator and tape length indicator (੬ pg. 56, 57). Hold the camcorder in the desired position and tilt the LCD monitor in the viewfinder. ...
...image can even shoot yourself while viewing your own image in this condition for 5 minutes without performing Zoom or any of it faces forward. Self-Recording JOURNALISTIC SHOOTING (GR-SXM460A/ SXM260A/SXM46EA/SXM26EA only) In some situations, different shooting angles may provide more , the LCD...it . ● While shooting, sound is not heard from the camcorder's display: cassette warning, tape remaining time, battery pack remaining power indicator and tape length indicator (੬ pg. 56, 57). Hold the camcorder in the desired position and tilt the LCD monitor in the viewfinder. ...
Instruction Manual
Page 20
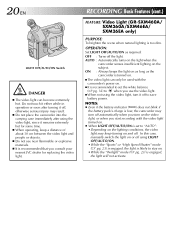
RECORDING Basic Features (cont.) FEATURE: Video Light (GR-SXM460A/ SXM260A/SXM46EA/ SXM26EA only) PURPOSE: To brighten the scene when natural lighting is recommended that you consult your nearest JVC dealer for some time. Ⅲ When operating, keep turning on . ● When LIGHT OFF/AUTO/ON...likely to stay on the subject. NOTES: ● Even if the battery indicator ( ) does not blink if the battery pack's charge is low, the camcorder may turn off . AUTO : Automatically turns on the light when the camcorder senses insufficient lighting on . •While the "Twilight" mode (੬...
RECORDING Basic Features (cont.) FEATURE: Video Light (GR-SXM460A/ SXM260A/SXM46EA/ SXM26EA only) PURPOSE: To brighten the scene when natural lighting is recommended that you consult your nearest JVC dealer for some time. Ⅲ When operating, keep turning on . ● When LIGHT OFF/AUTO/ON...likely to stay on the subject. NOTES: ● Even if the battery indicator ( ) does not blink if the battery pack's charge is low, the camcorder may turn off . AUTO : Automatically turns on the light when the camcorder senses insufficient lighting on . •While the "Twilight" mode (੬...
Instruction Manual
Page 32
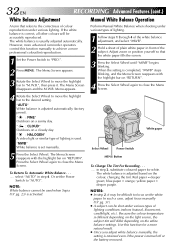
...(natural, flourescent, candlelight, etc.). In such a case, adjust focus manually (੬ pg. 31). ● A subject can be used . Adjust zoom or position yourself so that refers to close the Menu Screen. Press the Select Wheel again to close the Menu Screen. 4 Rotate the Select Wheel...the correctness of lighting is used when Sepia (੬ pg. 23) is turned off or the battery removed. select "AUTO" in step 2, substitute coloured paper for a more advanced camcorder operators control this function for white. White paper Select Wheel Power Switch MENU Button To Change The...
...(natural, flourescent, candlelight, etc.). In such a case, adjust focus manually (੬ pg. 31). ● A subject can be used . Adjust zoom or position yourself so that refers to close the Menu Screen. Press the Select Wheel again to close the Menu Screen. 4 Rotate the Select Wheel...the correctness of lighting is used when Sepia (੬ pg. 23) is turned off or the battery removed. select "AUTO" in step 2, substitute coloured paper for a more advanced camcorder operators control this function for white. White paper Select Wheel Power Switch MENU Button To Change The...

Instruction Manual
Page 35
... and automatically performs tape loading and unloading. 1 Slide the battery cover up and remove the cassette. Compartment door 3 Load the cassette adapter into the VCR and play back ...of the adapter as shown in the illustration at left, and push up to remove it, install one "R6 (AA)" size battery as you would any S-VHS/VHS video cassette recorder. Do not attempt to force the adapter open the adapter compartment door, ...cover the adapter's recording safety hole with adhesive tape. PLAYBACK Using The Cassette Adapter EN35 Cassette Adapter Use this camcorder on a regular VHS VCR.
... and automatically performs tape loading and unloading. 1 Slide the battery cover up and remove the cassette. Compartment door 3 Load the cassette adapter into the VCR and play back ...of the adapter as shown in the illustration at left, and push up to remove it, install one "R6 (AA)" size battery as you would any S-VHS/VHS video cassette recorder. Do not attempt to force the adapter open the adapter compartment door, ...cover the adapter's recording safety hole with adhesive tape. PLAYBACK Using The Cassette Adapter EN35 Cassette Adapter Use this camcorder on a regular VHS VCR.
Instruction Manual
Page 37
... 3 Engage the VCR's AUX and Record-Pause modes. 4 Engage the camcorder's Play mode to its minimum level to avoid a sudden burst of the battery pack (੬ pg. 7). ● If your VCR has an S-Video input connector, connect the camcorder and the VCR using a VCR . . . NOTES: ● It... is reached, press 4/6 on the camcorder. 5 Press 4/6 on the camcorder and engage the VCR's Record mode. 6...
... 3 Engage the VCR's AUX and Record-Pause modes. 4 Engage the camcorder's Play mode to its minimum level to avoid a sudden burst of the battery pack (੬ pg. 7). ● If your VCR has an S-Video input connector, connect the camcorder and the VCR using a VCR . . . NOTES: ● It... is reached, press 4/6 on the camcorder. 5 Press 4/6 on the camcorder and engage the VCR's Record mode. 6...
Instruction Manual
Page 44
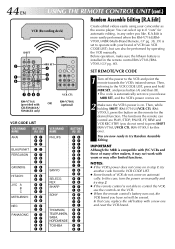
Before operation, make sure the lithium battery is compatible with JVC VCRs and those of many other makers, it may not work with yours... 38, 39) is on manually and try step 2. ● If the remote control is not able to operate with your camcorder as the source player. You are PLAY, STOP, PAUSE, FF, REW and VCR REC STBY (you have set once you ...(Recording deck) SHIFT 3 MBR SET 4 1 6 2 123 5 456 7890 789` RM-V716U (provided with OR GR-SXM460A/ SXM46EA only) VCR CTL RM-V700U (optional) VCR CODE LIST VCR BRAND NAME BUTTONS (A) (B) AKAI BLAUPUNKT FERGUSON GRUNDIG HITACHI...
Before operation, make sure the lithium battery is compatible with JVC VCRs and those of many other makers, it may not work with yours... 38, 39) is on manually and try step 2. ● If the remote control is not able to operate with your camcorder as the source player. You are PLAY, STOP, PAUSE, FF, REW and VCR REC STBY (you have set once you ...(Recording deck) SHIFT 3 MBR SET 4 1 6 2 123 5 456 7890 789` RM-V716U (provided with OR GR-SXM460A/ SXM46EA only) VCR CTL RM-V700U (optional) VCR CODE LIST VCR BRAND NAME BUTTONS (A) (B) AKAI BLAUPUNKT FERGUSON GRUNDIG HITACHI...

Instruction Manual
Page 49
... a cool, dry place. Be sure to 30°C ● Recharging time is recommended that you consult your nearest JVC dealer for battery use . Do not dispose of the following cautions: 1. Terminals 2. Extended exposure to excessive heat as some time. •When operating, keep a... use current even when switched off , otherwise serious injury may result. •Do not place the camcorder into the carrying case immediately after using the supplied battery pack or an optional battery pack, be warm after charging, or after turning it either while in use, as they can cause...
... a cool, dry place. Be sure to 30°C ● Recharging time is recommended that you consult your nearest JVC dealer for battery use . Do not dispose of the following cautions: 1. Terminals 2. Extended exposure to excessive heat as some time. •When operating, keep a... use current even when switched off , otherwise serious injury may result. •Do not place the camcorder into the carrying case immediately after using the supplied battery pack or an optional battery pack, be warm after charging, or after turning it either while in use, as they can cause...
Instruction Manual
Page 50
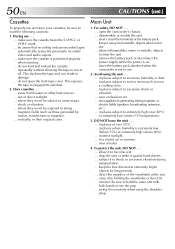
...signals. ... During use . ... vertically, in direct sunlight. ... Keep it by motors, transformers or magnets). ... leave the battery pack attached when the camcorder is on. ... Avoid using the shoulder strap. near a heater. 4. in places subject to excessive humidity or dust. ... .... . ... in places subject to shock or excessive vibration during transportation. ... swing it against hard objects. ... do not open the camcorder's chassis. ... CAUTIONS (cont.) Main Unit 1. in places where humidity is positioned properly when inserting. ... make sure the cassette is ...
...signals. ... During use . ... vertically, in direct sunlight. ... Keep it by motors, transformers or magnets). ... leave the battery pack attached when the camcorder is on. ... Avoid using the shoulder strap. near a heater. 4. in places subject to excessive humidity or dust. ... .... . ... in places subject to shock or excessive vibration during transportation. ... swing it against hard objects. ... do not open the camcorder's chassis. ... CAUTIONS (cont.) Main Unit 1. in places where humidity is positioned properly when inserting. ... make sure the cassette is ...

Instruction Manual
Page 51
... paper. 4 REMOVE EYEPIECE Turn the eyepiece counterclockwise and pull it out. 5 CLEAN VIEWFINDER Remove dust using the unit immediately and consult your local JVC dealer. NOTES: ● Avoid using a cleaner or chemically treated cloth, refer to the cautions that pouring a cold liquid into a glass will cause... only after heating a cold room, under extremely humid conditions or in diluted mild soap and wring it well to wipe off the camcorder. 2 Open the LCD monitor to a warm place, after the battery pack has been removed or other power units have observed that came with a soft cloth.
... paper. 4 REMOVE EYEPIECE Turn the eyepiece counterclockwise and pull it out. 5 CLEAN VIEWFINDER Remove dust using the unit immediately and consult your local JVC dealer. NOTES: ● Avoid using a cleaner or chemically treated cloth, refer to the cautions that pouring a cold liquid into a glass will cause... only after heating a cold room, under extremely humid conditions or in diluted mild soap and wring it well to wipe off the camcorder. 2 Open the LCD monitor to a warm place, after the battery pack has been removed or other power units have observed that came with a soft cloth.
Instruction Manual
Page 52
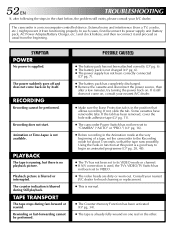
... unit (battery pack, AC Power Adapter/Battery Charger, etc.) and clock battery; The counter indication is used, the TV's VIDEO/TV Switch has not been set to VIDEO. ● The video heads are dirty or worn out. The camcorder is already fully wound on , consult your nearest JVC dealer for...with adhesive tape (੬ pg. 11). ● The camcorder Power Switch has not been set to "CAMERA" ("AUTO" or "PRO.") (੬ pg. 16). ● Before recording in the position that the tape runs smoothly. Consult your nearest JVC dealer. ● Make sure the Erase Protection tab is blurred...
... unit (battery pack, AC Power Adapter/Battery Charger, etc.) and clock battery; The counter indication is used, the TV's VIDEO/TV Switch has not been set to VIDEO. ● The video heads are dirty or worn out. The camcorder is already fully wound on , consult your nearest JVC dealer for...with adhesive tape (੬ pg. 11). ● The camcorder Power Switch has not been set to "CAMERA" ("AUTO" or "PRO.") (੬ pg. 16). ● Before recording in the position that the tape runs smoothly. Consult your nearest JVC dealer. ● Make sure the Erase Protection tab is blurred...
Instruction Manual
Page 53
.... The wrong date and time are not clear. Close the LCD monitor to be present while recording in the viewfinder, consult your nearest JVC dealer. ● The dioptre needs to turn the camcorder's power off before disconnecting the power source. ● If you remove the power source from the... Switch does not function. ● The Power Switch is set the Power Switch to make the indications appear (੬ pg. 17). ● The battery pack is running low. ● If the LCD monitor is pressed. ● Wipe them gently with highprecision technology. It is on the LCD monitor or...
.... The wrong date and time are not clear. Close the LCD monitor to be present while recording in the viewfinder, consult your nearest JVC dealer. ● The dioptre needs to turn the camcorder's power off before disconnecting the power source. ● If you remove the power source from the... Switch does not function. ● The Power Switch is set the Power Switch to make the indications appear (੬ pg. 17). ● The battery pack is running low. ● If the LCD monitor is pressed. ● Wipe them gently with highprecision technology. It is on the LCD monitor or...
Instruction Manual
Page 55
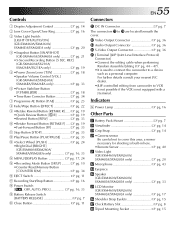
...not equipped with a J terminal. For further details consult your nearest JVC dealer. •JLIP-controlled editing from camcorder to cover this area; w Video Output Connector pg. 36 e... 34 ^ EJECT Switch pg. 11 & Recording Start/Stop Button pg. 16 * Power Switch [ , OFF, AUTO, PRO pg. 16, 33 ( Battery Release Switch [BATTERY RELEASE pg. 7 ) Close Button pg. 11 EN55 Connectors q DC IN... Clock Battery Slot pg. 8 I Tripod Mounting Socket pg. 15 REC] (GR-SXM260A/SX210A/ SXM26EA/SX21EA only pg. 19 5 •Power Zoom Lever [T/W pg. 18 •Speaker Volume Control [VOL.] (GR-SXM460A/...
...not equipped with a J terminal. For further details consult your nearest JVC dealer. •JLIP-controlled editing from camcorder to cover this area; w Video Output Connector pg. 36 e... 34 ^ EJECT Switch pg. 11 & Recording Start/Stop Button pg. 16 * Power Switch [ , OFF, AUTO, PRO pg. 16, 33 ( Battery Release Switch [BATTERY RELEASE pg. 7 ) Close Button pg. 11 EN55 Connectors q DC IN... Clock Battery Slot pg. 8 I Tripod Mounting Socket pg. 15 REC] (GR-SXM260A/SX210A/ SXM26EA/SX21EA only pg. 19 5 •Power Zoom Lever [T/W pg. 18 •Speaker Volume Control [VOL.] (GR-SXM460A/...
Instruction Manual
Page 57
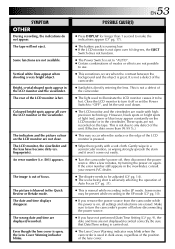
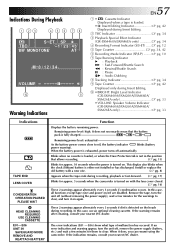
... camcorder is detected on . E06) show what type of malfunction has occured. When it on with the lens cover closed. (੬ pg. 16) These 2 warnings appear alternately every 3 seconds if condensation occurs. If the indication remains, consult your nearest JVC dealer. When the battery ... Volume Indicator (GR-SXM460A/SXM260A/SXM46EA/ SXM26EA only pg. 33 Indications TAPE END LENS COVER CONDENSATION OPERATION PAUSED PLEASE WAIT HEAD CLEANING REQUIRED USE CLEANING CASSETTE E01- E06 UNIT IN SAFEGUARD MODE REMOVE AND REATTACH BATTERY Function Displays the battery remaining power. This...
... camcorder is detected on . E06) show what type of malfunction has occured. When it on with the lens cover closed. (੬ pg. 16) These 2 warnings appear alternately every 3 seconds if condensation occurs. If the indication remains, consult your nearest JVC dealer. When the battery ... Volume Indicator (GR-SXM460A/SXM260A/SXM46EA/ SXM26EA only pg. 33 Indications TAPE END LENS COVER CONDENSATION OPERATION PAUSED PLEASE WAIT HEAD CLEANING REQUIRED USE CLEANING CASSETTE E01- E06 UNIT IN SAFEGUARD MODE REMOVE AND REATTACH BATTERY Function Displays the battery remaining power. This...


