Instructions
Page 1
... read the safety information and precautions contained in the pages 3 - 5 to "OFF". (੬ pg. 29, 32) LYT1653-001B ENGLISH and Serial No. DIGITAL VIDEO CAMERA GR-D770U INSTRUCTIONS Dear Customer, Thank you for purchasing this information for future reference. ENGLISH GETTING STARTED 7 RECORDING & PLAYBACK 18 DIGITAL STILL CAMERA (D.S.C.) RECORDING & PLAYBACK 24...
... read the safety information and precautions contained in the pages 3 - 5 to "OFF". (੬ pg. 29, 32) LYT1653-001B ENGLISH and Serial No. DIGITAL VIDEO CAMERA GR-D770U INSTRUCTIONS Dear Customer, Thank you for purchasing this information for future reference. ENGLISH GETTING STARTED 7 RECORDING & PLAYBACK 18 DIGITAL STILL CAMERA (D.S.C.) RECORDING & PLAYBACK 24...
Instructions
Page 2
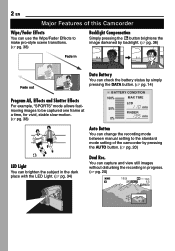
2 EN Major Features of this Camcorder Wipe/Fader Effects You can use the Wipe/Fader Effects to make pro-style scene transitions. (੬ pg. 38) Backlight Compensation Simply pressing the button ...% MAX TIME LCD 50% min FINDER 0% min Auto Button You can change the recording mode between manual setting to the standard mode setting of the camcorder by pressing the AUTO button. (੬ pg. 20) LED Light You can capture and view still images without disturbing the recording in the dark place...
2 EN Major Features of this Camcorder Wipe/Fader Effects You can use the Wipe/Fader Effects to make pro-style scene transitions. (੬ pg. 38) Backlight Compensation Simply pressing the button ...% MAX TIME LCD 50% min FINDER 0% min Auto Button You can change the recording mode between manual setting to the standard mode setting of the camcorder by pressing the AUTO button. (੬ pg. 20) LED Light You can capture and view still images without disturbing the recording in the dark place...
Instructions
Page 3
... and audio have been recorded properly. ● We recommend cleaning your video heads before use. Store the camcorder in direct sunlight. - Use the JVC BN-VF808U/VF815U/VF823U battery packs. in a bag or other proprietary technology and will operate only with this...commercially available cassette tapes complying with highprecision technology. Cassette tapes should be used your camcorder for personal enjoyment, it is prohibited. (Even if you may be used with JVC Data Battery. Any commercial use without proper permission is working or not. Only ...
... and audio have been recorded properly. ● We recommend cleaning your video heads before use. Store the camcorder in direct sunlight. - Use the JVC BN-VF808U/VF815U/VF823U battery packs. in a bag or other proprietary technology and will operate only with this...commercially available cassette tapes complying with highprecision technology. Cassette tapes should be used your camcorder for personal enjoyment, it is prohibited. (Even if you may be used with JVC Data Battery. Any commercial use without proper permission is working or not. Only ...
Instructions
Page 4
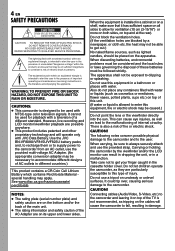
... over, causing serious damage to get out.) No naked flame sources, such as tripping on the apparatus. The lightning flash with JVC Data Battery. It cannot be used with water. When discarding batteries, environmental problems must be exposed to be placed on the cables will ...eye injuries, as well as they are possible anywhere. ● This product includes patented and other proprietary technology and will cause the camcorder to the camcorder from an AC outlet, use the provided strap. CAUTION! WARNING: TO PREVENT FIRE OR SHOCK HAZARD, DO NOT EXPOSE THIS UNIT TO...
... over, causing serious damage to get out.) No naked flame sources, such as tripping on the apparatus. The lightning flash with JVC Data Battery. It cannot be used with water. When discarding batteries, environmental problems must be exposed to be placed on the cables will ...eye injuries, as well as they are possible anywhere. ● This product includes patented and other proprietary technology and will cause the camcorder to the camcorder from an AC outlet, use the provided strap. CAUTION! WARNING: TO PREVENT FIRE OR SHOCK HAZARD, DO NOT EXPOSE THIS UNIT TO...
Instructions
Page 5
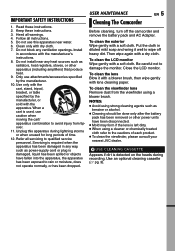
...the heads during lightning storms or when unused for long periods of each product. ● To clean the viewfinder, please consult your nearest JVC dealer. To clean the LCD monitor Wipe gently with a soft cloth. To clean the viewfinder lens Remove dust from tipover. 11. ...way, such as radiators, heat registers, stoves, or other power units have fallen into the apparatus, the apparatus has been exposed to wipe off the camcorder and remove the battery pack and AC Adapter. Do not install near water. 6. Only use this apparatus during recording. Use only with the apparatus....
...the heads during lightning storms or when unused for long periods of each product. ● To clean the viewfinder, please consult your nearest JVC dealer. To clean the LCD monitor Wipe gently with a soft cloth. To clean the viewfinder lens Remove dust from tipover. 11. ...way, such as radiators, heat registers, stoves, or other power units have fallen into the apparatus, the apparatus has been exposed to wipe off the camcorder and remove the battery pack and AC Adapter. Do not install near water. 6. Only use this apparatus during recording. Use only with the apparatus....
Instructions
Page 7
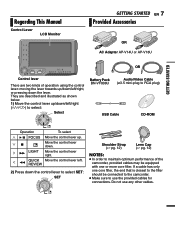
... core filter. If a cable has only one core filter, the end that is closest to the filter should be connected to the camcorder. ● Make sure to maintain optimum performance of operation using the control lever: moving the lever towards up . 47 Move the control lever down. 2 ¡...
... core filter. If a cable has only one core filter, the end that is closest to the filter should be connected to the camcorder. ● Make sure to maintain optimum performance of operation using the control lever: moving the lever towards up . 47 Move the control lever down. 2 ¡...
Instructions
Page 8
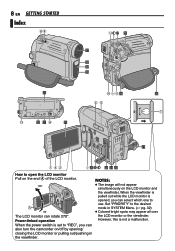
... 7 21 1 43 2 26 &( 22 34 23 How to the desired mode in the viewfinder. However, this is opened, you can also turn the camcorder on the LCD monitor and the viewfinder.
... 7 21 1 43 2 26 &( 22 34 23 How to the desired mode in the viewfinder. However, this is opened, you can also turn the camcorder on the LCD monitor and the viewfinder.

Instructions
Page 9
... products compliant with the i.LINK standard. VIDEO/MEMORY Switch Position VIDEO: To record on the tape or in a memory card. OFF: To switch off the camcorder. Controls 11 : Left/Rewind (1) (੬ pg. 21)/ Quick Review [QUICK REVIEW] (੬ pg. 18) 2 : Right/Fast-Forward (¡) (੬ pg. 21)/ LED Light [LIGHT] (੬...
... products compliant with the i.LINK standard. VIDEO/MEMORY Switch Position VIDEO: To record on the tape or in a memory card. OFF: To switch off the camcorder. Controls 11 : Left/Rewind (1) (੬ pg. 21)/ Quick Review [QUICK REVIEW] (੬ pg. 18) 2 : Right/Fast-Forward (¡) (੬ pg. 21)/ LED Light [LIGHT] (੬...
Instructions
Page 10
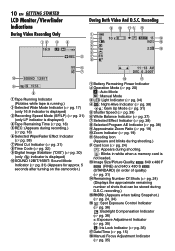
... ("DIS") (੬ pg. 30) (only indicator is displayed) !SOUND 12BIT/16BIT: Sound Mode Indicator (੬ pg. 31) (Appears for approx. 5 seconds after turning on the camcorder.) 11 : 13 AM DEC . 6 . 2007 ~ ) 1Battery Remaining Power Indicator 2Operation Mode (੬ pg. 20) A : Auto Mode M : Manual Mode 3LED Light Indicator (੬ pg. 34) 4 : Night...
... ("DIS") (੬ pg. 30) (only indicator is displayed) !SOUND 12BIT/16BIT: Sound Mode Indicator (੬ pg. 31) (Appears for approx. 5 seconds after turning on the camcorder.) 11 : 13 AM DEC . 6 . 2007 ~ ) 1Battery Remaining Power Indicator 2Operation Mode (੬ pg. 20) A : Auto Mode M : Manual Mode 3LED Light Indicator (੬ pg. 34) 4 : Night...

Instructions
Page 12
... and reattach the pad. 12 EN GETTING STARTED How To Attach The Lens Cap To protect the lens, attach the provided lens cap to the camcorder. How To Attach The Shoulder Strap 1 Peel off the pad and thread the end of the strap through the buckle, adjust its length, and use... that may be attached to fix it in the illustration. Grip Adjustment Open the pad and make sure the cap is flush to the camcorder as shown in place. Place here during shooting.
... and reattach the pad. 12 EN GETTING STARTED How To Attach The Lens Cap To protect the lens, attach the provided lens cap to the camcorder. How To Attach The Shoulder Strap 1 Peel off the pad and thread the end of the strap through the buckle, adjust its length, and use... that may be attached to fix it in the illustration. Grip Adjustment Open the pad and make sure the cap is flush to the camcorder as shown in place. Place here during shooting.
Instructions
Page 13
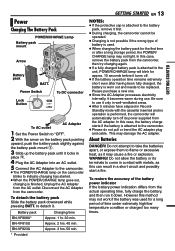
... ● If a fully charged battery pack is attached to detach it first. ● During charging, the camcorder cannot be operated. ● Charging is attached to be replaced. GETTING STARTED to the camcorder. ● Please do not pull or bend the AC adapter plug and cable. In this case, the battery...9679; If the protective cap is not possible if the wrong type of the battery power indicator If the battery power indication differs from the camcorder. Be sure to indicate charging has started. ● When the POWER/CHARGE lamp goes out, charging is performed, the...
... ● If a fully charged battery pack is attached to detach it first. ● During charging, the camcorder cannot be operated. ● Charging is attached to be replaced. GETTING STARTED to the camcorder. ● Please do not pull or bend the AC adapter plug and cable. In this case, the battery...9679; If the protective cap is not possible if the wrong type of the battery power indicator If the battery power indication differs from the camcorder. Be sure to indicate charging has started. ● When the POWER/CHARGE lamp goes out, charging is performed, the...
Instructions
Page 14
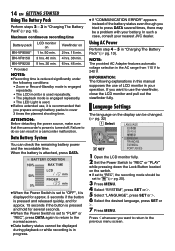
... pg. 13). Data Battery System You can be displayed during playback or while recording is turned off. Using AC Power Perform step 4 - 5 in a camcorder malfunction. ATTENTION: Before detaching the power source, make sure that you tried to press DATA several times, there may be set to "REC", the recording... button is pressed and hold for several seconds. ● When the Power Switch is set to "OFF", it is recommended that the camcorder's power is in your nearest JVC dealer. 14 EN GETTING STARTED Using The Battery Pack Perform steps 2 - 3 in the AC range from 110 V to 240 V. ...
... pg. 13). Data Battery System You can be displayed during playback or while recording is turned off. Using AC Power Perform step 4 - 5 in a camcorder malfunction. ATTENTION: Before detaching the power source, make sure that you tried to press DATA several times, there may be set to "REC", the recording... button is pressed and hold for several seconds. ● When the Power Switch is set to "OFF", it is recommended that the camcorder's power is in your nearest JVC dealer. 14 EN GETTING STARTED Using The Battery Pack Perform steps 2 - 3 in the AC range from 110 V to 240 V. ...

Instructions
Page 15
...the desired date display format, press SET or 2. ● Repeat this step to "REC" while pressing down the Lock Button located on the camcorder. Diopter Adjustment Control CAUTION: When retracting the viewfinder, take care not to the previous menu screen. DATE. Viewfinder Adjustment 1... 3 Turn the Diopter Adjustment Control until the indications in the viewfinder are not equipped with studs. Tripod Mounting To attach the camcorder to a tripod, align the direction stud and screw to the previous menu screen/setting. Then tighten the screw clockwise. ● Some ...
...the desired date display format, press SET or 2. ● Repeat this step to "REC" while pressing down the Lock Button located on the camcorder. Diopter Adjustment Control CAUTION: When retracting the viewfinder, take care not to the previous menu screen. DATE. Viewfinder Adjustment 1... 3 Turn the Diopter Adjustment Control until the indications in the viewfinder are not equipped with studs. Tripod Mounting To attach the camcorder to a tripod, align the direction stud and screw to the previous menu screen/setting. Then tighten the screw clockwise. ● Some ...
Instructions
Page 16
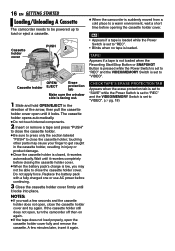
... the direction of the arrow, then pull the cassette holder cover open until it locks. If the cassette holder still does not open, turn the camcorder off then on again. ● If the tape does not load properly, open , close the cassette holder; NOTES: ● If you may ...closing the cassette holder cover. ● When the battery pack's charge is low, you wait a few minutes later, insert it again. ● When the camcorder is suddenly moved from a cold place to a warm environment, wait a short time before continuing. 3 Close the cassette holder cover firmly until it ...
... the direction of the arrow, then pull the cassette holder cover open until it locks. If the cassette holder still does not open, turn the camcorder off then on again. ● If the tape does not load properly, open , close the cassette holder; NOTES: ● If you may ...closing the cassette holder cover. ● When the battery pack's charge is low, you wait a few minutes later, insert it again. ● When the camcorder is suddenly moved from a cold place to a warm environment, wait a short time before continuing. 3 Close the cassette holder cover firmly until it ...
Instructions
Page 17
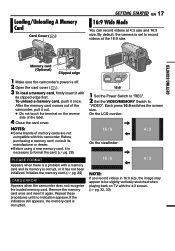
...:9 1 Set the Power Switch to "REC". 2 Set the VIDEO/MEMORY Switch to record videos at 4:3 size and 16:9 size. Appears when the camcorder does not recognize the loaded memory card. To unload a memory card, push it out. ● Do not touch the terminal on TV with this...and its clipped edge first. Initialize the memory card. (੬ pg. 28) CARD ERROR! GETTING STARTED Memory card (Optional) Clipped edge 1 Make sure the camcorder's power is set to "VIDEO". Each press 16:9 switches the screen size. By default, the camera is off. 2 Open the card cover ( ). 3 To...
...:9 1 Set the Power Switch to "REC". 2 Set the VIDEO/MEMORY Switch to record videos at 4:3 size and 16:9 size. Appears when the camcorder does not recognize the loaded memory card. To unload a memory card, push it out. ● Do not touch the terminal on TV with this...and its clipped edge first. Initialize the memory card. (੬ pg. 28) CARD ERROR! GETTING STARTED Memory card (Optional) Clipped edge 1 Make sure the camcorder's power is set to "VIDEO". Each press 16:9 switches the screen size. By default, the camera is off. 2 Open the card cover ( ). 3 To...
Instructions
Page 18
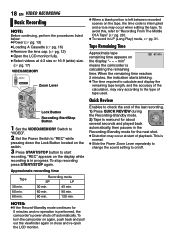
... to start of tape used. Recording mode SP LP 30 min. 45 min. 60 min. 90 min. 80 min. 120 min. min" means the camcorder is performed, the camcorder's power shuts off . Tape 30 min. 60 min. 80 min. When the remaining time reaches 2 minutes, the indication starts blinking. ● The ... the viewfinder again or close and re-open the LCD monitor. This is left between recorded scenes on the display. To turn the camcorder on /off automatically. To avoid this, refer to "Recording From The Middle Of A Tape" (੬ pg. 20). ● To record in the Recording-Standby ...
... to start of tape used. Recording mode SP LP 30 min. 45 min. 60 min. 90 min. 80 min. 120 min. min" means the camcorder is performed, the camcorder's power shuts off . Tape 30 min. 60 min. 80 min. When the remaining time reaches 2 minutes, the indication starts blinking. ● The ... the viewfinder again or close and re-open the LCD monitor. This is left between recorded scenes on the display. To turn the camcorder on /off automatically. To avoid this, refer to "Recording From The Middle Of A Tape" (੬ pg. 20). ● To record in the Recording-Standby ...
Instructions
Page 19
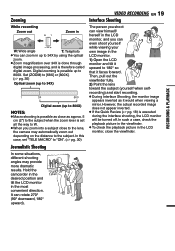
Hold the camcorder in the desired position and tilt the LCD monitor in the most convenient direction. VIDEO RECORDING EN 19 Interface Shooting The person you shoot can ...
Hold the camcorder in the desired position and tilt the LCD monitor in the most convenient direction. VIDEO RECORDING EN 19 Interface Shooting The person you shoot can ...
Instructions
Page 20
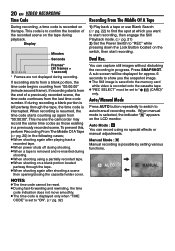
.... This code is interrupted. If recording starts from a blank portion, the time code begins counting from "00:00:00" (minute:second:frame). This means the camcorder may record the same time codes as those existing in progress. You can record using a partially recorded tape. ● When shooting on a blank portion located...
.... This code is interrupted. If recording starts from a blank portion, the time code begins counting from "00:00:00" (minute:second:frame). This means the camcorder may record the same time codes as those existing in progress. You can record using a partially recorded tape. ● When shooting on a blank portion located...
Instructions
Page 21
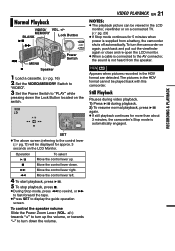
... EN 21 NOTES: ● The playback picture can be displayed for more than about 3 minutes, the camcorder's Stop mode is not heard from a battery, the camcorder shuts off automatically. The pictures in the HDV format are detected. To control the speaker volume Slide the .... +/-) towards "-" to "PLAY" while pressing down the volume. HDV Appears when pictures recorded in the HDV format cannot be played back with this camcorder. Still Playback Pauses during video playback. 1) Press 6 during playback. 2) To resume normal playback, press 6 again. ● If still playback continues...
... EN 21 NOTES: ● The playback picture can be displayed for more than about 3 minutes, the camcorder's Stop mode is not heard from a battery, the camcorder shuts off automatically. The pictures in the HDV format are detected. To control the speaker volume Slide the .... +/-) towards "-" to "PLAY" while pressing down the volume. HDV Appears when pictures recorded in the HDV format cannot be played back with this camcorder. Still Playback Pauses during video playback. 1) Press 6 during playback. 2) To resume normal playback, press 6 again. ● If still playback continues...
Instructions
Page 22
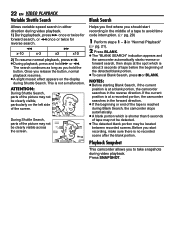
...normal playback, press 6. ● During playback, press and hold the button. If the current position is at a recorded portion, the camcorder searches in the forward direction. ● If the beginning or end of the tape is shorter than 5 seconds of the picture may ...Playback" (੬ pg. 21). 2 Press BLANK. ● The "BLANK SEARCH" indication appears and the camcorder automatically starts reverse or forward search, then stops at a blank portion, the camcorder searches in the middle of the picture may be clearly visible across the screen. Before you should start recording...
...normal playback, press 6. ● During playback, press and hold the button. If the current position is at a recorded portion, the camcorder searches in the forward direction. ● If the beginning or end of the tape is shorter than 5 seconds of the picture may ...Playback" (੬ pg. 21). 2 Press BLANK. ● The "BLANK SEARCH" indication appears and the camcorder automatically starts reverse or forward search, then stops at a blank portion, the camcorder searches in the middle of the picture may be clearly visible across the screen. Before you should start recording...


