Instructions
Page 2
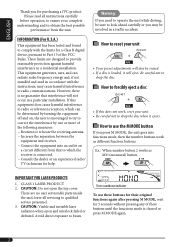
... does not work as MO (monaural) button. Connect the equipment into functions mode, then the number buttons work , reset your unit • Your preset adjustments will also be erased. • If a disc is encouraged to try to use these buttons for their original functions again after pressing M MODE, wait for a Class B digital device, pursuant to radio or television reception, which the receiver is connected. - Warning: If you need to operate the unit while driving, be...
... does not work as MO (monaural) button. Connect the equipment into functions mode, then the number buttons work , reset your unit • Your preset adjustments will also be erased. • If a disc is encouraged to try to use these buttons for their original functions again after pressing M MODE, wait for a Class B digital device, pursuant to radio or television reception, which the receiver is connected. - Warning: If you need to operate the unit while driving, be...
Instructions
Page 3
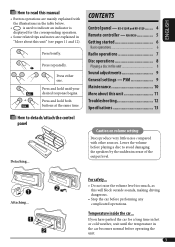
... started 6 Basic operations 6 Radio operations 7 Disc operations 8 Playing a disc in the unit 8 Sound adjustments 9 General settings - Lower the volume before playing a disc to detach/attach the control panel Detaching... Press briefly. CONTENTS Control panel - For safety... • Do not raise the volume level too much, as this will block outside sounds, making driving dangerous. • Stop the car before operating the unit. 3 Temperature inside the car... Press and hold both buttons at the same time. KD-G120R and KD-G120 ....... 4 Remote controller -
... started 6 Basic operations 6 Radio operations 7 Disc operations 8 Playing a disc in the unit 8 Sound adjustments 9 General settings - Lower the volume before playing a disc to detach/attach the control panel Detaching... Press briefly. CONTENTS Control panel - For safety... • Do not raise the volume level too much, as this will block outside sounds, making driving dangerous. • Stop the car before operating the unit. 3 Temperature inside the car... Press and hold both buttons at the same time. KD-G120R and KD-G120 ....... 4 Remote controller -
Instructions
Page 4
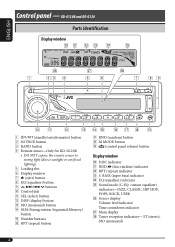
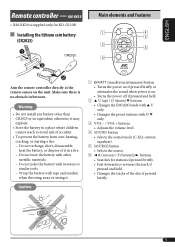
... 1 (standby/on/attenuator) button 2 SOURCE button 3 BAND button 4 Remote sensor-Only for KD-G120R • DO NOT expose the remote sensor to strong light (direct sunlight or artificial lighting). 5 Loading slot 6 Display window 7 0 (eject) button 8 EQ (equalizer) button 9 ¢/4 buttons p Control dial q SEL (select) button w DISP (display) button e MO (monaural) button r SSM (Strong-station Sequential Memory) button t Number buttons y RPT (repeat) button u RND (random) button i M MODE button o (control panel release) button Display window ; ENGLISH Control panel -
... 1 (standby/on/attenuator) button 2 SOURCE button 3 BAND button 4 Remote sensor-Only for KD-G120R • DO NOT expose the remote sensor to strong light (direct sunlight or artificial lighting). 5 Loading slot 6 Display window 7 0 (eject) button 8 EQ (equalizer) button 9 ¢/4 buttons p Control dial q SEL (select) button w DISP (display) button e MO (monaural) button r SSM (Strong-station Sequential Memory) button t Number buttons y RPT (repeat) button u RND (random) button i M MODE button o (control panel release) button Display window ; ENGLISH Control panel -
Instructions
Page 5
...; Turns the power on if pressed briefly or attenuates the sound when power is supplied only for stations if pressed briefly. • Fast-forwards or reverses the track if pressed and held. • Changes the tracks of the disc if pressed briefly. 5 Do not leave the battery with D ∞ only. 3 VOL - / VOL + buttons • Adjusts the volume level. 4 SOUND button • Selects the sound mode (C-EQ: custom equalizer). 5 SOURCE button...
...; Turns the power on if pressed briefly or attenuates the sound when power is supplied only for stations if pressed briefly. • Fast-forwards or reverses the track if pressed and held. • Changes the tracks of the disc if pressed briefly. 5 Do not leave the battery with D ∞ only. 3 VOL - / VOL + buttons • Adjusts the volume level. 4 SOUND button • Selects the sound mode (C-EQ: custom equalizer). 5 SOURCE button...
Instructions
Page 6
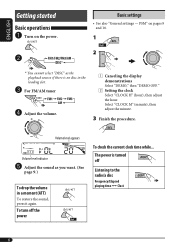
... power is no disc in a moment (ATT) To restore the sound, press it again. Volum. For FM/AM tuner ⁄ Adjust the volume. 1 Canceling the display demonstrations Select "DEMO," then "DEMO OFF." 2 Setting the clock Select "CLOCK H" (hour), then adjust the hour. To turn off Listening to the radio/a disc Frequency/Elapsed playing time Ô Clock 6 ENGLISH Getting started Basic operations ~ Turn on pages 9 and 10. 1 2 * You cannot select "DISC" as you want. (See page 9.) To drop the volume...
... power is no disc in a moment (ATT) To restore the sound, press it again. Volum. For FM/AM tuner ⁄ Adjust the volume. 1 Canceling the display demonstrations Select "DEMO," then "DEMO OFF." 2 Setting the clock Select "CLOCK H" (hour), then adjust the hour. To turn off Listening to the radio/a disc Frequency/Elapsed playing time Ô Clock 6 ENGLISH Getting started Basic operations ~ Turn on pages 9 and 10. 1 2 * You cannot select "DISC" as you want. (See page 9.) To drop the volume...
Instructions
Page 7
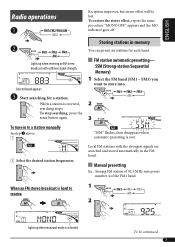
.... ! Start searching for each band. When a station is over. 2 Select the desired station frequencies. To stop searching, press the same button again. Manual presetting Ex.: Storing FM station of the FM1 band. ENGLISH Radio operations ~ Reception improves, but stereo effect will be continued... 7 To restore the stereo effect, repeat the same procedure "MONO OFF" appears and the MO indicator goes off. Local...
.... ! Start searching for each band. When a station is over. 2 Select the desired station frequencies. To stop searching, press the same button again. Manual presetting Ex.: Storing FM station of the FM1 band. ENGLISH Radio operations ~ Reception improves, but stereo effect will be continued... 7 To restore the stereo effect, repeat the same procedure "MONO OFF" appears and the MO indicator goes off. Local...
Instructions
Page 8
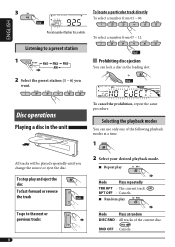
.... Disc operations Playing a disc in the loading slot. 2 Select the preset station (1 - 6) you change the source or eject the disc. Selecting the playback modes You can lock a disc in the unit To cancel the prohibition, repeat the same procedure. ENGLISH 3 To locate a particular track directly To select a number from 07 - 12: Listening to the next or previous tracks 8 Mode Plays at random DISC RND : All tracks of the following playback modes at a time. 1 All...
.... Disc operations Playing a disc in the loading slot. 2 Select the preset station (1 - 6) you change the source or eject the disc. Selecting the playback modes You can lock a disc in the unit To cancel the prohibition, repeat the same procedure. ENGLISH 3 To locate a particular track directly To select a number from 07 - 12: Listening to the next or previous tracks 8 Mode Plays at random DISC RND : All tracks of the following playback modes at a time. 1 All...
Instructions
Page 9
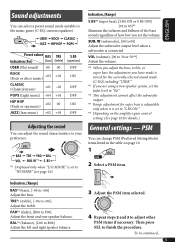
... "00." *4 This adjustment cannot affect the subwoofer output. *5 Range adjustment for the currently selected sound mode (C-EQ) including "USER." *3 If you set to F06] Adjust the front and rear speaker balance. Indication, [Range] S.BS*2 (super bass), [S.BS ON or S.BS OFF] [01 to 08] Adjust the subwoofer output level when a subwoofer is connected. Preset values BAS TRE S.BS Indication (For) (bass) (treble) (super bass) USER (Flat sound) 00 00 OFF ROCK (Rock or disco music) +03 +01...
... "00." *4 This adjustment cannot affect the subwoofer output. *5 Range adjustment for the currently selected sound mode (C-EQ) including "USER." *3 If you set to F06] Adjust the front and rear speaker balance. Indication, [Range] S.BS*2 (super bass), [S.BS ON or S.BS OFF] [01 to 08] Adjust the subwoofer output level when a subwoofer is connected. Preset values BAS TRE S.BS Indication (For) (bass) (treble) (super bass) USER (Flat sound) 00 00 OFF ROCK (Rock or disco music) +03 +01...
Instructions
Page 10
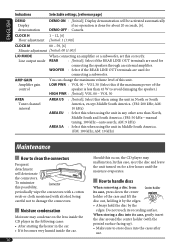
...; Display demonstration will deteriorate the connectors. To minimize this case, eject the disc and leave the unit turned on the lens inside the car. 10 Should this occur, the CD player may condense on for connecting a subwoofer. VOL 30 (Select this correctly. DEMO OFF : Cancels. CLOCK H 1 - 12, [6] Hour adjustment [Initial: 1 (1:00)] CLOCK M 00 - 59, [6] Minute adjustment [Initial: 00 (1:00)] L/O MODE Line output mode When connecting an amplifier or a subwoofer, set this if the maximum power...
...; Display demonstration will deteriorate the connectors. To minimize this case, eject the disc and leave the unit turned on the lens inside the car. 10 Should this occur, the CD player may condense on for connecting a subwoofer. VOL 30 (Select this correctly. DEMO OFF : Cancels. CLOCK H 1 - 12, [6] Hour adjustment [Initial: 1 (1:00)] CLOCK M 00 - 59, [6] Minute adjustment [Initial: 00 (1:00)] L/O MODE Line output mode When connecting an amplifier or a subwoofer, set this if the maximum power...
Instructions
Page 11
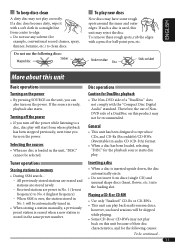
...; By pressing SOURCE on the unit, you turn on the power. To remove these rough spots, rub the edges with the "Compact Disc Digital Audio" standard. Received stations are stored newly. - Disc operations Caution for the following discs: Warped disc Sticker To play will be recommended. Therefore, the use the following causes: To be selected. General • This unit has been designed to clean discs. Tuner operations Storing stations in audio CD (CD-DA) format...
...; By pressing SOURCE on the unit, you turn on the power. To remove these rough spots, rub the edges with the "Compact Disc Digital Audio" standard. Received stations are stored newly. - Disc operations Caution for the following discs: Warped disc Sticker To play will be recommended. Therefore, the use the following causes: To be selected. General • This unit has been designed to clean discs. Tuner operations Storing stations in audio CD (CD-DA) format...
Instructions
Page 12
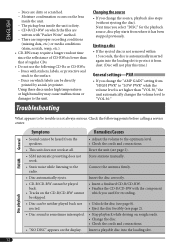
... time.) General settings-PSM • If you change the source, playback also stops (without ejecting the disc). Connect the antenna firmly. • Disc automatically ejects. Disc playback 12 What appears to the optimum level. • Check the cords and connections. • This unit does not work . Insert the disc correctly. • CD-R/CD-RW cannot be played back. • Tracks on the CD-R/CD-RW cannot be heard from the speakers. • Adjust the volume...
... time.) General settings-PSM • If you change the source, playback also stops (without ejecting the disc). Connect the antenna firmly. • Disc automatically ejects. Disc playback 12 What appears to the optimum level. • Check the cords and connections. • This unit does not work . Insert the disc correctly. • CD-R/CD-RW cannot be played back. • Tracks on the CD-R/CD-RW cannot be heard from the speakers. • Adjust the volume...
Instructions
Page 13
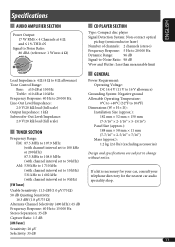
... Capture Ratio: 1.5 dB [AM Tuner] Sensitivity: 20 μV Selectivity: 35 dB CD PLAYER SECTION Type: Compact disc player Signal Detection System: Non-contact optical pickup (semiconductor laser) Number of channels: 2 channels (stereo) Frequency Response: 5 Hz to 20 000 Hz Dynamic Range: 96 dB Signal-to-Noise Ratio: 98 dB Wow and Flutter: Less than measurable limit GENERAL Power Requirement: Operating Voltage: DC 14.4 V (11...
... Capture Ratio: 1.5 dB [AM Tuner] Sensitivity: 20 μV Selectivity: 35 dB CD PLAYER SECTION Type: Compact disc player Signal Detection System: Non-contact optical pickup (semiconductor laser) Number of channels: 2 channels (stereo) Frequency Response: 5 Hz to 20 000 Hz Dynamic Range: 96 dB Signal-to-Noise Ratio: 98 dB Wow and Flutter: Less than measurable limit GENERAL Power Requirement: Operating Voltage: DC 14.4 V (11...

Instructions
Page 38
EN, SP, FR © 2005 Victor Company of How to reset your unit Still having trouble?? USA ONLY Call 1-800-252-5722 http://www.jvc.com We can help you! Please reset your unit Refer to page of Japan, Limited 1005DTSMDTJEIN Having TROUBLE with operation?
EN, SP, FR © 2005 Victor Company of How to reset your unit Still having trouble?? USA ONLY Call 1-800-252-5722 http://www.jvc.com We can help you! Please reset your unit Refer to page of Japan, Limited 1005DTSMDTJEIN Having TROUBLE with operation?


