User Manual (English)
Page 3
NS-P42Q-P501Q-P502Q-10A_09-0100_MAN_V1_English.book Page i Friday, March 20, 2009 3:11 PM Contents CHILD SAFETY 1 Important safety instructions 2 Warnings 2 Cautions 3 Introduction 4 Installing the stand or wall-mount bracket 4 Installing the stand 4 Securing your TV to a wall or cabinet 4 Installing a wall-mount bracket 5 TV components 5 Accessories... a digital audio amplifier 13 Connecting an analog audio amplifier 13 Turning on your TV for the first time 14 Understanding the basics 16 Turning your TV on or off 16 Selecting the video input source 16 On-screen menu overview ...
NS-P42Q-P501Q-P502Q-10A_09-0100_MAN_V1_English.book Page i Friday, March 20, 2009 3:11 PM Contents CHILD SAFETY 1 Important safety instructions 2 Warnings 2 Cautions 3 Introduction 4 Installing the stand or wall-mount bracket 4 Installing the stand 4 Securing your TV to a wall or cabinet 4 Installing a wall-mount bracket 5 TV components 5 Accessories... a digital audio amplifier 13 Connecting an analog audio amplifier 13 Turning on your TV for the first time 14 Understanding the basics 16 Turning your TV on or off 16 Selecting the video input source 16 On-screen menu overview ...
User Manual (English)
Page 4
...parental controls 28 Setting or changing the password 28 Turning parental controls on or off 28 Temporarily unblocking a channel 29 Setting U.S. NS-P42Q-P501Q-P502Q-10A_09-0100_MAN_V1_English.book Page ii Friday, March 20, 2009 3:11 PM Contents Adjusting advanced picture settings 19 Improving... & Play option 38 Resetting settings to the defaults 38 Upgrading TV software 39 Maintaining 40 Cleaning the TV cabinet 40 Cleaning the TV screen 40 Troubleshooting 40 Specifications 41 Computer display modes 42 Legal notices 44 Two-year limited warranty 45 ii www.insigniaproducts.com...
...parental controls 28 Setting or changing the password 28 Turning parental controls on or off 28 Temporarily unblocking a channel 29 Setting U.S. NS-P42Q-P501Q-P502Q-10A_09-0100_MAN_V1_English.book Page ii Friday, March 20, 2009 3:11 PM Contents Adjusting advanced picture settings 19 Improving... & Play option 38 Resetting settings to the defaults 38 Upgrading TV software 39 Maintaining 40 Cleaning the TV cabinet 40 Cleaning the TV screen 40 Troubleshooting 40 Specifications 41 Computer display modes 42 Legal notices 44 Two-year limited warranty 45 ii www.insigniaproducts.com...
User Manual (English)
Page 5
... sure that you route all . Use only a wall mount rated for the weight of your TV and that has been recommended by this TV manufacturer, listed in mind The issue The home theater entertainment experience is appropriate. NS-P42Q-P501Q-P502Q-10A_09-0100_MAN_V1_English.book Page 1 Friday, March 20, 2009 3:11 PM f CHILD SAFETY...
... sure that you route all . Use only a wall mount rated for the weight of your TV and that has been recommended by this TV manufacturer, listed in mind The issue The home theater entertainment experience is appropriate. NS-P42Q-P501Q-P502Q-10A_09-0100_MAN_V1_English.book Page 1 Friday, March 20, 2009 3:11 PM f CHILD SAFETY...

User Manual (English)
Page 6
...manufacturer, or sold with your mouth, immediately gargle, rinse, and consult with the apparatus. Handling the LCD panel • Your TV's screen is located on the apparatus. Unauthorized substitutions may cause skin inflammation. • If the liquid gets in accordance with liquids...any ventilation openings. Safety check After completing any antenna or cable system. Lightning For added protection for your TV. This label is made of glass. NS-P42Q-P501Q-P502Q-10A_09-0100_MAN_V1_English.book Page 2 Friday, March 20, 2009 3:11 PM Important safety instructions ...
...manufacturer, or sold with your mouth, immediately gargle, rinse, and consult with the apparatus. Handling the LCD panel • Your TV's screen is located on the apparatus. Unauthorized substitutions may cause skin inflammation. • If the liquid gets in accordance with liquids...any ventilation openings. Safety check After completing any antenna or cable system. Lightning For added protection for your TV. This label is made of glass. NS-P42Q-P501Q-P502Q-10A_09-0100_MAN_V1_English.book Page 2 Friday, March 20, 2009 3:11 PM Important safety instructions ...
User Manual (English)
Page 7
.... www.insigniaproducts.com 3 NS-P42Q-P501Q-P502Q-10A_09-0100_MAN_V1_English.book Page 3 Friday, March 20, 2009 3:11 PM Power source Operate your area. Specifically, it on the TV if the TV is normal and does not...lamp containing a small amount of power source indicated on the top of the plasma TV The top side of the product may be hot after long periods of the ...label. Disposal of the National Electrical Code, ANSI/NFPA No. 70, provides information with your TV picture and sound, operating problems, or even damage, keep your local authorities or the Electronic Industries...
.... www.insigniaproducts.com 3 NS-P42Q-P501Q-P502Q-10A_09-0100_MAN_V1_English.book Page 3 Friday, March 20, 2009 3:11 PM Power source Operate your area. Specifically, it on the TV if the TV is normal and does not...lamp containing a small amount of power source indicated on the top of the plasma TV The top side of the product may be hot after long periods of the ...label. Disposal of the National Electrical Code, ANSI/NFPA No. 70, provides information with your TV picture and sound, operating problems, or even damage, keep your local authorities or the Electronic Industries...
User Manual (English)
Page 8
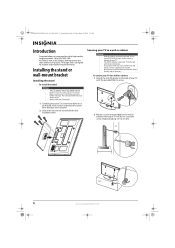
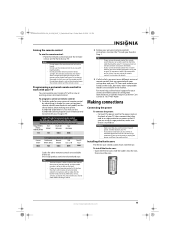
... art in place. • Make sure that you install the base securely before moving it in plasma TV design and is heavy. Securing your TV to a wall or cabinet Warnings • Pushing, pulling, or climbing on your TV can cause it to fall resulting in serious injury or damage to your... to lift the screen and hold it . Your NS-P42Q-10A, NS-P501Q-10A, or NS-P502Q-10A represents the state of a high-quality Insignia product. Installing the stand or wall-mount bracket Installing the stand To install the stand: Warnings • Your TV screen is designed for reliable and trouble-free performance...
... art in place. • Make sure that you install the base securely before moving it in plasma TV design and is heavy. Securing your TV to a wall or cabinet Warnings • Pushing, pulling, or climbing on your TV can cause it to fall resulting in serious injury or damage to your... to lift the screen and hold it . Your NS-P42Q-10A, NS-P501Q-10A, or NS-P502Q-10A represents the state of a high-quality Insignia product. Installing the stand or wall-mount bracket Installing the stand To install the stand: Warnings • Your TV screen is designed for reliable and trouble-free performance...
User Manual (English)
Page 9
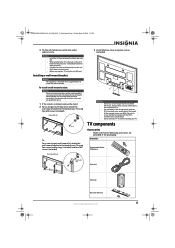
... cord Ferrite core Base cover with the VESA standard screw specifications. • Do not exceed a 15° tilt when mounting your TV, untie the anti-fall cord. NS-P42Q-P501Q-P502Q-10A_09-0100_MAN_V1_English.book Page 5 Friday, March 20, 2009 3:11 PM 3 Tie the anti-fall device cord to be...Do not use by a UL Listed wall-mount bracket. Warning • Install the TV close to the wall so that it does not come loose. • Before moving your TV. Insignia wall mount Screw Or, For a non-Insignia wall-mount kit, attach the wall-mount bracket to the inside of hazards, do ...
... cord Ferrite core Base cover with the VESA standard screw specifications. • Do not exceed a 15° tilt when mounting your TV, untie the anti-fall cord. NS-P42Q-P501Q-P502Q-10A_09-0100_MAN_V1_English.book Page 5 Friday, March 20, 2009 3:11 PM 3 Tie the anti-fall device cord to be...Do not use by a UL Listed wall-mount bracket. Warning • Install the TV close to the wall so that it does not come loose. • Before moving your TV. Insignia wall mount Screw Or, For a non-Insignia wall-mount kit, attach the wall-mount bracket to the inside of hazards, do ...
User Manual (English)
Page 10
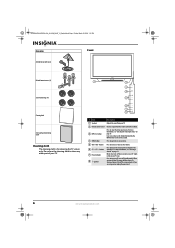
...Do no block. 3 INPUT button Press to the next or previous channel in the channel list. Blinks, then turns off your TV is for cleaning the TV screen only. When you turn off when you are using one) or unplug the power cord. 6 www.insigniaproducts.com Press to...control sensor Receives signals from your TV on -screen menu. 5 VOL+/VOL- In on-screen menus, this button functions like the ENTER button on the remote control. 4 MENU button Press to turn on page 16. For more information, see "Selecting a channel" on . NS-P42Q-P501Q-P502Q-10A_09-0100_MAN_V1_English.book...
...Do no block. 3 INPUT button Press to the next or previous channel in the channel list. Blinks, then turns off your TV is for cleaning the TV screen only. When you turn off when you are using one) or unplug the power cord. 6 www.insigniaproducts.com Press to...control sensor Receives signals from your TV on -screen menu. 5 VOL+/VOL- In on-screen menus, this button functions like the ENTER button on the remote control. 4 MENU button Press to turn on page 16. For more information, see "Selecting a channel" on . NS-P42Q-P501Q-P502Q-10A_09-0100_MAN_V1_English.book...
User Manual (English)
Page 11
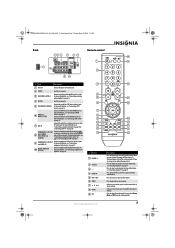
....insigniaproducts.com Description Press to turn off the sound. To disconnect power, turn off the surge protector (if you turn your TV, power still flows into it. NS-P42Q-P501Q-P502Q-10A_09-0100_MAN_V1_English.book Page 7 Friday, March 20, 2009 3:11 PM Back Remote control # Jack Description 1 ...Power in Connect the power cord to this jack. 2 SERVICE Used for an outdoor antenna or cable TV to this jack. Connect a DVI ...
....insigniaproducts.com Description Press to turn off the sound. To disconnect power, turn off the surge protector (if you turn your TV, power still flows into it. NS-P42Q-P501Q-P502Q-10A_09-0100_MAN_V1_English.book Page 7 Friday, March 20, 2009 3:11 PM Back Remote control # Jack Description 1 ...Power in Connect the power cord to this jack. 2 SERVICE Used for an outdoor antenna or cable TV to this jack. Connect a DVI ...
User Manual (English)
Page 12
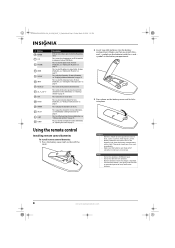
... on page 22. Press to select the picture size (aspect ratio). Press to the previously viewed channel. For more information, see "Adjusting the TV picture" on page 27. Cautions • Batteries should not be used for channels" on page 18. Notes Do not mix batteries of correctly.... symbols in , then lift the cover. 2 Insert two AAA batteries into place. For more information, see "Selecting a channel" on page 36. NS-P42Q-P501Q-P502Q-10A_09-0100_MAN_V1_English.book Page 8 Friday, March 20, 2009 3:11 PM # Button 10 RETURN 11 CCD 12 PICTURE 13 ZOOM 14 DISPLAY...
... on page 22. Press to select the picture size (aspect ratio). Press to the previously viewed channel. For more information, see "Adjusting the TV picture" on page 27. Cautions • Batteries should not be used for channels" on page 18. Notes Do not mix batteries of correctly.... symbols in , then lift the cover. 2 Insert two AAA batteries into place. For more information, see "Selecting a channel" on page 36. NS-P42Q-P501Q-P502Q-10A_09-0100_MAN_V1_English.book Page 8 Friday, March 20, 2009 3:11 PM # Button 10 RETURN 11 CCD 12 PICTURE 13 ZOOM 14 DISPLAY...
User Manual (English)
Page 13
NS-P42Q-P501Q-P502Q-10A_09-0100_MAN_V1_English.book Page 9 Friday, March 20, 2009 3:11 PM Aiming the remote control To aim the remote control: • Point the remote control towards the remote sensor on the front of the numbered code below , then making note of your TV. Tips &#..."teach" the commands one ) or unplug the power cord from interference. Do not place the remote control in an area with your Insignia TV. Insignia TV codes for universal remote controls (for all else fails, you must use a different universal remote control that you use the remote control in...
NS-P42Q-P501Q-P502Q-10A_09-0100_MAN_V1_English.book Page 9 Friday, March 20, 2009 3:11 PM Aiming the remote control To aim the remote control: • Point the remote control towards the remote sensor on the front of the numbered code below , then making note of your TV. Tips &#..."teach" the commands one ) or unplug the power cord from interference. Do not place the remote control in an area with your Insignia TV. Insignia TV codes for universal remote controls (for all else fails, you must use a different universal remote control that you use the remote control in...
User Manual (English)
Page 14
NS-P42Q-P501Q-P502Q-10A_09-0100_MAN_V1_English.book Page 10 Friday, March 20, 2009 3:11 PM Connecting an outdoor antenna Connecting a coaxial antenna 3 Connect the combiner to the ANT IN jack on the back of your TV. Use a screwdriver to tighten the screws. 3 Connect the adapter to the ANT IN jack ...in jack 10 www.insigniaproducts.com ANT IN Connecting a twin-lead antenna UHF VHF ANT IN Connecting cable TV Without a cable box To connect cable TV without a cable box: 1 Turn off your TV. ANT IN Connecting separate VHF and UHF antennas If you have separate VHF and UHF antennas, you ...
NS-P42Q-P501Q-P502Q-10A_09-0100_MAN_V1_English.book Page 10 Friday, March 20, 2009 3:11 PM Connecting an outdoor antenna Connecting a coaxial antenna 3 Connect the combiner to the ANT IN jack on the back of your TV. Use a screwdriver to tighten the screws. 3 Connect the adapter to the ANT IN jack ...in jack 10 www.insigniaproducts.com ANT IN Connecting a twin-lead antenna UHF VHF ANT IN Connecting cable TV Without a cable box To connect cable TV without a cable box: 1 Turn off your TV. ANT IN Connecting separate VHF and UHF antennas If you have separate VHF and UHF antennas, you ...
User Manual (English)
Page 15
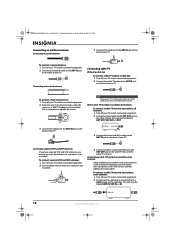
... the switch to the B position to view scrambled channels. (When you set the A/B switch to the B position, you need to tune your TV. NS-P42Q-P501Q-P502Q-10A_09-0100_MAN_V1_English.book Page 11 Friday, March 20, 2009 3:11 PM 3 Connect this cable to the cable box's output channel, ...which is usually channel 3 or 4.) Connecting satellite TV via a satellite TV box You can connect a satellite TV box using an HDMI, DVI, or component video connection. Incoming cable Splitter 4 Connect the first coaxial cable between the ANT ...
... the switch to the B position to view scrambled channels. (When you set the A/B switch to the B position, you need to tune your TV. NS-P42Q-P501Q-P502Q-10A_09-0100_MAN_V1_English.book Page 11 Friday, March 20, 2009 3:11 PM 3 Connect this cable to the cable box's output channel, ...which is usually channel 3 or 4.) Connecting satellite TV via a satellite TV box You can connect a satellite TV box using an HDMI, DVI, or component video connection. Incoming cable Splitter 4 Connect the first coaxial cable between the ANT ...
User Manual (English)
Page 16
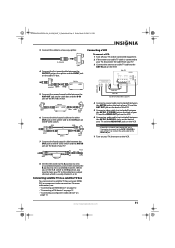
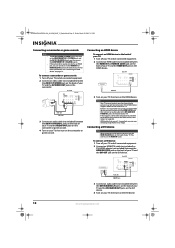
..., you connect an older HDMI device, connect the device to the HDMI 2(DVI) jack, then connect an audio cable to the back of your TV: 1 Turn off your TV and all connected equipment. 2 Connect an HDMI cable (not included) between the HDMI IN 1 or HDMI IN 2(DVI) jack on the back of... cable (not included) between the HDMI IN 2(DVI) jack on the back of your TV and the DVI OUT jack on the back of your TV. For more information, see "Connecting an HDMI device" on the camcorder. NS-P42Q-P501Q-P502Q-10A_09-0100_MAN_V1_English.book Page 12 Friday, March 20, 2009 3:11 PM Connecting...
..., you connect an older HDMI device, connect the device to the HDMI 2(DVI) jack, then connect an audio cable to the back of your TV: 1 Turn off your TV and all connected equipment. 2 Connect an HDMI cable (not included) between the HDMI IN 1 or HDMI IN 2(DVI) jack on the back of... cable (not included) between the HDMI IN 2(DVI) jack on the back of your TV and the DVI OUT jack on the back of your TV. For more information, see "Connecting an HDMI device" on the camcorder. NS-P42Q-P501Q-P502Q-10A_09-0100_MAN_V1_English.book Page 12 Friday, March 20, 2009 3:11 PM Connecting...
User Manual (English)
Page 17
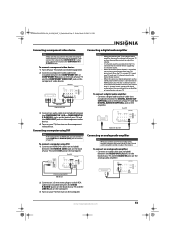
.... To connect an analog audio amplifier: • Connect an audio cable (not included) between the AUDIO OUT L/R jacks on the back of your TV and the AUDIO IN jacks on the analog audio amplifier. 3.5 mm stereo plug to dual-RCA HDMI/DVI cable 2 Connect an 3.5 mm stereo plug...you want to hear 5.1-channel sound, connect the digital audio jack on the amplifier. To connect a computer using a DTV signal, your TV, then turn on the computer. NS-P42Q-P501Q-P502Q-10A_09-0100_MAN_V1_English.book Page 13 Friday, March 20, 2009 3:11 PM Connecting a component video device Note Make sure that ...
.... To connect an analog audio amplifier: • Connect an audio cable (not included) between the AUDIO OUT L/R jacks on the back of your TV and the AUDIO IN jacks on the analog audio amplifier. 3.5 mm stereo plug to dual-RCA HDMI/DVI cable 2 Connect an 3.5 mm stereo plug...you want to hear 5.1-channel sound, connect the digital audio jack on the amplifier. To connect a computer using a DTV signal, your TV, then turn on the computer. NS-P42Q-P501Q-P502Q-10A_09-0100_MAN_V1_English.book Page 13 Friday, March 20, 2009 3:11 PM Connecting a component video device Note Make sure that ...
User Manual (English)
Page 18
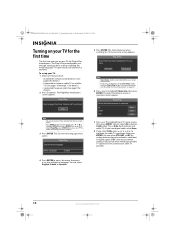
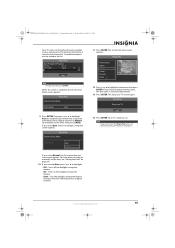
... or digital signals. You can select Air (antenna), Cable (cable TV), or Auto (both antenna and cable TV). NS-P42Q-P501Q-P502Q-10A_09-0100_MAN_V1_English.book Page 14 Friday, March 20, 2009 3:11 PM... Turning on your TV for the first time The first time you through 11 ..., French, or Spanish. 5 Press ENTER. The Select the Antenna source to highlight your cable TV provider. 14 www.insigniaproducts.com Press or to select Plug&Play, press ENTER, then press or...
... or digital signals. You can select Air (antenna), Cable (cable TV), or Auto (both antenna and cable TV). NS-P42Q-P501Q-P502Q-10A_09-0100_MAN_V1_English.book Page 14 Friday, March 20, 2009 3:11 PM... Turning on your TV for the first time The first time you through 11 ..., French, or Spanish. 5 Press ENTER. The Select the Antenna source to highlight your cable TV provider. 14 www.insigniaproducts.com Press or to select Plug&Play, press ENTER, then press or...
User Manual (English)
Page 19
... the Clock Mode. www.insigniaproducts.com 15 Air : 8 DTV Cable : -- Your TV is selected automatically. 13 Press ENTER. NS-P42Q-P501Q-P502Q-10A_09-0100_MAN_V1_English.book Page 15 Friday, March 20, 2009 3:11 PM Your TV starts searching for channels available in your TV screen opens. If you select Auto, the Set to reset the...
... the Clock Mode. www.insigniaproducts.com 15 Air : 8 DTV Cable : -- Your TV is selected automatically. 13 Press ENTER. NS-P42Q-P501Q-P502Q-10A_09-0100_MAN_V1_English.book Page 15 Friday, March 20, 2009 3:11 PM Your TV starts searching for channels available in your TV screen opens. If you select Auto, the Set to reset the...
User Manual (English)
Page 20
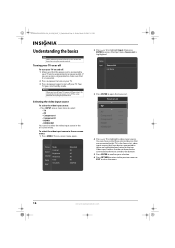
...the remote control. Selecting the video input source To select the video input source: • Press INPUT one or more times to select: • TV • AV • Component1 • Component2 • HDMI1 • HDMI2/DVI You can choose only those external devices that are connected to... turn off : 1 Make sure that it . Source List ▲ TV ▼ AV ---- NS-P42Q-P501Q-P502Q-10A_09-0100_MAN_V1_English.book Page 16 Friday, March 20, 2009 3:11 PM Understanding the basics Note Unless otherwise noted, all tasks...
...the remote control. Selecting the video input source To select the video input source: • Press INPUT one or more times to select: • TV • AV • Component1 • Component2 • HDMI1 • HDMI2/DVI You can choose only those external devices that are connected to... turn off : 1 Make sure that it . Source List ▲ TV ▼ AV ---- NS-P42Q-P501Q-P502Q-10A_09-0100_MAN_V1_English.book Page 16 Friday, March 20, 2009 3:11 PM Understanding the basics Note Unless otherwise noted, all tasks...
User Manual (English)
Page 21
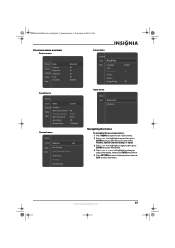
...adjust the option, then press ENTER to confirm. 5 Press RETURN to return to the previous menu or EXIT to access the menu. NS-P42Q-P501Q-P502Q-10A_09-0100_MAN_V1_English.book Page 17 Friday, March 20, 2009 3:11 PM On-screen menu overview Picture menu Picture Mode ... Channel Setup Input Equalizer SRS TruSurround HD Preferred Language Multi-Track Sound : Off : English : Stereo Auto Volume : Off Speaker Select : TV Speaker Channel menu Sound Channel Antenna : Air Setup Input Auto Program Clear Scrambled Channel Channel List Fine Tune Signal Strength Setup menu Channel Setup ...
...adjust the option, then press ENTER to confirm. 5 Press RETURN to return to the previous menu or EXIT to access the menu. NS-P42Q-P501Q-P502Q-10A_09-0100_MAN_V1_English.book Page 17 Friday, March 20, 2009 3:11 PM On-screen menu overview Picture menu Picture Mode ... Channel Setup Input Equalizer SRS TruSurround HD Preferred Language Multi-Track Sound : Off : English : Stereo Auto Volume : Off Speaker Select : TV Speaker Channel menu Sound Channel Antenna : Air Setup Input Auto Program Clear Scrambled Channel Channel List Fine Tune Signal Strength Setup menu Channel Setup ...
User Manual (English)
Page 22
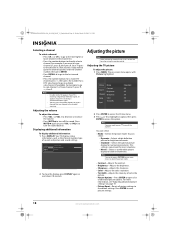
...For example, to go to a channel that was skipped in the picture. • Picture Options-Press ENTER to turn off the sound. Your TV displays status information, such as the channel number, type of advanced picture options. Note You can also press PICTURE one or more information, see ... To close the display, press DISPLAY again or wait about 10 seconds. Adjusting the picture Note Unless otherwise noted, all tasks in a few seconds. NS-P42Q-P501Q-P502Q-10A_09-0100_MAN_V1_English.book Page 18 Friday, March 20, 2009 3:11 PM Selecting a channel To select a channel: • Press CH or...
...For example, to go to a channel that was skipped in the picture. • Picture Options-Press ENTER to turn off the sound. Your TV displays status information, such as the channel number, type of advanced picture options. Note You can also press PICTURE one or more information, see ... To close the display, press DISPLAY again or wait about 10 seconds. Adjusting the picture Note Unless otherwise noted, all tasks in a few seconds. NS-P42Q-P501Q-P502Q-10A_09-0100_MAN_V1_English.book Page 18 Friday, March 20, 2009 3:11 PM Selecting a channel To select a channel: • Press CH or...