User Manual (English)
Page 3
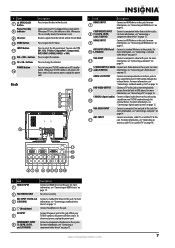
... the stand (NS-LDVD26Q-10A 4 Installing the stand (NS-LDVD32Q-10A 4 Attaching a wall-mount bracket (NS-LDVD26Q-10A 5 Attaching a wall-mount bracket (NS-LDVD32Q-10A 6 TV components 6 Package contents 6 Front 6 Back 7 Remote Control 8 Using the remote control 9 Installing remote control batteries 9 Aiming the remote control 9 Programming a universal remote control to work with your TV . . . 10 Making connections 10 Connecting the power cord 10 Connecting...
... the stand (NS-LDVD26Q-10A 4 Installing the stand (NS-LDVD32Q-10A 4 Attaching a wall-mount bracket (NS-LDVD26Q-10A 5 Attaching a wall-mount bracket (NS-LDVD32Q-10A 6 TV components 6 Package contents 6 Front 6 Back 7 Remote Control 8 Using the remote control 9 Installing remote control batteries 9 Aiming the remote control 9 Programming a universal remote control to work with your TV . . . 10 Making connections 10 Connecting the power cord 10 Connecting...
User Manual (English)
Page 8
... or expose the device to rain or moisture. Servicing is required when the apparatus has been damaged in clean water. Handling the LCD panel • Your TV's screen is left unattended and unused for at plugs, convenience receptacles, and the point where they exit from the apparatus. 11 ... the back of your TV. No user-serviceable parts are provided for long periods of time. 14 Refer all instructions. 5 Do not use caution when moving the S3125A cart/apparatus combination to avoid injury from the power outlet and disconnect any way, such as power-supply cord or plug is damaged,...
... or expose the device to rain or moisture. Servicing is required when the apparatus has been damaged in clean water. Handling the LCD panel • Your TV's screen is left unattended and unused for at plugs, convenience receptacles, and the point where they exit from the apparatus. 11 ... the back of your TV. No user-serviceable parts are provided for long periods of time. 14 Refer all instructions. 5 Do not use caution when moving the S3125A cart/apparatus combination to avoid injury from the power outlet and disconnect any way, such as power-supply cord or plug is damaged,...

User Manual (English)
Page 9
... for environmental reasons. End of life directives Your TV contains tin-lead solder and a fluorescent lamp containing a small amount of other controls may result in any way. • When your local power company. Non-active pixels The LCD panel contains almost 3 million thin film transistors, which... www.eia.org to find a recycler in your cordless and cellular telephones away from the TV. Condensation Moisture will often require extensive work by following conditions: • When the power supply cord or plug is damaged or frayed. • If liquid has been spilled or objects have...
... for environmental reasons. End of life directives Your TV contains tin-lead solder and a fluorescent lamp containing a small amount of other controls may result in any way. • When your local power company. Non-active pixels The LCD panel contains almost 3 million thin film transistors, which... www.eia.org to find a recycler in your cordless and cellular telephones away from the TV. Condensation Moisture will often require extensive work by following conditions: • When the power supply cord or plug is damaged or frayed. • If liquid has been spilled or objects have...
User Manual (English)
Page 12
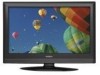
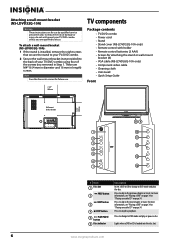
... chapter or track. Note Save the four extra screws for attaching the stand or wall-mount bracket (8) • VGA cable (NS-LDVD26Q-10A only) • Component video cable • Cleaning cloth • User Guide • Quick Setup Guide Front Wall-mount bracket location... and play or pause a disc. Attaching a wall-mount bracket (NS-LDVD32Q-10A) Warning These instructions are for use . 7.878" 200 mm TV components Package contents • TV/DVD combo • Power cord • Stand • Stand cover (NS-LDVD32Q-10A only) • Remote control with holder • Remote control batteries...
... chapter or track. Note Save the four extra screws for attaching the stand or wall-mount bracket (8) • VGA cable (NS-LDVD26Q-10A only) • Component video cable • Cleaning cloth • User Guide • Quick Setup Guide Front Wall-mount bracket location... and play or pause a disc. Attaching a wall-mount bracket (NS-LDVD32Q-10A) Warning These instructions are for use . 7.878" 200 mm TV components Package contents • TV/DVD combo • Power cord • Stand • Stand cover (NS-LDVD32Q-10A only) • Remote control with holder • Remote control batteries...
User Manual (English)
Page 13
..., see "Connecting a computer" on page 16. Connect a standard AV device to turn your TV is red. Press to select the AV signal input. POWER button 14 Press to this jack. To disconnect power, unplug the power cord. For more information, see "Connecting a TV" on page 14. For more information, see "Connecting a standard video device" on page...
..., see "Connecting a computer" on page 16. Connect a standard AV device to turn your TV is red. Press to select the AV signal input. POWER button 14 Press to this jack. To disconnect power, unplug the power cord. For more information, see "Connecting a TV" on page 14. For more information, see "Connecting a standard video device" on page...

User Manual (English)
Page 14
..." on page 36. Press to return to select the picture mode. To disconnect power, unplug the power cord. Press to skip to repeat a part of a disc. Press to the previous... or next chapter or track on -screen menu. Press to close the on a disc. You can select Standard, Music, Theater, News, or Custom. You can select Normal, Zoom, Wide, Cinema, Panorama, or Auto Zoom (TV...20 21 (eject) INPUT 22 ZOOM 23 CH /CH 24 25 RECALL FAVORITE 26 27 INFO PICTURE 28 29 AUDIO 30 31 EXIT 32 SETUP 33 A-B 34...
..." on page 36. Press to return to select the picture mode. To disconnect power, unplug the power cord. Press to skip to repeat a part of a disc. Press to the previous... or next chapter or track on -screen menu. Press to close the on a disc. You can select Standard, Music, Theater, News, or Custom. You can select Normal, Zoom, Wide, Cinema, Panorama, or Auto Zoom (TV...20 21 (eject) INPUT 22 ZOOM 23 CH /CH 24 25 RECALL FAVORITE 26 27 INFO PICTURE 28 29 AUDIO 30 31 EXIT 32 SETUP 33 A-B 34...
User Manual (English)
Page 16
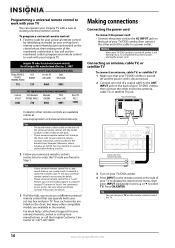
..., then making note of the numbered code below it using the Insignia TV remote to "teach" the commands one end of the cable to a power outlet. To completely disconnect power, unplug the power cord. INPUT jack on the remote control or the side of your TV/DVD combo, then connect the other remote controls are available online...
..., then making note of the numbered code below it using the Insignia TV remote to "teach" the commands one end of the cable to a power outlet. To completely disconnect power, unplug the power cord. INPUT jack on the remote control or the side of your TV/DVD combo, then connect the other remote controls are available online...
User Manual (English)
Page 17
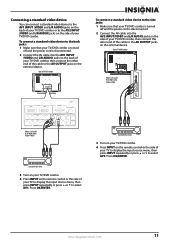
... 60Hz AC INPUT HDMI1 INPUT HDMI2 VGA INPUT ANT. To connect a standard video device to the side jacks: 1 Make sure that your TV/DVD combo is turned off and the power cord is disconnected. 2 Connect the AV cable into the AV2 INPUT(VIDEO and L/R AUDIO) jacks on the remote control or the side... combo or to the AV OUTPUT jacks on the external device. To connect a standard video device to the back jacks: 1 Make sure that your TV/DVD combo is turned off and the power cord is disconnected. 2 Connect the AV cable into the AV1 INPUT (VIDEO and L/R AUDIO) jacks on the back of your...
... 60Hz AC INPUT HDMI1 INPUT HDMI2 VGA INPUT ANT. To connect a standard video device to the side jacks: 1 Make sure that your TV/DVD combo is turned off and the power cord is disconnected. 2 Connect the AV cable into the AV2 INPUT(VIDEO and L/R AUDIO) jacks on the remote control or the side... combo or to the AV OUTPUT jacks on the external device. To connect a standard video device to the back jacks: 1 Make sure that your TV/DVD combo is turned off and the power cord is disconnected. 2 Connect the AV cable into the AV1 INPUT (VIDEO and L/R AUDIO) jacks on the back of your...
User Manual (English)
Page 18
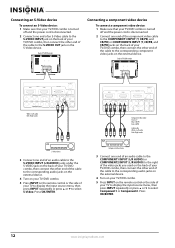
Connecting an S-Video device To connect an S-Video device: 1 Make sure that your TV/DVD combo is turned off and the power cord is disconnected. 2 Connect one end of the component video cable to the COMPONENT1 INPUT (Y, CB/PB, and CR/PR) or COMPONENT2 INPUT ...R AUDIO L L OUTPUT COMPONENT2 INPUT R S-VIDEO INPUT R DVD VIDEO Connecting a component video device To connect a component video device: 1 Make sure that your TV/DVD combo is turned off and the power cord is disconnected. 2 Connect one end of an audio cable to the S-VIDEO INPUT (L/R AUDIO) jacks under the S-VIDEO jack on your...
Connecting an S-Video device To connect an S-Video device: 1 Make sure that your TV/DVD combo is turned off and the power cord is disconnected. 2 Connect one end of the component video cable to the COMPONENT1 INPUT (Y, CB/PB, and CR/PR) or COMPONENT2 INPUT ...R AUDIO L L OUTPUT COMPONENT2 INPUT R S-VIDEO INPUT R DVD VIDEO Connecting a component video device To connect a component video device: 1 Make sure that your TV/DVD combo is turned off and the power cord is disconnected. 2 Connect one end of an audio cable to the S-VIDEO INPUT (L/R AUDIO) jacks under the S-VIDEO jack on your...
User Manual (English)
Page 19
... press or to select HDMI1, HDMI2, or HDMI3. Connecting an HDMI device To connect an HDMI device: 1 Make sure that your TV/DVD combo is turned off and the power cord is disconnected. 2 Connect one end of an HDMI cable to the HDMI1 INPUT or HDMI2 INPUT jack on the back of your... cable into the AUDIO OUT jack on the external device. Press OK/ENTER. Back of TV/DVD combo Connecting a DVI device To connect a DVI device: 1 Make sure that your TV/DVD combo is turned off and the power cord is disconnected. 2 Connect one end of an HDMI-to DVI cable to the HDMI1 INPUT...
... press or to select HDMI1, HDMI2, or HDMI3. Connecting an HDMI device To connect an HDMI device: 1 Make sure that your TV/DVD combo is turned off and the power cord is disconnected. 2 Connect one end of an HDMI cable to the HDMI1 INPUT or HDMI2 INPUT jack on the back of your... cable into the AUDIO OUT jack on the external device. Press OK/ENTER. Back of TV/DVD combo Connecting a DVI device To connect a DVI device: 1 Make sure that your TV/DVD combo is turned off and the power cord is disconnected. 2 Connect one end of an HDMI-to DVI cable to the HDMI1 INPUT...
User Manual (English)
Page 20
... a computer using HDMI or DVI: 1 Make sure that your TV/DVD combo is turned off and the power cord is disconnected. 2 Connect one end of an HDMI-to-DVI cable to the HDMI1 INPUT or HDMI2 INPUT jack on the back of your TV/DVD combo or to the HDMI3 INPUT jack on the... VIDEO HDMI1 INPUT HDMI2 VGA INPUT ANT. An HDMI cable transfers both video and audio. To connect a computer: 1 Make sure that your TV/DVD combo is turned off and the power cord is only required for a DVI connection. 3 If you are connecting to a DVI jack on the computer, connect an audio cable to...
... a computer using HDMI or DVI: 1 Make sure that your TV/DVD combo is turned off and the power cord is disconnected. 2 Connect one end of an HDMI-to-DVI cable to the HDMI1 INPUT or HDMI2 INPUT jack on the back of your TV/DVD combo or to the HDMI3 INPUT jack on the... VIDEO HDMI1 INPUT HDMI2 VGA INPUT ANT. An HDMI cable transfers both video and audio. To connect a computer: 1 Make sure that your TV/DVD combo is turned off and the power cord is only required for a DVI connection. 3 If you are connecting to a DVI jack on the computer, connect an audio cable to...
User Manual (English)
Page 21
...to select HDMI1, HDMI2, or HDMI3. Press OK/ENTER. Connecting a standard sound system To connect a standard sound system: 1 Make sure that your TV/DVD combo is turned off and the power cord is disconnected. 2 Connect one end of a coaxial cable to the COAXIAL OUTPUT jack on the back of your...of the cable to the COAXIAL IN jack on the external device. Back of TV/DVD combo Connecting a digital sound system To connect a digital sound system: 1 Make sure that your TV/DVD combo is turned off and the power cord is disconnected. 2 Connect a standard audio cable to the AUDIO L/R OUTPUT jacks...
...to select HDMI1, HDMI2, or HDMI3. Press OK/ENTER. Connecting a standard sound system To connect a standard sound system: 1 Make sure that your TV/DVD combo is turned off and the power cord is disconnected. 2 Connect one end of a coaxial cable to the COAXIAL OUTPUT jack on the back of your...of the cable to the COAXIAL IN jack on the external device. Back of TV/DVD combo Connecting a digital sound system To connect a digital sound system: 1 Make sure that your TV/DVD combo is turned off and the power cord is disconnected. 2 Connect a standard audio cable to the AUDIO L/R OUTPUT jacks...
User Manual (English)
Page 22
... INPUT HDMI2 VGA INPUT ANT. For more information, see "Connecting the power cord" on page 10. 2 Press POWER to turn on the external TV. If you are using an antenna for channels. Connecting a TV You can connect a TV to your TV/DVD combo to view DVD playback from the built-in the setup menu... The Setup Wizard guides you set up your TV/DVD combo: 1 Make sure that your TV/DVD combo is turned off and the power cord is normal when you through setting up the TV output" on page 10. • Connected the power cord. To set the TV OUTPUT to highlight English, Français, or...
... INPUT HDMI2 VGA INPUT ANT. For more information, see "Connecting the power cord" on page 10. 2 Press POWER to turn on the external TV. If you are using an antenna for channels. Connecting a TV You can connect a TV to your TV/DVD combo to view DVD playback from the built-in the setup menu... The Setup Wizard guides you set up your TV/DVD combo: 1 Make sure that your TV/DVD combo is turned off and the power cord is normal when you through setting up the TV output" on page 10. • Connected the power cord. To set the TV OUTPUT to highlight English, Français, or...
User Manual (English)
Page 23
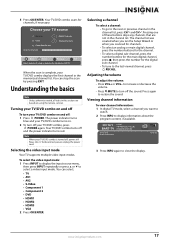
... • Component 1 • Component 2 • DVD • HDMI1 • HDMI2 • HDMI3 • VGA 2 Press OK/ENTER. The power indicator turns blue and your TV/DVD combo turns on using an antenna for the digital sub-channel. • To tune to the last viewed channel, press RECALL. Selecting...digital sub-channel, press the number buttons for the main digital channel, press , then press the number for standard or HD TV. To disconnect power, unplug the power cord. To select the video input mode: 1 Press INPUT to display the input source menu, then press INPUT repeatedly or press or...
... • Component 1 • Component 2 • DVD • HDMI1 • HDMI2 • HDMI3 • VGA 2 Press OK/ENTER. The power indicator turns blue and your TV/DVD combo turns on using an antenna for the digital sub-channel. • To tune to the last viewed channel, press RECALL. Selecting...digital sub-channel, press the number buttons for the main digital channel, press , then press the number for standard or HD TV. To disconnect power, unplug the power cord. To select the video input mode: 1 Press INPUT to display the input source menu, then press INPUT repeatedly or press or...


