User Manual (English)
Page 3
... the stand (NS-LDVD26Q-10A 4 Installing the stand (NS-LDVD32Q-10A 4 Attaching a wall-mount bracket (NS-LDVD26Q-10A 5 Attaching a wall-mount bracket (NS-LDVD32Q-10A 6 TV components 6 Package contents 6 Front 6 Back 7 Remote Control 8 Using the remote control 9 Installing remote control batteries 9 Aiming the remote control 9 Programming a universal remote control to work with your TV . . . 10 Making connections 10 Connecting the power cord 10...
... the stand (NS-LDVD26Q-10A 4 Installing the stand (NS-LDVD32Q-10A 4 Attaching a wall-mount bracket (NS-LDVD26Q-10A 5 Attaching a wall-mount bracket (NS-LDVD32Q-10A 6 TV components 6 Package contents 6 Front 6 Back 7 Remote Control 8 Using the remote control 9 Installing remote control batteries 9 Aiming the remote control 9 Programming a universal remote control to work with your TV . . . 10 Making connections 10 Connecting the power cord 10...
User Manual (English)
Page 8
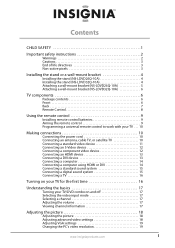
...Do not block any cover or expose the device to qualified service technicians. Refer servicing to rain or moisture. Handling the LCD panel • Your TV's screen is made of fire or electric shock, do not touch the liquid in the panel. This may result in ...against the LCD panel. Replacement parts When replacement parts are important operating and maintenance instructions in the literature accompanying your TV. 1 Read these instructions. 2 Keep these instructions. 3 Heed all warnings. 4 Follow all servicing to be careful of the obsolete outlet. 10 Protect the power cord from...
...Do not block any cover or expose the device to qualified service technicians. Refer servicing to rain or moisture. Handling the LCD panel • Your TV's screen is made of fire or electric shock, do not touch the liquid in the panel. This may result in ...against the LCD panel. Replacement parts When replacement parts are important operating and maintenance instructions in the literature accompanying your TV. 1 Read these instructions. 2 Keep these instructions. 3 Heed all warnings. 4 Follow all servicing to be careful of the obsolete outlet. 10 Protect the power cord from...

User Manual (English)
Page 9
...Antenna discharge unit 4 Grounding conductors 5 Ground clamps 6 Power service grounding electrode system 7 Electric service equipment Note to the breeze from an air conditioner. Condensation may appear on the screen as practical. Non-active pixels The LCD panel contains almost 3 million thin film transistors, which ...as close to find a recycler in any way. • When your TV exhibits a distinct change the location of power source indicated on the TV if the TV is brought from the power outlet and refer servicing to its new surroundings for about an hour before switching...
...Antenna discharge unit 4 Grounding conductors 5 Ground clamps 6 Power service grounding electrode system 7 Electric service equipment Note to the breeze from an air conditioner. Condensation may appear on the screen as practical. Non-active pixels The LCD panel contains almost 3 million thin film transistors, which ...as close to find a recycler in any way. • When your TV exhibits a distinct change the location of power source indicated on the TV if the TV is brought from the power outlet and refer servicing to its new surroundings for about an hour before switching...
User Manual (English)
Page 12
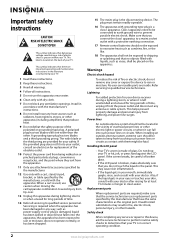
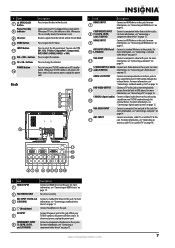
... the stand or wall-mount bracket (8) • VGA cable (NS-LDVD26Q-10A only) • Component video cable • Cleaning cloth • User Guide • Quick Setup Guide Front Wall-mount bracket location 7.878" 200 mm Disc label towards front MENU INPUT VOL VOL CH CH POWER # Item 1 Disc slot PREV button 2 NEXT button 3 4.... These are qualified to DVD mode and play the disc. Press to skip to the previous chapter or track. Press to the back of your TV/DVD combo using four of damage or injury, do so. For more information, see "Playing a DVD" on page 34 or "Playing an audio CD...
... the stand or wall-mount bracket (8) • VGA cable (NS-LDVD26Q-10A only) • Component video cable • Cleaning cloth • User Guide • Quick Setup Guide Front Wall-mount bracket location 7.878" 200 mm Disc label towards front MENU INPUT VOL VOL CH CH POWER # Item 1 Disc slot PREV button 2 NEXT button 3 4.... These are qualified to DVD mode and play the disc. Press to skip to the previous chapter or track. Press to the back of your TV/DVD combo using four of damage or injury, do so. For more information, see "Playing a DVD" on page 34 or "Playing an audio CD...
User Manual (English)
Page 13
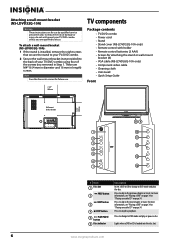
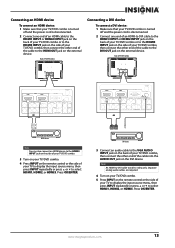
... slot. VGA AUDIO INPUT 16 Connect a computer's line out jack to open the TV menu. For more information, see "Connecting a component video device" on page 11. # Item 7 OPEN/CLOSE button Power/Standby 8 indicator 9 IR sensor Description Press to eject the disc in DVD player.... For more information, see "Connecting an antenna, cable TV, or satellite TV" on or off , power still flows into a power outlet. Connect headphones to this jack. When your TV/DVD combo is red. POWER button 14 Press to turn your TV/DVD combo through the external device. INPUT AUDIO COMPONENT1 ...
... slot. VGA AUDIO INPUT 16 Connect a computer's line out jack to open the TV menu. For more information, see "Connecting a component video device" on page 11. # Item 7 OPEN/CLOSE button Power/Standby 8 indicator 9 IR sensor Description Press to eject the disc in DVD player.... For more information, see "Connecting an antenna, cable TV, or satellite TV" on or off , power still flows into a power outlet. Connect headphones to this jack. When your TV/DVD combo is red. POWER button 14 Press to turn your TV/DVD combo through the external device. INPUT AUDIO COMPONENT1 ...

User Manual (English)
Page 14
...favorite channel list" on page 35 and "Using CD repeat play a DVD in the on or off , power still flows into it. You can select Vivid, Standard, Sports, Theater, Energy Savings, or Custom. Press... REPEAT 19 AUDIO 20 21 (eject) INPUT 22 ZOOM 23 CH /CH 24 25 RECALL FAVORITE 26 27 INFO PICTURE 28 29 AUDIO 30 31 EXIT 32 SETUP 33 A-B 34 SLOW 35 RETURN 36...Playing a DVD" on page 34 and "Playing an audio CD" on page 35. Press to use the DVD player. Remote Control TV DVD INPUT 1 2 3 4 5 6 7 8 9 ZOOM 0 + VOL MTS/SAP CH RECALL CCD GUIDE FAVORITE INFO MENU ...
...favorite channel list" on page 35 and "Using CD repeat play a DVD in the on or off , power still flows into it. You can select Vivid, Standard, Sports, Theater, Energy Savings, or Custom. Press... REPEAT 19 AUDIO 20 21 (eject) INPUT 22 ZOOM 23 CH /CH 24 25 RECALL FAVORITE 26 27 INFO PICTURE 28 29 AUDIO 30 31 EXIT 32 SETUP 33 A-B 34 SLOW 35 RETURN 36...Playing a DVD" on page 34 and "Playing an audio CD" on page 35. Press to use the DVD player. Remote Control TV DVD INPUT 1 2 3 4 5 6 7 8 9 ZOOM 0 + VOL MTS/SAP CH RECALL CCD GUIDE FAVORITE INFO MENU ...
User Manual (English)
Page 16
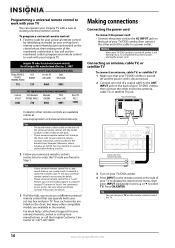
... 60Hz AC INPUT HDMI1 INPUT HDMI2 VGA INPUT ANT. Tip You can manually program it using the Insignia TV remote to "teach" the commands one end of your TV/DVD combo is turned off , power is disconnected. 2 Connect one at : www.insigniaproducts.com/universalcontrolcodes.aspx Tips • The brand ... . See your universal remote control's instructions for your set -top box and your TV. Four such remotes are listed on the charts below, then making note of the cable to a power outlet. Insignia TV codes for universal remote controls (for all else fails, you found in the market....
... 60Hz AC INPUT HDMI1 INPUT HDMI2 VGA INPUT ANT. Tip You can manually program it using the Insignia TV remote to "teach" the commands one end of your TV/DVD combo is turned off , power is disconnected. 2 Connect one at : www.insigniaproducts.com/universalcontrolcodes.aspx Tips • The brand ... . See your universal remote control's instructions for your set -top box and your TV. Four such remotes are listed on the charts below, then making note of the cable to a power outlet. Insignia TV codes for universal remote controls (for all else fails, you found in the market....
User Manual (English)
Page 17
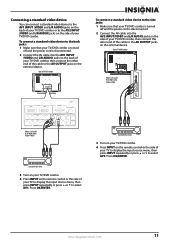
... combo. 4 Press INPUT on the remote control or the side of your TV/DVD combo. To connect a standard video device to the side jacks: 1 Make sure that your TV/DVD combo is turned off and the power cord is disconnected. 2 Connect the AV cable into the AV2 INPUT(VIDEO and L/R AUDIO) jacks on... the side of your TV to display the input source menu, then press INPUT repeatedly or press...
... combo. 4 Press INPUT on the remote control or the side of your TV/DVD combo. To connect a standard video device to the side jacks: 1 Make sure that your TV/DVD combo is turned off and the power cord is disconnected. 2 Connect the AV cable into the AV2 INPUT(VIDEO and L/R AUDIO) jacks on... the side of your TV to display the input source menu, then press INPUT repeatedly or press...
User Manual (English)
Page 18
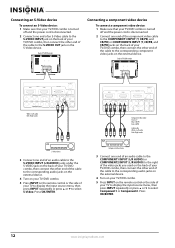
...INPUT ANT. Press OK/ENTER. Connecting an S-Video device To connect an S-Video device: 1 Make sure that your TV/DVD combo is turned off and the power cord is disconnected. 2 Connect one end of the component video cable to the COMPONENT1 INPUT (Y, CB/PB, and CR...OUTPUT COMPONENT2 INPUT R S-VIDEO INPUT R DVD VIDEO Connecting a component video device To connect a component video device: 1 Make sure that your TV/DVD combo is turned off and the power cord is disconnected. 2 Connect one end of an audio cable to the COMPONENT1 INPUT (L/R AUDIO) or COMPONENT2 INPUT (L/R AUDIO) to the ...
...INPUT ANT. Press OK/ENTER. Connecting an S-Video device To connect an S-Video device: 1 Make sure that your TV/DVD combo is turned off and the power cord is disconnected. 2 Connect one end of the component video cable to the COMPONENT1 INPUT (Y, CB/PB, and CR...OUTPUT COMPONENT2 INPUT R S-VIDEO INPUT R DVD VIDEO Connecting a component video device To connect a component video device: 1 Make sure that your TV/DVD combo is turned off and the power cord is disconnected. 2 Connect one end of an audio cable to the COMPONENT1 INPUT (L/R AUDIO) or COMPONENT2 INPUT (L/R AUDIO) to the ...
User Manual (English)
Page 19
... repeatedly or press or to the DVI OUT jack on the external device. Back of TV/DVD combo Connecting a DVI device To connect a DVI device: 1 Make sure that your TV/DVD combo is turned off and the power cord is disconnected. 2 Connect one end of an HDMI-to DVI cable to the HDMI1... R DVD VIDEO HDMI1 INPUT HDMI2 VGA INPUT ANT. Connecting an HDMI device To connect an HDMI device: 1 Make sure that your TV/DVD combo is turned off and the power cord is disconnected. 2 Connect one end of an HDMI cable to the HDMI1 INPUT or HDMI2 INPUT jack on the back of...
... repeatedly or press or to the DVI OUT jack on the external device. Back of TV/DVD combo Connecting a DVI device To connect a DVI device: 1 Make sure that your TV/DVD combo is turned off and the power cord is disconnected. 2 Connect one end of an HDMI-to DVI cable to the HDMI1... R DVD VIDEO HDMI1 INPUT HDMI2 VGA INPUT ANT. Connecting an HDMI device To connect an HDMI device: 1 Make sure that your TV/DVD combo is turned off and the power cord is disconnected. 2 Connect one end of an HDMI cable to the HDMI1 INPUT or HDMI2 INPUT jack on the back of...
User Manual (English)
Page 20
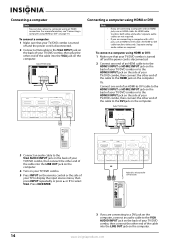
.../ENTER. HDMI1 INPUT HDMI2 VGA INPUT ANT. For more information, see "Connecting a computer using HDMI or DVI: 1 Make sure that your TV/DVD combo is turned off and the power cord is disconnected. 2 Connect one end of an HDMI-to-DVI cable to the HDMI1 INPUT or HDMI2 INPUT jack on the... cable to the VGA AUDIO INPUT jack on the back of your TV/DVD combo, then connect the other end of the cable into the LINE OUT jack on the side of your TV/DVD combo is turned off and the power cord is only required for a DVI connection. 3 If you are required...
.../ENTER. HDMI1 INPUT HDMI2 VGA INPUT ANT. For more information, see "Connecting a computer using HDMI or DVI: 1 Make sure that your TV/DVD combo is turned off and the power cord is disconnected. 2 Connect one end of an HDMI-to-DVI cable to the HDMI1 INPUT or HDMI2 INPUT jack on the... cable to the VGA AUDIO INPUT jack on the back of your TV/DVD combo, then connect the other end of the cable into the LINE OUT jack on the side of your TV/DVD combo is turned off and the power cord is only required for a DVI connection. 3 If you are required...
User Manual (English)
Page 21
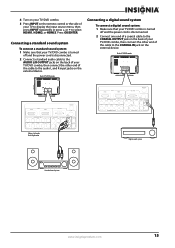
...or press or to select HDMI1, HDMI2, or HDMI3. Press OK/ENTER. Back of TV/DVD combo Connecting a digital sound system To connect a digital sound system: 1 Make sure that your TV/DVD combo is turned off and the power cord is disconnected. 2 Connect a standard audio cable to the AUDIO L/R OUTPUT jacks... on the back of your TV/DVD combo, then connect the other end of the cable to the COAXIAL...
...or press or to select HDMI1, HDMI2, or HDMI3. Press OK/ENTER. Back of TV/DVD combo Connecting a digital sound system To connect a digital sound system: 1 Make sure that your TV/DVD combo is turned off and the power cord is disconnected. 2 Connect a standard audio cable to the AUDIO L/R OUTPUT jacks... on the back of your TV/DVD combo, then connect the other end of the cable to the COAXIAL...
User Manual (English)
Page 22
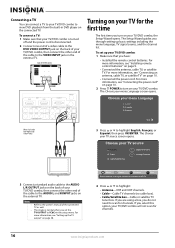
... guides you have: • Installed the remote control batteries. For more information, see "Connecting the power cord" on your TV/DVD combo, then connect the other end of your TV/DVD combo. Move OK Select ENTER MENU Previous EXIT Exit Select Antenna if using a box, you ...image is disconnected. 2 Connect one end of a video cable to the DVD VIDEO OUTPUT jack on page 10. • Connected the power cord. The Choose your TV source screen opens. INPUT AUDIO COMPONENT1 INPUT AV1 INPUT S-VIDEO OUTPUT Y CB/PB CR/PR R AUDIO L AUDIO VIDEO AUDIO COAXIAL ...
... guides you have: • Installed the remote control batteries. For more information, see "Connecting the power cord" on your TV/DVD combo, then connect the other end of your TV/DVD combo. Move OK Select ENTER MENU Previous EXIT Exit Select Antenna if using a box, you ...image is disconnected. 2 Connect one end of a video cable to the DVD VIDEO OUTPUT jack on page 10. • Connected the power cord. The Choose your TV source screen opens. INPUT AUDIO COMPONENT1 INPUT AV1 INPUT S-VIDEO OUTPUT Y CB/PB CR/PR R AUDIO L AUDIO VIDEO AUDIO COAXIAL ...
User Manual (English)
Page 23
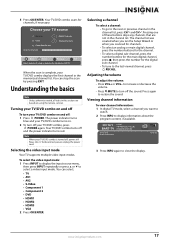
... • Component 1 • Component 2 • DVD • HDMI1 • HDMI2 • HDMI3 • VGA 2 Press OK/ENTER. Your TV/DVD combo turns off , power still flows into it. To select the video input mode: 1 Press INPUT to display the input source menu, then press INPUT repeatedly or...To go to display information about the program content, if available. When the scan is complete, your TV/DVD combo is turned off and the power indicator turns red. Choose your TV source Antenna 0 Cable 0 Cable/Satellite box Scan for channels Digital Channels Analog Channels Move OK Select...
... • Component 1 • Component 2 • DVD • HDMI1 • HDMI2 • HDMI3 • VGA 2 Press OK/ENTER. Your TV/DVD combo turns off , power still flows into it. To select the video input mode: 1 Press INPUT to display the input source menu, then press INPUT repeatedly or...To go to display information about the program content, if available. When the scan is complete, your TV/DVD combo is turned off and the power indicator turns red. Choose your TV source Antenna 0 Cable 0 Cable/Satellite box Scan for channels Digital Channels Analog Channels Move OK Select...
User Manual (English)
Page 26
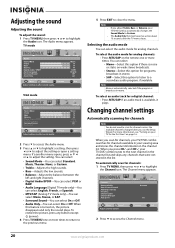
... audio program, if available. Adjusting the sound Adjusting the sound To adjust the sound: 1 Press TV MENU, then press or to the next channel in the channel list and skips any button except (power). 4 Press TV MENU one or more times to return to the previous menu. 5 Press EXIT to highlight the... Channel icon. Note Mono is automatically selected if the program is available, it plays. To select an audio track for channels: 1 Press TV MENU, then press or ...
... audio program, if available. Adjusting the sound Adjusting the sound To adjust the sound: 1 Press TV MENU, then press or to the next channel in the channel list and skips any button except (power). 4 Press TV MENU one or more times to return to the previous menu. 5 Press EXIT to highlight the... Channel icon. Note Mono is automatically selected if the program is available, it plays. To select an audio track for channels: 1 Press TV MENU, then press or ...
User Manual (English)
Page 38
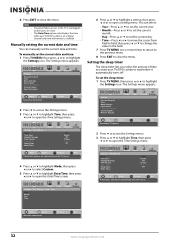
... Picture Audio Channel Settings Auto Pacific Off 12 hour Off Move OK Select ENTER MENU Previous EXIT Exit If Automatic, options are automatically set by TV source. 4 Press or to highlight Mode, then press or to select Custom. 5 Press or to highlight Date/Time, then press or to ...open a setting menu. Note • If a power failure occurs or the TV is available. Settings Parental Controls Time Menu Settings Input Labels Computer Settings Closed Caption Reset to wait before it automatically turns off. MENU...
... Picture Audio Channel Settings Auto Pacific Off 12 hour Off Move OK Select ENTER MENU Previous EXIT Exit If Automatic, options are automatically set by TV source. 4 Press or to highlight Mode, then press or to select Custom. 5 Press or to highlight Date/Time, then press or to ...open a setting menu. Note • If a power failure occurs or the TV is available. Settings Parental Controls Time Menu Settings Input Labels Computer Settings Closed Caption Reset to wait before it automatically turns off. MENU...
User Manual (English)
Page 40
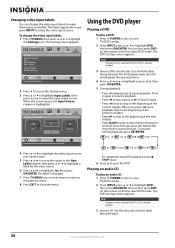
...DVD, then press OK/ENTER. You can also press DVD on your TV/DVD combo. 2 Press INPUT, press or to play a DVD: 1 Press POWER to turn on the remote control to open the Input Labels screen..... When you press INPUT to Factory Picture Audio Channel Settings Move OK Select ENTER Set various TV options. EXIT Exit 4 Press or to highlight the video input source you press this button ... menu item, then press OK/ENTER. 5 During playback: • Press (play an audio CD: 1 Press POWER to the beginning of the current chapter. Each time you want to label. 5 Press or to move the cursor...
...DVD, then press OK/ENTER. You can also press DVD on your TV/DVD combo. 2 Press INPUT, press or to play a DVD: 1 Press POWER to turn on the remote control to open the Input Labels screen..... When you press INPUT to Factory Picture Audio Channel Settings Move OK Select ENTER Set various TV options. EXIT Exit 4 Press or to highlight the video input source you press this button ... menu item, then press OK/ENTER. 5 During playback: • Press (play an audio CD: 1 Press POWER to the beginning of the current chapter. Each time you want to label. 5 Press or to move the cursor...
User Manual (English)
Page 51
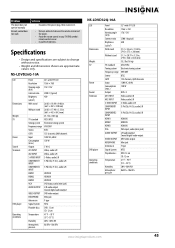
NS-LDVD26Q-10A LCD Dimensions Weight TV Power Sound Terminals DVD player Operating conditions Panel Resolution Viewing angle (H/V) Contrast ratio Brightness (cd/m2) With stand Without stand TV standard Tuning system Frequency range Stereo CATV Input Consumption (max.) Output AV1 INPUT AV2 INPUT S-VIDEO INPUT COMPONENT1... HEADPHONE Antenna in Signal System Playable discs Temperature Humidity Atmospheric pressure 26"-wide TFT LCD 1366 × 768 176°/176° 2500:1 (typical) 450 26.02 × 18.98 × 9.06 in. (661 × 482 × 230 mm) 26.02 × 17.40 × 3.33 in. (661...
NS-LDVD26Q-10A LCD Dimensions Weight TV Power Sound Terminals DVD player Operating conditions Panel Resolution Viewing angle (H/V) Contrast ratio Brightness (cd/m2) With stand Without stand TV standard Tuning system Frequency range Stereo CATV Input Consumption (max.) Output AV1 INPUT AV2 INPUT S-VIDEO INPUT COMPONENT1... HEADPHONE Antenna in Signal System Playable discs Temperature Humidity Atmospheric pressure 26"-wide TFT LCD 1366 × 768 176°/176° 2500:1 (typical) 450 26.02 × 18.98 × 9.06 in. (661 × 482 × 230 mm) 26.02 × 17.40 × 3.33 in. (661...

User Manual (English)
Page 52
... is connected. • Consult the dealer or an experienced technician for help. Macrovision statement This product incorporates copyright protection technology that the equivalent isotropically radiated power (e.i.r.p.) is subject to the following measures: • Reorient or relocate the receiving antenna. • Increase the separation between the equipment and receiver. • Connect the...
... is connected. • Consult the dealer or an experienced technician for help. Macrovision statement This product incorporates copyright protection technology that the equivalent isotropically radiated power (e.i.r.p.) is subject to the following measures: • Reorient or relocate the receiving antenna. • Increase the separation between the equipment and receiver. • Connect the...


